如何在AngularX 中 使用ngrx
ngrx 是 Angular框架的状态容器,提供可预测化的状态管理。
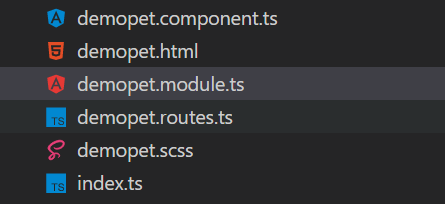
1.首先创建一个可路由访问的模块 这里命名为:DemopetModule。
包括文件:demopet.html、demopet.scss、demopet.component.ts、demopet.routes.ts、demopet.module.ts
代码如下:
demopet.html
<!--暂时放一个标签-->

<h1>Demo</h1>
demopet.scss
h1{

    color:#d70029;

}
demopet.component.ts
import { Component} from '@angular/core';

@Component({

  selector: 'demo-pet',

  styleUrls: ['./demopet.scss'],

  templateUrl: './demopet.html'

})

export class DemoPetComponent {

    //nothing now...

}
demopet.routes.ts
import { DemoPetComponent } from './demopet.component';

export const routes = [

  {

    path: '', pathMatch: 'full', children: [

      { path: '', component: DemoPetComponent }

    ]

  }

];
demopet.module.ts
import { CommonModule } from '@angular/common';

import { FormsModule } from '@angular/forms';

import { NgModule } from '@angular/core';

import { RouterModule } from '@angular/router';

import { routes } from './demopet.routes';

@NgModule({

  declarations: [

    DemoPetComponent,

  ],

  imports: [

    CommonModule,

    FormsModule,

    RouterModule.forChild(routes)

  ],

  providers: [

  ]

})

export class DemoPetModule {

}
整体代码结构如下:
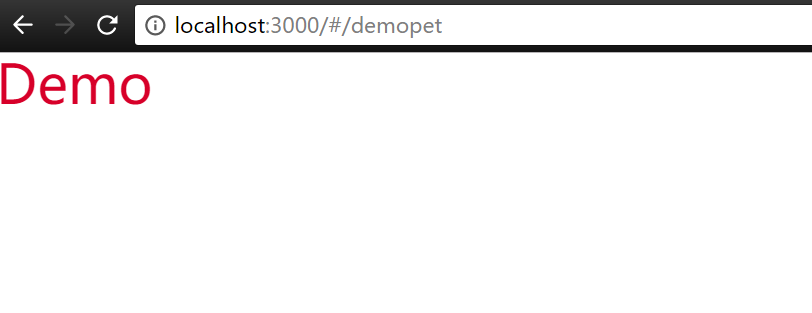
运行效果如下:只是为了学习方便,能够有个运行的模块
2.安装ngrx
npm install @ngrx/core --save
npm install @ngrx/store --save
npm install @ngrx/effects --save
@ngrx/store是一个旨在提高写性能的控制状态的容器
3.使用ngrx
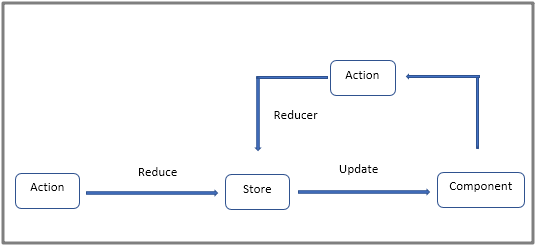
首先了解下单向数据流形式
代码如下:
pet-tag.actions.ts
import { Injectable } from '@angular/core';

import { Action } from '@ngrx/store';

@Injectable()

export class PettagActions{

    static LOAD_DATA='Load Data';

    loadData():Action{

        return {

            type:PettagActions.LOAD_DATA

        };

    }

    static LOAD_DATA_SUCCESS='Load Data Success';

    loadDtaSuccess(data):Action{

        return {

            type:PettagActions.LOAD_DATA_SUCCESS,

            payload:data

        };

    }

    static LOAD_INFO='Load Info';

    loadInfo():Action{

        return {

            type:PettagActions.LOAD_INFO

        };

    }

    static LOAD_INFO_SUCCESS='Load Info Success';

    loadInfoSuccess(data):Action{

        return {

            type:PettagActions.LOAD_INFO_SUCCESS,

            payload:data

        };

    }

}
pet-tag.reducer.ts
import { Action } from '@ngrx/store';

import { Observable } from 'rxjs/Observable';

import { PettagActions } from '../action/pet-tag.actions';

export function petTagReducer(state:any,action:Action){

    switch(action.type){

        case PettagActions.LOAD_DATA_SUCCESS:{

            return action.payload;

        }

        // case PettagActions.LOAD_INFO_SUCCESS:{

        //     return action.payload;

        // }

        default:{

            return state;

        }

    }

}

export function infoReducer(state:any,action:Action){

    switch(action.type){

        case PettagActions.LOAD_INFO_SUCCESS:{

            return action.payload;

        }

        default:{

            return state;

        }

    }

}
NOTE:Action中定义了我们期望状态如何发生改变 Reducer实现了状态具体如何改变
Action与Store之间添加ngrx/Effect 实现action异步请求与store处理结果间的解耦
pet-tag.effect.ts
import { Injectable } from '@angular/core';

import { Effect,Actions } from '@ngrx/effects';

import { PettagActions } from '../action/pet-tag.actions';

import { PettagService }  from '../service/pet-tag.service';

@Injectable()

export class PettagEffect {

    constructor(

        private action$:Actions,

        private pettagAction:PettagActions,

        private service:PettagService

    ){}

    @Effect() loadData=this.action$

                .ofType(PettagActions.LOAD_DATA)

                .switchMap(()=>this.service.getData())

                .map(data=>this.pettagAction.loadDtaSuccess(data))

    @Effect() loadInfo=this.action$

                .ofType(PettagActions.LOAD_INFO)

                .switchMap(()=>this.service.getInfo())

                .map(data=>this.pettagAction.loadInfoSuccess(data));

}
4.修改demopet.module.ts 添加 ngrx支持
import { StoreModule } from '@ngrx/store';

import { EffectsModule } from '@ngrx/effects';

import { PettagActions } from './action/pet-tag.actions';

import { petTagReducer,infoReducer } from './reducer/pet-tag.reducer';

import { PettagEffect } from './effect/pet-tag.effect';
@NgModule({

  declarations: [

    DemoPetComponent,

  ],

  imports: [

    CommonModule,

    FormsModule,

    RouterModule.forChild(routes),

    //here new added

    StoreModule.provideStore({

      pet:petTagReducer,

      info:infoReducer

    }),

    EffectsModule.run(PettagEffect)

  ],

  providers: [

    PettagActions,

    PettagService

  ]

})

export class DemoPetModule {  }
5.调用ngrx实现数据列表获取与单个详细信息获取
demopet.component.ts
import { Component, OnInit, ViewChild, AfterViewInit } from '@angular/core';

import { Observable } from "rxjs";

import { Store } from '@ngrx/store';

import { Subscription } from 'rxjs/Subscription';

import { HttpService } from '../shared/services/http/http.service';

import { PetTag } from './model/pet-tag.model';

import { PettagActions } from './action/pet-tag.actions';

@Component({

  selector: 'demo-pet',

  styleUrls: ['./demopet.scss'],

  templateUrl: './demopet.html'

})

export class DemoPetComponent {

  private sub: Subscription;

  public dataArr: any;

  public dataItem: any;

  public language: string = 'en';

  public param = {value: 'world'};

  constructor(

    private store: Store<PetTag>,

    private action: PettagActions

  ) {

    this.dataArr = store.select('pet');

  }

  ngOnInit() {

    this.store.dispatch(this.action.loadData());

  }

  ngOnDestroy() {

    this.sub.unsubscribe();

  }

  info() {

    console.log('info');

    this.dataItem = this.store.select('info');

    this.store.dispatch(this.action.loadInfo());

  }

}
demopet.html
<h1>Demo</h1>

<pre>

   <ul>

        <li *ngFor="let d of dataArr | async">

            DEMO :  {{ d.msg }}

            <button (click)="info()">info</button>

        </li>

    </ul>

    {{ dataItem | async | json }}

    <h1 *ngFor="let d of dataItem | async"> {{ d.msg }} </h1>

</pre>
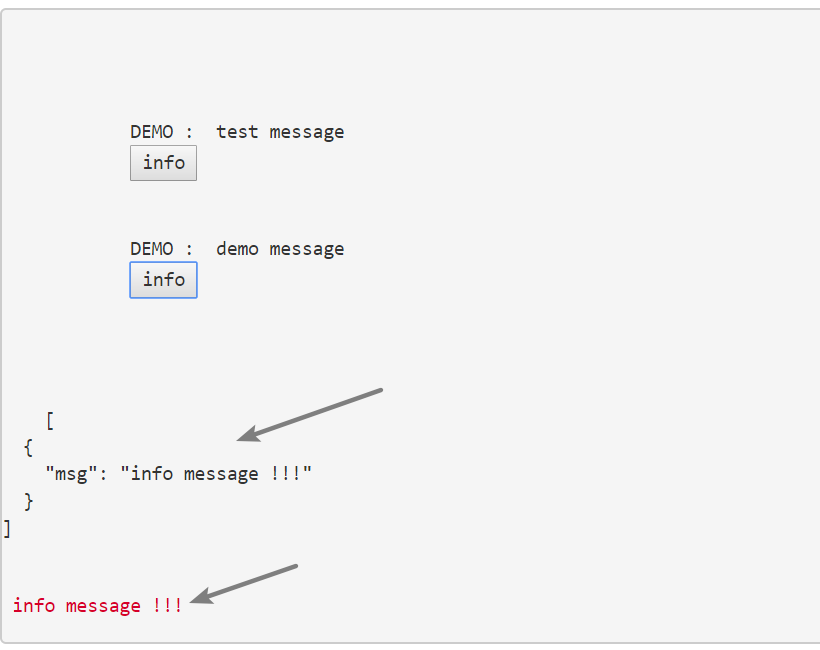
6.运行效果
初始化时候获取数据列表
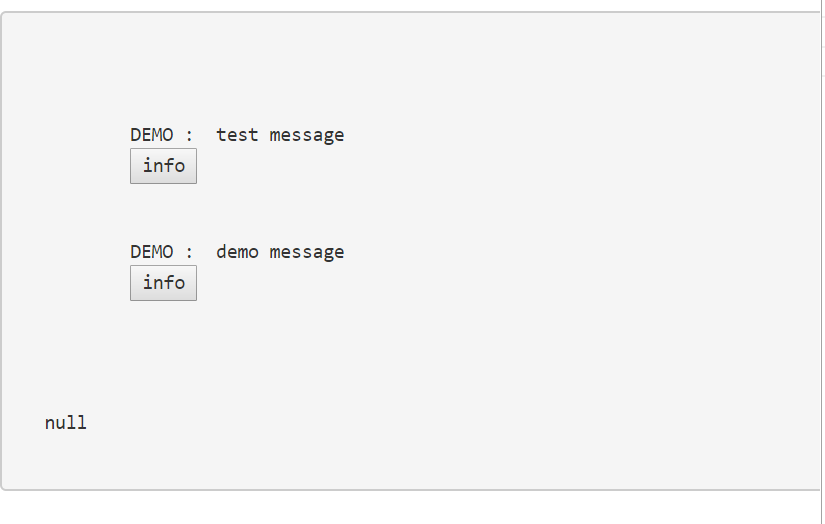
点击info按钮 获取详细详细
7.以上代码是从项目中取出的部分代码,其中涉及到HttpService需要自己封装,data.json demo.json两个测试用的json文件,名字随便取的当时。
http.service.ts
import { Inject, Injectable } from '@angular/core';

import { Http, Response, Headers, RequestOptions, URLSearchParams } from '@angular/http';

import { Observable } from "rxjs";

import 'rxjs/add/operator/map';

import 'rxjs/operator/delay';

import 'rxjs/operator/mergeMap';

import 'rxjs/operator/switchMap';

import 'rxjs/add/operator/catch';

import 'rxjs/add/observable/throw';

import { handleError } from './handleError';

import { rootPath } from './http.config';

@Injectable()

export class HttpService {

    private _root: string="";

    constructor(private http: Http) {

        this._root=rootPath;

    }

    public get(url: string, data: Map<string, any>, root: string = this._root): Observable<any> {

        if (root == null) root = this._root;

        let params = new URLSearchParams();

        if (!!data) {

            data.forEach(function (v, k) {

                params.set(k, v);

            });

        }

        return this.http.get(root + url, { search: params })

                        .map((resp: Response) => resp.json())

                        .catch(handleError);

    }

}
8.模块源代码 下载
9.我的微信公众号。

如何在AngularX 中 使用ngrx的更多相关文章
- 我是如何在SQLServer中处理每天四亿三千万记录的
首先声明,我只是个程序员,不是专业的DBA,以下这篇文章是从一个问题的解决过程去写的,而不是一开始就给大家一个正确的结果,如果文中有不对的地方,请各位数据库大牛给予指正,以便我能够更好的处理此次业务. ...
- 如何在SpringBoot中使用JSP ?但强烈不推荐,果断改Themeleaf吧
做WEB项目,一定都用过JSP这个大牌.Spring MVC里面也可以很方便的将JSP与一个View关联起来,使用还是非常方便的.当你从一个传统的Spring MVC项目转入一个Spring Boot ...
- 如何在latex 中插入EPS格式图片
如何在latex 中插入EPS格式图片 第一步:生成.eps格式的图片 1.利用visio画图,另存为pdf格式的图片 利用Adobe Acrobat裁边,使图片大小合适 另存为.eps格式,如下图所 ...
- 如何正确的使用json?如何在.Net中使用json?
什么是json json是一种轻量级的数据交换格式,由N组键值对组成的字符串,完全独立于语言的文本格式. 为什么要使用json 在很久很久以前,调用第三方API时,我们通常是采用xml进行数据交互,但 ...
- [原创]如何在Parcelable中使用泛型
[原创]如何在Parcelable中使用泛型 实体类在实现Parcelable接口时,除了要实现它的几个方法之外,还另外要定义一个静态常量CREATOR,如下例所示: public static cl ...
- 如何在springMVC 中对REST服务使用mockmvc 做测试
如何在springMVC 中对REST服务使用mockmvc 做测试 博客分类: java 基础 springMVCmockMVC单元测试 spring 集成测试中对mock 的集成实在是太棒了!但 ...
- 如何在tomcat中如何部署java EE项目
如何在tomcat中如何部署java EE项目 1.直接把项目复制到Tomcat安装目录的webapps目录中,这是最简单的一种Tomcat项目部署的方法,也是初学者最常用的方法.2.在tomcat安 ...
- 【转】我是如何在SQLServer中处理每天四亿三千万记录的
原文转自:http://blog.jobbole.com/80395/ 首先声明,我只是个程序员,不是专业的DBA,以下这篇文章是从一个问题的解决过程去写的,而不是一开始就给大家一个正确的结果,如果文 ...
- 如何在JAVA中实现一个固定最大size的hashMap
如何在JAVA中实现一个固定最大size的hashMap 利用LinkedHashMap的removeEldestEntry方法,重载此方法使得这个map可以增长到最大size,之后每插入一条新的记录 ...
随机推荐
- 关于JS的页面跳转
"window.location.href"."location.href"是本页面跳转 "parent.location.href"是上一 ...
- java 上传1(使用java组件fileupload)
使用fileupload要添加以下包
- 利用R语言进行交互数据可视化(转)
上周在中国R语言大会北京会场上,给大家分享了如何利用R语言交互数据可视化.现场同学对这块内容颇有兴趣,故今天把一些常用的交互可视化的R包搬出来与大家分享. rCharts包 说起R语言的交互包,第一个 ...
- opencv基础到进阶(1)
Opencv是一个用户基础非常多的视觉开发库,可以用来实现人脸识别等功能,由于涉及到大量的调用与计算,所以对硬件的条件要求很高,并且还需要时时刻刻注意内存溢出这个问题,怎么样?很刺激吧. 从这篇文章开 ...
- 入职这一段时间的总结,Don't Repeat Yourself.
1.第一次接触到大型软件系统的开发,现在我们使用的是 python + flask +vue.js ,数据库:postgresql 2. 不要在自己不懂的情况下复制代码,每次分析一段代码的时候,就跟以 ...
- sql备份(导出脚本)
第一步: 右键需要备份的数据库(这里以MyDB为例)-->任务-->生成脚本
- c++概括
c++到底是什么样的语言 在过去的几十年,计算机技术的发展令人吃惊,当前的笔记本电脑的计算速度和存储信息的能力超过了20世纪60年代的大型机.20世纪七十年代,C和Pascal语言引领人们进入结构化编 ...
- (原创)Python 自动化测试框架详解
自己折腾了一个python的自动化测试框架,梳理了一下流程,简单分享一下. 项目背景 B/S架构,进行用户界面的自动化测试 工具选择 python开发的自动化测试框架,足够灵活,可以随时根据需求进行变 ...
- POI使用:用poi接口不区分xls/xlsx格式解析Excel文档(41种日期格式解析方法,5种公式结果类型解析方法,3种常用数值类型精度控制办法)
一.使用poi解析excel文档 注:全部采用poi接口进行解析,不需要区分xls.xlsx格式,不需要判断文档类型. poi中的日期格式判断仅支持欧美日期习惯,对国内的日期格式并不支持判断,怎么办? ...
- IntelliJ IDEA提示:Error during artifact deployment. See server log for details.
IntelliJ IDEA-2017.1.1 tomcat-8.5.13 问题:在IntelliJ IDEA中使用tomcat部署web app时,提示:Error during artifact ...