
【mac上安装&配置&使用git】
转自:https://www.jianshu.com/p/7edb6b838a2e
目录
- 安装git
- 创建ssh key、配置git
- 提交本地项目到GitHub
一、安装Git
MAC 上安装Git主要有两种方式
首先查看电脑是否安装Git,终端输入:
git
安装过则会输出:
WMBdeMacBook-Pro:~ WENBO$ git

usage: git [--version] [--help] [-C <path>] [-c name=value]

           [--exec-path[=<path>]] [--html-path] [--man-path] [--info-path]

           [-p | --paginate | --no-pager] [--no-replace-objects] [--bare]

           [--git-dir=<path>] [--work-tree=<path>] [--namespace=<name>]

           <command> [<args>]

These are common Git commands used in various situations:

start a working area (see also: git help tutorial)

   clone      Clone a repository into a new directory

   init       Create an empty Git repository or reinitialize an existing one

work on the current change (see also: git help everyday)

   add        Add file contents to the index

   mv         Move or rename a file, a directory, or a symlink

   reset      Reset current HEAD to the specified state

   rm         Remove files from the working tree and from the index

examine the history and state (see also: git help revisions)

   bisect     Use binary search to find the commit that introduced a bug

   grep       Print lines matching a pattern

   log        Show commit logs

   show       Show various types of objects

   status     Show the working tree status

grow, mark and tweak your common history

   branch     List, create, or delete branches

   checkout   Switch branches or restore working tree files

   commit     Record changes to the repository

   diff       Show changes between commits, commit and working tree, etc

   merge      Join two or more development histories together

   rebase     Reapply commits on top of another base tip

   tag        Create, list, delete or verify a tag object signed with GPG

collaborate (see also: git help workflows)

   fetch      Download objects and refs from another repository

   pull       Fetch from and integrate with another repository or a local branch

   push       Update remote refs along with associated objects

'git help -a' and 'git help -g' list available subcommands and some

concept guides. See 'git help <command>' or 'git help <concept>'

to read about a specific subcommand or concept.
1、通过homebrew安装Git
- 1、未安装homebrew,需安装homebrew
/usr/bin/ruby -e "$(curl -fsSL https://raw.githubusercontent.com/Homebrew/install/master/install)"
- 2、安装git
brew install git
2、通过Xcode安装
直接从AppStore安装Xcode,Xcode集成了Git,不过默认没有安装,你需要运行Xcode,选择菜单“Xcode”->“Preferences”,在弹出窗口中找到“Downloads”,选择“Command Line Tools”,点“Install”就可以完成安装了。
二、创建ssh key、配置git
- 1、设置username和email(github每次commit都会记录他们)
git config --global user.name "wenbo"

git config --global user.email "1050794513@qq.com"
- 2、通过终端命令创建ssh key
ssh-keygen -t rsa -C "1050794513@qq.com"
1050794513@qq.com是我的邮件名,回车会有以下输出
Last login: Sat Jan   :: on ttys000

WMBdeMacBook-Pro:~ WENBO$ ssh-keygen -t rsa -C "1050794513@qq.com"

Generating public/private rsa key pair.

Enter file in which to save the key (/Users/WENBO/.ssh/id_rsa):

/Users/WENBO/.ssh/id_rsa already exists.

Overwrite (y/n)? n

WMBdeMacBook-Pro:~ WENBO$
由于这里我原来已经创建过,这里我选n,没有创建过的,会要求确认路径和输入密码,我们这使用默认的一路回车就行。成功的话会在~/下生成.ssh文件夹,进去,打开id_rsa.pub,复制里面的key。
终端查看.ssh/id_rsa.pub文件
open .ssh/id_rsa.pub
回车后,就会新弹出一个终端,然后复制里面的key。
或者用cat命令查看
cat .ssh/id_rsa.pub
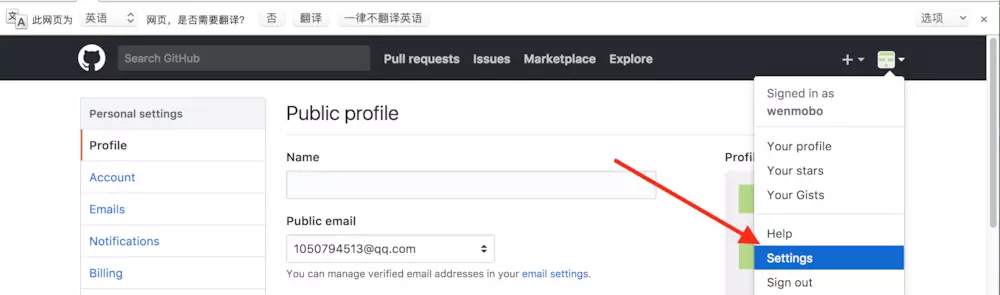
- 3、登录GitHub(默认你已经注册了GitHub账号),添加ssh key,点击Settings,如图
点击New SSH key,如图

添加key,如图

- 4、链接验证
ssh -T git@github.com
终端输出结果
Last login: Sat Jan   :: on ttys000

WMBdeMacBook-Pro:~ WENBO$ ssh -T git@github.com

Hi wenmobo! You've successfully authenticated, but GitHub does not provide shell access.

WMBdeMacBook-Pro:~ WENBO$
说明已经链接成功。
三、提交本地项目到GitHub
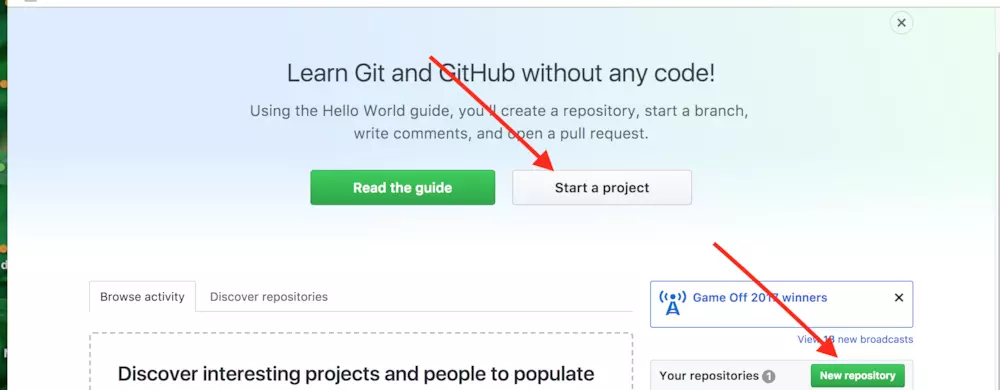
- 1、在GitHub上新创建一个 repository或者Start a Project,如图:
- 2、填写项目信息,如下图所示:
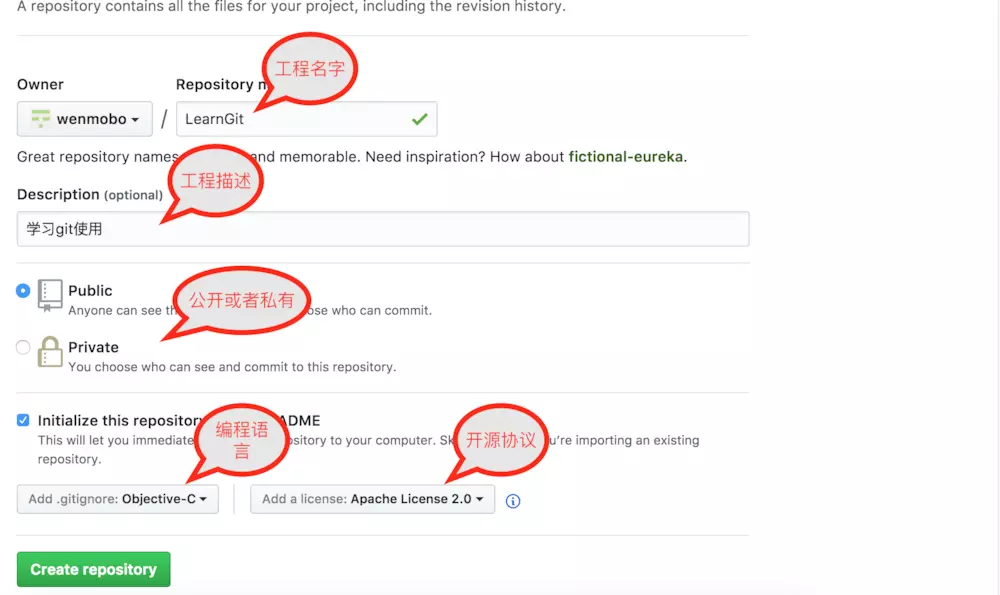
点击Create repository,就创好一个工程了。
3、Clone工程到本地,首先复制ssh 地址

打开终端,这里只是测试,我想把工程克隆在桌面,首先在终端中切换路径到桌面,输入以下命令:
cd /Users/WENBO/Desktop/
然后克隆项目,终端输入
git clone git@github.com:wenmobo/LearnGit.git
git@github.com:wenmobo/LearnGit.git是刚刚复制的ssh路径。
终端完整输出如下:
Last login: Sat Jan   :: on ttys000

WMBdeMacBook-Pro:~ WENBO$ cd /Users/WENBO/Desktop/

WMBdeMacBook-Pro:Desktop WENBO$ git clone git@github.com:wenmobo/LearnGit.git

Cloning into 'LearnGit'...

remote: Counting objects: , done.

remote: Compressing objects: % (/), done.

remote: Total  (delta ), reused  (delta ), pack-reused

Receiving objects: % (/), 5.2

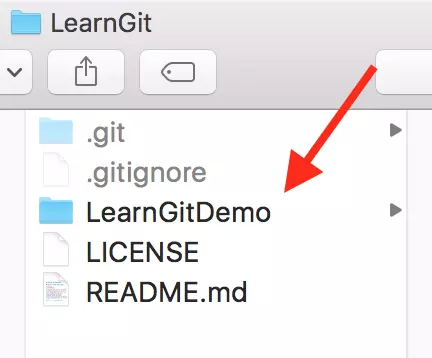
- 4、在Xcode中新创建一个工程,保存的路径为刚刚克隆下来的LearnGit文件夹下,如下图所示:
- 5、提交修改,首先切换到LearnGit文件路径:
cd /Users/WENBO/Desktop/LearnGit
然后输入:
//文件添加到仓库(.代表提交所有文件)

git add .

//把文件提交到仓库

git commit -m "First Commit"

//上传到github

git push
终端完整输出如下:
Last login: Sat Jan   :: on ttys000

WMBdeMacBook-Pro:~ WENBO$ cd /Users/WENBO/Desktop/LearnGit

WMBdeMacBook-Pro:LearnGit WENBO$ git add .

WMBdeMacBook-Pro:LearnGit WENBO$ git commit -m "First Commit"

[master ae3bbe9] First Commit

  files changed,  insertions(+)

 create mode  LearnGitDemo/LearnGitDemo.xcodeproj/project.pbxproj

 create mode  LearnGitDemo/LearnGitDemo.xcodeproj/project.xcworkspace/contents.xcworkspacedata

 create mode  LearnGitDemo/LearnGitDemo/AppDelegate.h

 create mode  LearnGitDemo/LearnGitDemo/AppDelegate.m

 create mode  LearnGitDemo/LearnGitDemo/Assets.xcassets/AppIcon.appiconset/Contents.json

 create mode  LearnGitDemo/LearnGitDemo/Base.lproj/LaunchScreen.storyboard

 create mode  LearnGitDemo/LearnGitDemo/Base.lproj/Main.storyboard

 create mode  LearnGitDemo/LearnGitDemo/Info.plist

 create mode  LearnGitDemo/LearnGitDemo/ViewController.h

 create mode  LearnGitDemo/LearnGitDemo/ViewController.m

 create mode  LearnGitDemo/LearnGitDemo/main.m

WMBdeMacBook-Pro:LearnGit WENBO$ git push

Warning: Permanently added the RSA host key for IP address '192.30.255.112' to the list of known hosts.

Counting objects: , done.

Delta compression using up to  threads.

Compressing objects: % (/), done.

Writing objects: % (/), 6.80 KiB |  bytes/s, done.

Total  (delta ), reused  (delta )

remote: Resolving deltas: % (/), done.

To github.com:wenmobo/LearnGit.git

   ..ae3bbe9  master -> master

WMBdeMacBook-Pro:LearnGit WENBO$
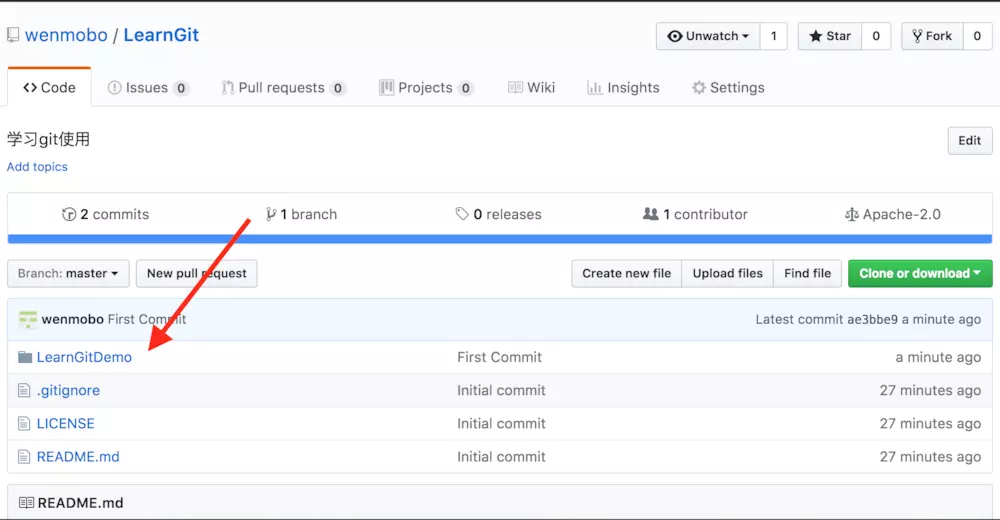
查看GitHub上的项目,已经上传成功啦,如下图所示:
【mac上安装&配置&使用git】的更多相关文章
- Mac上安装配置Go语言,其实很简单(一)
下载Go语言可以去:Go语言中文网 安装及自己选择是否修改GOPATH 下载下来后双击安装就好,使用 go version 查看安装版本: 在Mac上安装完成后,会自动设置一些环境变量,使用 go e ...
- Mac上安装配置和简单使用PostgreSQL(仍然很不懂)
因为想要使用推荐的rails-template.需要使用postgres.并初始化了一个用户postgres,密码是postgres.( e.g. $ createuser -d postgres ) ...
- 在Mac上安装mysql并配置环境(详细篇)
在Mac上安装mysql并配置环境(详细篇) 1.下载mysql mysql官网 这一步根据自己电脑架构选择,分为arm和x86 下载完成之后打开就可以 接下来运行安装就可以,一直下一步,设置完密码就 ...
- mac上一键配置和安装adb驱动或者环境
最近才使用的mac,老实说mac上要配置adb的环境不那么复杂,但是还是会让一些心不细或者动手能力不强的同学望而却步.那么到底有没有一个一键完成mac上adb和fastboot环境搭配的软件或者脚本呢 ...
- Mac上安装Charles进行抓包全流程设置
安装 -- 官网下载最新版的Charles版本,按照提示安装即可 破解 -- https://blog.csdn.net/qq_25821067/article/details/79848589. M ...
- 002-docker安装-mac上安装docker,17.06在CentOS7 64位机器上安装
一.mac上安装docker 1.下载 通过这个链接下载:https://download.docker.com/mac/stable/Docker.dmg 2.安装 将 Moby 的鲸鱼图标拖拽到 ...
- MAC上ITERM2配置SZ, RZ远程上传和下载文件
MAC上ITERM2配置SZ, RZ远程上传和下载文件 From article 在Windows上的SecureCRT.XShell远程连接Linux服务器,通常可以使用sz.rz等命令来上传和下载 ...
- Mac下安装配置NMP环境
第一次在Mac上安装NMP,记录下 因为下面环境的安装都是基于homebrew的,所以如果没有安装他的话,要先安装他(官网:https://brew.sh/index_zh-cn.html) 安装ho ...
- Mac上安装Grafana
Mac上安装Grafana 一.背景 二.安装步骤 1.通过 Home Brew 安装 2.通过二进制包进行安装 1.下载 2.grafana配置文件的路径 3.修改grafana配置 1.修改默认的 ...
随机推荐
- ORA-02275: 此表中已经存在这样的引用约束条件
问题描述: 针对这个问题,发表一下我的观点.emp表和dept表使用hibernate关联查询时报的错,使用的是非注解形式,和其他一样.他们各自有entity,各自有一个hbm.xml文件,emp表这 ...
- s2第六章继承和多态
public class Employee { //年龄 public int Age { get; set; } //性别 public Gender Gender { get; set; } // ...
- 黄聪:windows下使用xampp3.2.2配置多个监听端口和不同的网站目录
windows下使用xampp3.2.2配置多个监听端口和不同的网站目录 一:配置Apache文件httpd.conf 打开Apache的配置文件httpd.conf,可以通过点击xampp的Apac ...
- EasyMock 模拟对象测试
一.EasyMock 使用动态代理实现模拟对象创建,一般可以满足以下测试需求 1.要测试的模块依赖于其它自己控制不了的模块,如第三方服务,其它组员在开发的服务等,它们都没办法配合你来测试: 2.涉及到 ...
- php 7 event 安装
有效安排I/O,时间和信号的扩展 使用可用于特定平台的最佳I/O通知机制的事件,是PHP基础设施的libevent端口. 下载地址:http://pecl.php.net/package/event ...
- 涂抹mysql笔记-mysql复制特性
<>mysql复制特性:既可以实现整个服务(all databases)级别的复制,也可以只复制某个数据库或某个数据库中的某个指定的表对象.即可以实现A复制到B(主从单向复制),B再复制到 ...
- css变换与动画详解
举个栗子:--------元素整体居中.box{ position:absolute;top:50%;left:50%; width:50px; height:50px; t ...
- 浅析MySQL中concat以及group_concat的使用
说明: 本文中使用的例子均在下面的数据库表tt2下执行: 一.concat()函数 1.功能:将多个字符串连接成一个字符串. 2.语法:concat(str1, str2,...) 返回结果为连接 ...
- c# 对DataTable进行分组group by
]);//对索引为0的一列进行分组,结果是集合
- Android 开发 系统组件集合
常用的TextView.Button.ImageView和几个常用布局就不介绍了,我们介绍一些特别好用但是常常忘记的组件. 标题栏组件 <androidx.appcompat.widget.To ...