Apollo源码阅读笔记(一)
Apollo源码阅读笔记(一)
先来一张官方客户端设计图,方便我们了解客户端的整体思路。

我们在使用Apollo的时候,需要标记@EnableApolloConfig来告诉程序开启apollo配置,所以这里就以EnableApolloConfig为入口,来看下apollo客户端的实现逻辑。关于apollo的使用方法详见 这里
1. 入口 @EnableApolloConfig 注解
@EnableApolloConfig(value={"application","test-yejg"})
默认的namespace是application;
通过@EnableApolloConfig注解,引入了ApolloConfigRegistrar
public class ApolloConfigRegistrar implements ImportBeanDefinitionRegistrar {

  @Override

  public void registerBeanDefinitions(AnnotationMetadata importingClassMetadata, BeanDefinitionRegistry registry) {

    AnnotationAttributes attributes = AnnotationAttributes.fromMap(importingClassMetadata.getAnnotationAttributes(EnableApolloConfig.class.getName()));

    String[] namespaces = attributes.getStringArray("value");

    int order = attributes.getNumber("order");

	// 暂存需要关注的namespaces,后面在PropertySourcesProcessor中会把配置属性加载env中

    PropertySourcesProcessor.addNamespaces(Lists.newArrayList(namespaces), order);

    Map<String, Object> propertySourcesPlaceholderPropertyValues = new HashMap<>();

    // to make sure the default PropertySourcesPlaceholderConfigurer's priority is higher than PropertyPlaceholderConfigurer

    propertySourcesPlaceholderPropertyValues.put("order", 0);

    BeanRegistrationUtil.registerBeanDefinitionIfNotExists(registry, PropertySourcesPlaceholderConfigurer.class.getName(), PropertySourcesPlaceholderConfigurer.class, propertySourcesPlaceholderPropertyValues);

    BeanRegistrationUtil.registerBeanDefinitionIfNotExists(registry, PropertySourcesProcessor.class.getName(), PropertySourcesProcessor.class);

    BeanRegistrationUtil.registerBeanDefinitionIfNotExists(registry, ApolloAnnotationProcessor.class.getName(), ApolloAnnotationProcessor.class);

    BeanRegistrationUtil.registerBeanDefinitionIfNotExists(registry, SpringValueProcessor.class.getName(), SpringValueProcessor.class);

    BeanRegistrationUtil.registerBeanDefinitionIfNotExists(registry, SpringValueDefinitionProcessor.class.getName(), SpringValueDefinitionProcessor.class);

    BeanRegistrationUtil.registerBeanDefinitionIfNotExists(registry, ApolloJsonValueProcessor.class.getName(), ApolloJsonValueProcessor.class);

  }

}
注意上面代码中,通过PropertySourcesProcessor.addNamespaces暂存了namespaces,下面就先沿着 PropertySourcesProcessor来展开
2. 配置设置到environment的过程
PropertySourcesProcessor实现了BeanFactoryPostProcessor,并能获取到env
public class PropertySourcesProcessor implements BeanFactoryPostProcessor, EnvironmentAware, PriorityOrdered{

    ...

}
在Spring应用启动的时候
refresh() –> invokeBeanFactoryPostProcessors(beanFactory) –> PropertySourcesProcessor.postProcessBeanFactory
—> initializePropertySources();
—> initializeAutoUpdatePropertiesFeature(beanFactory);
就这样,Apollo的PropertySourcesProcessor就被调用起来了。
在它的postProcessBeanFactory方法中依次调用initializePropertySources和initializeAutoUpdatePropertiesFeature,先来看initializePropertySources做了啥事情:
将NAMESPACE_NAMES (Multimap<Integer, String>)排序;
遍历排序后的namespaces,依次调用 ConfigService.getConfig(namespace) 获取配置信息Config;
将config封装成ConfigPropertySource[Apollo的],保存到CompositePropertySource[spring-core的];
此composite名为 ApolloPropertySources
ConfigPropertySource继承自spring-core的EnumerablePropertySource
代码:composite.addPropertySource(XXX);
循环处理完 NAMESPACE_NAMES 之后,将其清空掉;
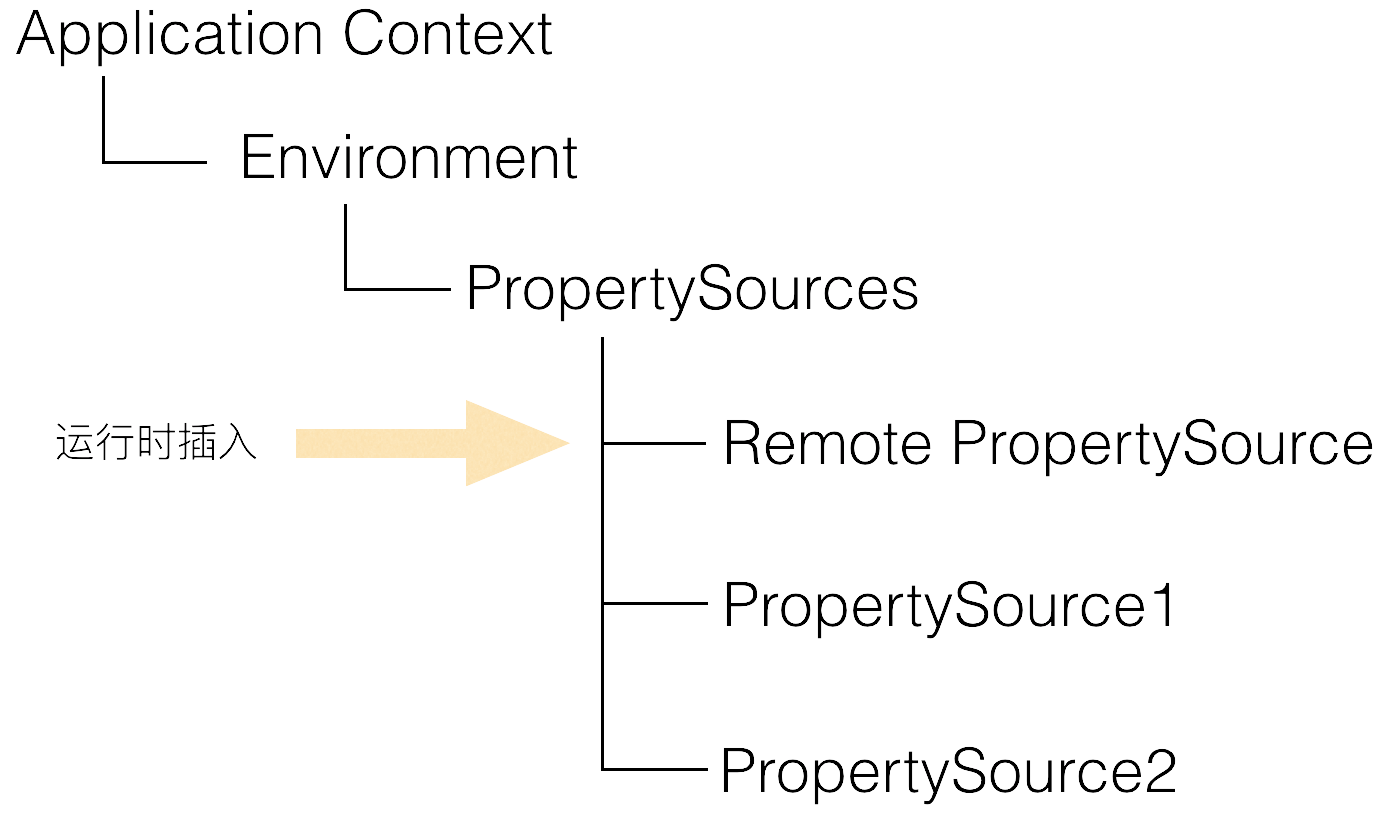
将前面循环处理好的compositePropertySource加入到env中;
加到env时,判断env中是否存在 ApolloBootstrapPropertySources是否存在,确保其在第一的位置,而前面循环处理得到的ApolloPropertySources紧随其后。
相关代码:
environment.getPropertySources().addAfter(“XXX source name”, composite);
environment.getPropertySources().addFirst(composite);
这部分的逻辑,其实就是佐证了Apollo的设计思路 。
盗用官方的一张图来简单说明这个流程:
Apollo源码阅读笔记(一)的更多相关文章
- Apollo源码阅读笔记(二)
Apollo源码阅读笔记(二) 前面 分析了apollo配置设置到Spring的environment的过程,此文继续PropertySourcesProcessor.postProcessBeanF ...
- CI框架源码阅读笔记5 基准测试 BenchMark.php
上一篇博客(CI框架源码阅读笔记4 引导文件CodeIgniter.php)中,我们已经看到:CI中核心流程的核心功能都是由不同的组件来完成的.这些组件类似于一个一个单独的模块,不同的模块完成不同的功 ...
- CI框架源码阅读笔记4 引导文件CodeIgniter.php
到了这里,终于进入CI框架的核心了.既然是“引导”文件,那么就是对用户的请求.参数等做相应的导向,让用户请求和数据流按照正确的线路各就各位.例如,用户的请求url: http://you.host.c ...
- CI框架源码阅读笔记3 全局函数Common.php
从本篇开始,将深入CI框架的内部,一步步去探索这个框架的实现.结构和设计. Common.php文件定义了一系列的全局函数(一般来说,全局函数具有最高的加载优先权,因此大多数的框架中BootStrap ...
- CI框架源码阅读笔记2 一切的入口 index.php
上一节(CI框架源码阅读笔记1 - 环境准备.基本术语和框架流程)中,我们提到了CI框架的基本流程,这里再次贴出流程图,以备参考: 作为CI框架的入口文件,源码阅读,自然由此开始.在源码阅读的过程中, ...
- 源码阅读笔记 - 1 MSVC2015中的std::sort
大约寒假开始的时候我就已经把std::sort的源码阅读完毕并理解其中的做法了,到了寒假结尾,姑且把它写出来 这是我的第一篇源码阅读笔记,以后会发更多的,包括算法和库实现,源码会按照我自己的代码风格格 ...
- Three.js源码阅读笔记-5
Core::Ray 该类用来表示空间中的“射线”,主要用来进行碰撞检测. THREE.Ray = function ( origin, direction ) { this.origin = ( or ...
- PHP源码阅读笔记一(explode和implode函数分析)
PHP源码阅读笔记一一.explode和implode函数array explode ( string separator, string string [, int limit] )此函数返回由字符 ...
- AQS源码阅读笔记(一)
AQS源码阅读笔记 先看下这个类张非常重要的一个静态内部类Node.如下: static final class Node { //表示当前节点以共享模式等待锁 static final Node S ...
随机推荐
- 【转】B树、B+树、B*树
出处:http://blog.csdn.net/v_JULY_v 1.前言: 动态查找树主要有:二叉查找树(Binary Search Tree),平衡二叉查找树(Balanced Binary Se ...
- Maven的多mirrors的配置
repo1 central Human Readable Name for this Mirror. http://repo1.maven.org/maven2/ repo2 central Huma ...
- Android-Java-静态变量
描述Person对象: package android.java.oop09; // 描述Person对象 public class Person { private String name; pri ...
- Akka-Cluster(3)- ClusterClient, 集群客户端
上篇我们介绍了distributed pub/sub消息传递机制.这是在同一个集群内的消息共享机制:发布者(publisher)和订阅者(subscriber)都在同一个集群的节点上,所有节点上的Di ...
- FTPClient 中 FTPClient.changeWorkingDirectory(filePath) 代码一直返回 false
FTP文件下载需要的jar包: commons-net-2.0.jar 有时可能还需要:jakarta-oro.jar 参考:FTPClient参考文档 这里记录下我碰到的问题: 刚开始我的账号和密 ...
- [Swift]LaunchScreen.storyboard如何跳转到到Main.storyboard
在加载App时,首先读取[LaunchScreen.storyboard]中的内容, 在App加载到内存之后,自动读取[Main.storyboard]中的初始视图控制器, 用于替换原来的[Launc ...
- xtrabackup备份mysql-1
1,在mysql服务器上安装xtrabackup 2,创建备份目录,使用xtrabackup做全备 3,到备份目录查看效果 我这台服务器搭建的是MediaWiki,可以看到wikidb这个库 恢复流程 ...
- Java基本数据类型总结、类型转换、常量的声明规范,final关键字的用法
1 Java 基本数据类型 变量就是申请内存来存储值.也就是说,当创建变量的时候,需要在内存中申请空间. 内存管理系统根据变量的类型为变量分配存储空间,分配的空间只能用来储存该类型数据. 因此,通过 ...
- Spring.Net实现跨数据库服务层事务管理
在实际项目中用了Spring.Net框架之后,发现这框架在处理数据库事务上特别强大,声明式的数据库事务解放了一般开发人员对数据库事务操作的复杂处理.尤其是多数据库事务处理上,尤为显得更简便,几个简单的 ...
- Windows 10安装Python 3 7成功打印Hello World!
Python下载 Python最新源码,二进制文档,新闻资讯等可以在Python的官网查看到: Python官网:https://www.python.org/ 你可以在以下链接中下载 Python ...