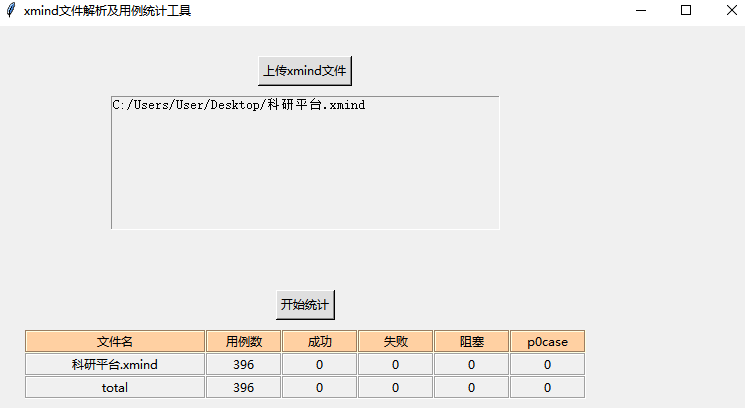
python提效小工具-统计xmind用例数量
问题:做测试的朋友们经常会用到xmind这个工具来梳理测试点或写测试用例,但是xmind8没有自带的统计测试用例,其他版本的xmind有些自带节点数量统计功能,但也也不会累计最终的数量,导致统计测试工作量比较困难。
解决方法:利用python开发小工具,实现同一份xmind文件中一个或多个sheet页的用例数量统计功能。
一、源码
#!/usr/bin/env python

# -*- coding:utf-8 -*-

__author__ = 'zhongxintao'

import tkinter as tk

from tkinter import filedialog, messagebox

from xmindparser import xmind_to_dict

import xmind

class ParseXmind:

    def __init__(self, root):

        self.count = 0

        self.case_fail = 0

        self.case_success = 0

        self.case_block = 0

        self.case_priority = 0

        # total汇总用

        self.total_cases = 0

        self.total_success = 0

        self.total_fail = 0

        self.total_block = 0

        self.toal_case_priority = 0

        # 设置弹框标题、初始位置、默认大小

        root.title(u'xmind文件解析及用例统计工具')

        width = 760

        height = 600

        xscreen = root.winfo_screenwidth()

        yscreen = root.winfo_screenheight()

        xmiddle = (xscreen - width) / 2

        ymiddle = (yscreen - height) / 2

        root.geometry('%dx%d+%d+%d' % (width, height, xmiddle, ymiddle))

        # 设置2个Frame

        self.frm1 = tk.Frame(root)

        self.frm2 = tk.Frame(root)

        # 设置弹框布局

        self.frm1.grid(row=1, padx='20', pady='20')

        self.frm2.grid(row=2, padx='30', pady='30')

        self.but_upload = tk.Button(self.frm1, text=u'上传xmind文件', command=self.upload_files, bg='#dfdfdf')

        self.but_upload.grid(row=0, column=0, pady='10')

        self.text = tk.Text(self.frm1, width=55, height=10, bg='#f0f0f0')

        self.text.grid(row=1, column=0)

        self.but2 = tk.Button(self.frm2, text=u"开始统计", command=self.new_lines, bg='#dfdfdf')

        self.but2.grid(row=0, columnspan=6, pady='10')

        self.label_file = tk.Label(self.frm2, text=u"文件名", relief='groove', borderwidth='2', width=25,

                                   bg='#FFD0A2')

        self.label_file.grid(row=1, column=0)

        self.label_case = tk.Label(self.frm2, text=u"用例数", relief='groove', borderwidth='2', width=10,

                                   bg='#FFD0A2').grid(row=1, column=1)

        self.label_pass = tk.Label(self.frm2, text=u"成功", relief='groove', borderwidth='2', width=10,

                                   bg='#FFD0A2').grid(row=1, column=2)

        self.label_fail = tk.Label(self.frm2, text=u"失败", relief='groove', borderwidth='2', width=10,

                                   bg='#FFD0A2').grid(row=1, column=3)

        self.label_block = tk.Label(self.frm2, text=u"阻塞", relief='groove', borderwidth='2', width=10,

                                    bg='#FFD0A2').grid(row=1, column=4)

        self.label_case_priority = tk.Label(self.frm2, text="p0case", relief='groove', borderwidth='2',

                                            width=10, bg='#FFD0A2').grid(row=1, column=5)

    def count_case(self, li):

        """统计xmind中的用例数"""

        for i in range(len(li)):

            if li[i].__contains__('topics'):

                # 带topics标签表示有子标题,递归执行方法

                self.count_case(li[i]['topics'])

                # 不带topics表示无子标题,此级别即是用例

            else:

                # 有标记成功或失败时会有makers标签

                if li[i].__contains__('makers'):

                    for mark in li[i]['makers']:

                        # 成功

                        if mark == "symbol-right":

                            self.case_success += 1

                        # 失败

                        elif mark == "symbol-wrong":

                            self.case_fail += 1

                        # 阻塞

                        elif mark == "symbol-attention":

                            self.case_block += 1

                        # 优先级

                        elif mark == "priority-1":

                            self.case_priority += 1

                # 用例总数

                self.count += 1

    def new_line(self, filename, row_number):

        """用例统计表新增一行"""

        # sheets是一个list,可包含多sheet页

        sheets = xmind_to_dict(filename)  # 调用此方法,将xmind转成字典

        for sheet in sheets:

            print(sheet)

            # 字典的值sheet['topic']['topics']是一个list

            my_list = sheet['topic']['topics']

            print(my_list)

            self.count_case(my_list)

        # 插入一行统计数据

        lastname = filename.split('/')

        self.label_file = tk.Label(self.frm2, text=lastname[-1], relief='groove', borderwidth='2', width=25)

        self.label_file.grid(row=row_number, column=0)

        self.label_case = tk.Label(self.frm2, text=self.count, relief='groove', borderwidth='2', width=10)

        self.label_case.grid(row=row_number, column=1)

        self.label_pass = tk.Label(self.frm2, text=self.case_success, relief='groove', borderwidth='2',

                                   width=10)

        self.label_pass.grid(row=row_number, column=2)

        self.label_fail = tk.Label(self.frm2, text=self.case_fail, relief='groove', borderwidth='2', width=10)

        self.label_fail.grid(row=row_number, column=3)

        self.label_block = tk.Label(self.frm2, text=self.case_block, relief='groove', borderwidth='2', width=10)

        self.label_block.grid(row=row_number, column=4)

        self.label_case_priority = tk.Label(self.frm2, text=self.case_priority, relief='groove', borderwidth='2',

                                            width=10)

        self.label_case_priority.grid(row=row_number, column=5)

        self.total_cases += self.count

        self.total_success += self.case_success

        self.total_fail += self.case_fail

        self.total_block += self.case_block

        self.toal_case_priority += self.case_priority

    def new_lines(self):

        """用例统计表新增多行"""

        # 从text中获取所有行

        lines = self.text.get(1.0, tk.END)

        row_number = 2

        # 分隔成每行

        for line in lines.splitlines():

            if line == '':

                break

            print(line)

            self.new_line(line, row_number)

            row_number += 1

        # total汇总行

        self.label_file = tk.Label(self.frm2, text='total', relief='groove', borderwidth='2', width=25)

        self.label_file.grid(row=row_number, column=0)

        self.label_case = tk.Label(self.frm2, text=self.total_cases, relief='groove', borderwidth='2', width=10)

        self.label_case.grid(row=row_number, column=1)

        self.label_pass = tk.Label(self.frm2, text=self.total_success, relief='groove', borderwidth='2',

                                   width=10)

        self.label_pass.grid(row=row_number, column=2)

        self.label_fail = tk.Label(self.frm2, text=self.total_fail, relief='groove', borderwidth='2', width=10)

        self.label_fail.grid(row=row_number, column=3)

        self.label_block = tk.Label(self.frm2, text=self.total_block, relief='groove', borderwidth='2',

                                    width=10)

        self.label_block.grid(row=row_number, column=4)

        self.label_case_priority = tk.Label(self.frm2, text=self.toal_case_priority, relief='groove',

                                            borderwidth='2',

                                            width=10)

        self.label_case_priority.grid(row=row_number, column=5)

    def upload_files(self):

        """上传多个文件,并插入text中"""

        select_files = tk.filedialog.askopenfilenames(title=u"可选择1个或多个文件")

        for file in select_files:

            self.text.insert(tk.END, file + '\n')

            self.text.update()

if __name__ == '__main__':

    r = tk.Tk()

    ParseXmind(r)

    r.mainloop()
二、工具使用说明
1、xmind文件中使用下列图标进行分类标识:
标记表示p0级别case:数字1
标记表示执行通过case:绿色√
标记表示执行失败case:红色×
标记表示执行阻塞case:橙色!
2、执行代码
3、在弹框内【上传xmind文件】按钮
三、实现效果

python提效小工具-统计xmind用例数量的更多相关文章
- java性能问题排查提效脚本工具
在性能测试过程中,往往会出现各种各样的性能瓶颈.其中java常见瓶颈故障模型有cpu资源瓶颈:文件IO瓶颈:网络IO瓶颈:内存资源瓶颈:资源消耗不高程序本身执行慢等场景模型. 如何快速定位分析这些类型 ...
- 前端必备,5大mock省时提效小tips,用了提前下班一小时
一.一些为难前端的业务场景 在我的工作经历里,需要等待后端童鞋配合我的情形大概有以下几种: a.我们跟外部有项目合作,需要调用到第三方接口. 一般这种情况下,商务那边谈合同,走流程,等第三方审核, ...
- Python趣味实用小工具
代码地址如下:http://www.demodashi.com/demo/12918.html python 趣味实用小工具 概述 用python实现的三个趣味实用小工具: 图片转Execl工具 , ...
- Python+Tkinter 密保小工具
上图 代码 核心 编解码方面 Tkinter界面更新 总结 昨天被一同学告知,网上的一个QQ密码库中有我的一条记录,当时我就震惊了,赶紧换了密码.当然了,这件事也给了我一个警示,那就是定期的更换自己的 ...
- 几个可以提高工作效率的Python内置小工具
在这篇文章里,我们将会介绍4个Python解释器自身提供的小工具.这些小工具在笔者的日常工作中经常用到,减少了各种时间的浪费,然而,却很容易被大家忽略.每当有新来的同事看到我这么使用时,都忍不住感叹, ...
- python tkinter模块小工具界面
代码 #-*-coding:utf-8-*- import os from tkinter import * root=Tk() root.title('小工具') #清空文本框内容 def clea ...
- 纯Python综合图像处理小工具(1)分通道直方图
平时工作经常需要做些图像分析,需要给图像分通道,计算各个通道的直方图分布特点,这个事儿photoshop也能做,但是用起来不方便,且需要电脑上安装有PS软件,如果用OpenCV, 更是需要在visua ...
- 纯Python综合图像处理小工具(4)自定义像素级处理(剪纸滤镜)
上一节介绍了python PIL库自带的10种滤镜处理,现成的库函数虽然用起来方便,但是对于图像处理的各种实际需求,还需要开发者开发自定义的滤镜算法.本文将给大家介绍如何使用PIL对图像进行自定义 ...
- 纯Python综合图像处理小工具(3)10种滤镜算法
<背景> 滤镜处理是图像处理中一种非常常见的方法.比如photoshop中的滤镜效果,除了自带的滤镜,还扩展了很多第三方的滤镜效果插件,可以对图像做丰富多样的变换:很多手机app实现了实 ...
随机推荐
- 使用python3.7和opencv4.1来实现人脸识别和人脸特征比对以及模型训练
原文转载自「刘悦的技术博客」https://v3u.cn/a_id_126 OpenCV4.1已经发布将近一年了,其人脸识别速度和性能有了一定的提高,这里我们使用opencv来做一个实时活体面部识别的 ...
- Mysql8基础知识
系统表都变为InnoDb表 从MySQL 8.0开始,系统表全部换成事务型的InnoDB表,默认的MySQL实例将不包含任何MyISAM表,除非手动创建MyISAM表 基本操作 创建数据表的语句为CR ...
- Jenkins使用pipeline部署服务到远程服务器
写这篇文章是对之前搭建Jenkins做的修改和完善,让jenkins更好的为我们服务 Docker搭建Jenkins服务 使用过程中遇到的问题: 为方便部署,打算将jenkins用到的jdk11.ma ...
- Java SE 16 新增特性
Java SE 16 新增特性 作者:Grey 原文地址:Java SE 16 新增特性 源码 源仓库: Github:java_new_features 镜像仓库: GitCode:java_new ...
- 理解C++函数指针和指针函数(一)
函数指针 实际上使用最多的还是指针函数,但我们还是可以先看看函数指针 奇怪的是,大家搜索指针函数,或者Pointer function,出来的还是函数指针的链接. OK,废话不多说,先给大家举个例子. ...
- MyBatis快速上手与知识点总结
目录 1.MyBatis概述 1.1 MyBatis概述 1.2 JDBC缺点 1.3 MyBatis优化 2.MyBatis快速入门 3.Mapper代理开发 3.1 Mapper代理开发概述 3. ...
- RT-Thread Studio增加软件包操作
RT-Thread Studio增加软件包操作 1. 在本地中完成如下操作 打开RTthread Studio的安装目录 在当前目录下找到env的目录 在env的目录下找到要添加软件包的分类文件夹 本 ...
- 如何使用Postman快速简单的调用快递物流平台快递鸟API接口
前沿 快递鸟是一家聚合类的第三方快递物流平台,目前该平台提供的产品主要以API为主.由于API不能直观的看到产品效果,需要进行API对接联调成功后才能真实的看到产品的实际效果.但是如果一上来就写代码进 ...
- Hint 使用--leading
Oracle hint -- leading 的作用是提示优化器某张表先访问,可以指定一张或多张表,当指定多张表时,表示按指定的顺序访问这几张表.而 Postgresql leading hint的功 ...
- SpringMvc(四)- 下载,上传,拦截器
1.图片下载 图片下载:将服务器端的文件以流的形式写到客户端,通过浏览器保存到本地,实现下载: 1.1 图片下载步骤 1.通过session获取上下文对象(session.getServletCont ...
