MySQL(一)Linux下MySQL的安装
Linux下MySQL的安装
1 MySQL的安装
1.1 Linux系统以及工具的准备
这里使用两台CentOS7虚拟机,一台安装8.0版本,另一台克隆的虚拟机安装5.7版本
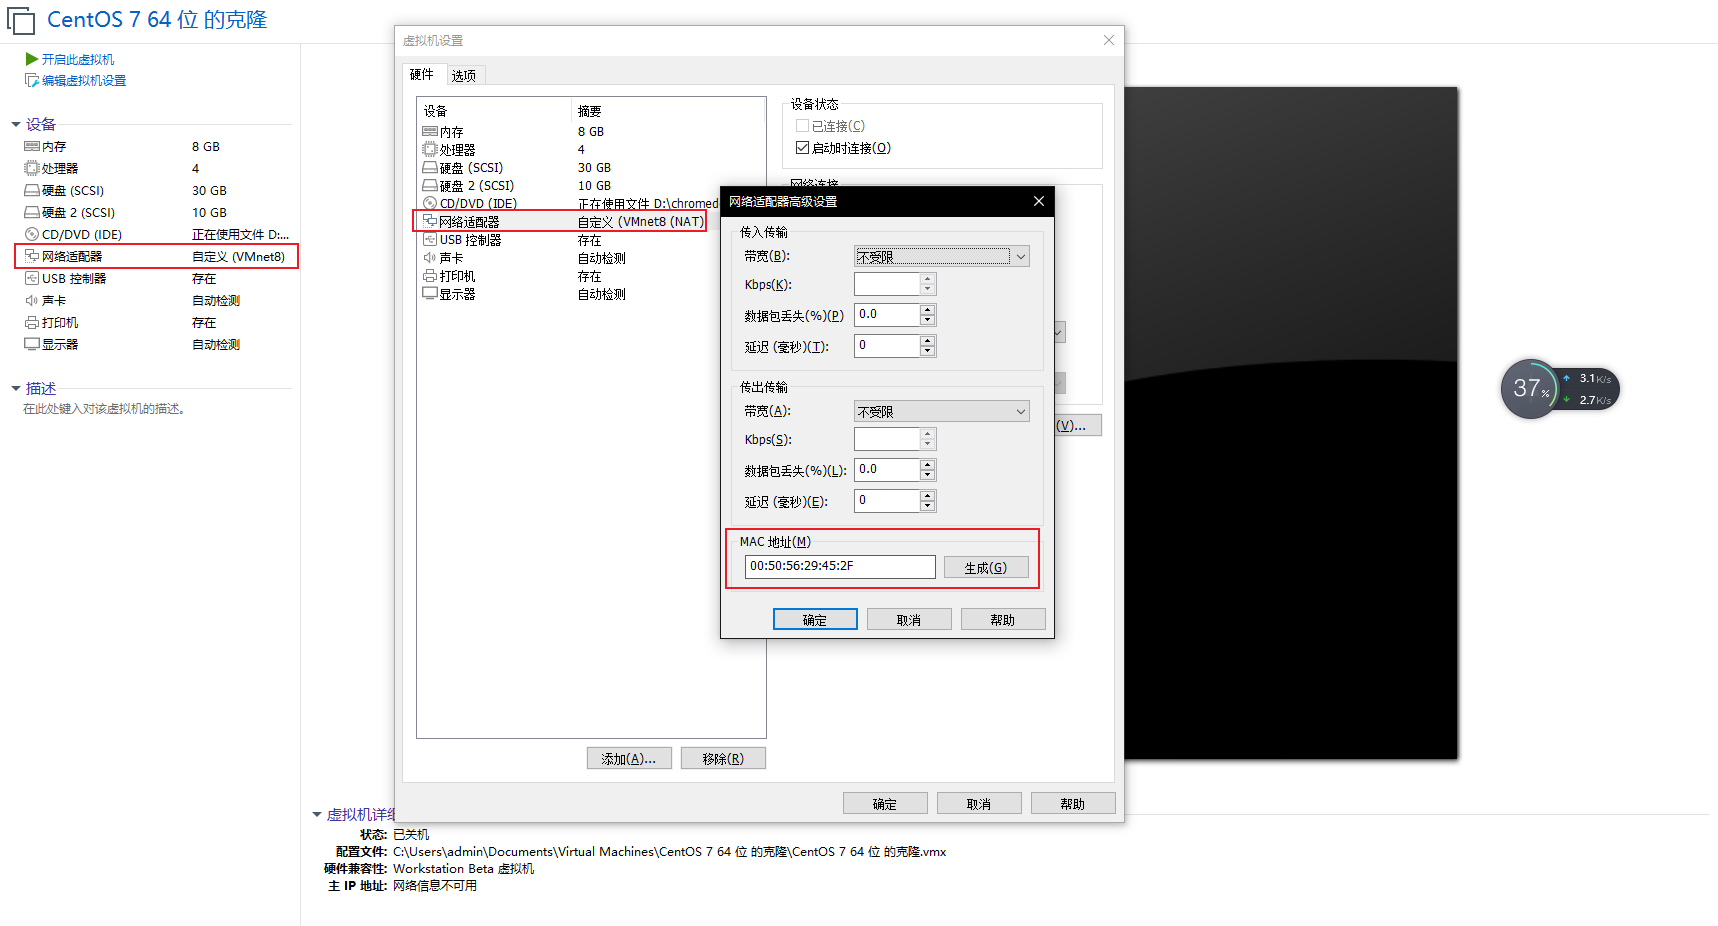
克隆的虚拟机需要进行配置修改:
mac地址
主机名
cd /etc/hostname

hadoop101
ip地址
vim /etc/sysconfig/network-scripts/ifcfg-ens33

UUID="7d88feef-895e-488f-85f6-ece3f5193a73"

DEVICE="ens33"

ONBOOT="yes"

IPADDR=192.168.60.101
uuid
UUID="7d88feef-895e-488f-85f6-ece3f5193a73"

DEVICE="ens33"

ONBOOT="yes"

IPADDR=192.168.60.101
1.2 安装包抽取
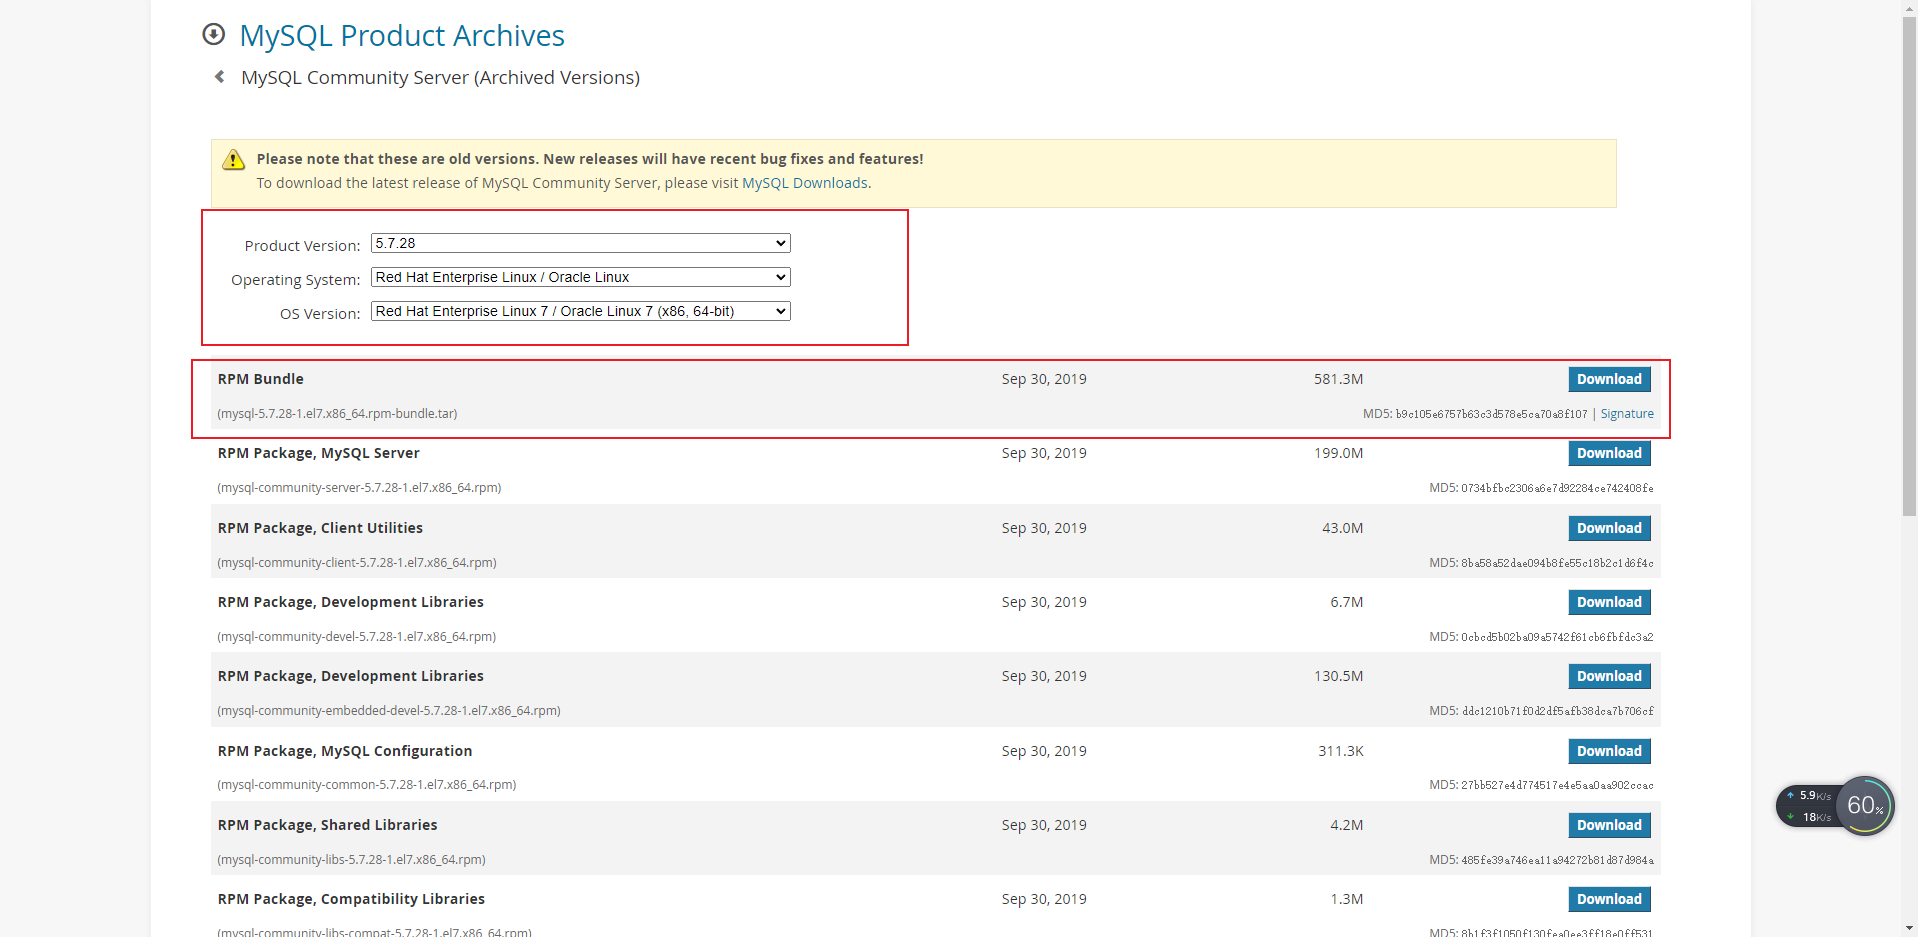
MySQL社区版网址:https://downloads.mysql.com/archives/community/,选择版本和红帽系操作系统Linux7,下载RPM Bundle离线版本,然后抽取其中的四个rpm上传到服务器进行安装:
-rw-r--r--. 1 root root  45109364 1月   5 20:44 mysql-community-client-5.7.28-1.el7.x86_64.rpm

-rw-r--r--. 1 root root    318768 1月   5 20:44 mysql-community-common-5.7.28-1.el7.x86_64.rpm

-rw-r--r--. 1 root root   4374364 1月   5 20:44 mysql-community-libs-5.7.28-1.el7.x86_64.rpm

-rw-r--r--. 1 root root 208694824 1月   5 20:44 mysql-community-server-5.7.28-1.el7.x86_64.rpm
1.3 CentOS7下检查MySQL依赖环境
① 检查/tmp临时目录权限(必不可少)
在MySQL安装过程中,会通过MySQL用户在目录/tmp下新建tmp_db文件,所以需要给/tmp足够大的权限:
chmod -R 777 /tmp
②检查libaio依赖
[root@hadoop101 opt]# rpm -qa | grep libaio

libaio-0.3.109-13.el7.x86_64
③检查net-tools依赖
[root@hadoop101 opt]# rpm -qa | grep net-tools

net-tools-2.0-0.25.20131004git.el7.x86_64
1.4 将下载的安装包上传至/opt目录然后顺序执行安装
需要使用rpm -ivh 命令按照如下的顺序进行安装:
- mysql-community-common-5.7.28-1.el7.x86_64.rpm
- mysql-community-client-plugins.rpm(高版本mysql会有这一个)
- mysql-community-libs-5.7.28-1.el7.x86_64.rpm
- mysql-community-client-5.7.28-1.el7.x86_64.rpm
- mysql-community-server-5.7.28-1.el7.x86_64.rpm
执行第三条的时候可能会出现错误:
[root@hadoop101 opt]# rpm -ivh mysql-community-libs-5.7.28-1.el7.x86_64.rpm

警告:mysql-community-libs-5.7.28-1.el7.x86_64.rpm: 头V3 DSA/SHA1 Signature, 密钥 ID 5072e1f5: NOKEY

错误:依赖检测失败:

        mysql-community-common(x86-64) >= 5.7.9 被 mysql-community-libs-5.7.28-1.el7.x86_64 需要

        mariadb-libs 被 mysql-community-libs-5.7.28-1.el7.x86_64 取代
这时候需要执行下面语句,执行完再次运行上面即可
yum remove mysql-libs
1.5 查看是否安装成功
① 查看版本号
[root@hadoop101 opt]# mysql --version

mysql  Ver 14.14 Distrib 5.7.28, for Linux (x86_64) using  EditLine wrapper
② rpm查看安装依赖:
[root@hadoop101 opt]# rpm -qa | grep mysql

mysql-community-server-5.7.28-1.el7.x86_64

mysql-community-common-5.7.28-1.el7.x86_64

mysql-community-libs-5.7.28-1.el7.x86_64

mysql-community-client-5.7.28-1.el7.x86_64
1.6 服务初始化
为了保证mysql目录与文件的所有者为mysql登录用户,如果是以root身份运行mysql服务的,需要执行下面的初始化语句
mysqld --initialize --user=mysql
--initialize表示以安全模式来初始化,则会为root用户生成一个密码,并将该密码标记为过期,登录之后需要用户设置新的密码,生成的临时密码会往日志中记录一份。
查看密码:
[root@hadoop101 opt]# cat /var/log/mysqld.log

2023-01-06T05:07:46.462818Z 0 [Warning] TIMESTAMP with implicit DEFAULT value is deprecated. Please use --explicit_defaults_for_timestamp server option (see documentation for more details).

2023-01-06T05:07:47.050060Z 0 [Warning] InnoDB: New log files created, LSN=45790

2023-01-06T05:07:47.158678Z 0 [Warning] InnoDB: Creating foreign key constraint system tables.

2023-01-06T05:07:47.182640Z 0 [Warning] No existing UUID has been found, so we assume that this is the first time that this server has been started. Generating a new UUID: 0f62f16d-8d80-11ed-acba-000c29c698c1.

2023-01-06T05:07:47.183419Z 0 [Warning] Gtid table is not ready to be used. Table 'mysql.gtid_executed' cannot be opened.

2023-01-06T05:07:47.793260Z 0 [Warning] CA certificate ca.pem is self signed.

2023-01-06T05:07:47.930913Z 1 [Note] A temporary password is generated for root@localhost: h;Q/>jrTQ3uk
1.7 服务启动并查看状态
[root@hadoop101 mysql]# systemctl start mysqld

[root@hadoop101 mysql]# systemctl status mysqld

● mysqld.service - MySQL Server

   Loaded: loaded (/usr/lib/systemd/system/mysqld.service; enabled; vendor preset: disabled)

   Active: active (running) since 四 2023-01-05 21:25:02 PST; 49s ago
启动过程中出现了一个错误,经过查看/var/log/mysqld.log日志发现是由于是克隆的虚拟机,所以存在另一个mysql服务占用了3306端口,在docker中停止然后删除该容器再执行即可
Job for mysqld.service failed because the control process exited with error
1.8 设置自启动
首先查看服务是否为自启动
[root@hadoop101 mysql]# systemctl list-unit-files | grep mysqld

mysqld.service                                enabled

mysqld@.service                               disabled
如果mysqld.service是disable,则执行下面语句设置自启动
[root@hadoop101 mysql]# systemctl list-unit-files | grep mysqld

mysqld.service                                enabled

mysqld@.service                               disabled

[root@hadoop101 mysql]# systemctl disable mysqld.service

Removed symlink /etc/systemd/system/multi-user.target.wants/mysqld.service.

[root@hadoop101 mysql]# systemctl list-unit-files | grep mysqld.service

mysqld.service                                disabled

[root@hadoop101 mysql]# systemctl enable mysqld.service

Created symlink from /etc/systemd/system/multi-user.target.wants/mysqld.service to /usr/lib/systemd/system/mysqld.service.

[root@hadoop101 mysql]# systemctl list-unit-files | grep mysqld.service

mysqld.service                                enabled
1.9 使用临时密码登录mysql
[root@hadoop101 mysql]# mysql -u root -p

Enter password:

Welcome to the MySQL monitor.  Commands end with ; or \g.

Your MySQL connection id is 8

Server version: 5.7.28
进行密码修改,否则无法进行任何操作
mysql> alter user 'root'@'localhost' identified by '321Onlyyou';
1.10 使用远程连接工具连接Mysql
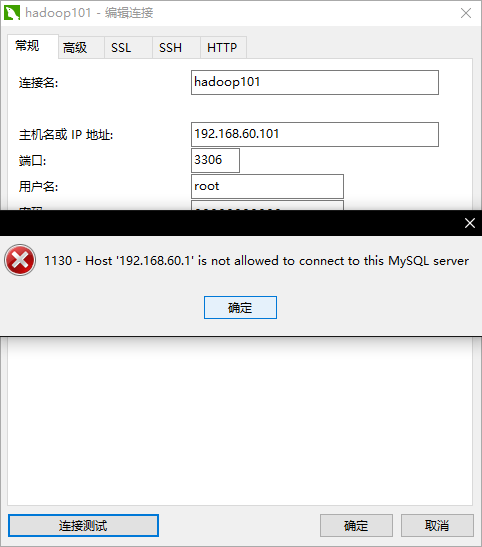
直接连接可用看到报1130不允许连接mysql服务器的错误,首先对问题进行排查:
- ping 192.168.60.100 检查虚拟机网络是否畅通
- telnet 192.168.60.101 3306 检查端口号是否畅通
然后第二步出现:
EHost '192.168.60.1' is not allowed to connect to this MySQL server
遗失对主机的连接。
出现这个的原因是windows和linux防火墙造成的,解决的思路有两个
关闭防火墙
[root@hadoop101 mysql]# systemctl status firewalld

● firewalld.service - firewalld - dynamic firewall daemon

   Loaded: loaded (/usr/lib/systemd/system/firewalld.service; disabled; vendor preset: enabled)

   Active: inactive (dead)

     Docs: man:firewalld(1)

[root@hadoop101 mysql]# systemctl stop firewalld
开放端口号
略
然后发现还是连接不上,这其实还有一个用户连接端口设置的问题,首先查看mysql自带的数据库表:
mysql> show databases;

+--------------------+

| Database           |

+--------------------+

| information_schema |

| mysql              |

| performance_schema |

| sys                |

+--------------------+

4 rows in set (0.00 sec)
然后查看mysql数据库中的user表,其中host就代表可用使用user连接的地址
mysql> use mysql;

mysql> select host,user from user

    -> ;

+-----------+---------------+

| host      | user          |

+-----------+---------------+

| localhost | mysql.session |

| localhost | mysql.sys     |

| localhost | root          |

+-----------+---------------+

3 rows in set (0.00 sec)
对连接限制的地址进行修改并更新权限:
mysql> update user set host = '%' where user = 'root';

Query OK, 1 row affected (0.00 sec)

Rows matched: 1  Changed: 1  Warnings: 0

mysql> select host,user from user;

+-----------+---------------+

| host      | user          |

+-----------+---------------+

| %         | root          |

| localhost | mysql.session |

| localhost | mysql.sys     |

+-----------+---------------+

3 rows in set (0.00 sec)

mysql> flush privileges;

Query OK, 0 rows affected (0.00 sec)
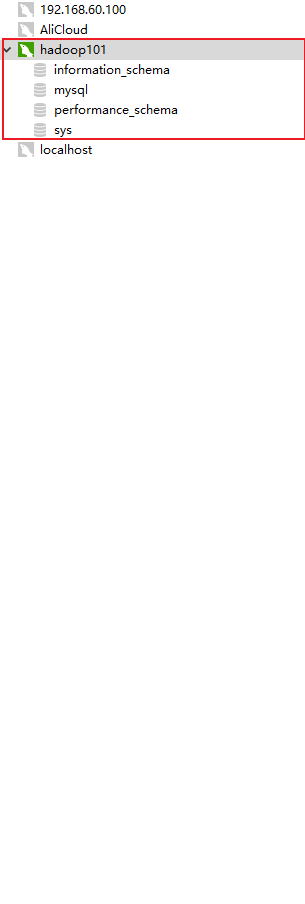
此时就能连接成功了
1.11 安装问题记录
2059 Navcicat编码问题
mysql -uroot -p

password #登录

use mysql; #选择数据库

ALTER USER 'root'@'localhost' IDENTIFIED BY '你的mysql密码' PASSWORD EXPIRE NEVER; #更改加密方式

ALTER USER 'root'@'localhost' IDENTIFIED WITH mysql_native_password BY 'password'; #更新用户密码

FLUSH PRIVILEGES; #刷新权限
MySQL(一)Linux下MySQL的安装的更多相关文章
- 【MySQL】Linux下MySQL 5.5、5.6和5.7的RPM、二进制和源码安装
[MySQL]Linux下MySQL 5.5.5.6和5.7的RPM.二进制和源码安装 1.1 BLOG文档结构图 1.2 前言部分 1.2.1 导读和注意事项 各位技术爱好者,看完本文后, ...
- windows下mysql和linux下mysql主从配置
1. linux下mysql安装版本5.6 windows下mysql版本5.7 不要问我为什么版本不一致 就是想这么搞 2. linux为主服务器 windows为从服务器 3.找到li ...
- 【MySQL】Linux下mysql安装全过程——小白入门篇(含有问题详解)
本次安装操作在申请的腾讯云上实现(版本:CentOS Linux release 7.4.1708 (Core) ). 根据教程实现(中途各种挖坑,填坑...),地址:http://www.runoo ...
- mysql 在linux下的完整安装过程
1.下载RPM包 https://cdn.mysql.com//archives/mysql-5.7/mysql-5.7.20-1.el7.x86_64.rpm-bundle.tar 2.先使用命令删 ...
- Navicat MySQL连接Linux下MySQL的问题解决方案
Error1: 2003:Can't connect to MySQL server on 'localhost' 解决方法:关闭Linux的防火墙功能. #chkconfig iptables of ...
- linux下MySQL 5.6源码安装
linux下MySQL 5.6源码安装 1.下载:当前mysql版本到了5.6.20 http://dev.mysql.com/downloads/mysql 选择Source Code 2.必要软件 ...
- linux下使用yum安装mysql、tomcat、httpd
一.linux下使用yum安装mysql 1.安装 查看有没有安装过: yum list installed mysql* rpm -qa | grep m ...
- linux下mysql的安装
一.下载 http://dev.mysql.com/downloads/mysql/ 选择对应的版本,这里选择“Linux-Generic” 以64位系统为例,这里需要下载如下两个文件: MySQL- ...
- linux下MySQL安装登录及操作
linux下MySQL安装登录及操作 二.安装Mysql 1.下载MySQL的安装文件 安装MySQL需要下面两个文件: MySQL-server-4.0.16-0.i386.rpm MySQL-cl ...
- Linux下MySQL安装和配置
--Linux下MySQL安装和配置 ---------------------------2014/05/18 Linux下MySQL的配置和安装 本文的安装采用 rpm 包安装 1.首先在官网下载 ...
随机推荐
- PHP中获取时间的下一周下个月的方法
PHP中获取时间的下一周,下个月等通常用于定制服务的时候使用,比如包月会员,包年等等 //通常用于定制服务的时候使用,比如包月会员,包年等等 //获取当前时间过一个月的时间,以DATETIME格式显示 ...
- [C#]接口Interface快速Demo
参考代码1: using System; namespace InterfaceDemo { /// <summary> /// 定义一个爬树接口 /// </summary> ...
- Spring AOP的动态代理原理和XML与注解配置
AOP 实现底层就是对上面的动态代理的代码进行了封装,封装后我们只需要对需要关注的部分进行代码编写,并通过配置的方式完成指定目标的方法增强. 相关术语: Target(目标对象):代理的目标对象 Pr ...
- python求列表中n个最大或最小的值
import heapq #y为结果列表,n为所求的n个值,x为来源列表 y=heapq.nsmallest(n,x) y=heapq.nlargest(n,x)
- Linux中profile、bashrc、bash_profile之间的区别和联系(转)
/etc/profile:此文件为系统的每个用户设置环境信息,当用户第一次登录时,该文件被执行.并从/etc/profile.d目录的配置文件中搜集shell的设置. 英文描述为: # /etc/pr ...
- IntelliJ IDEA常用插件
Mybatis Log Plugin安装好插件后,在Tools工具栏中可以看到安装好的插件,点击即可打开相应窗口,在Debug时,相应的Sql语句即可输出到此窗口,方便查看.此插件相当好用,提升开发效 ...
- ICSFUZZ:操纵I/O、二进制代码重用以及插桩,来Fuzzing工业控制应用程序
本文系原创,转载请说明出处 Please Subscribe Wechat Official Account:信安科研人,获取更多的原创安全资讯 源码:GitHub - momalab/ICSFu ...
- kali 配置apt源、设置中文、安装googlepinyin输入法
配置apt源地址 kali 自带的apt源是国外的,更新网速很慢,这里我设置的是中科大的源. http://mirrors.ustc.edu.cn/help/kali.html 1.复制页面的源地址 ...
- Docker下部署LNMP黄金架构
一.部署lnmp 1.网络规划 172.16.10.0/24nginx:172.16.10.10mysql:172.16.10.20php:172.16.10.30网站访问主目录:/wwwrootng ...
- Android studio手机界面的显示
终于显示出来啦! 前几天因为SDK的地址错误一直不显示,现在终于显示出来啦! 关于报错原因的话,我也不太清楚是咋解决的,就改了改Android studio软件里面下载SDK的地址,就出来啦!(只要报 ...