
linux作业--第八周
1、创建私有CA并进行证书申请。
配置文件存放路径 /etc/pki/tls/openssl.cnf
[ CA_default ]

dir		= /etc/pki/CA		# Where everything is kept

certs		= $dir/certs		# Where the issued certs are kept

crl_dir		= $dir/crl		# Where the issued crl are kept

database	= $dir/index.txt	# database index file.

#unique_subject	= no			# Set to 'no' to allow creation of

					# several ctificates with same subject.

new_certs_dir	= $dir/newcerts		# default place for new certs.

certificate	= $dir/cacert.pem 	# The CA certificate

serial		= $dir/serial 		# The current serial number

crlnumber	= $dir/crlnumber	# the current crl number

					# must be commented out to leave a V1 CRL

crl		= $dir/crl.pem 		# The current CRL

private_key	= $dir/private/cakey.pem# The private key

RANDFILE	= $dir/private/.rand	# private random number file

创建CA所需要的文件
#生成证书索引数据库文件

touch /etc/pki/CA/index.txt

#指定第一个颁发证书的序列号

echo 01 > /etc/pki/CA/serial
生成CA私钥
cd /etc/pki/CA/

(umask 066; openssl genrsa -out private/cakey.pem 2048)

生成CA自签名证书
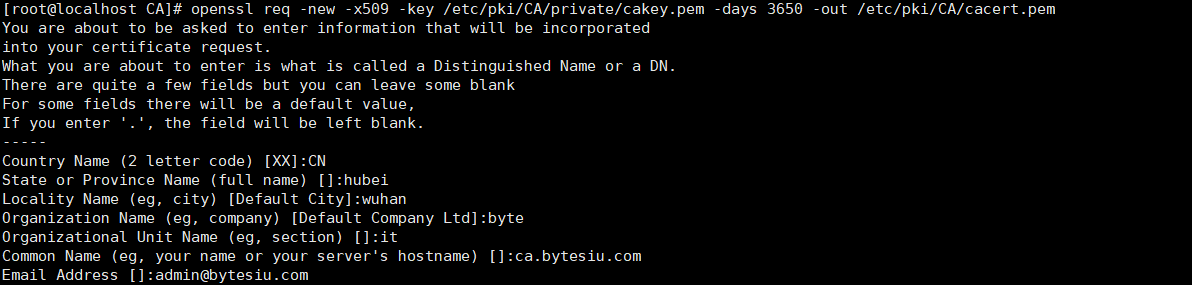
# openssl req -new -x509 -key /etc/pki/CA/private/cakey.pem -days 3650 -out /etc/pki/CA/cacert.pem
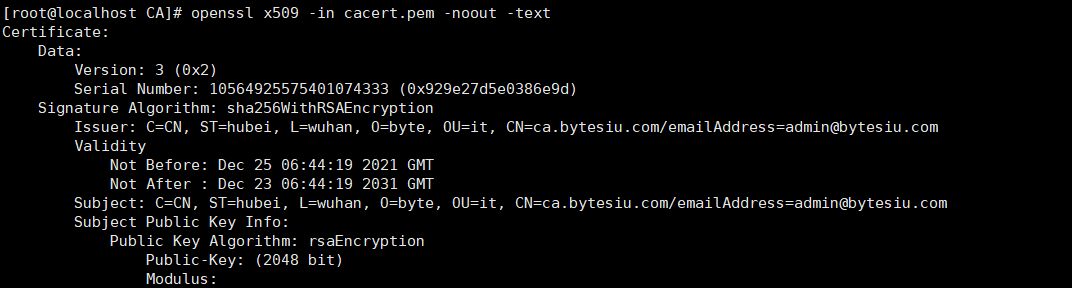
[root@localhost CA]# openssl x509 -in cacert.pem -noout -text

将证书文件的base64编码转换为一个易读的格式查看证书文件
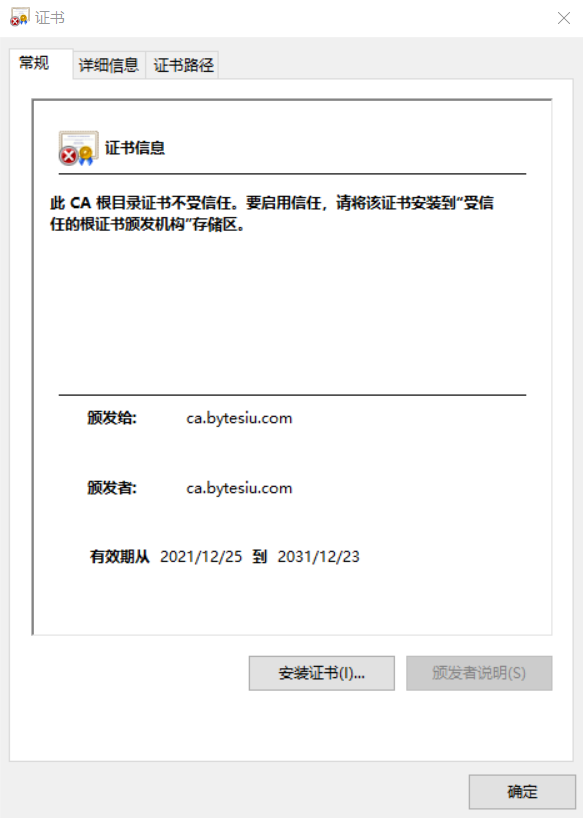
将证书文件cacert.pem传至windows桌面,修改文件名为cacert.pem.crt,双击可以看到下面显示
[root@localhost CA]# sz cacert.pem
用户生成私钥和证书申请
生成私钥
[root@localhost data]# mkdir app1

[root@localhost app1]# (umask 066; openssl genrsa -out /data/app1/app1.key 2048)

Generating RSA private key, 2048 bit long modulus

....+++

................................................................................................................................................+++

e is 65537 (0x10001)
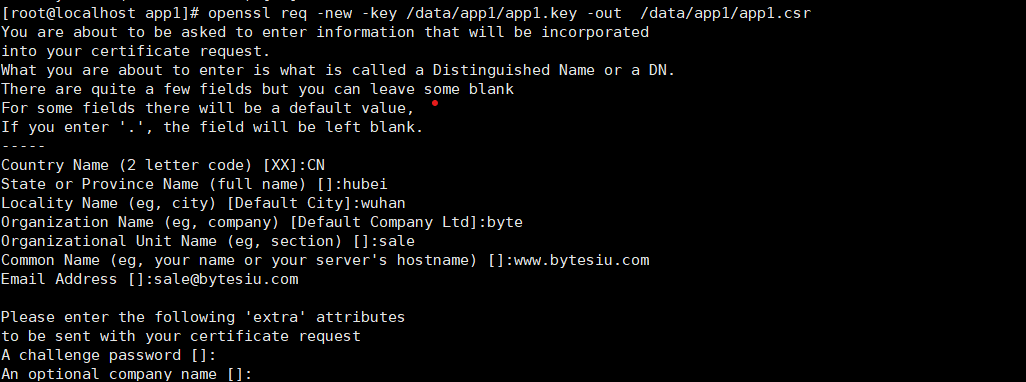
生成证书申请文件
[root@localhost app1]# openssl req -new -key /data/app1/app1.key -out /data/app1/app1.csr
CA颁发证书
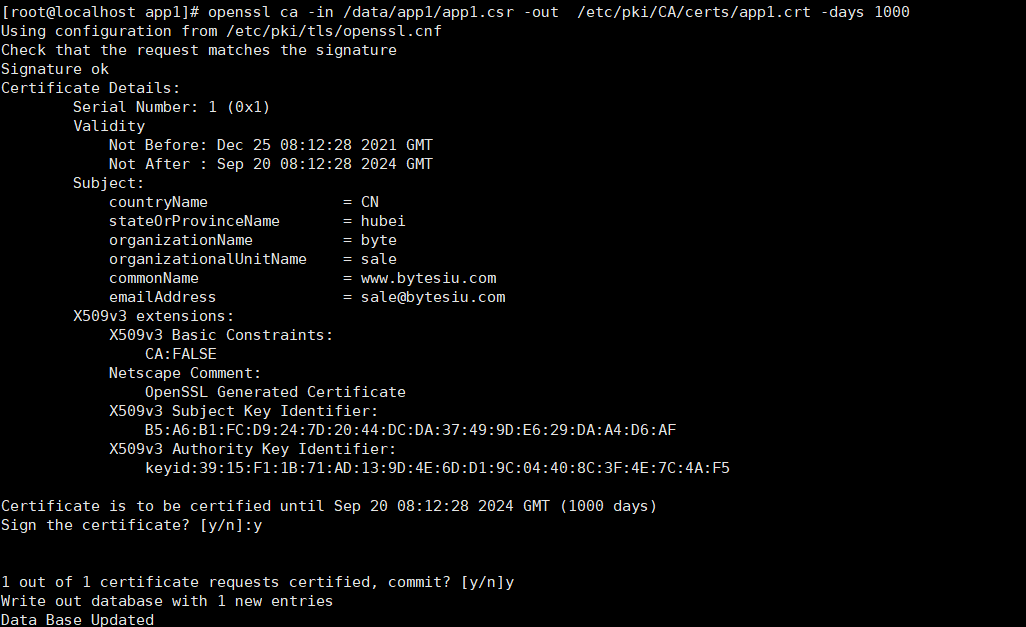
[root@localhost app1]# openssl ca -in /data/app1/app1.csr -out /etc/pki/CA/certs/app1.crt -days 1000
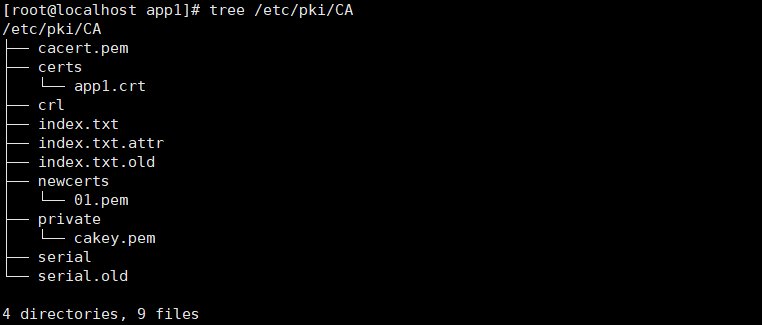
验证指定编号对应证书的有效性
[root@localhost app1]# openssl ca -status 01

Using configuration from /etc/pki/tls/openssl.cnf

01=Valid (V)
导出CA证书
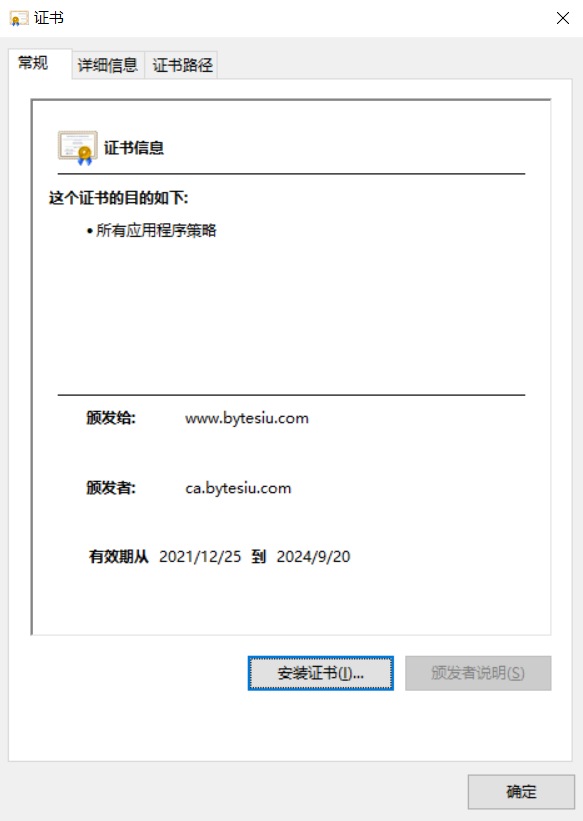
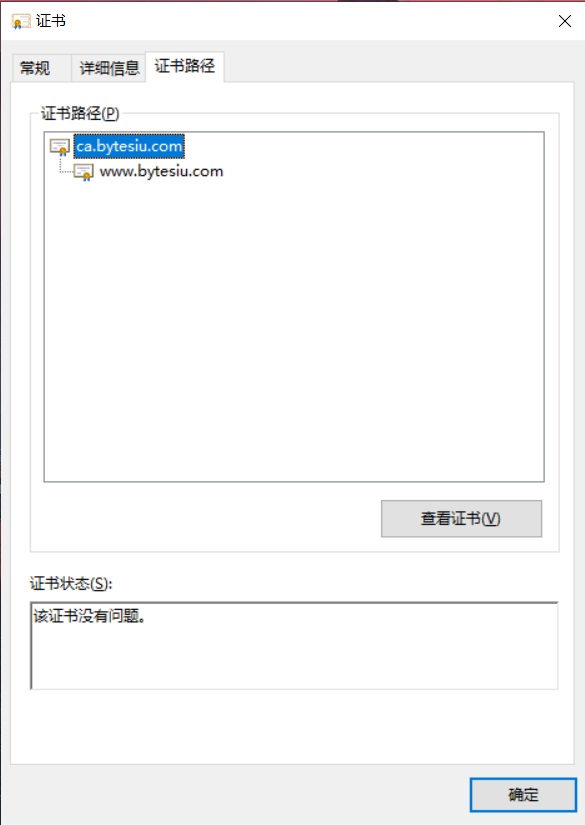
至此CA颁发证书的整个过程已经完成
2、总结ssh常用参数、用法
常见参数:
- -p port #远程服务器监听的端口
- -b #指定连接的源IP
- -v #调试模式
- -C #压缩方式
- -X #支持x11转发
- -t #强制伪tty分配,如:ssh -t remoteserver1 ssh -t remoteserver2 ssh remoteserver3
用法:
ssh命令是ssh客户端,允许实现对远程系统经验证地加密安全访问。ssh客户端配置文件是:/etc/ssh/ssh_config

ssh命令配合的常见选项:

-p port:远程服务器监听的端口

ssh 192.168.42.200 -p 2222

-b 指定连接的源IP

ssh 192.168.42.200 -p 2222 -b 192.168.42.5

-v 调试模式

ssh 192.168.42.200 -p 2222 -v

-C 压缩方式

-X 支持x11转发

支持将远程linux主机上的图形工具在当前设备使用

-t 强制伪tty分配,如:ssh -t remoteserver1 ssh -t remoteserver2   ssh  remoteserver3

ssh -t 192.168.42.201 ssh -t 192.168.42.202 ssh 192.168.42.200

-o option   如:-o StrictHostKeyChecking=no

-i <file> 指定私钥文件路径,实现基于key验证,默认使用文件: ~/.ssh/id_dsa, ~/.ssh/id_ecdsa, ~/.ssh/id_ed25519,~/.ssh/id_rsa等
3、总结sshd服务常用参数。
服务器端的配置文件: /etc/ssh/sshd_config

常用参数:

Port                                                 #端口号

ListenAddress ipLoginGraceTime 2m                   #宽限期

PermitRootLogin yes                                  #默认ubuntu不允许root远程ssh登录

StrictModes yes                                     #检查.ssh/文件的所有者,权限等

MaxAuthTries   6

MaxSessions  10                                       #同一个连接最大会话

PubkeyAuthentication yes                              #基于key验证

PermitEmptyPasswords no                               #空密码连接

PasswordAuthentication yes                             #基于用户名和密码连接

GatewayPorts no

ClientAliveInterval 10                                 #单位:秒

ClientAliveCountMax 3                                  #默认3

UseDNS yes                                            #提高速度可改为no

GSSAPIAuthentication yes                              #提高速度可改为no

MaxStartups                                          #未认证连接最大值,默认值10

Banner /path/file

#以下设置可以限制可登录用户:

AllowUsers user1 user2 user3

DenyUsers

AllowGroups
4、搭建dhcp服务,实现ip地址申请分发
注:DHCP服务的软件:
dhcp(CentOS 7 之前版本) 或 dhcp-server(CentOS 8 中的包名)
本实验在centos7完成
- 安装软件包
yum install -y dhcp 或 yum install -y dhcp-server (centos8)
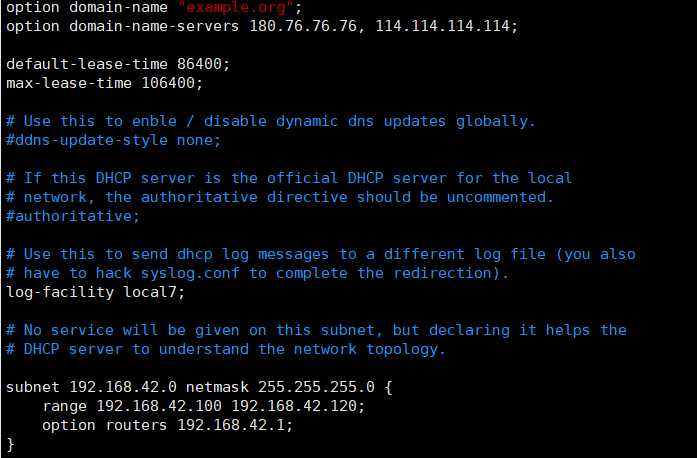
- 修改配置文件
[root@localhost ~]# cp  /usr/share/doc/dhcp-4.2.5/dhcpd.conf.example  /etc/dhcp/dhcpd.conf

vim /etc/dhcp/dhcpd.conf

option domain-name "example.org";

option domain-name-servers 180.76.76.76, 114.114.114.114;  #DNS服务

default-lease-time 86400;   #地址租期

max-lease-time 106400;      #地址最大租期

subnet 192.168.42.0 netmask 255.255.255.0 {

    range 192.168.42.100 192.168.42.120;    #地址池

    option routers 192.168.42.1;            #网关

}

注:将地址与MAC地址进行绑定

host test {

   hardware ethernet  00:0c:29:b1:39:7a;

   fixed-address 192.168.42.125;

}
- 重启服务
systemctl restart dhcpd
- 客户端网卡配置
[root@localhost ~]# cat /etc/sysconfig/network-scripts/ifcfg-eth0

# Generated by dracut initrd

NAME="eth0"

DEVICE="eth0"

ONBOOT=yes

NETBOOT=yes

UUID="71bb1423-8fef-4074-88fd-30cb062bdde7"

IPV6INIT=yes

BOOTPROTO=dhcp

TYPE=Ethernet
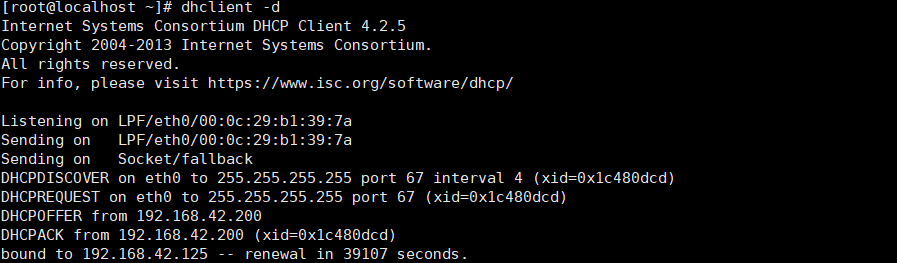
- 获取地址
dhclient -d
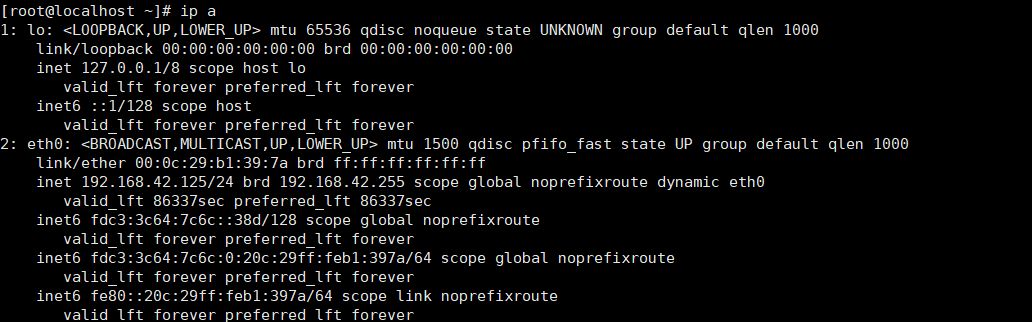
- 查看获取到的地址
linux作业--第八周的更多相关文章
- bug终结者 团队作业第八周
bug终结者 团队作业第八周 本次任务 素材提供及编辑:20162328 蔡文琛 博客修改完善:20162322 朱娅霖 "bug终结者" 宏伟蓝图 UML 手绘底稿 用例图 选项 ...
- 20135302魏静静——linux课程第八周实验及总结
linux课程第八周实验及总结 实验及学习总结 1. 进程切换在内核中的实现 linux中进程切换是很常见的一个操作,而这个操作是在内核中实现的. 实现的时机有以下三个时机: 中断处理过程(包括时钟中 ...
- 补交作业-第八周PSP
一.表格 C(分类) C(内容) S(开始时间) ST(结束时间) I(打断时间) △(净工作时间) 讨论 用户界面 9:30 10:40 15 55 编码 编码 13:20 16:30 10 180 ...
- Linux内核分析作业第八周
进程的切换和系统的一般执行过程 一.进程调度的时机 中断处理过程(包括时钟中断.I/O中断.系统调用和异常)中,直接调用schedule(),或者返回用户态时根据need_resched标记调用sch ...
- linux作业--第五周
1.简述osi七层模型和TCP/IP五层模型 一.OSI参考模型 (1) OSI的来源 OSI(Open System Interconnect),即开放式系统互联. 一般都叫OSI参考模型,是ISO ...
- linux作业--第三周
1.统计出/etc/passwd文件中其默认shell为非/sbin/nologin的用户个数,并将用户都显示出来 [root@localhost ~]# cat /etc/passwd | grep ...
- Linux入门-第八周
1.用shell脚本实现自动登录机器 #!/usr/bin/expectset ip 192.168.2.192set user rootset password rootspawn ssh $use ...
- linux作业--第十一周
1. 导入hellodb.sql生成数据库 (1) 在students表中,查询年龄大于25岁,且为男性的同学的名字和年龄 (2) 以ClassID为分组依据,显示每组的平均年龄 (3) 显示第2题中 ...
- linux作业--第十周
1.在阿里云服务器搭建openv-p-n(有条件的同学再做) 2.通过编译.二进制安装MySQL5.7 编译安装MySQL5.7 安装相关包 yum -y install libaio numactl ...
随机推荐
- ApacheCN Kali Linux 译文集 20211020 更新
Kali Linux 秘籍 中文版 第一章 安装和启动Kali 第二章 定制 Kali Linux 第三章 高级测试环境 第四章 信息收集 第五章 漏洞评估 第六章 漏洞利用 第七章 权限提升 第八章 ...
- 自定义 RestTemplate 异常处理 (转)
转自:https://ethendev.github.io/2018/11/06/RestTemplate-error-handler/ 一些 API 的报错信息通过 Response 的 body返 ...
- Java与网页JSP文件编码的小总结
感谢大佬: https://www.cnblogs.com/yangguoe/p/8467672.html(编码发展史) https://blog.csdn.net/seabiscuityj/arti ...
- Apache中commons包的各种jar的功能说明
commons-logging.jar -----记录日志,通常和 log4j.jar共同使用 commons-beanutils.jar(1.1) 主要提供Bean的 ...
- java的本地文件操作
一.文件的创建.删除和重命名 File file = new File("/bin/hello.txt");//文件无法被创建,系统找不到指定的路径file.createNewFi ...
- spring boot 配置静态路径
一 前言 最近有个项目,需要上传一个zip文件(zip文件就是一堆的html压缩组成)的压缩文件,然后后端解压出来,用户可以预览上传好的文件. 查看资料,spring boot对静态文件,可以通过配 ...
- VScode git无法使用,Error: command 'git.push' not found 源代码管理无法使用的问题及解决方法
正常条件下,只要电脑中安装了Git,VScode就可以直接使用. 在开始界面有下图所示的功能: 在源代码管理栏目中: 如果没能正常工作,就看不到这些功能. 可能在用某些与git相关的功能时,如安装了G ...
- Jetpack的ViewModel与LiveData
本文基于SDK 29 一.ViewModel与LiveData的作用: 1.viewModel: 数据共享,屏幕旋转不丢失数据,并且在Activity与Fragment之间共享数据. 2.LiveDa ...
- Solution -「Code+#4」「洛谷 P4370」组合数问题 2
\(\mathcal{Description}\) Link. 给定 \(n,k\),求 \(0\le b\le a\le n\) 的 \(\binom{a}{b}\) 的前 \(k\) 大. ...
- Zookeeper应用之一:数据发布与订阅初体验
Zookeeper到底是什么?可以从Zookeeper提供的功能来理解.本篇小作文就是使用其提供的功能之一:数据发布与订阅. 需求:服务端开启多个实例提供服务,客户端使用服务.如果服务端某个服务下线或 ...