torch& tensorflow
#torch
import torch
import torch.nn as nn
import torch.nn.functional as F class Net(nn.Module): def __init__(self):
super(Net, self).__init__()
# 1 input image channel, 6 output channels, 5x5 square convolution
# kernel
self.conv1 = nn.Conv2d(1, 6, 5)
self.conv2 = nn.Conv2d(6, 16, 5)
# an affine operation: y = Wx + b
self.fc1 = nn.Linear(16 * 5 * 5, 120)
self.fc2 = nn.Linear(120, 84)
self.fc3 = nn.Linear(84, 10) def forward(self, x):
# Max pooling over a (2, 2) window
x = F.max_pool2d(F.relu(self.conv1(x)), (2, 2))
# If the size is a square you can only specify a single number
x = F.max_pool2d(F.relu(self.conv2(x)), 2)
x = x.view(-1, self.num_flat_features(x))
x = F.relu(self.fc1(x))
x = F.relu(self.fc2(x))
x = self.fc3(x)
return x def num_flat_features(self, x):
size = x.size()[1:] # all dimensions except the batch dimension
num_features = 1
for s in size:
num_features *= s
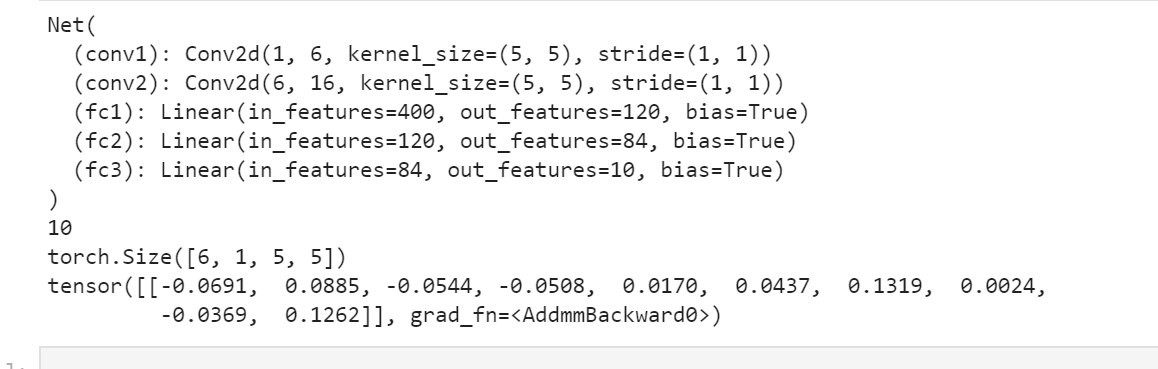
return num_features net = Net()
print(net) params = list(net.parameters())
print(len(params))
print(params[0].size()) # conv1's .weigh input = torch.randn(1, 1, 32, 32)
out = net(input)
print(out)
vgg
#从keras.model中导入model模块,为函数api搭建网络做准备
from tensorflow.keras import Model
from tensorflow.keras.layers import Flatten,Dense,Dropout,MaxPooling2D,Conv2D,BatchNormalization,Input,ZeroPadding2D,Concatenate
from tensorflow.keras import *
from tensorflow.keras import regularizers #正则化
from tensorflow.keras.optimizers import RMSprop #优化选择器
from tensorflow.keras.layers import AveragePooling2D
from tensorflow.keras.datasets import mnist
import matplotlib.pyplot as plt
import numpy as np
from tensorflow.python.keras.utils import np_utils #数据处理
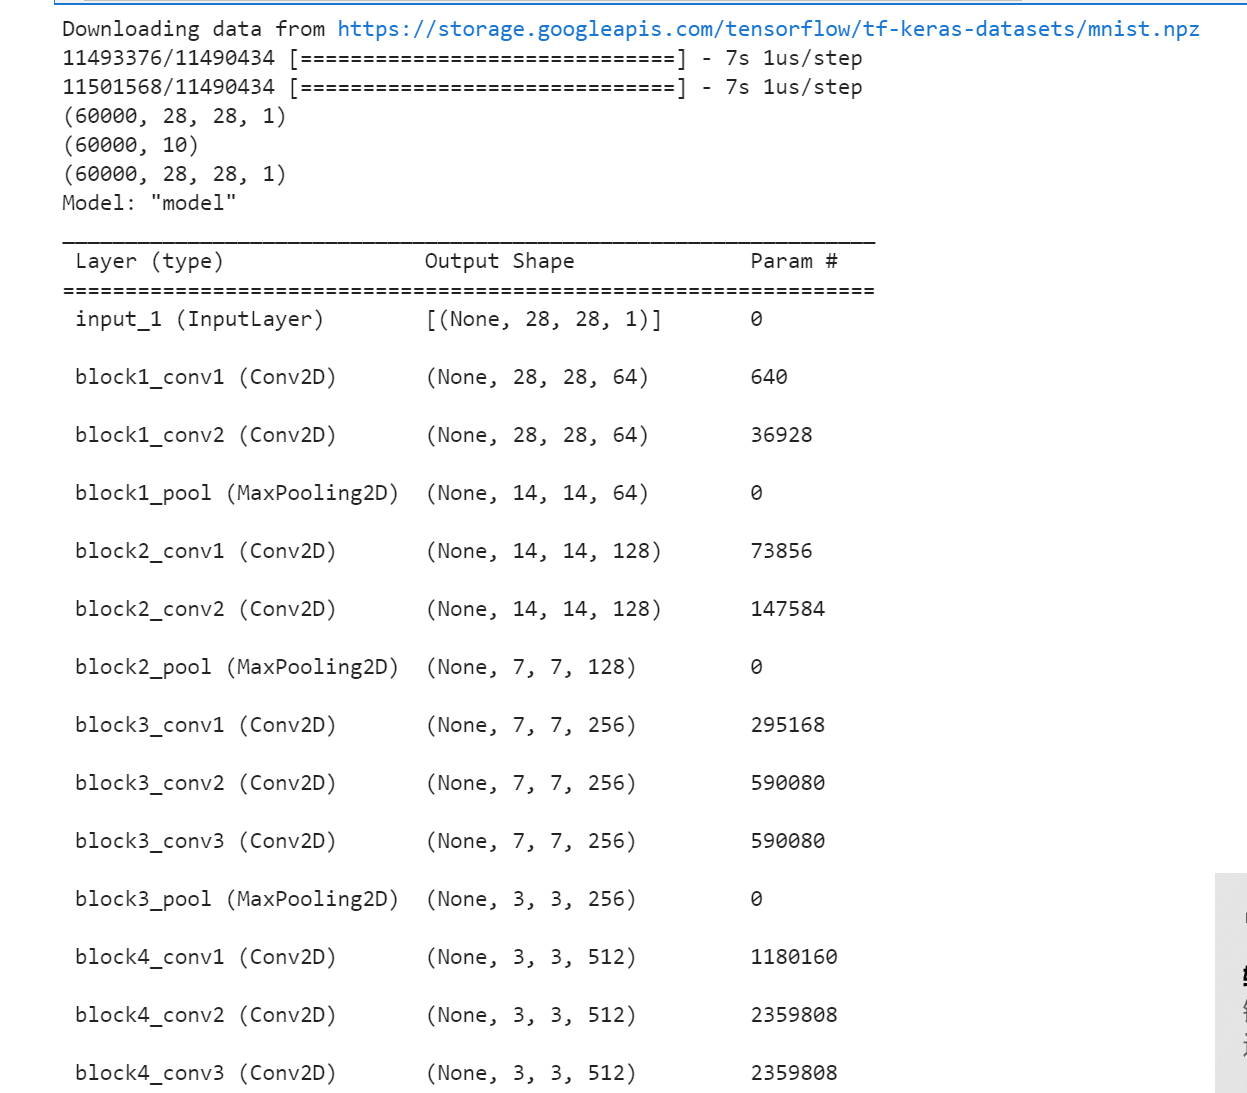
(X_train,Y_train),(X_test,Y_test)=mnist.load_data()
X_test1=X_test
Y_test1=Y_test
X_train=X_train.reshape(-1,28,28,1).astype("float32")/255.0
X_test=X_test.reshape(-1,28,28,1).astype("float32")/255.0
Y_train=np_utils.to_categorical(Y_train,10)
Y_test=np_utils.to_categorical(Y_test,10)
print(X_train.shape)
print(Y_train.shape)
print(X_train.shape) def vgg16():
x_input = Input((28, 28, 1)) # 输入数据形状28*28*1
# Block 1
x = Conv2D(64, (3, 3), activation='relu', padding='same', name='block1_conv1')(x_input)
x = Conv2D(64, (3, 3), activation='relu', padding='same', name='block1_conv2')(x)
x = MaxPooling2D((2, 2), strides=(2, 2), name='block1_pool')(x) # Block 2
x = Conv2D(128, (3, 3), activation='relu', padding='same', name='block2_conv1')(x)
x = Conv2D(128, (3, 3), activation='relu', padding='same', name='block2_conv2')(x)
x = MaxPooling2D((2, 2), strides=(2, 2), name='block2_pool')(x) # Block 3
x = Conv2D(256, (3, 3), activation='relu', padding='same', name='block3_conv1')(x)
x = Conv2D(256, (3, 3), activation='relu', padding='same', name='block3_conv2')(x)
x = Conv2D(256, (3, 3), activation='relu', padding='same', name='block3_conv3')(x)
x = MaxPooling2D((2, 2), strides=(2, 2), name='block3_pool')(x) # Block 4
x = Conv2D(512, (3, 3), activation='relu', padding='same', name='block4_conv1')(x)
x = Conv2D(512, (3, 3), activation='relu', padding='same', name='block4_conv2')(x)
x = Conv2D(512, (3, 3), activation='relu', padding='same', name='block4_conv3')(x)
x = MaxPooling2D((2, 2), strides=(2, 2), name='block4_pool')(x) # Block 5
x = Conv2D(512, (3, 3), activation='relu', padding='same', name='block5_conv1')(x)
x = Conv2D(512, (3, 3), activation='relu', padding='same', name='block5_conv2')(x)
x = Conv2D(512, (3, 3), activation='relu', padding='same', name='block5_conv3')(x) #BLOCK 6
x=Flatten()(x)
x=Dense(256,activation="relu")(x)
x=Dropout(0.5)(x)
x = Dense(256, activation="relu")(x)
x = Dropout(0.5)(x)
#搭建最后一层,即输出层
x = Dense(10, activation="softmax")(x)
# 调用MDOEL函数,定义该网络模型的输入层为X_input,输出层为x.即全连接层
model = Model(inputs=x_input, outputs=x)
# 查看网络模型的摘要
model.summary()
return model model=vgg16()
optimizer=RMSprop(lr=1e-4)
model.compile(loss="binary_crossentropy",optimizer=optimizer,metrics=["accuracy"])
#训练加评估模型
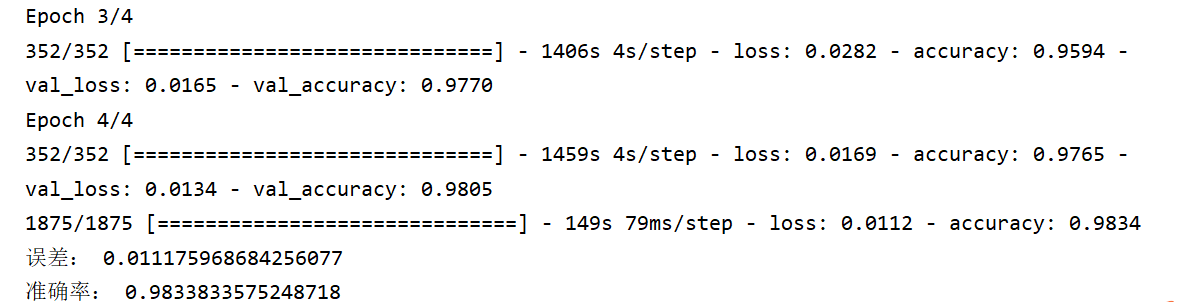
n_epoch=4
batch_size=128
def run_model(): #训练模型
training=model.fit(
X_train,
Y_train,
batch_size=batch_size,
epochs=n_epoch,
validation_split=0.25,
verbose=1
)
test=model.evaluate(X_train,Y_train,verbose=1)
return training,test
training,test=run_model()
print("误差:",test[0])
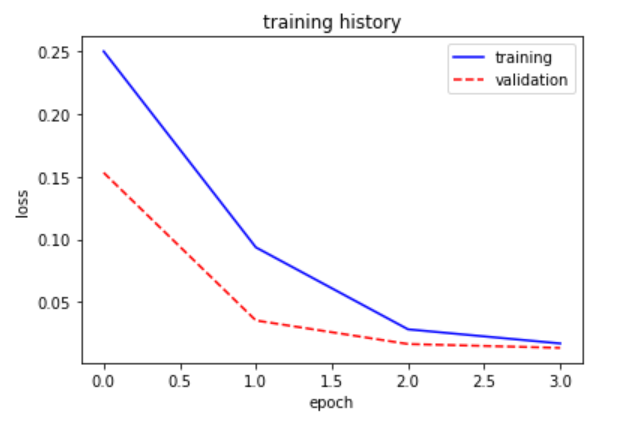
print("准确率:",test[1]) def show_train(training_history,train, validation):
plt.plot(training.history[train],linestyle="-",color="b")
plt.plot(training.history[validation] ,linestyle="--",color="r")
plt.title("training history")
plt.xlabel("epoch")
plt.ylabel("accuracy")
plt.legend(["training","validation"],loc="lower right")
plt.show()
show_train(training,"accuracy","val_accuracy") def show_train1(training_history,train, validation):
plt.plot(training.history[train],linestyle="-",color="b")
plt.plot(training.history[validation] ,linestyle="--",color="r")
plt.title("training history")
plt.xlabel("epoch")
plt.ylabel("loss")
plt.legend(["training","validation"],loc="upper right")
plt.show()
show_train1(training,"loss","val_loss") prediction=model.predict(X_test)
def image_show(image):
fig=plt.gcf() #获取当前图像
fig.set_size_inches(2,2) #改变图像大小
plt.imshow(image,cmap="binary") #显示图像
plt.show()
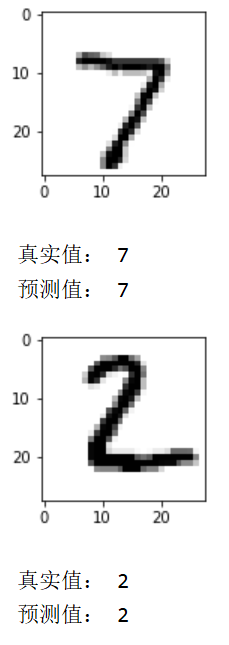
def result(i):
image_show(X_test1[i])
print("真实值:",Y_test1[i])
print("预测值:",np.argmax(prediction[i]))
result(0)
result(1)


torch& tensorflow的更多相关文章
- Tutorial: Implementation of Siamese Network on Caffe, Torch, Tensorflow
Tutorial: Implementation of Siamese Network with Caffe, Theano, PyTorch, Tensorflow Updated on 2018 ...
- torch 入门
torch 入门1.安装环境我的环境mac book pro 集成显卡 Intel Iris不能用 cunn 模块,因为显卡不支持 CUDA2.安装步骤: 官方文档 (1).git clone htt ...
- 学习Data Science/Deep Learning的一些材料
原文发布于我的微信公众号: GeekArtT. 从CFA到如今的Data Science/Deep Learning的学习已经有一年的时间了.期间经历了自我的兴趣.擅长事务的探索和试验,有放弃了的项目 ...
- pytorch使用不完全文档
1. 利用tensorboard看loss: tensorflow和pytorch环境是好的的话,链接中的logger.py拉到自己的工程里,train.py里添加相应代码,直接能用. 关于环境,小小 ...
- CS231n 2016 通关 第一章-内容介绍
第一节视频的主要内容: Fei-Fei Li 女神对Computer Vision的整体介绍.包括了发展历史中的重要事件,其中最为重要的是1959年测试猫视觉神经的实验. In 1959 Harvar ...
- 深度学习框架caffe/CNTK/Tensorflow/Theano/Torch的对比
在单GPU下,所有这些工具集都调用cuDNN,因此只要外层的计算或者内存分配差异不大其性能表现都差不多. Caffe: 1)主流工业级深度学习工具,具有出色的卷积神经网络实现.在计算机视觉领域Caff ...
- Torch,Tensorflow使用: Ubuntu14.04(x64)+ CUDA8.0 安装 Torch和Tensorflow
系统配置: Ubuntu14.04(x64) CUDA8.0 cudnn-8.0-linux-x64-v5.1.tgz(Tensorflow依赖) Anaconda 1. Torch安装 Torch是 ...
- 一图看懂深度学习框架对比----Caffe Torch Theano TensorFlow
Caffe Torch Theano TensorFlow Language C++, Python Lua Python Python Pretrained Yes ++ Yes ++ Yes ...
- tensorflow,torch tips
apply weightDecay,L2 REGULARIZATION_LOSSES weights = tf.get_collection(tf.GraphKeys.TRAINABLE_VARIAB ...
- 关于类型为numpy,TensorFlow.tensor,torch.tensor的shape变化以及相互转化
https://blog.csdn.net/zz2230633069/article/details/82669546 2018年09月12日 22:56:50 一只tobey 阅读数:727 1 ...
随机推荐
- 血药谷浓度能否区分经TNF拮抗剂诱导获得缓解和低活动度的RA患者
血药谷浓度能否区分经TNF拮抗剂诱导获得缓解和低活动度的RA患者? Sanmarti R, et al. EULAR 2015. Present ID: FRI0133. 原文 译文 FRI0133 ...
- Docker安装配置Oracle详细教程(以作持久化处理)
Docker安装Oracle 1,拉取Oracle镜像,拉取成功后查看 docker pull registry.cn-hangzhou.aliyuncs.com/helowin/oracle_11 ...
- obj对象数据归类整理
两个字段根据id对应整理 <!doctype html> <html lang="en"> <head> <meta charse ...
- 从安装开发环境到第一个“hello world”
安装Java8 为什么要安装java8? java8和小破站的教程同步. 安装方法: 1.官网安装(我踩雷了,下载得慢,不过最后安装成功了!) 2.镜像网站:清华镜像 3.公众号(网上的全是套路了) ...
- PHP实现QQ第三方登录代码
前言: PHP实现QQ快速登录,罗列了三种方法 方法一:面向过程,回调地址和首次触发登录写到了一个方法页面[因为有了if做判断], 方法二,三:面向对象 1.先调用登录方法,向腾讯发送请求,2.腾讯携 ...
- Vue-cli创建的项目结构分析,各初始化文件解释说明
结构图: 一.项目结构说明 1..gitignore :git的忽略文件(哪些文件或文件夹不想接受git管理的,可在此文件配置) 2.babel.config.js:babel控制文件,ES6=&g ...
- MySQL-存储引擎-索引
事务 方式1:set @@autocommit = 0 -- 将事务提交方式设置为手动 方式2:start transaction -- 开启事务 事务四大特性ACID: A:原子性(Atomicit ...
- 前端框架大比拼:2022年的Vue与React谁更胜一筹?
携手创作,共同成长!这是我参与「掘金日新计划 · 8 月更文挑战」的第 18 天,点击查看活动详情 前端框架经历了十多年的争奇斗艳百花齐放,经历了 JSP.jQuery.Ember.Angular.R ...
- 如何在mac上配置Apache服务器
如何在mac上配置Apache服务器 1. 打开终端,开启Apache: //开启apache: sudo apachectl start //重启apache: sudo apachectl ...
- Dilworth
Dilworth 定理 偏序集能划分成的最少的全序集个数等于最大反链的大小. 名词解释 偏序 在集合 \(S\) 中定义的二元关系 \(\le\),如果它满足以下三个性质: 自反性:\(\forall ...