C-01\编译器和链接器以及真正的入口函数
编译器:
| 工具 | 编译器 | 路径 |
|---|---|---|
VC++6.0 |
CL.EXE(一段shell)只负责分析命令行参数,真正功能实现在C1.DLL、C1XX.DLL、C2.DLL |
C:\Program Files (x86)\Microsoft Visual Studio\VC98\Bin |
VS2019 |
CL.EXE(一段shell),真正功能实现在C1.DLL、C1XX.DLL、C2.DLL |
C:\Program Files (x86)\Microsoft Visual Studio\2019\Community\VC\Tools\MSVC\14.28.29910\bin\Hostx64\x64 |
链接器:
| 工具 | 链接器 | 路径 |
|---|---|---|
VC++6.0 |
LINK.EXE |
C:\Program Files (x86)\Microsoft Visual Studio\VC98\Bin |
VS2019 |
LINK.EXE |
C:\Program Files (x86)\Microsoft Visual Studio\2019\Community\VC\Tools\MSVC\14.28.29910\bin\Hostx64\x64 |
VC++6.0 : 6.0说的是链接器的版本,不是编译器的版本
注意:vs2019正版会在线更新编译器
在所在目录右键快速打开cmd设置方法(WIN 10):
 1.右键:命令行

[HKEY_CLASSES_ROOT\Directory\Background\shell\OpenCmdHere]

@="在此处打开命令行窗口"

[HKEY_CLASSES_ROOT\Directory\Background\shell\OpenCmdHere\command]

@="cmd.exe -noexit -command Set-Location -literalPath \"%V\""

2.右键:命令行(管理员)

[HKEY_CLASSES_ROOT\Directory\Background\shell\runas]

@="在此处打开命令行窗口(管理员)"

"ShowBasedOnVelocityId"=dword:00639bc8

[HKEY_CLASSES_ROOT\Directory\Background\shell\runas\command]

@="cmd.exe /s /k pushd \"%V\""
编译器常用参数:
/c 只编译不链接 生成 .obj文件(.obj标准为coff标准,可以跨语言平台,其余语言也可以使用)
/W 警告等级,分1~4级,4级最高,默认为1级(/W1~/W4),/W3 不会报变量闲置警告,/W4会报变量闲置警告
/WX 将警告视为错误,一旦有了警告,动作停止,不产生.obj文件,迫使操作员对警告进行处理
/P 生成预处理信息文件 .i(带#的语句都是预处理语句) 可以查看复杂宏的正确性
编译和链接的指令:
编译指令:
cl /c filePath //filePath为要编译的文件路径
链接指令:
link filePath //filePath为要链接的文件路径
#include <> 与#include ""区别:
#include <>   	// 先根据每个 /I 编译器选项指定的路径查找,然后再根据环境变量 include 命令设置的路径去找

			// 然后copy整个文件替换该语句

#include "" 	// 如果文件名给定的是全路径,则只搜索该路径

			// 如果是相对路径,则先在源文件所在的目录查找,然后根据每个 /I 编译器选项指定的路径查找,最后再根据环境变量 include 命令设置的路径去找

			// 然后copy整个文件替换该语句

include 不检查扩展名
入口函数所在文件路径:
C:\Program Files (x86)\Microsoft Visual Studio\VC98\CRT\SRC\CRT0.C //VC++6.0
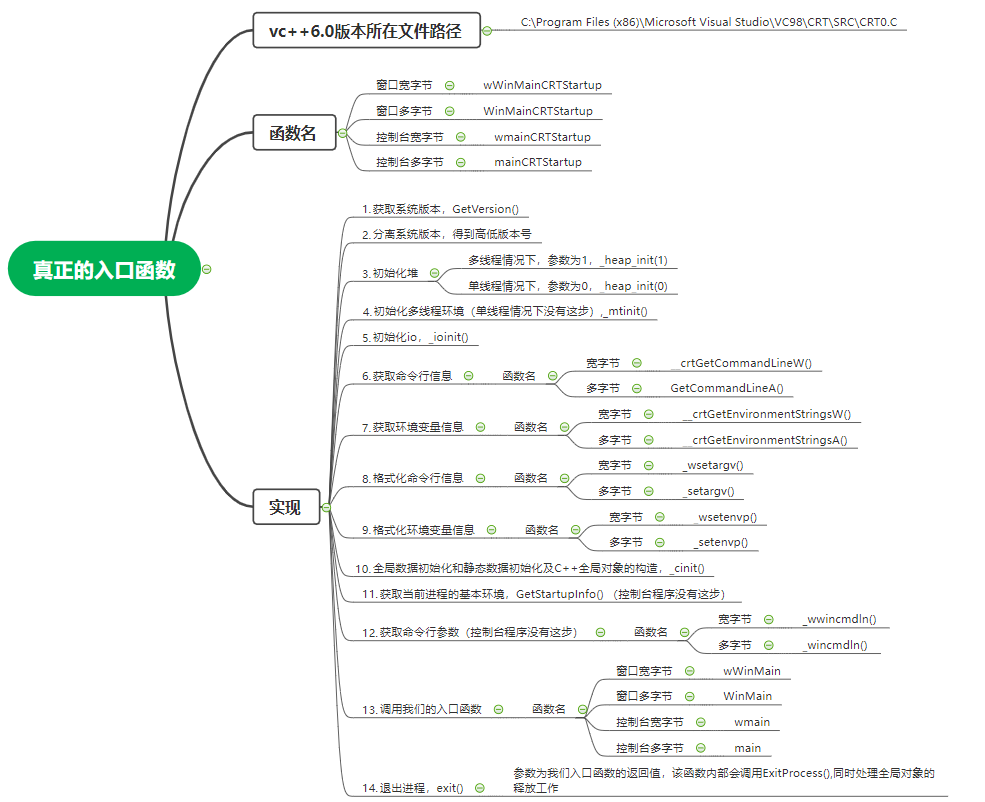
/***

*BaseProcessStartup(PVOID Peb)

*

*Purpose:

*       This routine does the C runtime initialization, calls main(), and

*       then exits.  It never returns.

*

*Entry:

*       PVOID Peb - pointer to Win32 Process Environment Block (not used)

*		//

*Exit:

*       This function never returns. // 该函数没有返回值

*

*******************************************************************************/

// 通过宏 _WINMAIN_ 区分窗口和控制台 存在宏 _WINMAIN_ 就是窗口程序

// 通过宏 WPRFLAG 区分宽字节和多字节 存在宏 WPRFLAG 就是宽字节

// 通过宏 _MT 区分多线程还是单线程

// 窗口宽字节

void wWinMainCRTStartup(void)

{

    int mainret;   			        // 主函数返回值

    _TUCHAR *lpszCommandLine;

    STARTUPINFO StartupInfo;

    /*

     * Get the full Win32 version

     */

    _osver = GetVersion();			// 获取系统版本

    // 分离系统版本号

    _winminor = (_osver >> 8) & 0x00FF ;

    _winmajor = _osver & 0x00FF ;

    _winver = (_winmajor << 8) + _winminor;

    _osver = (_osver >> 16) & 0x00FFFF ;

#ifdef _MT

    if ( !_heap_init(1) )               /* initialize heap */	// 多线程情况下初始化堆

#else  /* _MT */

    if ( !_heap_init(0) )               /* initialize heap */	// 单线程情况下初始化堆

#endif  /* _MT */

        fast_error_exit(_RT_HEAPINIT);  /* write message and die */

#ifdef _MT

    if( !_mtinit() )                    /* initialize multi-thread */  // 多线程情况下初始化多线程环境

        fast_error_exit(_RT_THREAD);    /* write message and die */

#endif  /* _MT */

    /*

     * Guard the remainder of the initialization code and the call

     * to user's main, or WinMain, function in a __try/__except

     * statement.

     */

    __try {

        _ioinit();                      /* initialize lowio */	// 初始化io

        /* get wide cmd line info */

        _wcmdln = (wchar_t *)__crtGetCommandLineW();	// 获取命令行信息

        /* get wide environ info */

        _wenvptr = (wchar_t *)__crtGetEnvironmentStringsW();	// 获取环境变量信息

        _wsetargv();	// 格式化命令行信息

        _wsetenvp();	// 格式化环境变量信息

        // 全局数据初始化和静态数据初始化以及C++全局对象的构造函数的调用

        _cinit();                       /* do C data initialize */

        StartupInfo.dwFlags = 0;

        GetStartupInfo( &StartupInfo );		// 获取当前进程的基本环境

        lpszCommandLine = _wwincmdln();		// 获取命令行参数

        mainret = wWinMain(

            GetModuleHandleA(NULL),

            NULL,

            lpszCommandLine,

            StartupInfo.dwFlags & STARTF_USESHOWWINDOW

            ? StartupInfo.wShowWindow

            : SW_SHOWDEFAULT

        );

        exit(mainret);	// 退出进程,里面调用 ExitProcess(mainret),同时处理全局对象的释放工作

    }

    __except ( _XcptFilter(GetExceptionCode(), GetExceptionInformation()) )

    {

        /*

         * Should never reach here

         */

        _exit( GetExceptionCode() );

    } /* end of try - except */

}

// 窗口多字节

void WinMainCRTStartup(void)

{

    int mainret;

    _TUCHAR *lpszCommandLine;

    STARTUPINFO StartupInfo;

    /*

     * Get the full Win32 version

     */

    _osver = GetVersion();

    _winminor = (_osver >> 8) & 0x00FF ;

    _winmajor = _osver & 0x00FF ;

    _winver = (_winmajor << 8) + _winminor;

    _osver = (_osver >> 16) & 0x00FFFF ;

#ifdef _MT

    if ( !_heap_init(1) )               /* initialize heap */

#else  /* _MT */

    if ( !_heap_init(0) )               /* initialize heap */

#endif  /* _MT */

        fast_error_exit(_RT_HEAPINIT);  /* write message and die */

#ifdef _MT

    if( !_mtinit() )                    /* initialize multi-thread */

        fast_error_exit(_RT_THREAD);    /* write message and die */

#endif  /* _MT */

    /*

     * Guard the remainder of the initialization code and the call

     * to user's main, or WinMain, function in a __try/__except

     * statement.

     */

    __try {

        _ioinit();                      /* initialize lowio */

        /* get cmd line info */

        _acmdln = (char *)GetCommandLineA();

        /* get environ info */

        _aenvptr = (char *)__crtGetEnvironmentStringsA();

        _setargv();

        _setenvp();

        _cinit();                       /* do C data initialize */

        StartupInfo.dwFlags = 0;

        GetStartupInfo( &StartupInfo );

        lpszCommandLine = _wincmdln();

        mainret = WinMain(

            GetModuleHandleA(NULL),

            NULL,

            lpszCommandLine,

            StartupInfo.dwFlags & STARTF_USESHOWWINDOW

            ? StartupInfo.wShowWindow

            : SW_SHOWDEFAULT

        );

        exit(mainret);

    }

    __except ( _XcptFilter(GetExceptionCode(), GetExceptionInformation()) )

    {

        /*

         * Should never reach here

         */

        _exit( GetExceptionCode() );

    } /* end of try - except */

}

// 控制台宽字节

void wmainCRTStartup(void)

{

    int mainret;

    /*

     * Get the full Win32 version

     */

    _osver = GetVersion();

    _winminor = (_osver >> 8) & 0x00FF ;

    _winmajor = _osver & 0x00FF ;

    _winver = (_winmajor << 8) + _winminor;

    _osver = (_osver >> 16) & 0x00FFFF ;

#ifdef _MT

    if ( !_heap_init(1) )               /* initialize heap */

#else  /* _MT */

    if ( !_heap_init(0) )               /* initialize heap */

#endif  /* _MT */

        fast_error_exit(_RT_HEAPINIT);  /* write message and die */

#ifdef _MT

    if( !_mtinit() )                    /* initialize multi-thread */

        fast_error_exit(_RT_THREAD);    /* write message and die */

#endif  /* _MT */

    /*

     * Guard the remainder of the initialization code and the call

     * to user's main, or WinMain, function in a __try/__except

     * statement.

     */

    __try {

        _ioinit();                      /* initialize lowio */

        /* get wide cmd line info */

        _wcmdln = (wchar_t *)__crtGetCommandLineW();

        /* get wide environ info */

        _wenvptr = (wchar_t *)__crtGetEnvironmentStringsW();

        _wsetargv();

        _wsetenvp();

        _cinit();                       /* do C data initialize */

        __winitenv = _wenviron;

        mainret = wmain(__argc, __wargv, _wenviron);

        exit(mainret);

    }

    __except ( _XcptFilter(GetExceptionCode(), GetExceptionInformation()) )

    {

        /*

         * Should never reach here

         */

        _exit( GetExceptionCode() );

    } /* end of try - except */

}

// 控制台多字节

void mainCRTStartup(void);

{

    int mainret;

    /*

         * Get the full Win32 version

         */

    _osver = GetVersion();

    _winminor = (_osver >> 8) & 0x00FF ;

    _winmajor = _osver & 0x00FF ;

    _winver = (_winmajor << 8) + _winminor;

    _osver = (_osver >> 16) & 0x00FFFF ;

#ifdef _MT

    if ( !_heap_init(1) )               /* initialize heap */

#else  /* _MT */

    if ( !_heap_init(0) )               /* initialize heap */

#endif  /* _MT */

        fast_error_exit(_RT_HEAPINIT);  /* write message and die */

#ifdef _MT

    if( !_mtinit() )                    /* initialize multi-thread */

        fast_error_exit(_RT_THREAD);    /* write message and die */

#endif  /* _MT */

    /*

     * Guard the remainder of the initialization code and the call

     * to user's main, or WinMain, function in a __try/__except

     * statement.

     */

    __try {

        _ioinit();                      /* initialize lowio */

        /* get cmd line info */

        _acmdln = (char *)GetCommandLineA();

        /* get environ info */

        _aenvptr = (char *)__crtGetEnvironmentStringsA();

        _setargv();

        _setenvp();

        _cinit();                       /* do C data initialize */

        __initenv = _environ;

        mainret = main(__argc, __argv, _environ);

        exit(mainret);

    }

    __except ( _XcptFilter(GetExceptionCode(), GetExceptionInformation()) )

    {

        /*

         * Should never reach here

         */

        _exit( GetExceptionCode() );

    } /* end of try - except */

}
补充知识
vs中8字节的是__int64,long int还是4字节,可能为了用户黏性,故意为之,与c标准不一致- 常量后面加
L,表示长整型常量,占8字节 - 3.14是双精度浮点数,加
f才是单精度浮点数 stdin, stdout支持重定向stderr不支持重定向
C-01\编译器和链接器以及真正的入口函数的更多相关文章
- 你好,C++(4)2.1.3 我的父亲母亲:编译器和链接器 2.1.4 C++程序执行背后的故事
2.1.3 我的父亲母亲:编译器和链接器 从表面上看,我是由Visual Studio创建的,而实际上,真正负责编译源代码创建生成可执行程序HelloWorld.exe的却是Visual Studi ...
- C编译器、链接器、加载器详解
摘自http://blog.csdn.net/zzxian/article/details/16820035 C编译器.链接器.加载器详解 一.概述 C语言的编译链接过程要把我们编写的一个c程序(源代 ...
- C++之编译器与链接器工作原理
原文来自:http://blog.sina.com.cn/s/blog_5f8817250100i3oz.html 这里并没不是讨论大学课程中所学的<编译原理>,只是写一些我自己对C++编 ...
- C++编译器与链接器工作原理
http://blog.csdn.net/success041000/article/details/6714195 1. 几个概念 1)编译:把源文件中的源代码翻译成机器语言,保存到目标文件中.如果 ...
- 浅谈C++编译原理 ------ C++编译器与链接器工作原理
原文:https://blog.csdn.net/zyh821351004/article/details/46425823 第一篇: 首先是预编译,这一步可以粗略的认为只做了一件事情,那就 ...
- C++编译器、链接器工作原理
1 几个基本概念 编译:编译器对源文件的编译过程,就是将源文件中的文本形式代码翻译为机器语言形式的目标文件的过程,此过程中会有一系列语法检查.指令优化等,生成目标(OBJ)文件. 编译单元:每一个CP ...
- C入门语言基础一[可移植性、涉及的三种文件、编程7个步骤、编译器、链接器]
Review Questions What dose portability mean in the context of programming? 文中讲到的可移植性是什么意思? C本身是不涉及 ...
- Visual Stdio C++ 编译器、链接器常用命令
概览: cmd常用命令配合使用: del 删除指定文件 同erase cls 清屏 rd 删除空目录文件夹 dir 显示目录 cd 在当前盘符跳转指定目录(不同盘符跳转用盘符号)(分别表示根目录 上一 ...
- 深入探究VC —— 链接器link.exe(4)
在程序编译完成后,生成的文件是以.obj为扩展名的对象文件,link.exe是将这些对象文件与库链接起来以创建可执行文件或动态链接库文件的工具. link.exe的输入文件包括obj文件.lib文件. ...
- Qt Windows下链接子系统与入口函数(终结版)(可同时存在main和WinMain函数)
Qt Windows下链接子系统与入口函数(终结版) 转载自:http://blog.csdn.net/dbzhang800/article/details/6358996 能力所限,本讨论仅局限于M ...
随机推荐
- 3.JS
1.简介 JavaScript 因为互联网而生,紧随着浏览器的出现而问世 1997年7月,ECMAScript 1.0发布. 1998年6月,ECMAScript 2.0版发布. 1999年12月,E ...
- 自学 TypeScript 第一天 环境开发配置 及 TS 基本类型声明
前言: 自学第一天,什么是TS ,为什么要用 TS TS 全程 Typed JavaScript at Any Scale 解释起来就是 添加了类型系统的 JavaScript, 是 JavaScr ...
- 【Android逆向】rpc调用某安App的X-App-Token签名函数
阅读此文档的过程中遇到任何问题,请关注公众号[移动端Android和iOS开发技术分享]或加QQ群[309580013] 1.目标 在学习的过程中,会遇到有些算法比较麻烦,没有办法直接还原.那我们就另 ...
- 【云原生 · Kubernetes】kubernetes v1.23.3 二进制部署(三)
5 部署 etcd 集群 etcd 是基于 Raft 的分布式 KV 存储系统,由 CoreOS 开发,常用于服务发现.共享配置以及并发控制(如 leader 选举.分布式锁等). kubernete ...
- Selenium4+Python3系列(九) - 上传文件及滚动条操作
一.上传文件操作 上传文件是每个做自动化测试同学都会遇到,而且可以说是面试必考的问题,标准控件我们一般用send_keys()就能完成上传, 但是我们的测试网站的上传控件一般为自己封装的,用传统的上传 ...
- 关于deepin-wine或wine设置PATH环境变量的方法
前言 更改wine中PATH变量主要是为了能在 cmd输入一些命令而已,这里你可能会问怎么用cmd? deepin-wine cmd 这样就进入了cmd,而设置PATH 环境变量不能像windows一 ...
- WEB入门——爆破21-28
WEB21 首先尝试网站后台常见登陆的弱口令,发现错误 则使用burp suite抓包试试看 通过分析,在未填入账号密码时,响应头如下所示: 填入弱口令账号密码,发现响应头如下: 则对应可知账号密 ...
- 批量删除多个相同格式内容的Excel表格的列
Sub Del_Col()Application.DisplayAlerts = FalseDim myFiles As StringDim myExcels As StringWith Applic ...
- hexo-通过-metaweblog-api-同步各大博客网站
闲聊 不多逼逼了.上干货 如何写一篇文章同步到多个博客网站 最近通过hexo 建立了博客网站,发现流量少的可怜,那把文章发到各个博客网站呢,我又懒那通过一番研究 终于搞定了通过MetaWebLog A ...
- 【Java SE进阶】Day10 缓冲流、转换流、序列化流 、打印流
一.缓冲流 1.概述 比普通流更强大的IO流,可以增加读写的效率 组成 缓冲输入流:BufferedInputStream.BufferedReader 缓冲输出流:BufferedOutputStr ...