ABP应用开发(Step by Step)-下篇
测试 ProductAppService 类
ProductAppService类的GetListAsync方法写单元测试代码(构建自动化测试细节后续再议)。ProductAppService_Tests类:using Shouldly;
using System.Threading.Tasks;
using Volo.Abp.Application.Dtos;
using Xunit;
namespace ProductManagement.Products
{
public class ProductAppService_Tests : ProductManagementApplicationTestBase
{
private readonly IProductAppService _productAppService;
public ProductAppService_Tests()
{
_productAppService =
GetRequiredService<IProductAppService>();
}
/* TODO: Test methods */
}
}
该类继承自ProductManagementApplicationTestBase,它默认集成 ABP 框架和其他基础设施库,这样我们就可以直接使用内置的测试能力。另外,我们使用方法GetRequiredService来解决测试代码中的依赖关系,而不是构造函数注入(这在测试中是不可能的)。
ProductAppService_Tests类中添加如下代码:[Fact]
public async Task Should_Get_Product_List()
{
//Act
var output = await _productAppService.GetListAsync(
new PagedAndSortedResultRequestDto()
);
//Assert
output.TotalCount.ShouldBe(3);
output.Items.ShouldContain(
x => x.Name.Contains("Acme Monochrome Laser Printer")
);
}
该方法调用该GetListAsync方法并检查结果是否正确。如果您打开测试资源管理器窗口(在 Visual Studio 中的查看|测试资源管理器菜单下),您可以看到我们添加的测试方法。测试资源管理器用于显示和运行解决方案中的测试:
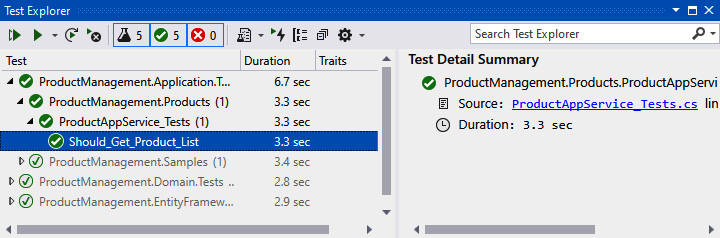
运行测试到检查它是否按预期工作。如果方法正常工作,将在测试方法名称的左侧看到一个绿色图标。
自动 API 控制器和 Swagger UI
/swagger URL,如图所示:

我们没有创建ProductController接口。这个接口是如何出现的?
动态 JavaScript 代理

getList的,您可以定位到/Abp/ServiceProxyScript地址,查看由 ABP 框架动态创建的 JavaScript 代理函数。产品列表
Index.cshtml。下图显示了我们添加的页面的位置:
编辑内容,Index.cshtml如下代码块所示:
@page

@using ProductManagement.Web.Pages.Products

@model IndexModel

<h1>Products Page</h1>
在这里,我放置一个h1元素作为页眉。接下来我们在主菜单中添加一个菜单来打开这个页面。
添加菜单项
ProductManagementMenuContributor类,并在ConfigureMainMenuAsync方法末尾添加以下代码:context.Menu.AddItem(
new ApplicationMenuItem(
"ProductManagement",
l["Menu:ProductManagement"],
icon: "fas fa-shopping-cart"
).AddItem(
new ApplicationMenuItem(
"ProductManagement.Products",
l["Menu:Products"],
url: "/Products"
)
)
);
此代码添加了一个产品管理主菜单,其中包含产品菜单项。里面的l["…"]语法是用来获取本地化的值。
en.json文件,并将以下代码添加到该texts部分的末尾:Menu:作为菜单的本地化键的前缀,例如Menu:Products 。我们将在[第 8 章] 使用 ABP 的功能和服务中探讨本地化主题。
创建产品数据表
Index.cshtml页面(在Pages/Products文件夹),并将其内容更改为以下内容:@page
@using ProductManagement.Web.Pages.Products
@using Microsoft.Extensions.Localization
@using ProductManagement.Localization
@model IndexModel
@inject IStringLocalizer<ProductManagementResource> L
@section scripts
{
<abp-script src="/Pages/Products/Index.cshtml.js" />
}
<abp-card>
<abp-card-header>
<h2>@L["Menu:Products"]</h2>
</abp-card-header>
<abp-card-body>
<abp-table id="ProductsTable" striped-rows="true" />
</abp-card-body>
</abp-card>
abp-script是一个 ABP 标签助手,用于将脚本文件添加到页面,并具有自动捆绑、压缩和版本控制功能。abp-card是另一个标签助手,以一种类型安全且简单的方式渲染 Card 组件。
我们可以使用标准的 HTML 标签。但是,ABP 标签助手极大地简化了 MVC/Razor 页面中的 UI 创建。此外,它们支持智能感知和编译时错误类型检查。我们将在[第 12 章] 使用 MVC/Razor 页面中研究标签助手。
Index.cshtml.js,内容如下:$(function () {
var l = abp.localization.getResource('ProductManagement');
var dataTable = $('#ProductsTable').DataTable(
abp.libs.datatables.normalizeConfiguration({
serverSide: true,
paging: true,
order: [[0, "asc"]],
searching: false,
scrollX: true,
ajax: abp.libs.datatables.createAjax(
productManagement.products.product.getList),
columnDefs: [
/* TODO: Column definitions */
]
})
);
});
ABP 简化了数据表配置并提供了内置集成:
abp.localization.getResource返回一个本地化对象,ABP 允许您在 JS中重用服务器端定义的本地化。abp.libs.datatables.normalizeConfiguration是 ABP 框架定义的辅助函数。它通过为缺失选项提供常规默认值来简化数据表的配置。abp.libs.datatables.createAjax使 ABP 的动态 JS 客户端代理来适配数据表的参数格式。productManagement.products.product.getList是动态JS代理方法。
columnDefs数组用于定义数据表中的列:{
title: l('Name'),
data: "name"
},
{
title: l('CategoryName'),
data: "categoryName",
orderable: false
},
{
title: l('Price'),
data: "price"
},
{
title: l('StockState'),
data: "stockState",
render: function (data) {
return l('Enum:StockState:' + data);
}
},
{
title: l('CreationTime'),
data: "creationTime",
dataFormat: 'date'
}
通常,列有一个title字段和一个data字段。data字段匹配ProductDto类中的属性名称,格式为驼峰式(一种命名风格,其中每个单词的第一个字母大写,第一个单词除外;它是JavaScript 语言中常用的命名风格)。
render选项用于精细控制如何显示列数据。en.json文件,并在该部分的末尾添加以下条目texts:"Name": "Name",
"CategoryName": "Category name",
"Price": "Price",
"StockState": "Stock state",
"Enum:StockState:0": "Pre-order",
"Enum:StockState:1": "In stock",
"Enum:StockState:2": "Not available",
"Enum:StockState:3": "Stopped",
"CreationTime": "Creation time"
看一下实际的产品数据表:

创建产品
定义新的应用服务方法来获取类别和创建产品。
- 定义应用服务的获取类别和创建产品方法。
- 在 UI 部分,使用 ABP 的动态表单功能,基于 C# 类自动生成产品创建表单。
定义应用接口
IProductAppService接口添加两个新方法开始:GetCategoriesAsync方法获取产品类别的下拉数据。我们定义了两个新的 DTO。CreateUpdateProductDto用于创建和更新产品(我们将在编辑产品时候重复使用它)。我们在ProductManagement.Application.Contracts项目的Products文件夹中定义它:using System;
using System.ComponentModel.DataAnnotations;
namespace ProductManagement.Products
{
public class CreateUpdateProductDto
{
public Guid CategoryId { get; set; }
[Required]
[StringLength(ProductConsts.MaxNameLength)]
public string Name { get; set; }
public float Price { get; set; }
public bool IsFreeCargo { get; set; }
public DateTime ReleaseDate { get; set; }
public ProductStockState StockState { get; set; }
}
}
接下来,在ProductManagement.Application.Contracts项目的Categories文件夹中定义一个CategoryLookupDto类:
using System;

namespace ProductManagement.Categories

{

    public class CategoryLookupDto

    {

        public Guid Id { get; set; }

        public string Name { get; set; }

    }

}
定了接口相关类,现在我们可以在应用层实现接口了。
实现应用服务
ProductAppService中实现CreateAsync和GetCategoriesAsync方法(ProductManagement.Application项目中),如下代码块:public async Task CreateAsync(CreateUpdateProductDto input)
{
await _productRepository.InsertAsync(
ObjectMapper.Map<CreateUpdateProductDto, Product>(input)
);
}
public async Task<ListResultDto<CategoryLookupDto>> GetCategoriesAsync()
{
var categories = await _categoryRepository.GetListAsync();
return new ListResultDto<CategoryLookupDto>(
ObjectMapper.Map<List<Category>, List<CategoryLookupDto>>(categories)
);
}
这里,_categoryRepository属于IRepository<Category, Guid>服务类型,通过构造函数注入,方法实现很简单,无需解释。
ProductManagementApplicationAutoMapperProfile.cs文件(在ProductManagement.Application项目中),添加以下代码:CreateMap<CreateUpdateProductDto, Product>();
CreateMap<Category, CategoryLookupDto>();
用户界面
CreateProductModal.cshtmlRazor 页面。打开CreateProductModal.cshtml.cs文件,更改CreateProductModalModel代码:using System.Linq;
using System.Threading.Tasks;
using Microsoft.AspNetCore.Mvc;
using Microsoft.AspNetCore.Mvc.Rendering;
using ProductManagement.Products;
namespace ProductManagement.Web.Pages.Products
{
Public class CreateProductModalModel:ProductManagementPageModel
{
[BindProperty]
public CreateEditProductViewModel Product { get; set; }
public SelectListItem[] Categories { get; set; }
private readonly IProductAppService _productAppService; public CreateProductModalModel(IProductAppService productAppService)
{
_productAppService = productAppService;
}
public async Task OnGetAsync()
{
// TODO
}
public async Task<IActionResult> OnPostAsync()
{
// TODO
}
}
}
这里的ProductManagementPageModel是基类。你可以继承它来创建PageModel类。[BindProperty]是一个标准的 ASP.NET Core 属性,在HTTP Post 请求时,会将数据绑定到Product属性。Categories将用于显示下拉列表中的类别。我们通过注入IProductAppService接口以使用之前定义的方法。
CreateEditProductViewModel还没定义,我们将其定义在与CreateProductModal.cshtml相同的文件夹下:using ProductManagement.Products;
using System;
using System.ComponentModel;
using System.ComponentModel.DataAnnotations;
using Volo.Abp.AspNetCore.Mvc.UI.Bootstrap.TagHelpers.Form;
namespace ProductManagement.Web.Pages.Products
{
public class CreateEditProductViewModel
{
[SelectItems("Categories")]
[DisplayName("Category")]
public Guid CategoryId { get; set; }
[Required]
[StringLength(ProductConsts.MaxNameLength)]
public string Name { get; set; }
public float Price { get; set; }
public bool IsFreeCargo { get; set; }
[DataType(DataType.Date)]
public DateTime ReleaseDate { get; set; }
public ProductStockState StockState { get; set; }
}
}
SelectItems告诉我们CategoryId属性将从Categories列表中选择。我们将在编辑模式对话框中重用此类。这就是我为什么命名它为CreateEditProductViewModel。DTO 与 ViewModel
CreateEditProductViewModel似乎没有必要,因为它与 CreateUpdateProductDtoDTO非常相似。当然你也可以在视图里复用DTO。但是,考虑到这些类具有不同的用途,并且随着时间的推移会向不同的方向发展,所更推荐的办法是将每个关注点分开。例如,[SelectItems("Categories")]属性指向 Razor Page 模型,它在应用层没有任何意义。CreateProductModalModel类中实现OnGetAsync方法:public async Task OnGetAsync()
{
Product = new CreateEditProductViewModel
{
ReleaseDate = Clock.Now,
StockState = ProductStockState.PreOrder
}; var categoryLookup = await _productAppService.GetCategoriesAsync();
Categories = categoryLookup.Items.Select(x => new SelectListItem(x.Name, x.Id.ToString())).ToArray();
}
我们使用默认值创建Product类,然后使用产品应用服务填充Categories列表。Clock是 ABP 框架提供的服务,用于获取当前时间(在不处理时区和本地/UTC 时间的情况下),这里我们不再使用DateTime.Now。具体内容这将在[第 8 章] 使用 ABP 的功能和服务中进行解释。
OnPostAsync代码块:public async Task<IActionResult> OnPostAsync()
{
await _productAppService.CreateAsync(
ObjectMapper.Map<CreateEditProductViewModel,CreateUpdateProductDto> (Product)
);
return NoContent();
}
由于我们要映射CreateEditProductViewModel到CreateProductDto,所以需要定义映射配置。我们在ProductManagement.Web项目中打开ProductManagementWebAutoMapperProfile类,并更改以下代码块内容:
public class ProductManagementWebAutoMapperProfile : Profile

{

    public ProductManagementWebAutoMapperProfile()

    {

        CreateMap<CreateEditProductViewModel, CreateUpdateProductDto>();

    }

}
我们已经完成了产品创建 UI 的 C# 端,接下来可以开始构建 UI 和 JavaScript 代码。打开CreateProductModal.cshtml文件,并将内容更改如下:
@page

@using Microsoft.AspNetCore.Mvc.Localization

@using ProductManagement.Localization

@using Volo.Abp.AspNetCore.Mvc.UI.Bootstrap.TagHelpers.Modal

@model ProductManagement.Web.Pages.Products.CreateProductModalModel

@inject IHtmlLocalizer<ProductManagementResource> L

@{

    Layout = null;

}

<abp-dynamic-form abp-model="Product" asp-page="/Products/CreateProductModal">

    <abp-modal>

        <abp-modal-header title="@L["NewProduct"].Value"></abp-modal-header>

        <abp-modal-body>

            <abp-form-content />

        </abp-modal-body>

        <abp-modal-footer buttons="@(AbpModalButtons.Cancel|AbpModalButtons.Save)"></abp-modal-footer>

    </abp-modal>

</abp-dynamic-form>
在这里,abp-dynamic-form会根据 C# 模型类自动创建表单元素。abp-form-content是呈现表单元素的地方。abp-modal用于创建模态对话框。
Index.cshtml文件,然后将abp-card-header部分更改如下:<abp-card-header>
<abp-row>
<abp-column size-md="_6">
<abp-card-title>@L["Menu:Products"]</abp-card-title>
</abp-column>
<abp-column size-md="_6" class="text-end">
<abp-button id="NewProductButton"
text="@L["NewProduct"].Value"
icon="plus"
button-type="Primary"/>
</abp-column>
</abp-row>
</abp-card-header>
我添加了 2 列,其中每列都有一个size-md="_6"属性(即 12 列 Bootstrap 网格的一半)。左侧设置卡片标题,右侧放置了一个按钮。
Index.cshtml.js文件末尾(在})之前):var createModal = new abp.ModalManager(abp.appPath + 'Products/CreateProductModal');
createModal.onResult(function () {
dataTable.ajax.reload();
});
$('#NewProductButton').click(function (e) {
e.preventDefault();
createModal.open();
});
abp.ModalManager用于在客户端管理模式对话框。在内部,它使用 Twitter Bootstrap 的标准模态组件,封装了很多细节,并提供了一个简单的 API。当模型触发保存时会返回一个回调函数createModal.onResult()。createModal.open()用于打开模态对话框。
en.json文件中定义一些本地化文本(.Domain.Shared项目的Localization/ProductManagement 文件夹下):"NewProduct": "New Product",
"Category": "Category",
"IsFreeCargo": "Free Cargo",
"ReleaseDate": "Release Date"
再次运行 Web 尝试创建新产品
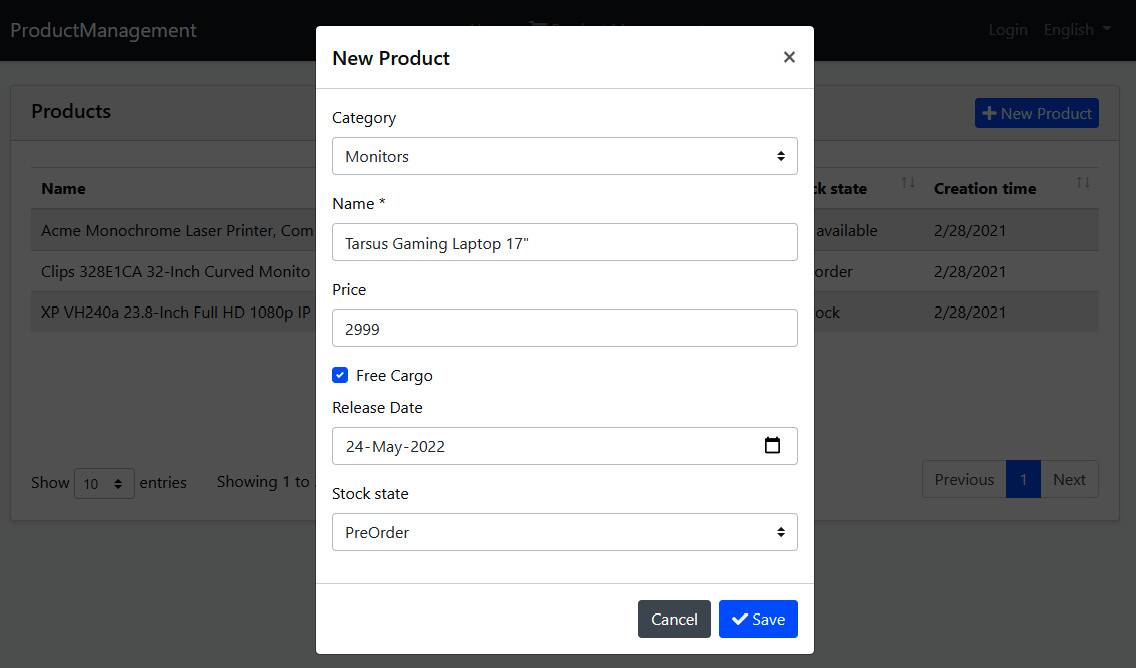
ABP基于 C# 类模型自动创建表单字段。本地化和验证也可以通过读取属性和使用约定来自动工作。我们将在[第 12 章] 使用 MVC/Razor 页面 中更详细地介绍验证和本地化主题。
编辑产品
定义应用接口
IProductAppService接口定义两个新方法:Task<ProductDto> GetAsync(Guid id);
Task UpdateAsync(Guid id, CreateUpdateProductDto input);
第一种方法用于通过ID获取产品。我们在UpdateAsync方法中重用之前定义的CreateUpdateProductDto。
实现应用接口
ProductAppService类中:public async Task<ProductDto> GetAsync(Guid id)
{
return ObjectMapper.Map<Product, ProductDto>(
await _productRepository.GetAsync(id)
);
}
public async Task UpdateAsync(Guid id, CreateUpdateProductDto input)
{
var product = await _productRepository.GetAsync(id);
ObjectMapper.Map(input, product);
}
GetAsync方法用于从数据库中获取产品,并将其映射到ProductDto对象后进行返回。UpdateAsync方法获取到一个产品后,将给定的DTO输入映射到产品。通过这种方式,我们用新值覆盖产品。
_productRepository.UpdateAsync,因为 EF Core有一个变更跟踪系统。ABP 的工作单元如果没有抛出异常,则在请求结束时会自动保存更改。我们将在[第 6 章] *使用数据访问基础架构”*中介绍工作单元系统。用户界面
EditProductModal.cshtmlRazor 页面(ProductManagement.Web项目的 Pages/Products文件夹下)。打开EditProductModal.cshtml.cs,代码更改如下:using System;
using System.Linq;
using System.Threading.Tasks;
using Microsoft.AspNetCore.Mvc;
using Microsoft.AspNetCore.Mvc.Rendering;
using ProductManagement.Products;
namespace ProductManagement.Web.Pages.Products
{
public class EditProductModalModel : ProductManagementPageModel
{
[HiddenInput]
[BindProperty(SupportsGet = true)]
public Guid Id { get; set; }
[BindProperty]
public CreateEditProductViewModel Product { get; set; }
public SelectListItem[] Categories { get; set; }
private readonly IProductAppService _productAppService; public EditProductModalModel(IProductAppService productAppService)
{
_productAppService = productAppService;
}
public async Task OnGetAsync()
{
// TODO
}
public async Task<IActionResult> OnPostAsync()
{
// TODO
}
}
}
表单中Id字段将被隐藏。
Product和Categories属性类似于创建产品。我们还将
IProductAppService接口注入到构造函数。OnGetAsync方法,如下代码块所示:public async Task OnGetAsync()
{
var productDto = await _productAppService.GetAsync(Id);
Product = ObjectMapper.Map<ProductDto, CreateEditProductViewModel>(productDto); var categoryLookup = await _productAppService.GetCategoriesAsync();
Categories = categoryLookup.Items
.Select(x => new SelectListItem(x.Name, x.Id.ToString()))
.ToArray();
}
首先,我们要先获取一个产品 ( ProductDto),再将其转换为CreateEditProductViewModel,使用它在 UI 上来创建编辑表单。然后,我们在表单上选择产品类别。
ProductDto到CreateEditProductViewModel,所以我们需要在ProductManagementWebAutoMapperProfile类中定义配置映射(ProductManagement.Web项目中),这和我们之前操作是一样的:CreateMap<ProductDto, CreateEditProductViewModel>();
我们再看下OnPostAsync()方法:
public async Task<IActionResult> OnPostAsync()

{

    await _productAppService.UpdateAsync(Id,

        ObjectMapper.Map<CreateEditProductViewModel, CreateUpdateProductDto>(Product)

    );

    return NoContent();

}
OnPostAsync方法很简单,把CreateEditProductViewModel转换为CreateUpdateProductDto。
EditProductModal.cshtml,内容更改如下:@page
@using Microsoft.AspNetCore.Mvc.Localization
@using ProductManagement.Localization
@using Volo.Abp.AspNetCore.Mvc.UI.Bootstrap.TagHelpers.Modal
@model ProductManagement.Web.Pages.Products.EditProductModalModel
@inject IHtmlLocalizer<ProductManagementResource> L
@{
Layout = null;
}
<abp-dynamic-form abp-model="Product" asp-page="/Products/EditProductModal">
<abp-modal>
<abp-modal-header title="@Model.Product.Name"></abp-modal-header>
<abp-modal-body>
<abp-input asp-for="Id" />
<abp-form-content/>
</abp-modal-body>
<abp-modal-footer buttons="@(AbpModalButtons.Cancel|AbpModalButtons.Save)"></abp-modal-footer>
</abp-modal>
</abp-dynamic-form>
页面与CreateProductModal.cshtml非常相似。我刚刚将Id字段作为隐藏字段添加到表单,用来存储Id编辑的产品的属性。
Index.cshtml.js文件,并在dataTable代码的头部添加一个ModalManager对象:var editModal = new abp.ModalManager(abp.appPath + 'Products/EditProductModal');
然后,在dataTable内部的columnDefs数组中定义一个列(第一项):
{

    title: l('Actions'),

    rowAction: {

        items:

            [

                {

                    text: l('Edit'),

                    action: function (data) {

                        editModal.open({ id: data.record.id });

                    }

                }

            ]

    }

},
此代码向数据表添加了一个新的Actions列,并添加了一个Edit操作按钮,单击即可打开编辑窗口。rowAction是 ABP Framework 提供的一个特殊选项。它用于在表中的一行添加一个或多个操作按钮。
dataTable初始化代码后添加如下:editModal.onResult(function () {
dataTable.ajax.reload();
});
在保存产品编辑对话框后刷新数据表,确保我们可以看到表上的最新数据。最终的 UI 类似于下图:

我们现在可以查看、创建和编辑产品了。最后一部分将实现删除产品。
删除产品
IProductAppService接口中添加一个新方法:Task DeleteAsync(Guid id);
然后,在ProductAppService类中实现它:
public async Task DeleteAsync(Guid id)

{

    await _productRepository.DeleteAsync(id);

}
现在向产品列表添加一个新删除按钮。打开Index.cshtml.js,并在Edit操作之后添加以下定义(在rowAction.items数组中):
{

    text: l('Delete'),

    confirmMessage: function (data) {

        return l('ProductDeletionConfirmationMessage',data.record.name);

    },

    action: function (data) {

        productManagement.products.product

            .delete(data.record.id)

            .then(function() {

                abp.notify.info(l('SuccessfullyDeleted'));

                dataTable.ajax.reload();

            });

    }

}
confirmMessage用于在删除之前获得用户确认。productManagement.products.product.delete函数由 ABP 框架动态创建。通过这种方式,可以直接在 JS 代码中调用服务器端方法。我们只需传递当前记录的 ID。then函数传递一个回调函数,用于删除之后的操作。最后,我们使用abp.notify.info通知用户,最后刷新数据表。
en.json文件中添加以下代码:
因为现在有两个操作按钮,所以编辑按钮会自动变成一个下拉选项。当您单击删除操作时,您会收到一条确认消息:

Product实体派生于FullAuditedAggregateRoot,所以它使用了软删除。删除产品后检查数据库,您会看到它并没有真正删除,但是IsDeleted字段已经设置为true(逻辑删除不是物理删除)。下次查询商品时,已删除的商品会自动过滤掉,不包含在查询结果中。这是由 ABP 框架的数据过滤系统完成的。概括
(构建自动化测试细节后续再议)
ABP应用开发(Step by Step)-下篇的更多相关文章
- Step by Step: 基于MFC下的COM组件开发-Helloworld
http://blog.csdn.net/sybifei/article/details/45008745 [这篇文章有问题, 仅供参考] http://blog.csdn.net/define_us ...
- Step by step Dynamics CRM 2011升级到Dynamics CRM 2013
原创地址:http://www.cnblogs.com/jfzhu/p/4018153.html 转载请注明出处 (一)检查Customizations 从2011升级到2013有一些legacy f ...
- Step by step Install a Local Report Server and Remote Report Server Database
原创地址:http://www.cnblogs.com/jfzhu/p/4012097.html 转载请注明出处 前面的文章<Step by step SQL Server 2012的安装 &g ...
- WPF Step By Step 系列-Prism框架在项目中使用
WPF Step By Step 系列-Prism框架在项目中使用 回顾 上一篇,我们介绍了关于控件模板的用法,本节我们将继续说明WPF更加实用的内容,在大型的项目中如何使用Prism框架,并给予Pr ...
- WPF Step By Step 完整布局介绍
WPF Step By Step 完整布局介绍 回顾 上一篇,我们介绍了基本控件及控件的重要属性和用法,我们本篇详细介绍WPF中的几种布局容器及每种布局容器的使用场景,当 然这些都是本人在实际项目中的 ...
- WPF Step By Step 控件介绍
WPF Step By Step 控件介绍 回顾 上一篇,我们主要讨论了WPF的几个重点的基本知识的介绍,本篇,我们将会简单的介绍几个基本控件的简单用法,本文会举几个项目中的具体的例子,结合这些 例子 ...
- WPF Step By Step 系列 - 开篇 ·
WPF Step By Step 系列 - 开篇 公司最近要去我去整理出一个完整的WPF培训的教程,我刚好将自己学习WPF的过程和经验总结整理成笔记的方式来讲述,这里就不按照书上面的东西来说了,书本上 ...
- WinForm RDLC SubReport Step by step
最近在做的一个PO管理系统,因为要用到订单打印,没有用水晶报表,直接使用VS2010的Reporting.参考了网上的一些文章,但因为找到的数据是用于WebForm的,适配到WinForm有点区别,竟 ...
- Struts2+Spring+Hibernate step by step 11 ssh拦截验证用户登录到集成
注意:该系列文章从教师王健写了一部分ssh集成开发指南 引言: 之前没有引入拦截器之前,我们使用Filter过滤器验证用户是否登录,在使用struts2之后,全然能够使用拦截器,验证用户是否已经登录, ...
- 持续交付工具ThoughtWorks Go部署step by step
持续交付工具ThoughtWorks Go部署step by step http://blogs.360.cn/360cloud/2014/05/13/%E6%8C%81%E7%BB%AD%E4%BA ...
随机推荐
- 【ASP.NET Core】MVC模型绑定:自定义InputFormatter读取CSV内容
在上一篇文章中,老周介绍了用自定义 ModelBinder 的方式实现一个 API(或MVC操作方法)可以同时支持 JSON 格式和 Form-data 格式的数据正文.今天该轮到 InputForm ...
- 判断一文件是不是字符设备文件,如果是将其拷贝到 /dev 目录下?
#!/bin/bashread -p "Input file name: " FILENAMEif [ -c "$FILENAME" ];then cp $FI ...
- spring-boot-关于module自定义jar包打包无法给其他module使用
####世界大坑: 如果仅是使用 <build> <plugins> <plugin> <groupId>org.springframework.boo ...
- spring-boot-learning-RabbitMQ
为什么需要MQ??? 异步处理: 场景: 用户注册后,需要发注册邮件和注册短信,传统的做法有两种 1.串行的方式 2.并行的方式` 用户注册-发送注册邮箱-发送注册短信都完成之后才结束返回给客户端 邮 ...
- volatile 类型变量提供什么保证?
volatile 变量提供顺序和可见性保证,例如,JVM 或者 JIT 为了获得更好的性能 会对语句重排序,但是 volatile 类型变量即使在没有同步块的情况下赋值也不会 与其他语句重排序. vo ...
- 学习Apache(四)
介绍 Apache HTTP 服务器被设计为一个功能强大,并且灵活的 web 服务器, 可以在很多平台与环境中工作.不同平台和不同的环境往往需要不同 的特性,或可能以不同的方式实现相同的特性最有效率. ...
- python udp socket通信
前段时间学习了一下c++的socket通信,但发现那玩意儿比较复杂还是转向python了,下面就是一个简单的udpsocket通信程序,欢迎大佬前来指正 udp聊天 import socket # 创 ...
- python模块 | 时间处理模块—datetime模块
在python中,与时间处理相关的模块有 time,datetime,calendar. 时间的两个概念: UTC(世界协调时): 整个地球分为二十四时区,每个时区都有自己的本地时间.格林威治天文时间 ...
- 数字电路基础知识——组合逻辑电路(数据选择器MUX、多路复用器)
转自:https://blog.csdn.net/vivid117/article/details/100747939 数字电路基础知识--组合逻辑电路(数据选择器MUX.也即多路复用器)本次介绍数据 ...
- Web最佳实践阅读总结(1)
介绍 最近开始刷一些书和题,此系列是介绍在读Web最佳实践的一些收获和体会. web前端发展现状 存在问题: 代码组织混乱 代码格式的问题突出 页面布局随意 网站整体性能差,没有意识到应用诸如缓存,动 ...