MyBatis插件 - 通用mapper
1、简单认识通用mapper
1.1、了解mapper
- 作用:就是为了帮助我们自动的生成sql语句 [ ps:MyBatis需要编写xxxMapper.xml,而逆向工程是根据entity实体类来进行生成的,有时由于业务需要,会让实体类与数据库字段名不对应,所以逆向工程生成的xxxMapper.xml配置就会有问题。其实:通用Mapper和JPA很像 ]
- 通用mapper是MyBatis的一个插件,是pageHelper的同一个作者进行开发的
- 作者gitee地址:https://gitee.com/free
- 通用mapper官网地址:https://gitee.com/free/Mapper
- 通用mapper文档介绍地址:https://gitee.com/free/Mapper/wikis/Home
1.2、学习通用mapper需要的知识
- Mybatis
- Spring
2、玩通用mapper
2.1、准备工作
建测试表
CREATE TABLE `user` (

  `user_id` int(11) NOT NULL AUTO_INCREMENT COMMENT '用户id',

  `user_name` varchar(20) DEFAULT NULL COMMENT '用户名',

  `user_sex` varchar(2) DEFAULT NULL COMMENT '用户性别',

  `user_salary` decimal(5,2) DEFAULT NULL COMMENT '用户薪资',

  PRIMARY KEY (`user_id`)

) ENGINE=InnoDB AUTO_INCREMENT=4 DEFAULT CHARSET=utf8 COMMENT='用户表';

insert  into `user`(`user_id`,`user_name`,`user_sex`,`user_salary`) values

(1,'紫邪情','女',100.00),

(2,'紫玲','女',50.00),

(3,'张三','男',999.99);
创建Spring项目 并 导入依赖
    <!--  spring整合mybatis的依赖  -->

    <!--  1、spring需要的依赖  -->

    <dependencies>

        <dependency>

            <groupId>org.springframework</groupId>

            <artifactId>spring-context</artifactId>

            <version>5.2.9.RELEASE</version>

        </dependency>

		<dependency>

            <groupId>org.springframework</groupId>

            <artifactId>spring-aspects</artifactId>

            <version>5.1.9.RELEASE</version>

        </dependency>

        <!-- 2、mybatis的依赖 -->

        <dependency>

            <groupId>org.mybatis</groupId>

            <artifactId>mybatis</artifactId>

            <version>3.4.6</version>

        </dependency>

        <!-- spring整合mybatis的第三方依赖 -->

        <dependency>

            <groupId>org.mybatis</groupId>

            <artifactId>mybatis-spring</artifactId>

            <version>2.0.2</version>

        </dependency>

        <!--    1、数据库驱动    -->

        <dependency>

            <groupId>mysql</groupId>

            <artifactId>mysql-connector-java</artifactId>

            <version>5.1.47</version>

        </dependency>

        <dependency>

            <groupId>com.alibaba</groupId>

            <artifactId>druid</artifactId>

            <version>1.2.6</version>

        </dependency>

        <dependency>

            <groupId>org.springframework</groupId>

            <artifactId>spring-jdbc</artifactId>

            <version>5.2.9.RELEASE</version>

        </dependency>

        <dependency>

            <groupId>org.projectlombok</groupId>

            <artifactId>lombok</artifactId>

            <version>1.18.22</version>

        </dependency>

        <dependency>

            <groupId>junit</groupId>

            <artifactId>junit</artifactId>

            <version>4.12</version>

            <scope>test</scope>

        </dependency>

        <dependency>

            <groupId>log4j</groupId>

            <artifactId>log4j</artifactId>

            <version>1.2.17</version>

        </dependency>

        <!-- 通用mapper的依赖 -->

        <dependency>

            <groupId>tk.mybatis</groupId>

            <artifactId>mapper</artifactId>

            <version>3.4.2</version>

        </dependency>

    </dependencies>
编写SSM框架整合的xml文件
<?xml version="1.0" encoding="UTF-8"?>
<beans xmlns="http://www.springframework.org/schema/beans"
xmlns:aop="http://www.springframework.org/schema/aop"
xmlns:context="http://www.springframework.org/schema/context"
xmlns:tx="http://www.springframework.org/schema/tx"
xmlns:xsi="http://www.w3.org/2001/XMLSchema-instance"
xsi:schemaLocation="http://www.springframework.org/schema/beans
https://www.springframework.org/schema/beans/spring-beans.xsd
http://www.springframework.org/schema/aop
https://www.springframework.org/schema/aop/spring-aop.xsd
http://www.springframework.org/schema/context
https://www.springframework.org/schema/context/spring-context.xsd
http://www.springframework.org/schema/tx
https://www.springframework.org/schema/tx/spring-tx.xsd
">
<!-- 1、获取数据源 —— 使用druid -->
<context:property-placeholder location="classpath:db.properties"/>
<bean id="dataSource" class="com.alibaba.druid.pool.DruidDataSource">
<property name="driverClassName" value="${druid.driverClassName}"/>
<property name="url" value="${druid.url}"/>
<property name="username" value="${druid.username}"/>
<property name="password" value="${druid.password}"/>
</bean>
<!-- 2、获取SQLSessionFactory工厂-->
<bean id="sqlSessionFactory" class="org.mybatis.spring.SqlSessionFactoryBean">
<property name="dataSource" ref="dataSource"/>
<!-- 把mybatis集成进来 -->
<property name="configLocation" value="classpath:mybatis-config.xml"/> <!-- 集成mybatis-config.xml -->
</bean>
<!-- 3、配置事务管理 -->
<!-- 声明事务托管 -->
<bean id="txManager" class="org.springframework.jdbc.datasource.DataSourceTransactionManager">
<property name="dataSource" ref="dataSource"/>
</bean>
<!-- 说明哪些方法要进行事务托管 —— 即:通知类 -->
<tx:advice id="txAdvice" transaction-manager="txManager">
<tx:attributes>
<tx:method name="*" rollback-for="Exception"/>
</tx:attributes>
</tx:advice>
<!-- 编写切面 -->
<aop:config>
<!-- 切点 -->
<aop:pointcut id="pointCut" expression="execution( * cn.xiegongzi.mapper.*.*(..) )"/>
<!-- 组装切面 ——— 切点和通知类组装 -->
<aop:advisor advice-ref="txAdvice" pointcut-ref="pointCut"/>
</aop:config>
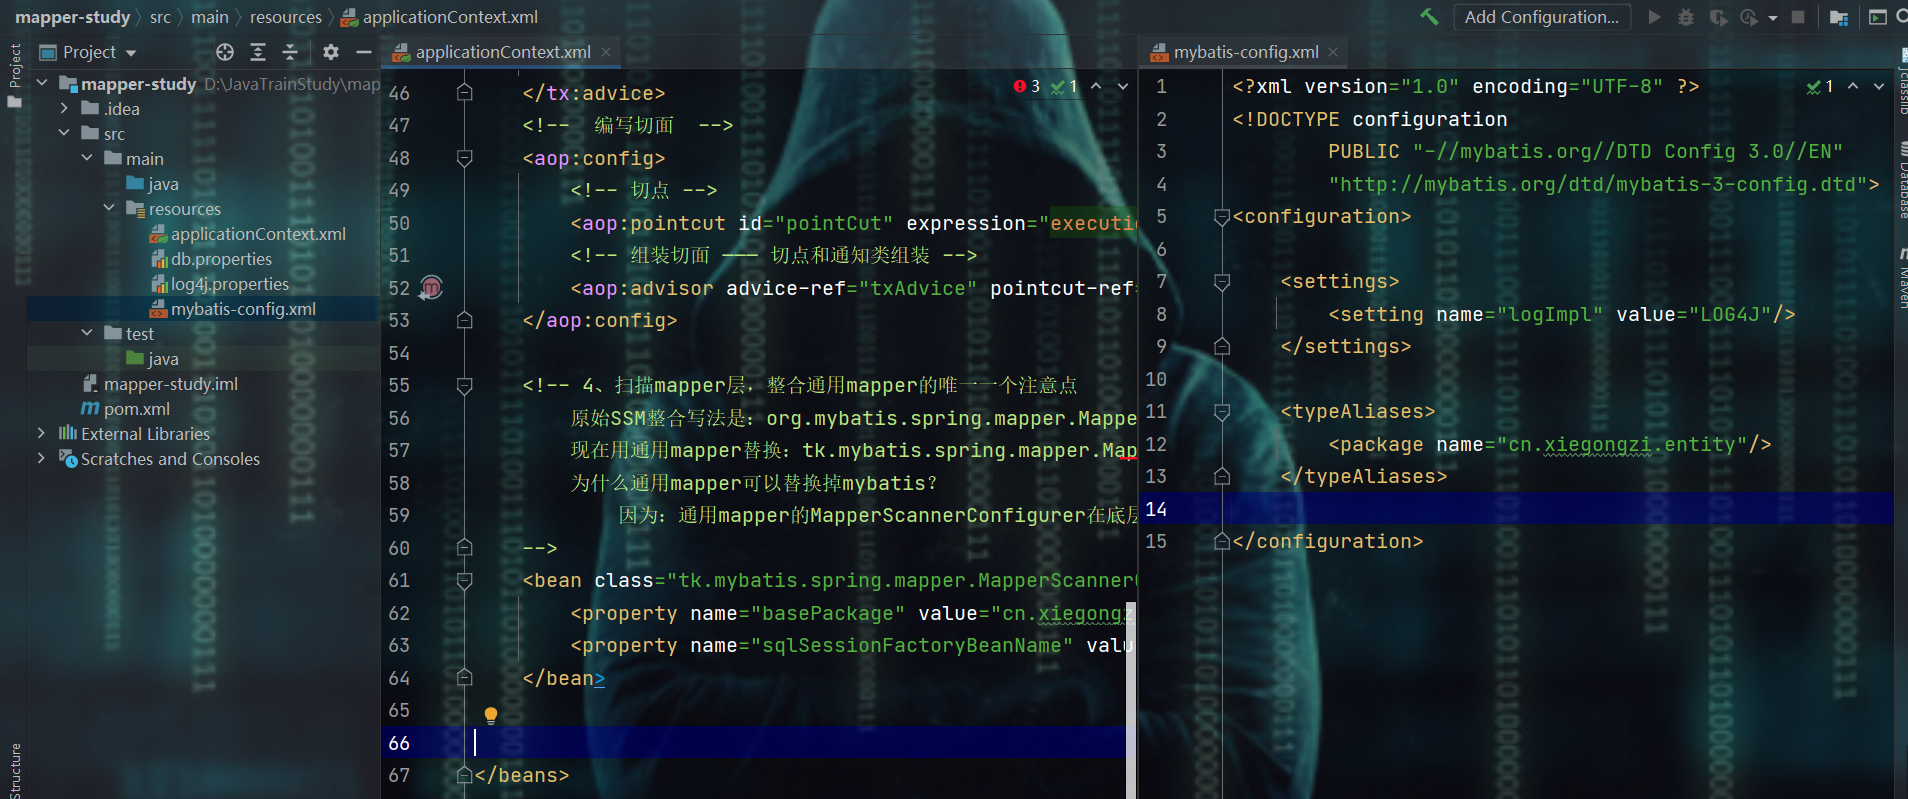
<!-- 4、扫描mapper层,整合通用mapper的唯一一个注意点
原始SSM整合写法是:org.mybatis.spring.mapper.MapperScannerConfigurer
现在用通用mapper替换:tk.mybatis.spring.mapper.MapperScannerConfigurer
为什么通用mapper可以替换掉mybatis?
因为:通用mapper的MapperScannerConfigurer在底层继承了mybatis的MapperScannerConfigurer,可以点源码
-->
<bean class="tk.mybatis.spring.mapper.MapperScannerConfigurer">
<property name="basePackage" value="cn.zixieqing.mapper"/>
<property name="sqlSessionFactoryBeanName" value="sqlSessionFactory"/>
</bean>
<!--扫描service层-->
<context:component-scan base-package="cn.zixieqing.service"/>
</beans>
- 注意点:在扫描mapper层时,使用通用mapper覆盖mybatis,写法不太一样

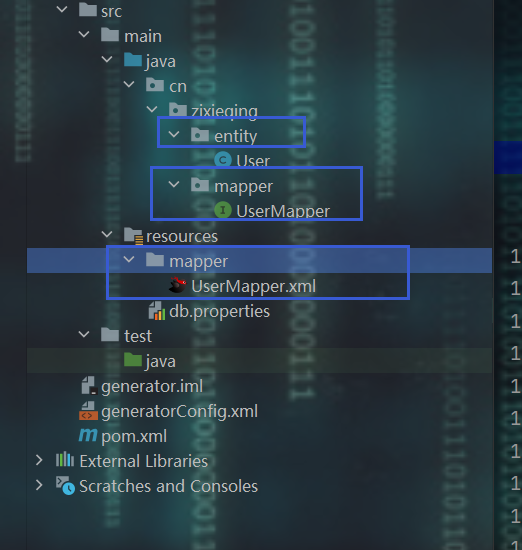
- 我的项目结构如下
建对应的实体类
- 注意点:数据类型用包装类,因为包装类可以判断null值,这个涉及到通用mapper的原理,数据类型用包装类在MaBatis中就已经知道的事情
@Data

@AllArgsConstructor

@NoArgsConstructor

@Accessors(chain = true)

public class UserEntity implements Serializable {

    private Integer userId;

    private String userName;

    private String userSex;

    private Double userSalary;

}
2.2、玩通用mapper的基础API
先看一下通用mapper大概有哪些API
// 这里接口直接继承通用mapper接口即可

//    注意:泛型中的信息就是实体类

public interface UserMapper extends Mapper<User> {		// 看源码,点mapper即可进入

}

看看BaseMapper

- 其他的都是差不多的套路,归纳起来其实就是增删查改的封装,然后做了不同的细分,需要继续查看的,那就往后挨个去点击
2.2.1、和select相关
2.2.1、selectOne方法 和 @Table注解

编写测试类 并启动
package cn.zixieqing;

import cn.zixieqing.entity.*;

import cn.zixieqing.mapper.*;

import org.junit.*;

import org.springframework.context.*;

import org.springframework.context.support.*;

public class MyTest {

    @Test

    public void selectOneTest() {

        ApplicationContext context = new ClassPathXmlApplicationContext("applicationContext.xml");

        UserMapper userMapper = context.getBean("userMapper", UserMapper.class);

        UserEntity userEntity = new UserEntity();

        userEntity.setUserId(1)

                .setUserName("紫邪情")

                .setUserSex("女")

                .setUserSalary(new Double(100));

        System.out.println(userMapper.selectOne(userEntity));

    }

}
- 出现报错:Table 'mapper_study.user_entity' doesn't exist

- 原因就是编写的实体类名叫做UserEntity,而数据库的表名叫做user,解决方式就是在实体类中加入@Table注释,注意此注解是import javax.persistence.*;包下的

另外的selectxxx方法直接一点就出来了,基本上都是见名知意,就算不知道的源码中也有解释,通用mapper就是国内人写的
- 至于@Column注解就是见名知意,用来处理实体类的字段和数据库中的字段不一致的问题
- 默认规则:
- 实体类字段:驼峰式命名
- 数据库表字段:使用“_”区分各个单词
- 默认规则:

2.2.2、观察日志总结selectOne方法

- selectOne()是将封装的实体类作为了WHERE子句的条件
- 这里是使用了非空的值作为的WHERE子句

- 在条件表达式中使用“=”进行比较
- 注意点:要求必须返回一个实体类结果,如果有多个,则会抛出异常
2.2.3、xxxByPrimaryKey方法 和 @Id注解
测试
    @Test

    public void selectByPrimaryKey() {

        System.out.println(userMapper.selectByPrimaryKey(3));

    }

- 结果:发现将实体类的所有字段属性都作为WHERE子句的条件了
- 解决办法:给实体类中对应的数据库表的主键字段加上@Id注解


2.2.4、xxxByPrimaryKey方法 和 @Id注解总结
@Id注解
为了将实体类字段属性和对应的数据库表主键做匹配
原因:通用mapper在执行xxxByPrimaryKey方法时会出现两种情况:
1、没有加@Id注解时,通用mapper会将实体类的所有属性作为联合主键来匹配数据库表的主键,故而会出现将实体类中的字段属性全部作为WHERE子句后面的条件字段
SELECT user_id,user_name,user_sex,user_salary

FROM user

WHERE user_id = ? AND user_name = ? AND user_sex = ? AND user_salary = ?
2、使用@Id主键将实体类中的字段属性和数据库表中的主键做明确匹配


xxxByPrimaryKey方法
- 需要使用@Id注解来让实体类中的字段属性和数据库表中的主键做明确匹配,否则:通用mapper默认将实体类的所有字段属性作为联合主键来进行匹配
2.2.5、select方法
- 传什么,就用什么来拼接WHERE子句的条件
测试
    @Test

    public void select() {

        UserEntity userEntity = new UserEntity();

        userEntity.setUserName("紫邪情");

        System.out.println(userMapper.select(userEntity));

    }

2.2.6、xxxSelective方法
- 可选择的嘛
- 非主键字段,如果不为null,则就假如sql语句
- 注意:是非null啊,所以前面才说实体类的类型最好用包装类
2.2.2、和insert相关
2.2.2.1、insert方法
测试
    @Test

    public void insertTest() {

        UserEntity userEntity = new UserEntity();

        userEntity.setUserId(4)

                .setUserName("不知火舞");

        // 这个API会将null也拼接到SQL语句中

        System.out.println(userMapper.insert(userEntity));

    }

2.2.2.2、insertSelective方法
    @Test

    public void insertSelective() {

        UserEntity userEntity = new UserEntity();

        userEntity.setUserName("百里守约")

                .setSex("老六");

        // 这个API会将非null的字段拼接说起来语句中

        userMapper.insertSelective(userEntity);

    }

2.2.2.3、@GeneratedValue注解
这个注解是为了让通用mapper再执行insert语句之后,把数据库中自动生成的主键值回填到实体类对象中
官网文档介绍:https://gitee.com/free/Mapper/wikis/2.orm/2.3-generatedvalue

2.2.3、和update相关
2.2.3.1、updateByPrimaryKeySelective方法
- 这个其实看一眼就知道了,也就是:根据主键把不为null值的字段修改掉,即:set后面的字段就是实体类中不为null的字段
    @Test

    public void updateByPrimaryKeySelectiveTest() {

        System.out.println( userMapper.updateByPrimaryKeySelective( new UserEntity().setUserId(1).setUserName("小紫") ) );

    }

2.2.4、和delete相关
2.2.4.1、delete方法
- 切记:使用时,记得把实体类值传进去,否则:若是null的实体类,则:SQL语句就没有WHERE条件了,继而:变成全表的逻辑删除了
- 原理:还是一样的,使用非null的字段作为WHERE子句条件

2.2.4.2、deleteByPrimaryKey方法
- 见名知意,直接通过主键来删
    @Test

    public void deleteByPrimaryKeyTest() {

        userMapper.deleteByPrimaryKey(2);

    }

2.2.5、@Transient注解
- 一般情况下,实体中的字段和数据库表中的字段是一一对应的,但是也有很多情况我们会在实体中增加一些额外的属性,这种情况下,就需要使用
@Transient注解来告诉通用 Mapper 这不是表中的字段
@Transient

private String otherThings; //非数据库表中字段
2.3、QBC查询
- QBC全称:query by criteria 也就是通过规则( criteria )来查询
2.3.1、Criteria对象
public class ExampleTest {

    ApplicationContext context = new ClassPathXmlApplicationContext("applicationContext.xml");

    UserMapper userMapper = context.getBean("userMapper", UserMapper.class);

    // 1、创建Example对象

    Example example = new Example(UserEntity.class);

    @Test

    public void exampleTest() {

        // 2、使用Example创建Criteria对象

        Example.Criteria criteria = example.createCriteria();

        // 3、添加规则 下面这些都是Criteria能够调的API,还有其他的,需要时再说

        /*

            andGreaterThan 即:>               andGreaterThanOrEqualTo 即:>=

            andLessThan 即:<                  andLessThanOrEqualTo 即:<=

            andIn 即:就是SQL的in               andNotIn  就是SQL的not in

            andBetween  即:SQL的between       andNotBetween 即SQL中的not between

            andLike 即sql中的like              andNotLike  即SQL的not like

            要看这些比较符,直接点andGreaterThan看源码,里面都有各种介绍

        */

        criteria.andGreaterThan("userSalary", 50).andLessThan("userSalary", 200);

        // 4、调用Example封装的API 不止selectByExample这一个,还有其他的CRUD

        List<UserEntity> userEntities = userMapper.selectByExample(example);

        for (UserEntity userEntity : userEntities) {

            System.out.println(userEntity);

        }

    }

}

2.3.2、Example对象能调用的API
2.3.2.1、CreateCriteria()
    @Test

    public void createCriteriaTest() {

        // createCriteria创建规则 - 有一个别扭的注意点

        Example.Criteria criteria01 = example.createCriteria();

        Example.Criteria criteria02 = example.createCriteria();

        // 使用Example调用or()时,传入的这个Criteria对象的参数有点别扭

        // 添加规则1

        criteria01.andGreaterThan("userId", 1).andLessThan("userId", 6);

        // 添加规则2

        criteria02.andGreaterThan("userSalary", 100).andLessThan("userSalary", 500);

        /*

        * 拼接的SQL语句:

        *   SELECT user_id,user_name,user_sex,user_salary

        *   FROM user

        *   WHERE ( user_id > ? and user_id < ? ) or ( user_salary > ? and user_salary < ? )

        * */

        // 别扭之处就在这里:是将规则2 criteria02 使用or拼接起来,理论上应该是criteria01.or(criteria02)

        // 但是:却是使用example来调的or( Criteria criteria ),所以感觉example就相当于是criteria01一样,有点别扭

        example.or(criteria02);

        List<UserEntity> userEntities = userMapper.selectByExample(example);

        userEntities.forEach(System.out::println);

    }

2.3.2.2、orderBy( String property )排序
    @Test

    public void orderByTest() {

        // userSalary 排序字段      desc 排序方式 - 降序desc 升序asc

        example.orderBy("userSalary").desc();

        userMapper.selectByExample(example).forEach(System.out::println);

    }

2.3.2.3、setDistinct( boolean isDistinct )去重
    @Test

    public void setDistinctTest() {

        example.setDistinct(true);

        userMapper.selectByExample(example).forEach(System.out::println);

    }
2.3.2.4、selectProperties( String... properties )设置select后的字段
    // 设置拼接SQL的select后面的字段

    @Test

    public void selectPropertiesTest() {

        // 拼接的SQL语句: SELECT user_id , user_name FROM user

        // 默认是* 即:实体类的所有字段都拼接上去了

        example.selectProperties("userId","userName");

        userMapper.selectByExample(example).forEach(System.out::println);

    }
2.3.2.5、excludeProperties(String... properties)设置select后不包含的字段
    // 设置select后不包含的字段

    @Test

    public void excludePropertiesTest() {

        // SQL语句 SELECT user_name , user_sex FROM user

        example.excludeProperties("userId", "userSalary");

        userMapper.selectByExample(example).forEach(System.out::println);

    }
- 其他的API直接用example点就出来了,都是见名知意的
2.4、通用mapper逆向工程
2.4.1、pom.xml配置
<!-- 注意:别少了这个依赖啊,下面plugins中的依赖,那只是插件需要的依赖
没有引入这个dependency的通用mapper依赖的话,那么生成的代码需要引入一些包,到时就是不存在,会报错的
-->
<dependencies>
<dependency>
<groupId>tk.mybatis</groupId>
<artifactId>mapper</artifactId>
<version>4.0.0-beta3</version>
</dependency>
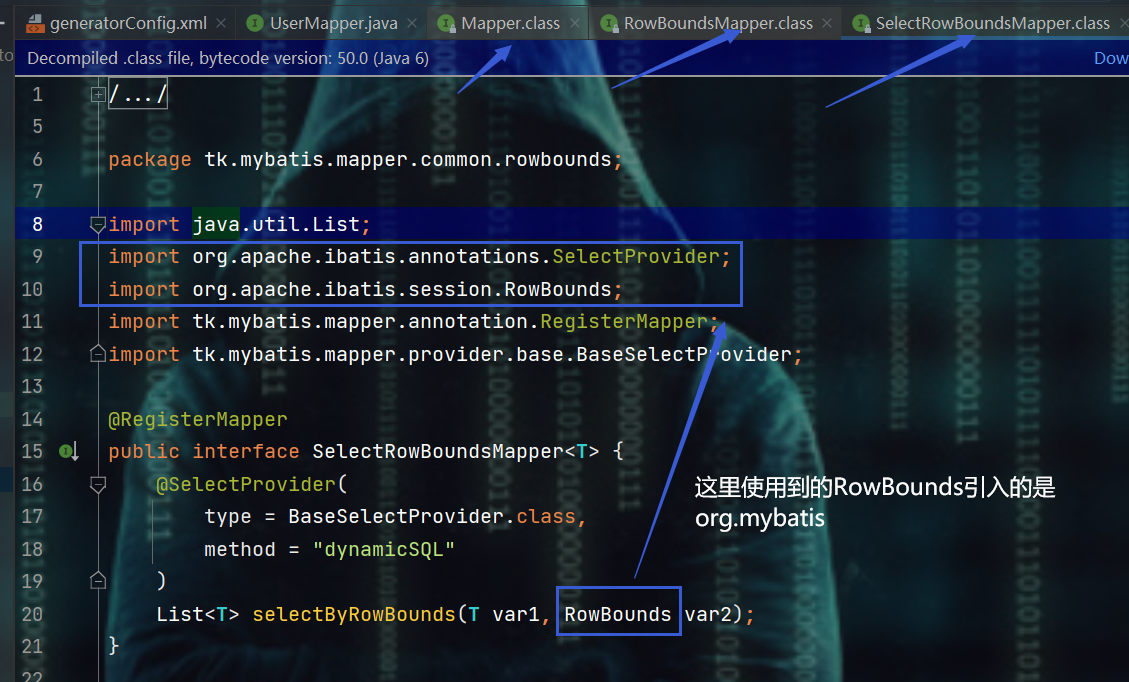
<!-- 有些人可能会出现生成的mapper接口层报错,说的是:rowBounds不存在 查看import发现源码是引入的org.mybatis
但是目前我用得时候并没有报错,所以:为了以防万一还是加上这个org.mybatis依赖
-->
<dependency>
<groupId>org.mybatis</groupId>
<artifactId>mybatis</artifactId>
<version>3.5.7</version>
</dependency>
</dependencies>
<build>
<plugins>
<plugin>
<artifactId>maven-compiler-plugin</artifactId>
<configuration>
<source>1.8</source>
<target>1.8</target>
</configuration>
</plugin>
<plugin>
<groupId>org.mybatis.generator</groupId>
<artifactId>mybatis-generator-maven-plugin</artifactId>
<version>1.3.6</version>
<configuration>
<!-- generatorConfig.xml逆向工程配置文件所在地 根据需要自行修改 -->
<configurationFile>
${basedir}/generatorConfig.xml
</configurationFile>
<overwrite>true</overwrite>
<verbose>true</verbose>
</configuration>
<!-- 通用mapper逆向工程需要的两个依赖 -->
<dependencies>
<dependency>
<groupId>mysql</groupId>
<artifactId>mysql-connector-java</artifactId>
<version>5.1.47</version>
</dependency>
<dependency>
<groupId>tk.mybatis</groupId>
<artifactId>mapper</artifactId>
<version>4.0.0-beta3</version>
</dependency>
</dependencies>
</plugin>
</plugins>
</build>
- 若是出现上述报RowBounds不存在的原因在下面这里
2.4.2、generatorConfig.xml配置
<!DOCTYPE generatorConfiguration

        PUBLIC "-//mybatis.org//DTD MyBatis Generator Configuration 1.0//EN"

        "http://mybatis.org/dtd/mybatis-generator-config_1_0.dtd">

<generatorConfiguration>

    <!-- 引入外部数据库配置文件 最好使用引入,否则:下面数据库配置那里奇葩要求很多 -->

    <properties resource="db.properties"/>

    <!-- MySQL基础信息 就是起始和结束分隔符  如:`` -->

    <context id="Mysql" targetRuntime="MyBatis3Simple" defaultModelType="flat">

        <property name="beginningDelimiter" value="`"/>

        <property name="endingDelimiter" value="`"/>

        <!-- 通用mapper插件 -->

        <!--

            type 是通用mapper插件,这个可以配置在前面引入的那个外部配置文件中,即配置成如下:

                mapper.plugin=tk.mybatis.mapper.generator.MapperPlugin

                然后在这里使用${mapper.plugin}引入,这种方式方便管理

        -->

        <plugin type="tk.mybatis.mapper.generator.MapperPlugin">

            <!-- 这是mapper接口层中extend继承的那个类,即:public interface userMapper extends Mapper<User> -->

            <property name="mappers" value="tk.mybatis.mapper.common.Mapper"/>

            <!-- 这是区别大小写 如:user 和 User -->

            <property name="caseSensitive" value="true"/>

        </plugin>

        <!-- 数据库 -->

        <jdbcConnection driverClass="${jdbc.driver}"

                        connectionURL="${jdbc.url}"

                        userId="${jdbc.username}"

                        password="${jdbc.password}">

        </jdbcConnection>

        <!-- 实体类 -->

        <javaModelGenerator targetPackage="cn.zixieqing.entity"

                            targetProject="src/main/java"/>

        <!-- xxxMapper.xml所在位置 -->

        <sqlMapGenerator targetPackage="mapper"

                         targetProject="src/main/resources"/>

        <!-- mapper接口层 -->

        <javaClientGenerator targetPackage="cn.zixieqing.mapper"

                             targetProject="src/main/java"

                             type="XMLMAPPER"/>

        <!-- 数据库表名 和 实体类生成关系

            如果感觉每个表都配置麻烦,那么直接改变tableName的值即可,即:tableName="%"

            但是:此种方式的默认规则是采用 _ 转驼峰命名,如:table_name  ——> TableName

            可是:有时我们并不需要这样命名,此时就需要使用tableName 和 domainObjectName两个配置项一起来配置

                tableName 数据库表名

                domainObjectName  生成的实体类名

        -->

        <table tableName="user" domainObjectName = "User">

            <!-- 主键生成策略 -->

            <generatedKey column="user_id" sqlStatement="JDBC"/>

        </table>

    </context>

</generatorConfiguration>
引入的外部文件db.properties的配置
# 数据库配置

jdbc.driver=com.mysql.jdbc.Driver

# 注意:建议使用db.properties配置从而在generatorConfig.xml中引入的原因就在这里

# 在这里可以在这个url后面拼接参数,如:useSSL=false

# 若是直接把这些配置写到generatorConfig.xml中,那么后面的参数配置就有几个奇葩的地方

# 			1、参数之间而不是通过&隔开,而是需要使用;分号隔开  如:useSSL=false;useUnicode=true

#			2、false / true等值需要使用``括起来,具体可以尝试,然后看报的ERROR

jdbc.url=jdbc:mysql://localhost:3306/mapper_study?useSSL=false&useUnicode=true&characterEncoding=utf-8

jdbc.username=root

jdbc.password=root

#c3p0

jdbc.maxPoolSize=50

jdbc.minPoolSize=10

jdbc.maxStatements=100

jdbc.testConnection=true

# 通用Mapper配置 若是在generatorConfig.xml的plugin配置中是通过引入的方式来做的,那么就可以在这里配置这两个信息

# 从而方便管理

# mapper.plugin=tk.mybatis.mapper.generator.MapperPlugin

# mapper.Mapper=tk.mybatis.mapper.common.Mapper
2.4.3、启动
- 在 pom.xml 这一级目录的命令行窗口执行
mvn mybatis-generator:generate即可

2.5、自定义mapper

- 自定义mapper接口的作用:根据实际需要自行重组mapper接口【 ps:即 并不是通用mapper中的所有接口和方法都需要 】
2.5.1、玩一下自定义mapper接口
1、自定义自己要的mapper接口
package cn.zixieqing.common;

import tk.mybatis.mapper.common.*;

public interface CustomMapper<T> extends BaseMapper<T> {

    // 这个自定义的mapper,想继承前面画的通用mapper中的哪个接口都可以

}
2、编写业务mapper
package cn.zixieqing.mapper;

import cn.zixieqing.common.*;

import cn.zixieqing.entity.*;

public interface UserMapper extends CustomMapper<UserEntity> {

}

- 注意点:别把自定义mapper和业务mapper放到一个包中,会报错
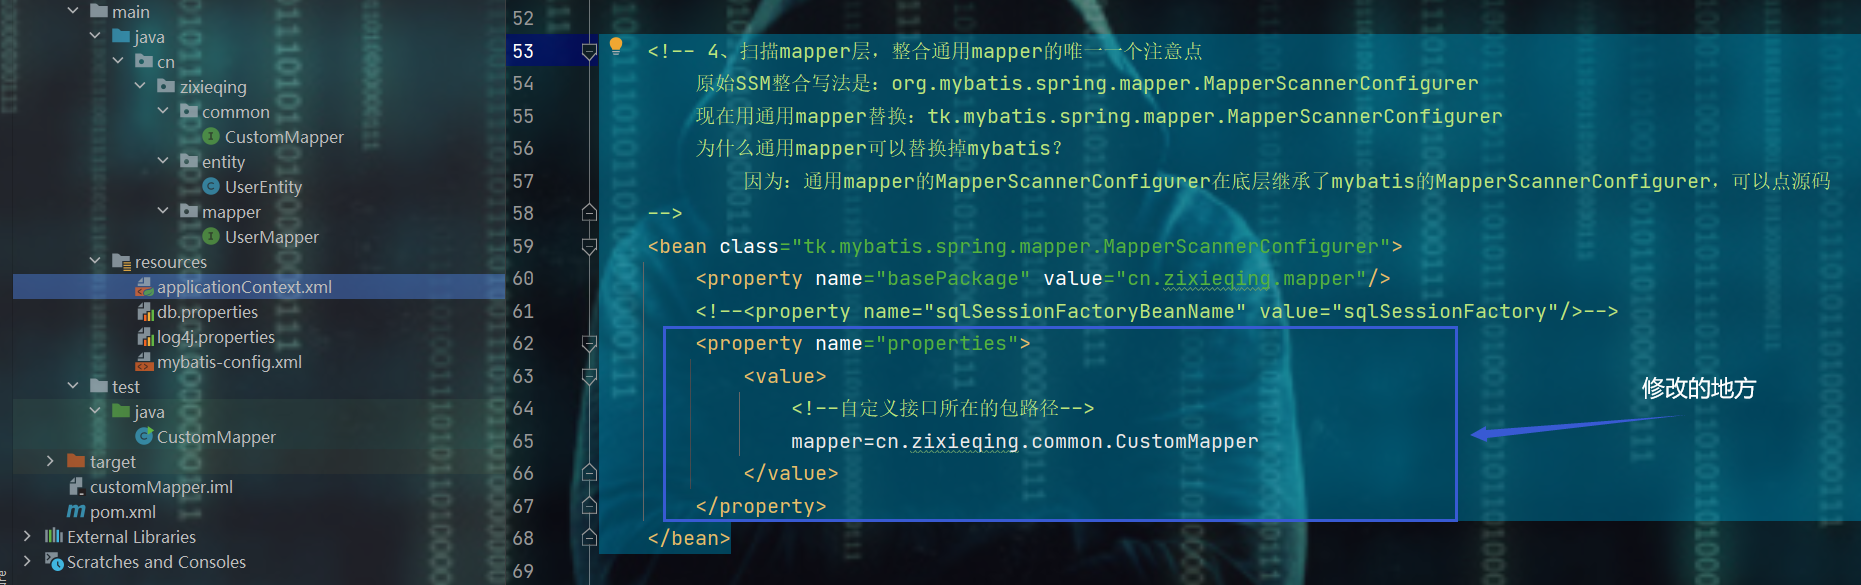
3、修改applicationContext.xml文件的MapperScannerConfigurer配置
    <!-- 4、扫描mapper层,整合通用mapper的唯一一个注意点

        原始SSM整合写法是:org.mybatis.spring.mapper.MapperScannerConfigurer

        现在用通用mapper替换:tk.mybatis.spring.mapper.MapperScannerConfigurer

        为什么通用mapper可以替换掉mybatis?

            因为:通用mapper的MapperScannerConfigurer在底层继承了mybatis的MapperScannerConfigurer,可以点源码

    -->

    <bean class="tk.mybatis.spring.mapper.MapperScannerConfigurer">

        <property name="basePackage" value="cn.zixieqing.mapper"/>

        <!--<property name="sqlSessionFactoryBeanName" value="sqlSessionFactory"/>-->

        <property name="properties">

            <value>

                <!--自定义接口所在的包路径-->

                mapper=cn.zixieqing.common.CustomMapper

            </value>

        </property>

    </bean>
4、测试
    @Test

    public void customMapperTest() {

        ApplicationContext context = new ClassPathXmlApplicationContext("applicationContext.xml");

        UserMapper userMapper = context.getBean("userMapper",UserMapper.class);

        userMapper.selectAll().forEach(System.out::println);

    }

补充1、要是不想写applicationContext.xml中MapperScannerConfigurer的那个配置

- 那把内容注释掉,在自定义mapper接口的地方加个注解@RegisterMapper就搞定了

补充2、如果将自定义mapper接口 和 业务mapper接口放到一个包中了

- 一运行就会报错
tk.mybatis.mapper.MapperException: java.lang.ClassCastException: sun.reflect.generics.reflectiveObjects.TypeVariableImpl cannot be cast to java.lang.Class

- 原因就是利用反射,获取类对象时失败,即:原因如下


2.6、了解通用mapper的二级缓存
- 一二级缓存的概念哪些就跳过了,MyBatis中已经见过了,这里玩通用mapper的配置
- 测试:自行编写一个业务mapper,然后去实现mapper,从而进行多次执行,会发现SQL执行了多次

- 注意:需要让mapper中的实体类T实现Serializable接口,从而有用序列号,否则:会报错的

修改mybatis-config.xml文件
    <settings>

        <!--显示开启缓存-->

        <setting name="cacheEnabled" value="true"/>

    </settings>
在业务mapper接口中添加@CacheNamespace注解
@CacheNamespace

public interface UserMapper extends Mapper<UserEntity> {

}
再次测试

2.7、类型处理器 typeHandler
- 这里说的类型是简单类型和复杂类型,注意:和Java中说的基本类型和引用类型不是一回事,不是说基本类型就一定是简单类型,这里不用去考虑基本和引用的问题
- 简单类型和复杂类型可以参考一对一和一对多这两种
- 简单类型:只有一个值
- 复杂类型:有多个值


- 而上面这种,对于userName来说,是无法进行CRUD的

- 这种情况就是复杂类型,而通用mapper默认是没处理的,就有点类似于在上述例子的userName上加了一个@Transient注解,从而忽略了该字段,从而造成的效果就是:去数据库中找对应的字段值时没找到,从数据库中找到数据,然后返还给对象时没有相应的对象可以接受

解决办法:自定义类型处理器

具体操作流程如下:
1、创建一个类型处理器的类,然后实现TypeHandler接口,其中:T就是要处理的那个类型,如:上述例子的NameEntity
2、实现里面的四个方法
    @Override

    public void setParameter(PreparedStatement preparedStatement, int i, NameEntity nameEntity, JdbcType jdbcType) throws SQLException {

    }

    @Override

    public NameEntity getResult(ResultSet resultSet, String s) throws SQLException {

        return null;

    }

    @Override

    public NameEntity getResult(ResultSet resultSet, int i) throws SQLException {

        return null;

    }

    @Override

    public NameEntity getResult(CallableStatement callableStatement, int i) throws SQLException {

        return null;

    }
实例逻辑编写如下
public class NameHandler implements TypeHandler<NameEntity> {

    /**

     * 这个方法就是:对象NameEntity ——> 数据库的流程规则,可以将其理解为序列化流程 但是完全不一样啊

     * 只是说:像序列化一样把数据转成一个样

     * @param ps

     * @param i

     * @param nameEntity

     * @param jdbcType

     * @throws SQLException

     */

    @Override

    public void setParameter(PreparedStatement ps, int i, NameEntity nameEntity, JdbcType jdbcType) throws SQLException {

        // 1、验证NameEntity

        if ( null == nameEntity) {

            return;

        }

        // 2、取出nameEntity中的值

        String firstName = nameEntity.getFirstName();

        String lastName = nameEntity.getLastName();

        // 3、把取出的值 拼接成 一个字符串

        // 自定义规则:使用 - 进行隔开

        StringBuilder builder = new StringBuilder();

        builder.append(firstName)

                .append("-")

                .append(lastName);

        // 4、拼接SQL的参数

        ps.setString(i,builder.toString() );

    }

    /**

     * 这下面三个是重载,是为了解决:数据库 ——> 对象NameEntity的流程,类似于反序列化,把另一个东西转成正常需要的样子

     * @param resultSet

     * @param columnName

     * @return

     * @throws SQLException

     */

    @Override

    public NameEntity getResult(ResultSet resultSet, String columnName ) throws SQLException {

        // 1、从结果集ResultSet根据字段名取出字段值

        String columnValue = resultSet.getString(columnName);

        // 2、验证columnValue

        if ( null == columnValue || columnValue.length() == 0 || !columnValue.contains("-") ) {

            return null;

        }

        // 3、根据“-”对columnValue进行拆分

        String[] column = columnValue.split("-");

        // 4、把拆分之后的值 给到 对象的对应值

        return new NameEntity().setFirstName( column[0] ).setLastName( column[1] );

    }

    @Override

    public NameEntity getResult(ResultSet resultSet, int i) throws SQLException {

        // 1、从结果集ResultSet根据字段名取出字段值

        String columnValue = resultSet.getString(i);

        // 2、验证columnValue

        if ( null == columnValue || columnValue.length() == 0 || !columnValue.contains("-") ) {

            return null;

        }

        // 3、根据“-”对columnValue进行拆分

        String[] column = columnValue.split("-");

        // 4、把拆分之后的值 给到 对象的对应值

        return new NameEntity().setFirstName( column[0] ).setLastName( column[1] );

    }

    @Override

    public NameEntity getResult(CallableStatement cs, int i) throws SQLException {

        // 1、从CallableStatement 根据 索引取出字段值

        String columnValue = cs.getString(i);

        // 2、验证columnValue

        if ( null == columnValue || columnValue.length() == 0 || !columnValue.contains("-") ) {

            return null;

        }

        // 3、根据“-”对columnValue进行拆分

        String[] column = columnValue.split("-");

        // 4、把拆分之后的值 给到 对象的对应值

        return new NameEntity().setFirstName( column[0] ).setLastName( column[1] );

    }

}
3、注册类型处理器
第一种( 字段级别 ):使用
@ColumnType(typeHandler = xxxx.class)注解

- 注意啊:我这里是改数据库了的,这是做的查询嘛,要是数据库中的数据没符合规范,那还是查不到

第二种( 全局配置 ):在mybatis-config.xml中进行配置
<?xml version="1.0" encoding="UTF-8" ?>

<!DOCTYPE configuration

        PUBLIC "-//mybatis.org//DTD Config 3.0//EN"

        "http://mybatis.org/dtd/mybatis-3-config.dtd">

<configuration>

    <settings>

        <setting name="logImpl" value="LOG4J"/>

        <!--显示开启缓存-->

        <setting name="cacheEnabled" value="true"/>

    </settings>

    <typeAliases>

        <package name="cn.xiegongzi.entity"/>

    </typeAliases>

    <typeHandlers>

        <!--

            handler 处理器位置

            javaType 要处理的是哪个对象

        -->

        <typeHandler handler="cn.zixieqing.handler.NameHandler"

                     javaType="cn.zixieqing.entity.NameEntity"/>

    </typeHandlers>

</configuration>
给用到该类型的地方添加
@Column注解@Data
@AllArgsConstructor
@NoArgsConstructor
@Accessors(chain = true)
@Table(name = "user")
@ToString
public class UserEntity implements Serializable { private static final long serialVersionUID = -5580827379143778431L; private Integer userId; /**
* @Transient
*
* @ColumnType(typeHandler = NameHandler.class)
*/
@Column
private NameEntity userName; private String userSex; private Double userSalary;
}
MyBatis插件 - 通用mapper的更多相关文章
- Mybatis整合通用Dao,Mybatis整合通用Mapper,MyBatis3.x整合通用 Mapper3.5.x
Mybatis整合通用Dao,Mybatis整合通用Mapper,MyBatis3.x整合通用 Mapper3.5.x ============================== 蕃薯耀 2018年 ...
- 扩展mybatis和通用mapper,支持mysql的geometry类型字段
因项目中需要用到地理位置信息的存储.查询.计算等,经过研究决定使用mysql(5.7版本)数据库的geometry类型字段来保存地理位置坐标,使用虚拟列(Virtual Generated Colum ...
- Spring Boot集成Mybatis及通用Mapper
集成Mybatis可以通过 mybatis-spring-boot-starter 实现. <!-- https://mvnrepository.com/artifact/org.mybatis ...
- (二、下) springBoot 、maven 、mysql、 mybatis、 通用Mapper、lombok 简单搭建例子 《附项目源码》
接着上篇文章中 继续前进. 一.在maven 的pom.xm中添加组件依赖, mybatis通用Mapper,及分页插件 1.mybatis通用Mapper <!-- mybatis通用Mapp ...
- mybatis的通用mapper小结
import tk.mybatis.mapper.entity.Example; //此包是tk下的1.定义一个dao层接口不需要任何方法 需要继承Mapper<类型> 2.在servic ...
- Springboot集成mybatis通用Mapper与分页插件PageHelper
插件介绍 通用 Mapper 是一个可以实现任意 MyBatis 通用方法的框架,项目提供了常规的增删改查操作以及 Example 相关的单表操作.通用 Mapper 是为了解决 MyBatis 使用 ...
- 浅谈Mybatis通用Mapper使用方法_java - JAVA
文章来源:嗨学网 敏而好学论坛www.piaodoo.com 欢迎大家相互学习 对单表进行增删改查是项目中不可避免的需求,Mybatis的通用Mapper插件使这些操作变得简单 添加maven依赖 在 ...
- springboot学习笔记:8. springboot+druid+mysql+mybatis+通用mapper+pagehelper+mybatis-generator+freemarker+layui
前言: 开发环境:IDEA+jdk1.8+windows10 目标:使用springboot整合druid数据源+mysql+mybatis+通用mapper插件+pagehelper插件+mybat ...
- 通用Mapper与分页插件的集成
SpringBoot 是为了简化 Spring 应用的创建.运行.调试.部署等一系列问题而诞生的产物,自动装配的特性让我们可以更好的关注业务本身而不是外部的XML配置,我们只需遵循规范,引入相关的依赖 ...
随机推荐
- 学习Spring资料
参考文档 官方文档 源码分析 书籍 Spring5核心原理与30个类手写实战 Spring技术内幕 视频 bilibili
- MyBatis in
- ConcurrentHashMap 的并发度是什么 ?
ConcurrentHashMap 的并发度就是 segment 的大小,默认为 16,这意味着最多同时可以有 16 条线程操作 ConcurrentHashMap,这也是ConcurrentHash ...
- docker打包镜像,测试部署
docker基本入门以后,(docker基本入门https://www.cnblogs.com/yangyangming/p/11470926.html)可以试试打包docker镜像与dockerfi ...
- vsftd及虚拟用户
临时需要搭建一个ftp,突然忘记怎么搞了,重新整一下,以后备用 vsftd及虚拟用户 1.安装vsftpd yum install vsftpd 2.添加用户(用于虚拟用户映射) adduser se ...
- 数据仓库(5)数仓Kimball与Inmon架构的对比
数据仓库主要有四种架构,Kimball的DW/BI架构.独立数据集市架构.辐射状企业信息工厂Inmon架构.混合Inmon与Kimball架构.不过不管是那种架构,基本上都会使用到维度建模. < ...
- jdbc的快速入门(需要mysql-connector-java-5.1.39-bin.jar包)
package Lianxi;import java.io.InputStream;import java.sql.Connection;import java.sql.DriverManager;i ...
- simulink中scope图像显示添加图例
1. 在scope中添加图例 (1)首先打开配置属性(configuration properties),在display下面的show legend前面打钩 这样就允许图例显示出来 (2)对scop ...
- 外部晶振的使用原因与内部RC振荡器的使用方法
原因一 早些年,芯片的生产制作工艺也许还不能够将晶振做进芯片内部,但是现在可以了.这个问题主要还是实用性和成本决定的. 原因二 芯片和晶振的材料是不同的,芯片 (集成电路) 的材料是硅,而晶体则是 ...
- 使用Node.js版本管理器
使用Node.js版本管理器 完全卸载Node.js 清除Package缓存:npm cache clean --force 卸载Node.js:wmic product where caption= ...