Beats processors
文章转载自:https://elasticstack.blog.csdn.net/article/details/111321105
我们通常的做法是使用 Elasticsearch 的 ingest node 或者 Logstash 来对数据进行清洗。这其中包括删除,添加,丰富,转换等等。但是针对每个 beats 来讲,它们也分别有自己的一组 processors 来可以帮我们处理数据。我们可以访问 Elastic 的官方网站来查看针对 filebeat 的所有 processors。 也就是说,我们可以在配置 beats 的时候并同时配置相应的 processors 来对数据进行处理。每个 processor 能够修改经过它的事件。
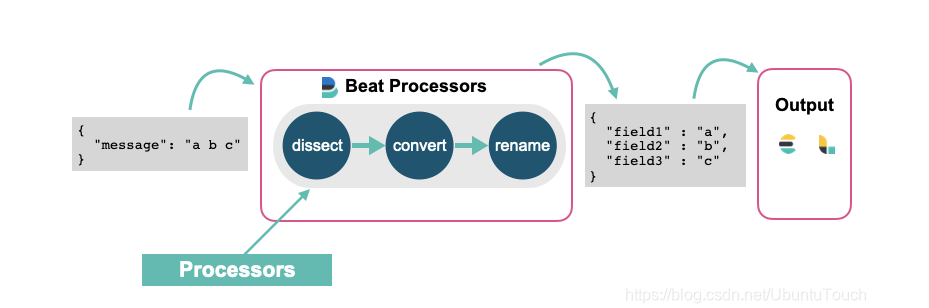
如果你想了解 ingest pipeline 是如何清洗这些事件的,请阅读我之前的文章 “Elastic可观测性 - 运用 pipeline 使数据结构化”。在之前文章 “深入理解 Dissect ingest processor” 中,我讲述了 dissect ingest processor 的应用。在今天的文章中,我将使用同样的 beat processor 来说明如何对数据进行格式化。
使用 filebeat 来对数据进行处理
在今天的实验中,我们将使用如下是例子来进行。我们创建一个叫做 sample.log 的文件,其内容如下:
sample.log
"321 - App01 - WebServer is starting"

"321 - App01 - WebServer is up and running"

"321 - App01 - WebServer is scaling 2 pods"

"789 - App02 - Database is will be restarted in 5 minutes"

"789 - App02 - Database is up and running"

"789 - App02 - Database is refreshing tables"
由于 filebeat 是以换行符来识别每一行的数据的,所以我在文件的最后一行也加上了一个换行符以确保最后一行的数据能被导入。
我们创建一个叫做 filebeat_processors.yml 的 filebeat 配置文件:
filebeat_processors.yml
它的内容如下:
filebeat.inputs:

- type: log

  enabled: true

  paths:

    - /Users/liuxg/data/beatsprocessors/sample.log

processors:

 - drop_fields:

     fields: ["ecs", "agent", "log", "input", "host"]

 - dissect:

     tokenizer: '"%{pid|integer} - %{service.name} - %{service.status}"'

     field: "message"

     target_prefix: ""

setup.template.enabled: false

setup.ilm.enabled: false

output.elasticsearch:

  hosts: ["localhost:9200"]

  index: "sample"

  bulk_max_size: 1000
请注意你需要依据自己 sample.log 的位置修改上面的 paths 中的路径。
在上面,我们使用了 drop_fields 以及 dissect 两个 processor。我们使用如下的命令来运行 filebeat:
./filebeat -e -c ~/data/beatsprocessors/filebeat_processors.yml
同样地,我们需要根据自己的配置文件路径修改上面的路径。
运行完上面的命令后,我们可以在 Kibana 中进行查询 sample 索引的内容:
GET sample/_search
{

  "took" : 0,

  "timed_out" : false,

  "_shards" : {

    "total" : 1,

    "successful" : 1,

    "skipped" : 0,

    "failed" : 0

  },

  "hits" : {

    "total" : {

      "value" : 6,

      "relation" : "eq"

    },

    "max_score" : 1.0,

    "hits" : [

      {

        "_index" : "sample",

        "_type" : "_doc",

        "_id" : "qrBscHYBpymojx8hDWuV",

        "_score" : 1.0,

        "_source" : {

          "@timestamp" : "2020-12-17T11:18:16.540Z",

          "message" : "\"321 - App01 - WebServer is starting\"",

          "service" : {

            "name" : "App01",

            "status" : "WebServer is starting"

          },

          "pid" : 321

        }

      },

      {

        "_index" : "sample",

        "_type" : "_doc",

        "_id" : "q7BscHYBpymojx8hDWuV",

        "_score" : 1.0,

        "_source" : {

          "@timestamp" : "2020-12-17T11:18:16.541Z",

          "pid" : 321,

          "message" : "\"321 - App01 - WebServer is up and running\"",

          "service" : {

            "name" : "App01",

            "status" : "WebServer is up and running"

          }

        }

      },

      {

        "_index" : "sample",

        "_type" : "_doc",

        "_id" : "rLBscHYBpymojx8hDWuV",

        "_score" : 1.0,

        "_source" : {

          "@timestamp" : "2020-12-17T11:18:16.541Z",

          "message" : "\"321 - App01 - WebServer is scaling 2 pods\"",

          "service" : {

            "name" : "App01",

            "status" : "WebServer is scaling 2 pods"

          },

          "pid" : 321

        }

      },

      {

        "_index" : "sample",

        "_type" : "_doc",

        "_id" : "rbBscHYBpymojx8hDWuV",

        "_score" : 1.0,

        "_source" : {

          "@timestamp" : "2020-12-17T11:18:16.541Z",

          "message" : "\"789 - App02 - Database is will be restarted in 5 minutes\"",

          "pid" : 789,

          "service" : {

            "name" : "App02",

            "status" : "Database is will be restarted in 5 minutes"

          }

        }

      },

      {

        "_index" : "sample",

        "_type" : "_doc",

        "_id" : "rrBscHYBpymojx8hDWuV",

        "_score" : 1.0,

        "_source" : {

          "@timestamp" : "2020-12-17T11:18:16.541Z",

          "service" : {

            "name" : "App02",

            "status" : "Database is up and running"

          },

          "pid" : 789,

          "message" : "\"789 - App02 - Database is up and running\""

        }

      },

      {

        "_index" : "sample",

        "_type" : "_doc",

        "_id" : "r7BscHYBpymojx8hDWuV",

        "_score" : 1.0,

        "_source" : {

          "@timestamp" : "2020-12-17T11:18:16.541Z",

          "service" : {

            "status" : "Database is refreshing tables",

            "name" : "App02"

          },

          "message" : "\"789 - App02 - Database is refreshing tables\"",

          "pid" : 789

        }

      }

    ]

  }

}
显然,我们得到了一个结构化的索引。在上面,我们对 pid 还进行了从字符串到整型值的转换。
我们甚至可以重新对一个字段命名,比如:
filebeat_processors.yml
filebeat.inputs:

- type: log

  enabled: true

  paths:

    - /Users/liuxg/data/beatsprocessors/sample.log

processors:

 - drop_fields:

     fields: ["ecs", "agent", "log", "input", "host"]

 - dissect:

     tokenizer: '"%{pid|integer} - %{service.name} - %{service.status}"'

     field: "message"

     target_prefix: ""

 - rename:

     fields:

        - from: "pid"

          to: "PID"

     ignore_missing: false

     fail_on_error: true

setup.template.enabled: false

setup.ilm.enabled: false

output.elasticsearch:

  hosts: ["localhost:9200"]

  index: "sample"

  bulk_max_size: 1000
重新运行上面的配置文件,我们发现:
{

  "took" : 0,

  "timed_out" : false,

  "_shards" : {

    "total" : 1,

    "successful" : 1,

    "skipped" : 0,

    "failed" : 0

  },

  "hits" : {

    "total" : {

      "value" : 6,

      "relation" : "eq"

    },

    "max_score" : 1.0,

    "hits" : [

      {

        "_index" : "sample",

        "_type" : "_doc",

        "_id" : "UrB5cHYBpymojx8h7oCK",

        "_score" : 1.0,

        "_source" : {

          "@timestamp" : "2020-12-17T11:33:26.114Z",

          "service" : {

            "status" : "WebServer is starting",

            "name" : "App01"

          },

          "message" : "\"321 - App01 - WebServer is starting\"",

          "PID" : 321

        }

      },

   ...
之前的 pid 已经转换为 PID 字段。
我们还可以通过脚本来实现对事件的处理,比如:
filebeat_processors.yml
filebeat.inputs:

- type: log

  enabled: true

  paths:

    - /Users/liuxg/data/beatsprocessors/sample.log

processors:

 - drop_fields:

     fields: ["ecs", "agent", "log", "input", "host"]

 - dissect:

     tokenizer: '"%{pid|integer} - %{service.name} - %{service.status}"'

     field: "message"

     target_prefix: ""

 - rename:

     fields:

        - from: "pid"

          to: "PID"

     ignore_missing: false

     fail_on_error: true

 - script:

     lang: javascript

     id: my_filter

     params:

        pid: 789

     source: >

       var params = {pid: 0};

       function register(scriptParams) {

          params = scriptParams;

       }

       function process(event) {

          if (event.Get("PID") == params.pid) {

              event.Cancel();

          }

       }

setup.template.enabled: false

setup.ilm.enabled: false

output.elasticsearch:

  hosts: ["localhost:9200"]

  index: "sample"

  bulk_max_size: 1000
在上面,当 PID 的值为 789 时,我们将过滤这个事件。重新运行 filebeat:
{

  "took" : 0,

  "timed_out" : false,

  "_shards" : {

    "total" : 1,

    "successful" : 1,

    "skipped" : 0,

    "failed" : 0

  },

  "hits" : {

    "total" : {

      "value" : 3,

      "relation" : "eq"

    },

    "max_score" : 1.0,

    "hits" : [

      {

        "_index" : "sample",

        "_type" : "_doc",

        "_id" : "5bCBcHYBpymojx8hrIup",

        "_score" : 1.0,

        "_source" : {

          "@timestamp" : "2020-12-17T11:41:53.478Z",

          "PID" : 321,

          "service" : {

            "status" : "WebServer is starting",

            "name" : "App01"

          },

          "message" : "\"321 - App01 - WebServer is starting\""

        }

      },

      {

        "_index" : "sample",

        "_type" : "_doc",

        "_id" : "5rCBcHYBpymojx8hrIup",

        "_score" : 1.0,

        "_source" : {

          "@timestamp" : "2020-12-17T11:41:53.479Z",

          "message" : "\"321 - App01 - WebServer is up and running\"",

          "service" : {

            "status" : "WebServer is up and running",

            "name" : "App01"

          },

          "PID" : 321

        }

      },

      {

        "_index" : "sample",

        "_type" : "_doc",

        "_id" : "57CBcHYBpymojx8hrIup",

        "_score" : 1.0,

        "_source" : {

          "@timestamp" : "2020-12-17T11:41:53.479Z",

          "service" : {

            "status" : "WebServer is scaling 2 pods",

            "name" : "App01"

          },

          "message" : "\"321 - App01 - WebServer is scaling 2 pods\"",

          "PID" : 321

        }

      }

    ]

  }

}
我们发现所有关于 PID 为789 的事件都被过滤掉了。
我们设置可以通过 script 的方法为事件添加一个 tag。当然由于这是一种 Javascript 的脚本编程,我们甚至可以依据一些条件对事件添加不同的 tag。
filebeat_processors.yml
filebeat.inputs:

- type: log

  enabled: true

  paths:

    - /Users/liuxg/data/beatsprocessors/sample.log

processors:

 - drop_fields:

     fields: ["ecs", "agent", "log", "input", "host"]

 - dissect:

     tokenizer: '"%{pid|integer} - %{service.name} - %{service.status}"'

     field: "message"

     target_prefix: ""

 - rename:

     fields:

        - from: "pid"

          to: "PID"

     ignore_missing: false

     fail_on_error: true

 - script:

     lang: javascript

     id: my_filter

     params:

        pid: 789

     source: >

       var params = {pid: 0};

       function register(scriptParams) {

          params = scriptParams;

       }

       function process(event) {

          if (event.Get("PID") == params.pid) {

              event.Cancel();

          }

          event.Tag("myevent")

       }

setup.template.enabled: false

setup.ilm.enabled: false

output.elasticsearch:

  hosts: ["localhost:9200"]

  index: "sample"

  bulk_max_size: 1000
在上面,我们添加了 event.Tag("myevent")。重新运行我们可以看到:
    "hits" : [

      {

        "_index" : "sample",

        "_type" : "_doc",

        "_id" : "C7CScHYBpymojx8hkKVy",

        "_score" : 1.0,

        "_source" : {

          "@timestamp" : "2020-12-17T12:00:20.365Z",

          "message" : "\"321 - App01 - WebServer is starting\"",

          "PID" : 321,

          "service" : {

            "name" : "App01",

            "status" : "WebServer is starting"

          },

          "tags" : [

            "myevent"

          ]

        }

      },
在上面,我们可以看到 tags 字段里有一个叫做 myevent 的值。
在今天的介绍中,我就当是抛砖引玉。更多关于 Filebeat 的 Beats processors,请参阅链接 https://www.elastic.co/guide/en/beats/filebeat/current/defining-processors.html#processors
在今天的文章中,我们介绍了一种数据处理的方式。这种数据处理可以在 beats 中进行实现,而不需要在 Elasticsearch 中的 ingest node 中实现。在实际的使用中,你需要依据自己的架构设计来实现不同的设计方案。
Beats processors的更多相关文章
- Beats: Filebeat和pipleline processors
简要来说: 使用filebeat读取log日志,在filebeat.yml中先一步处理日志中的个别数据,比如丢弃某些数据项,增加某些数据项. 按照之前的文档,是在filebeat.yml中操作的,具体 ...
- Beats:运用 Filebeat 来对微服务 API 进行分析
文章转载自:https://elasticstack.blog.csdn.net/article/details/118145104 需要学习的是httpjson请求的写法 使用 Filebeat 的 ...
- Beats:使用 Elastic Stack 记录 Python 应用日志
文章转载自:https://elasticstack.blog.csdn.net/article/details/112259500 日志记录实际上是每个应用程序都必须具备的功能.无论你选择基于哪种技 ...
- Beats:在 Beats 中实现动态 pipeline
转载自:https://blog.csdn.net/UbuntuTouch/article/details/107127197 在我们今天的练习中,我们将使用 Metricbeat 来同时监控 kib ...
- lib/sqlalchemy/cextension/processors.c:10:20: 致命错误: Python.h:没有那个文件或目录
本文地址:http://www.cnblogs.com/yhLinux/p/4063444.html $ sudo easy_install sqlalchemy [sudo] password fo ...
- Beats数据采集---Packetbeat\Filebeat\Topbeat\WinlogBeat使用指南
Beats是elastic公司的一款轻量级数据采集产品,它包含了几个子产品: packetbeat(用于监控网络流量). filebeat(用于监听日志数据,可以替代logstash-input-fi ...
- BSS Audio® Introduces Full-Bandwidth Acoustic Echo Cancellation Algorithm for Soundweb London Conferencing Processors
BSS Audio® Introduces Full-Bandwidth Acoustic Echo Cancellation Algorithm for Soundweb London Confer ...
- regardless of how many processors are devoted to a parallelized execution of this program
https://en.wikipedia.org/wiki/Amdah's_law Amdahl's law is often used in parallel computing to predic ...
- ELK beats通用配置说明(12th)
Beats配置文件是以YAML语法,该文件包含用于所有的beats的通用配置选项,以及其特点的选项.下面说说通用的配置,特定的配置要看各自beat文档. 通用的配置如下几部分: Shipper Out ...
随机推荐
- linux新建分区和磁盘
1.查看已有分区 ]# df –hl fdisk -l 查看磁盘情况 ]# fdisk –l 2.对未分区的进行分区 # fdisk /dev/vdb 硬盘分区 创建了一个55G的分区磁盘 1.新建第 ...
- SpringBoot到底是什么?
摘要:Spring Boot是由Pivotal团队提供的全新框架,其设计目的是用来简化新Spring应用的初始搭建以及开发过程. 本文分享自华为云社区<SpringBoot到底是什么?如何理解p ...
- ACWing94. 递归实现排列型枚举
题面 把 1∼n 这 n个整数排成一行后随机打乱顺序,输出所有可能的次序. 输入格式 一个整数 n. 输出格式 按照从小到大的顺序输出所有方案,每行 1 个. 首先,同一行相邻两个数用一个空格隔开. ...
- CSDN垃圾的没有底线!
平时写代码,经常需要百度. 今天我输入搜索关键词"access sql字符串转日期"进行百度搜索: 然后点开第一条: 这个加粗的标题可以点的,再点开: 这个内容跟我的搜索关键词有什 ...
- 密码学系列之:PEM和PKCS7,PKCS8,PKCS12
目录 简介 PEM PKCS7 PKCS8 PKCS12 总结 简介 PEM是一种常见的保存key或者证书的格式,PEM格式的文件一般来说后缀是以.pem结尾的.那么PEM到底是什么呢?它和常用的证书 ...
- 恭喜社区喜提三枚新 Committer!
点击上方 蓝字关注我们 ✎ 编 者 按 Apache DolphinScheduler 社区最近又迎来三位新的 Committer,凭借对社区的高质量贡献,社区很荣幸地邀请他们加入 Committer ...
- Luogu1502 窗口的星星 (线段树扫描线)
将每个点拓展为矩形,将\(y\)离散,延\(x\)轴扫描,每次更新最值 用了一百年的pushdown操作疑似有问题,亦或这道题特殊,我乱改了pushdown位置就过了,我能怎么办,WA了一发,y数组没 ...
- LINUX下基于NVIDIA HPC SDK 的 VASP6.3.x编译安装报错整理
关于gcc 用旧版本安装NVIDIA HPC SDK再编译会报错: "/opt/rh/devtoolset-8/root/usr/include/c++/8/bits/move.h" ...
- java-前端之HTML
--html网页简单使用 1.html网页的基本标签 <!doctype html><!-- 声明网页版本 --> <html><!-- 唯一的跟元素 --& ...
- TS 泛型推断好难啊,看看你能写出来不
前言 最近做东西都在用ts,有时候写比较复杂的功能,如果不熟悉,类型写起来还是挺麻烦的.有这样一个功能,在这里,我们就不以我们现有的业务来举例了,我们还是已Animal举例,来说明场景.通过一个工厂来 ...