python GUI尝鲜(但当涉猎,见往事耳)
第一步:简单的窗口和内容
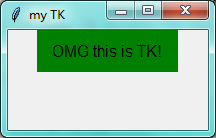
import tkinter as tk

window = tk.Tk()                # 窗口obj对象

window.title('my TK')          # 窗口名字

window.geometry('200x100')     # 窗口宽度和高度

# Label对象传入相应参数text:文本内容; bg:背景; font:字体; width、height 内容的宽度、高度

l = tk.Label(window,text='OMG this is TK!',bg='green',font=('Arial',12),width=15,height=2)

l.pack()                       # 例如放在上边、右边、下边、左边(未传参数,随便放置)

# l.place()                    # 例如放在具体某个点

window.mainloop()              # 不断的循环循环窗口,保证我们点击窗口后,可以及时执行命令
第二步:增加一个button
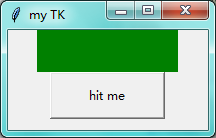
点击hit me 后出现下面这个:

import tkinter as tk

window = tk.Tk()                # 窗口obj对象

window.title('my TK')          # 窗口名字

window.geometry('200x100')     # 窗口宽度和高度

var = tk.StringVar()            # 创建一个字符串对象

# Label对象传入相应参数textvariable:字符串对象; bg:背景; font:字体; width、height 内容的宽度、高度

l = tk.Label(window,textvariable=var,bg='green',font=('Arial',12),width=15,height=2)

l.pack()                       # 例如放在上边、右边、下边、左边(未传参数,随便放置)

on_hit = False                 # 创建一个标志位

def hit_me():

    global on_hit

    if on_hit:

        var.set('')

        on_hit = False

    else:

        var.set('you hit me!')

        on_hit = True

# 内容中多加一个button,点击之后执行command所指向的函数

b = tk.Button(window,text='hit me',width=15,height=2,command=hit_me)

b.pack()                       # 每一个对象都要安放

window.mainloop()              # 不断的循环循环窗口,保证我们点击窗口后,可以及时执行命令
第三步:Entry对象

当你点击 insert point 后:会在光标位置插入 you
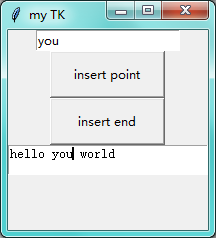
当你点击 insert end 后:会在末尾位置插入 you(无论此时你的光标在哪)

import tkinter as tk

window = tk.Tk()                # 窗口obj对象

window.title('my TK')          # 窗口名字

window.geometry('200x200')     # 窗口宽度和高度

e = tk.Entry(window,show=None)  # show='*'隐藏所输入的字符为*不可见形式 show=None显示原格式

e.pack()

def insert_point():

    var = e.get()

    t.insert('insert',var)

def insert_end():

    var = e.get()

    t.insert('end',var)

b1 = tk.Button(window,text='insert point',width=15,height=2,command=insert_point)  # 执行insert_point函数 光标位置插入

b1.pack()                       # 每一个对象都要安放

b2 = tk.Button(window,text='insert end',width=15,height=2,command=insert_end)       # 执行insert_end函数 末尾插入

b2.pack()                       # 每一个对象都要安放

t = tk.Text(window,height=2,)   # Text 高度是两个字符串的高度

t.pack()

window.mainloop()              # 不断的循环循环窗口,保证我们点击窗口后,可以及时执行命令
在指定行列插入只需要修改
def insert_end():

    var = e.get()

    t.insert(2.3,var)
会在第二行,第四列插入(列的话从0算起)

第四步:Listbox

import tkinter as tk

window = tk.Tk()                # 窗口obj对象

window.title('my TK')          # 窗口名字

window.geometry('200x200')     # 窗口宽度和高度

var1 = tk.StringVar()

l = tk.Label(window,bg='yellow',width=4,textvariable=var1)

l.pack()

def print_selection():

    value = lb.get(lb.curselection())  # 拿到鼠标选中的值

    var1.set(value)                    # 设置给var1对象

b1 = tk.Button(window,text='insert point',width=15,height=2,command=print_selection)  # 执行insert_point函数 光标位置插入

b1.pack()                       # 每一个对象都要安放

var2 = tk.StringVar()

var2.set((11,22,33)) # 默认值

lb = tk.Listbox(window,listvariable=var2)  # 列表对象

lb.pack()

list_item = [77,88,99]

for item in list_item:    # 循环插入列表值

    lb.insert('end',item)

lb.insert(1,'first')      # 在指定位置插入

lb.insert(2,'second')

lb.delete(2)               # 在指定位置插入后马上删除

window.mainloop()              # 不断的循环循环窗口,保证我们点击窗口后,可以及时执行命令
第五步:Radiobutton
默认全部选中

点击Option A后:
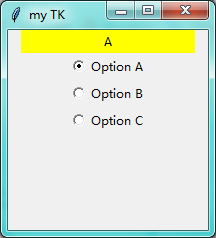
点击Option B后

import tkinter as tk

window = tk.Tk()                # 窗口obj对象

window.title('my TK')          # 窗口名字

window.geometry('200x200')     # 窗口宽度和高度

var = tk.StringVar()

l = tk.Label(window,bg='yellow',width=24,textvariable=var,text='empty')

l.pack()

def print_selection():

    l.config(text='you have select '+ var.get()) # 对 l 对象设置 text 值

r1 = tk.Radiobutton(window,text='Option A',variable=var,value='A',command=print_selection) # 点击执行print_selection函数

r1.pack()

r2 = tk.Radiobutton(window,text='Option B',variable=var,value='B',command=print_selection)

r2.pack()

r3 = tk.Radiobutton(window,text='Option C',variable=var,value='C',command=print_selection)

r3.pack()

window.mainloop()              # 不断的循环循环窗口,保证我们点击窗口后,可以及时执行命令
第六步:Scale
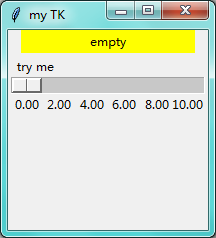
拖动一下后:

import tkinter as tk

window = tk.Tk()                # 窗口obj对象

window.title('my TK')          # 窗口名字

window.geometry('200x200')     # 窗口宽度和高度

l = tk.Label(window,bg='yellow',width=24,text='empty')

l.pack()

def print_selection(v):

    l.config(text='you have select '+ v) # 对 l 对象设置 text 值

# label 名称; from_ 、to 从0到10; orient 是横向显示(tk.HORIZONTAL)还是竖向显示; tickinterval 间隔2 ; resolution 两位小数

s = tk.Scale(window,label='try me',from_=0,to=10,orient=tk.HORIZONTAL,length=200,showvalue=0,tickinterval=2,resolution=0.01,

             command=print_selection)

s.pack()

window.mainloop()              # 不断的循环循环窗口,保证我们点击窗口后,可以及时执行命令
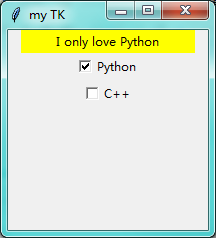
第七步:Checkbutton 复选框


import tkinter as tk

window = tk.Tk()                # 窗口obj对象

window.title('my TK')          # 窗口名字

window.geometry('200x200')     # 窗口宽度和高度

l = tk.Label(window,bg='yellow',width=24,text='empty')

l.pack()

def print_selection():

    if (var1.get()==1) and (var2.get()==0):

        l.config(text='I only love Python')

    elif (var1.get()==0) and (var2.get()==1):

        l.config(text='I only love C++')

    elif (var1.get()==0) and (var2.get()==0):

        l.config(text='I do not love either')

    else:

        l.config(text='I love both')

var1 = tk.IntVar()

var2 = tk.IntVar()

c1 = tk.Checkbutton(window,text='Python',variable=var1,onvalue=1,offvalue=0,command=print_selection)

c1.pack()

c2 = tk.Checkbutton(window,text='C++',variable=var2,onvalue=1,offvalue=0,command=print_selection)

c2.pack()

window.mainloop()              # 不断的循环循环窗口,保证我们点击窗口后,可以及时执行命令
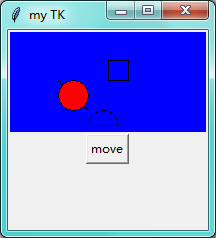
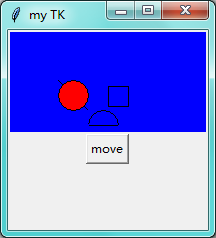
第八步:画布 canvas
import tkinter as tk

window = tk.Tk()                # 窗口obj对象

window.title('my TK')          # 窗口名字

window.geometry('200x200')     # 窗口宽度和高度

canvas = tk.Canvas(window,bg='blue',width=200,height=100)

# image_file = tk.PhotoImage(file='hsk.gif')

# image = canvas.create_image(0,0,anchor='nw',image=image_file)

x0,y0,x1,y1=50,50,80,80

line = canvas.create_line(x0,y0,x1,y1)

oval = canvas.create_oval(x0,y0,x1,y1,fill='red') # 圆  填充红色

arc = canvas.create_arc(x0+30,y0+30,x1+30,y1+30,start=0,extent=180) # 扇形 0到180度

rect = canvas.create_rectangle(100,30,120,50) # 正方形

canvas.pack()

def moveit():

    canvas.move(rect,0,2)  # x方向移动0 y方向每次点击移动2

b = tk.Button(window,text='move',command=moveit).pack()

window.mainloop()              # 不断的循环循环窗口,保证我们点击窗口后,可以及时执行命令
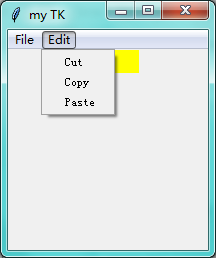
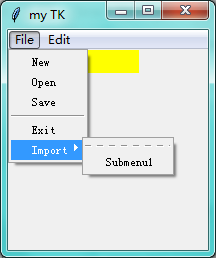
第九步: Menu

import tkinter as tk

window = tk.Tk()                # 窗口obj对象

window.title('my TK')          # 窗口名字

window.geometry('200x200')     # 窗口宽度和高度

l = tk.Label(window,text='              ',bg='yellow')

l.pack()

counter = 0

def do_job():

    global counter

    l.config(text='do '+ str(counter))

    counter+=1

menubar = tk.Menu(window)    # 菜单栏

filemenu = tk.Menu(menubar,tearoff=0)

menubar.add_cascade(label='File',menu=filemenu)

filemenu.add_cascade(label='New',command=do_job)  # 给file 加各种功能

filemenu.add_cascade(label='Open',command=do_job)

filemenu.add_cascade(label='Save',command=do_job)

filemenu.add_separator()    # 分割线

filemenu.add_cascade(label='Exit',command=window.quit)  # 关掉窗口

editmenu = tk.Menu(menubar,tearoff=0)

menubar.add_cascade(label='Edit',menu=editmenu)   # 给 edit 加各种功能

editmenu.add_cascade(label='Cut',command=do_job)

editmenu.add_cascade(label='Copy',command=do_job)

editmenu.add_cascade(label='Paste',command=do_job)

window.config(menu=menubar)

window.mainloop()              # 不断的循环循环窗口,保证我们点击窗口后,可以及时执行命令
import tkinter as tk

window = tk.Tk()                # 窗口obj对象

window.title('my TK')          # 窗口名字

window.geometry('200x200')     # 窗口宽度和高度

l = tk.Label(window,text='              ',bg='yellow')

l.pack()

counter = 0

def do_job():

    global counter

    l.config(text='do '+ str(counter))

    counter+=1

menubar = tk.Menu(window)    # 菜单栏

filemenu = tk.Menu(menubar,tearoff=0)

menubar.add_cascade(label='File',menu=filemenu)

filemenu.add_cascade(label='New',command=do_job)  # 给file 加各种功能

filemenu.add_cascade(label='Open',command=do_job)

filemenu.add_cascade(label='Save',command=do_job)

filemenu.add_separator()    # 分割线

filemenu.add_cascade(label='Exit',command=window.quit)  # 关掉窗口

editmenu = tk.Menu(menubar,tearoff=0)

menubar.add_cascade(label='Edit',menu=editmenu)   # 给 edit 加各种功能

editmenu.add_cascade(label='Cut',command=do_job)

editmenu.add_cascade(label='Copy',command=do_job)

editmenu.add_cascade(label='Paste',command=do_job)

submenu = tk.Menu(filemenu)          # file 中再嵌套一个 Import 下有 Submenu1

filemenu.add_cascade(label='Import',menu=submenu,underline=0)

submenu.add_command(label='Submenu1',)

window.config(menu=menubar)

window.mainloop()              # 不断的循环循环窗口,保证我们点击窗口后,可以及时执行命令
第十步:Frame 窗口布局

import tkinter as tk

window = tk.Tk()                # 窗口obj对象

window.title('my TK')          # 窗口名字

window.geometry('200x200')     # 窗口宽度和高度

l = tk.Label(window,text='on the window',bg='yellow')

l.pack()

frm = tk.Frame(window)  # 主frame

frm.pack()

frm_l = tk.Frame(frm)  # 左fram

frm_r = tk.Frame(frm)  # 右fram

frm_l.pack(side='left')

frm_r.pack(side='right')

tk.Label(frm_l,text='on the frame_l1').pack()

tk.Label(frm_l,text='on the frame_l2').pack()

tk.Label(frm_r,text='on the frame_r1').pack()

window.mainloop()              # 不断的循环循环窗口,保证我们点击窗口后,可以及时执行命令
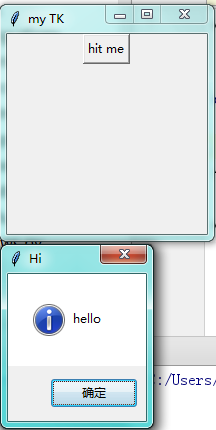
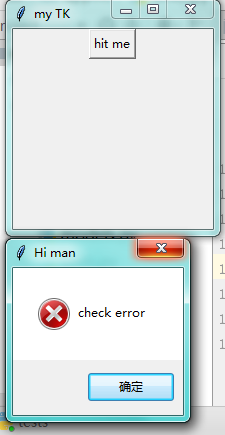
第十一步:messagebox 弹窗

import tkinter as tk

from tkinter import messagebox

window = tk.Tk()                # 窗口obj对象

window.title('my TK')          # 窗口名字

window.geometry('200x200')     # 窗口宽度和高度

def hit_me():

    # messagebox.showinfo(title='Hi',message='hello')

    # messagebox.showwarning(title='Hi man',message='check warning')

    # messagebox.showerror(title='Hi man',message='check error')

    # messagebox.askquestion(title='Hi man',message='hello world')   # return yes or no

    # messagebox.askokcancel(title='Hi man',message='hello world')  # return True or False

    messagebox.askyesno(title='Hi man',message='hello world')      # return True or False

tk.Button(window,text='hit me',command=hit_me).pack()

window.mainloop()              # 不断的循环循环窗口,保证我们点击窗口后,可以及时执行命令
第十二步:放置位置
import tkinter as tk
from tkinter import messagebox
window = tk.Tk() # 窗口obj对象
window.title('my TK') # 窗口名字
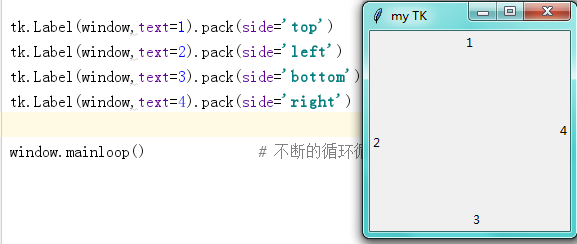
window.geometry('200x200') # 窗口宽度和高度 # tk.Label(window,text=1).pack(side='top')
# tk.Label(window,text=2).pack(side='left')
# tk.Label(window,text=3).pack(side='bottom')
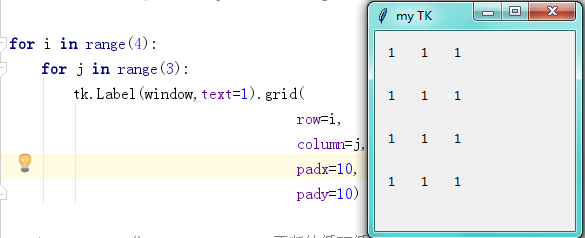
# tk.Label(window,text=4).pack(side='right') # for i in range(4):
# for j in range(3):
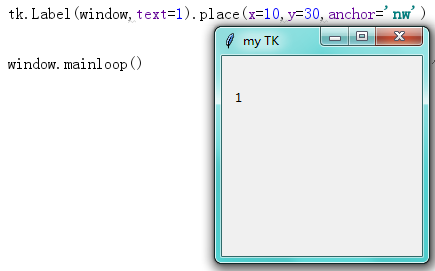
# tk.Label(window,text=1).grid(row=i,column=j,padx=10,pady=10) tk.Label(window,text=1).place(x=10,y=30,anchor='nw') window.mainloop() # 不断的循环循环窗口,保证我们点击窗口后,可以及时执行命令
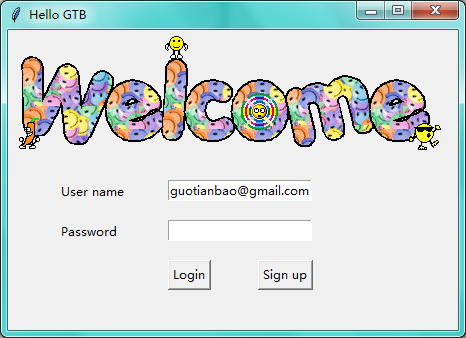
第十三步:登录注册窗口

from tkinter import messagebox

import tkinter as tk

from  tkinter import *

import pickle

window = tk.Tk()                # 窗口obj对象

window.title('Hello GTB')    # 窗口名字

window.geometry('450x300')     # 窗口宽度和高度

# welcome message

canvas = tk.Canvas(window,height=200,width=500)

image_file = PhotoImage(file='C:\\Users\\mu\\Desktop\\welcome.gif')

image = canvas.create_image(0,0,anchor='nw',image=image_file)

canvas.pack(side='top')

var_user_name = tk.StringVar()

var_user_name.set('guotianbao@gmail.com')

var_password =  tk.StringVar()

# userinfo

tk.Label(window,text='User name').place(x=50,y=150)

tk.Label(window,text='Password').place(x=50,y=190)

entry_user_name = tk.Entry(window,textvariable=var_user_name)

entry_user_name.place(x=160,y=150)

entry_password = tk.Entry(window,textvariable=var_password,show='*')

entry_password.place(x=160,y=190)

# login and sign up

def user_login():

    user_name = var_user_name.get()

    user_password = var_password.get()

    try:

        with open('C:\\Users\\mu\\PycharmProjects\\mycrm\\app01\\user_info.txt','rb') as user_file:

            user_info = pickle.load(user_file)

    except FileNotFoundError:

        with open('user_info.txt', 'ab+') as user_file:

            user_info = {'admin':'admin'}

            pickle.dump(user_info,user_file)

    if user_name in user_info:

        if user_password == user_info[user_name]:

            messagebox.showinfo(title='Welcome',message='How are you '+user_name)

        else:

            messagebox.showerror(title='Hi man',message= 'Your password is wrong, try again. ')

    else:

        is_sign_up = messagebox.askyesno('Welcome','You have not sign up yet. Sign up now ?')

        if is_sign_up:

            user_sign()

def user_sign():

    def sign_last():

        np = new_pwd.get()          # 注册密码

        npf = new_pwd_confirm.get() # 确认密码

        nn = new_name.get()         # 注册的名字

        with open('C:\\Users\\mu\\PycharmProjects\\mycrm\\app01\\user_info.txt','rb') as usr_file :

            exist_usr_info = pickle.load(usr_file)

        if np != npf:

            tk.messagebox.showerror('Error', 'Password and confirm password must be the same!')

        elif nn in exist_usr_info:

            tk.messagebox.showerror('Error', 'The user has already signed up!')

        else:

            exist_usr_info[nn] = np

            with open('usrs_info.txt', 'ab+') as usr_file:

                pickle.dump(exist_usr_info, usr_file)

            tk.messagebox.showinfo('Welcome', 'You have successfully signed up!')

            window_sign_up.destroy()

    window_sign_up = tk.Toplevel()

    window_sign_up.title('Sign up window')

    window_sign_up.geometry('350x200')

    new_name = tk.StringVar()

    new_name.set('example@gmail.com')

    tk.Label(window_sign_up,text='User name:').place(x=10,y=10)

    entry_new_name = tk.Entry(window_sign_up,textvariable=new_name)

    entry_new_name.place(x=150,y=10)

    new_pwd = tk.StringVar()

    tk.Label(window_sign_up, text='Password:').place(x=10, y=50)

    entry_new_pwd = tk.Entry(window_sign_up, textvariable=new_pwd,show='*')

    entry_new_pwd.place(x=150, y=50)

    new_pwd_confirm = tk.StringVar()

    tk.Label(window_sign_up, text='Password:').place(x=10, y=90)

    entry_new_pwd_confirm = tk.Entry(window_sign_up, textvariable=new_pwd_confirm,show='*')

    entry_new_pwd_confirm.place(x=150, y=90)

    btn_comfirm_sign_up = tk.Button(window_sign_up, text='Sign up', command=sign_last)

    btn_comfirm_sign_up.place(x=150, y=130)

btn_login = tk.Button(window,text='Login',command=user_login)

btn_login.place(x=160,y=230)

btn_login = tk.Button(window,text='Sign up',command=user_sign)

btn_login.place(x=250,y=230)

window.mainloop()              # 不断的循环循环窗口,保证我们点击窗口后,可以及时执行命令
学习: YouTube 莫烦 python GUI 简易教程
python GUI尝鲜(但当涉猎,见往事耳)的更多相关文章
- 【响应式】foundation栅格布局的“尝鲜”与“填坑”
提到响应式,就不得不提两个响应式框架--bootstrap和foundation.在标题上我已经说明白啦,今天给大家介绍的是foundation框架. 何为"尝鲜"?就是带大伙 ...
- 微信团队分享:Kotlin渐被认可,Android版微信的技术尝鲜之旅
本文由微信开发团队工程是由“oneliang”原创发表于WeMobileDev公众号,内容稍有改动. 1.引言 Kotlin 是一个用于现代多平台应用的静态编程语言,由 JetBrains 开发( ...
- Python GUI之tkinter窗口视窗教程大集合(看这篇就够了) JAVA日志的前世今生 .NET MVC采用SignalR更新在线用户数 C#多线程编程系列(五)- 使用任务并行库 C#多线程编程系列(三)- 线程同步 C#多线程编程系列(二)- 线程基础 C#多线程编程系列(一)- 简介
Python GUI之tkinter窗口视窗教程大集合(看这篇就够了) 一.前言 由于本篇文章较长,所以下面给出内容目录方便跳转阅读,当然也可以用博客页面最右侧的文章目录导航栏进行跳转查阅. 一.前言 ...
- C++17尝鲜
https://cloud.tencent.com/developer/article/1351910 [译]C++17,optional, any, 和 variant 的更多细节 用户261520 ...
- Python GUI 背景色与语法高亮主题配置
[补充] Python GUI 中 :ALT+P 可以重复上一条命令. ---------------------------------------------------------------- ...
- Windows 10 周年版尝鲜
早在今年的 Build 大会上,微软就开始宣传最新的 Windows 10 周年版更新,炫了不少特技,直到昨天(2016/8/2 PST)才正式放出,相关新闻可以参考这里,正式的版本为 Version ...
- Python-1 IDLE(Python GUI)
#1 运行Python: 开始 -> 程序 -> Python -> IDLE(Python GUI) 或 开始 -> 输入IDLE #2 各个菜单项及基本用法的帮助: Hel ...
- Python GUI with Tkinter (from youtube) 在youtube上能找到很多编程视频...
Python GUI with Tkinter - 1 - Introduction以上链接是一个python tkinter视频系列的第一讲的链接.虽然英语不好,但是,程序还是看得懂的(照着做就可以 ...
- 【翻译】五步快速使用LINQPad尝鲜StreamInsight
StreamInsight 学习地址:http://www.cnblogs.com/StreamInsight/archive/2011/10/26/StreamInsight-Query-Seri ...
随机推荐
- 获取当前外网IP地址
<script src="http://pv.sohu.com/cityjson?ie=utf-8"></script><script>cons ...
- shift:解决shell编程中的入渗问题
我说过了,shell是我的常规武器,目前虽然还不纯熟,但是我爱shell这门语言,在Linux下面混,总要写脚本.程序员是有基因,对编程语言是有偏好的,你让我写C代码,我会觉得很爽,会有困难,会有痛苦 ...
- 28个jQuery性能优化的建议
我一直在寻找有关jQuery性能优化方面的小窍门,能让我那臃肿的动态网页应用变得轻便些.找了很多文章后,我决定将最好最常用的一些优化性能的建议列出来.我也做了一个jQuery性能优化的简明样式表,你可 ...
- flume-ng script should first try finding java from PATH and then try using bigtop, instead of vice-versa
[FLUME-1154] flume-ng script should first try finding java from PATH and then try using bigtop, inst ...
- 增删改查,连接数据库UsersDao
package com.abc.dao; import java.sql.Connection;import java.sql.PreparedStatement;import java.sql.Re ...
- machine learning for hacker记录(2) 数据分析
本章主要讲了对数据的一些基本探索,常见的six numbers,方差,均值等 > data.file <- file.path('data', '01_heights_weights_ge ...
- [haoi2015]T1
题意:给定你一颗树,要求你在这棵树中确定K个黑点和N-K个白点,使黑点间与白点间两两距离之和最大,输出最大值.n<=2000 对于这道题,我想了好几个思路,包括点分治,贪心,动规,网络流等等,实 ...
- Android系统shell中的clear命令实现【转】
本文转载自:http://blog.csdn.net/morixinguan/article/details/73467845 之前一直不太清楚,当我们在shell命令行输入很多命令,会在屏幕上输出一 ...
- Android源码的编译和下载【转】
本文转载自:http://blog.csdn.net/banketree/article/details/9089827 网上介绍下载.编译Android方法一坨,读万卷书不如行万里路,以下是笔者亲身 ...
- Bestcoder BestCoder Round #28 A Missing number(查找缺失的合法数字)
Problem Description There is a permutation without two numbers in it, and now you know what numbers ...