Vue处理ajax请求
Ajax请求
1>解决跨域问题
1.1前端解决。只需要在vue.config.js中增加devServer节点增加代理:
const path = require("path");

const resolve = dir => path.join(__dirname, dir);

const BASE_URL = process.env.NODE_ENV === 'procution' ? '/iview-admin/' : '/'

module.exports = {

  lintOnSave: false,

  baseUrl: BASE_URL,

  chainWebpack: config => {

    config.resolve.alias.set("@",resolve('src')).set("_c",resolve('src/components'))

  },

  //打包时不生成.map文件

  productionSourceMap: false,

  //跨域配置

 devServer: {

    proxy:"http://localhost:4000"

 }

}
1.2后端解决,应用cors(Cross-Origin Resource Sharing)解决。
如果是node环境,可以这样写:
app.all("*",(req,res,next)=>{

    res.hearder("Access-Control-Allow-Origin","*");

    res.hearder("Access-Control-Allow-Headers","X-Requested-With,Content-Type");

    res.hearder("Access-Control-Allow-Methods","PUT,POST,GET,DELETE,OPTIONS");

});
如果是.net环境,在Global.asax中添加如下代码片段:
protected void Application_BeginRequest(object sender, EventArgs e)

{

  HttpContext.Current.Response.AddHeader("Access-Control-Allow-Origin", "*");

  if (HttpContext.Current.Request.HttpMethod == "OPTIONS")

  {

    HttpContext.Current.Response.AddHeader("Access-Control-Allow-Methods", "POST, PUT, DELETE");

    HttpContext.Current.Response.AddHeader("Access-Control-Allow-Headers", "Content-Type, Accept");

    HttpContext.Current.Response.AddHeader("Access-Control-Max-Age", "");

    HttpContext.Current.Response.End();

  }

}
2>封装axios
下面用axios模拟一个ajax请求为例来对其进行封装:
后端采用node.js模拟一个接口,代码如下:
router.post('getUSerInfo', function(req, res, next) {

    console.log('请求成功');

    res.status(200).send({

        code: 200,

        data: {

            name: "Lison"

        }

    });

});
前端代码目录结构:
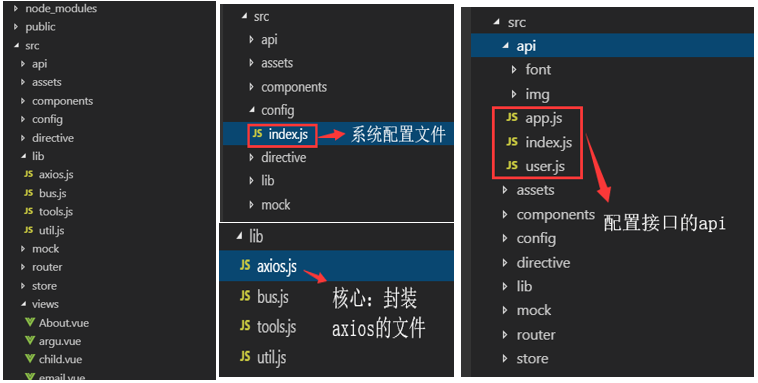
config/index.js:
export const baseURL =

  process.env.NODE_ENV == "production"

    ? "http://production.com"

    : "http://localhost:3000";
lib/axios.js:
import axios from "axios";

import { baseURL } from "@/config";

//ES6类的写法

class HttpRequest {

  //ES6默认参数

  constructor(baseUrl = baseURL) {

    this.baseUrl = baseUrl;

    this.queue = {}; //将请求都放到队列中

  }

  getInsideConfig() {

    const config = {

      baseURL: this.baseUrl,

      hearders: {

        //

      }

    };

    return config;

  }

  //封装拦截器

  interceptors(instance, url) {

    instance.interceptors.request.use(

      config => {

        //添加全局的loading

        //Object.keys() 方法会返回一个由一个给定对象的自身可枚举属性组成的数组

        if (!Object.keys(this.queue).length) {

          //spin.show

        }

        this.queue[url] = true;

        return config;

      },

      error => {

        return Promise.reject(error);

      }

    );

    instance.interceptors.response.use(

      res => {

        delete this.queue[url];

        const { data, status } = res;

        return { data, status };

      },

      error => {

        delete this.queue[url];

        return Promise.reject(error);

      }

    );

  }

  request(options) {

    debugger

    const instance = axios.create();

    /**

     * Object.assign() 方法用于将所有可枚举属性的值从一个或多个源对象复制到目标对象。它将返回目标对象。

     * const target = { a: 1, b: 2 };

     * const source = { b: 4, c: 5 };

     * const returnedTarget = Object.assign(target, source);

     * console.log(target);

     * expected output: Object { a: 1, b: 4, c: 5 }

     */

    options = Object.assign(this.getInsideConfig(), options);

    this.interceptors(instance, options.url);

    return instance(options);

  }

}

export default HttpRequest;
api/index.js
import HttpRequest from '@/lib/axios'

const axios = new HttpRequest()

export default axios
api/user.js
import axios from "./index";

export const getUserInfo = ({ userId }) => {

  debugger

  return axios.request({

    url: "/getUserInfo",

    method: "post",

    data: {

      userId

    }

  });

};
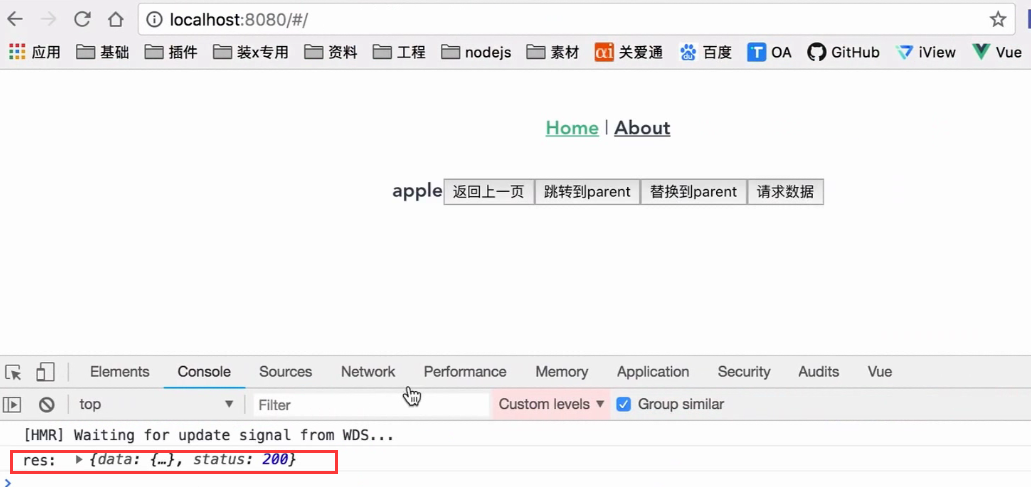
home.vue:
  <template>

  <div class="home">

    <b>{{ food }}</b>

    <button @click="getInfo">请求数据</button>

  </div>

</template>

  <script>

// @ is an alias to /src

import HelloWorld from "@/components/HelloWorld.vue";

import { getUserInfo } from '@/api/user'

export default {

  name: "home",

  components: {

    HelloWorld

  },

  props: {

    food: {

      type: String,

      default: "apple"

    }

  },

  beforeRouteEnter(to, from, next) {

    // 在渲染该组件的对应路由被 confirm 前调用

    // 不!能!获取组件实例 `this`

    // 因为当守卫执行前,组件实例还没被创建

    next(vm => {

      //若想使用实例,可使用这种方法

      console.log(vm);

    });

  },

  beforeRouteLeave(to, from, next) {

    // const leave = confirm('您确定要离开吗?')

    // if (leave) next()

    // else next(false)

    next();

  },

  methods: {

    getInfo() {

      getUserInfo({ userId: 21 }).then(res => {

        console.log("res: ", res);

      });

   }

  }

};

</script>
Vue处理ajax请求的更多相关文章
- 从零开始学 Web 之 Vue.js(四)Vue的Ajax请求和跨域
大家好,这里是「 从零开始学 Web 系列教程 」,并在下列地址同步更新...... github:https://github.com/Daotin/Web 微信公众号:Web前端之巅 博客园:ht ...
- vue 发送ajax请求
一. 简介 1.vue本身不支持发送AJAX请求,需要使用vue-resource(vue1.0版本).axios(vue2.0版本)等插件实现 2.axios是一个基于Promise的HTTP请求客 ...
- vue发送ajax请求
一.vue-resource 1.简介 一款vue插件,用于处理ajax请求,vue1.x时广泛应用,现不被维护. 2.使用流程 step1:安装 [命令行输入] npm install vue-re ...
- vue实现ajax请求(vue-resource和axios)
1.vue-resouce实现ajax请求 vue1中主要用vue-resouce实现ajax请求, 2.1 引用vue-resouce 引入axios,直接在index.html文件中引入; 或者在 ...
- vue中ajax请求发送
示例 <!DOCTYPE html> <html lang="en"> <head> <meta charset="UTF-8& ...
- vue的ajax请求之axios
axios.get(this.apiUrl+'good/info',{params:{'goodsid':'sp441153'}}) .then(function(response){ console ...
- vue实现ajax滚动下拉加载,同时具有loading效果
<!doctype html> <html> <head> <meta charset="utf-8"> <title> ...
- Vue框架axios请求(类似于ajax请求)
Vue框架axios get请求(类似于ajax请求) 首先介绍下,这个axios请求最明显的地方,通过这个请求进行提交的时候页面不会刷新 <!DOCTYPE html> <html ...
- Vue(七)发送Ajax请求
发送AJAX请求 1. 简介 vue本身不支持发送AJAX请求,需要使用vue-resource.axios等插件实现 axios是一个基于Promise的HTTP请求客户端,用来发送请求,也是vue ...
随机推荐
- Unity3D 自动添加Fbx Animation Event
http://blog.csdn.net/aa20274270/article/details/52528449 using UnityEngine; using System.Collections ...
- floyd判环算法(龟兔赛跑算法)
floyd判环算法(龟兔赛跑算法) 注意,这个算法是用来判断一条链+一条环的图,环的长度或者环与链的交界处的,所以此floyd非彼floyd(虽然都是一个人想出来的). (图不是我的) 如果只要求环的 ...
- codevs1229 数字游戏
1229 数字游戏 时间限制: 1 s 空间限制: 128000 KB 题目等级 : 白银 Silver 题解
- Android实现监听控件点击事件
Android实现监听控件点击事件 引言 这篇文章主要想写一下Android实现监听点击事件的几种方法,Activity和Fragment实现起来有些方法上会有些不同,这里也略做介绍. 最近一直在忙一 ...
- PJzhang:子域名发掘工具Sublist3r
猫宁!!! 参考链接:https://www.freebuf.com/sectool/90584.html 作者上一次更新是2018年10月16日了,sublist3r中融合有另外一个子域名爆破工具S ...
- P1308-道路修建 (noi 2011)
题目描述 在 W 星球上有 n 个国家.为了各自国家的经济发展,他们决定在各个国家 之间建设双向道路使得国家之间连通.但是每个国家的国王都很吝啬,他们只愿 意修建恰好 n – 1 条双向道路. 每条道 ...
- jsf+ejb
jsf+ejb 示例 http://docs.jboss.org/jbossas/docs/Installation_And_Getting_Started_Guide/5/html/Sample_J ...
- redids
Redis 地理位置(geo) Redis 键(key) Redis 字符串(String) Redis 哈希(Hash) Redis 列表(List) Redis 集合(Set) Redis 有序集 ...
- HttpEnum
package com.yd.ifm.client.caller.util.http; public class HttpEnum { public enum DefContentTypeEnum i ...
- springboot在lunix后台启动,退出账号也不关闭
首先需要进到自己springboot项目的根目录,然后执行如下linux命令 nohup java -jar 自己的springboot项目.jar >日志文件名.log 2>&1 ...