ABP 数据访问 - IRepository 仓储
ABP系列,这个系列来的比较晚,很多大佬其实已经分析过,为什么现在我又来一轮呢?
1.想自己来完整的学习一轮ABP
2.公司目前正在使用ABP,准备迁移Core
基于以上的目的,开始这个系列
ABP IRepository
先上 IRepository 类图结构
只是描述了类的关联关系,很多成员并不准确
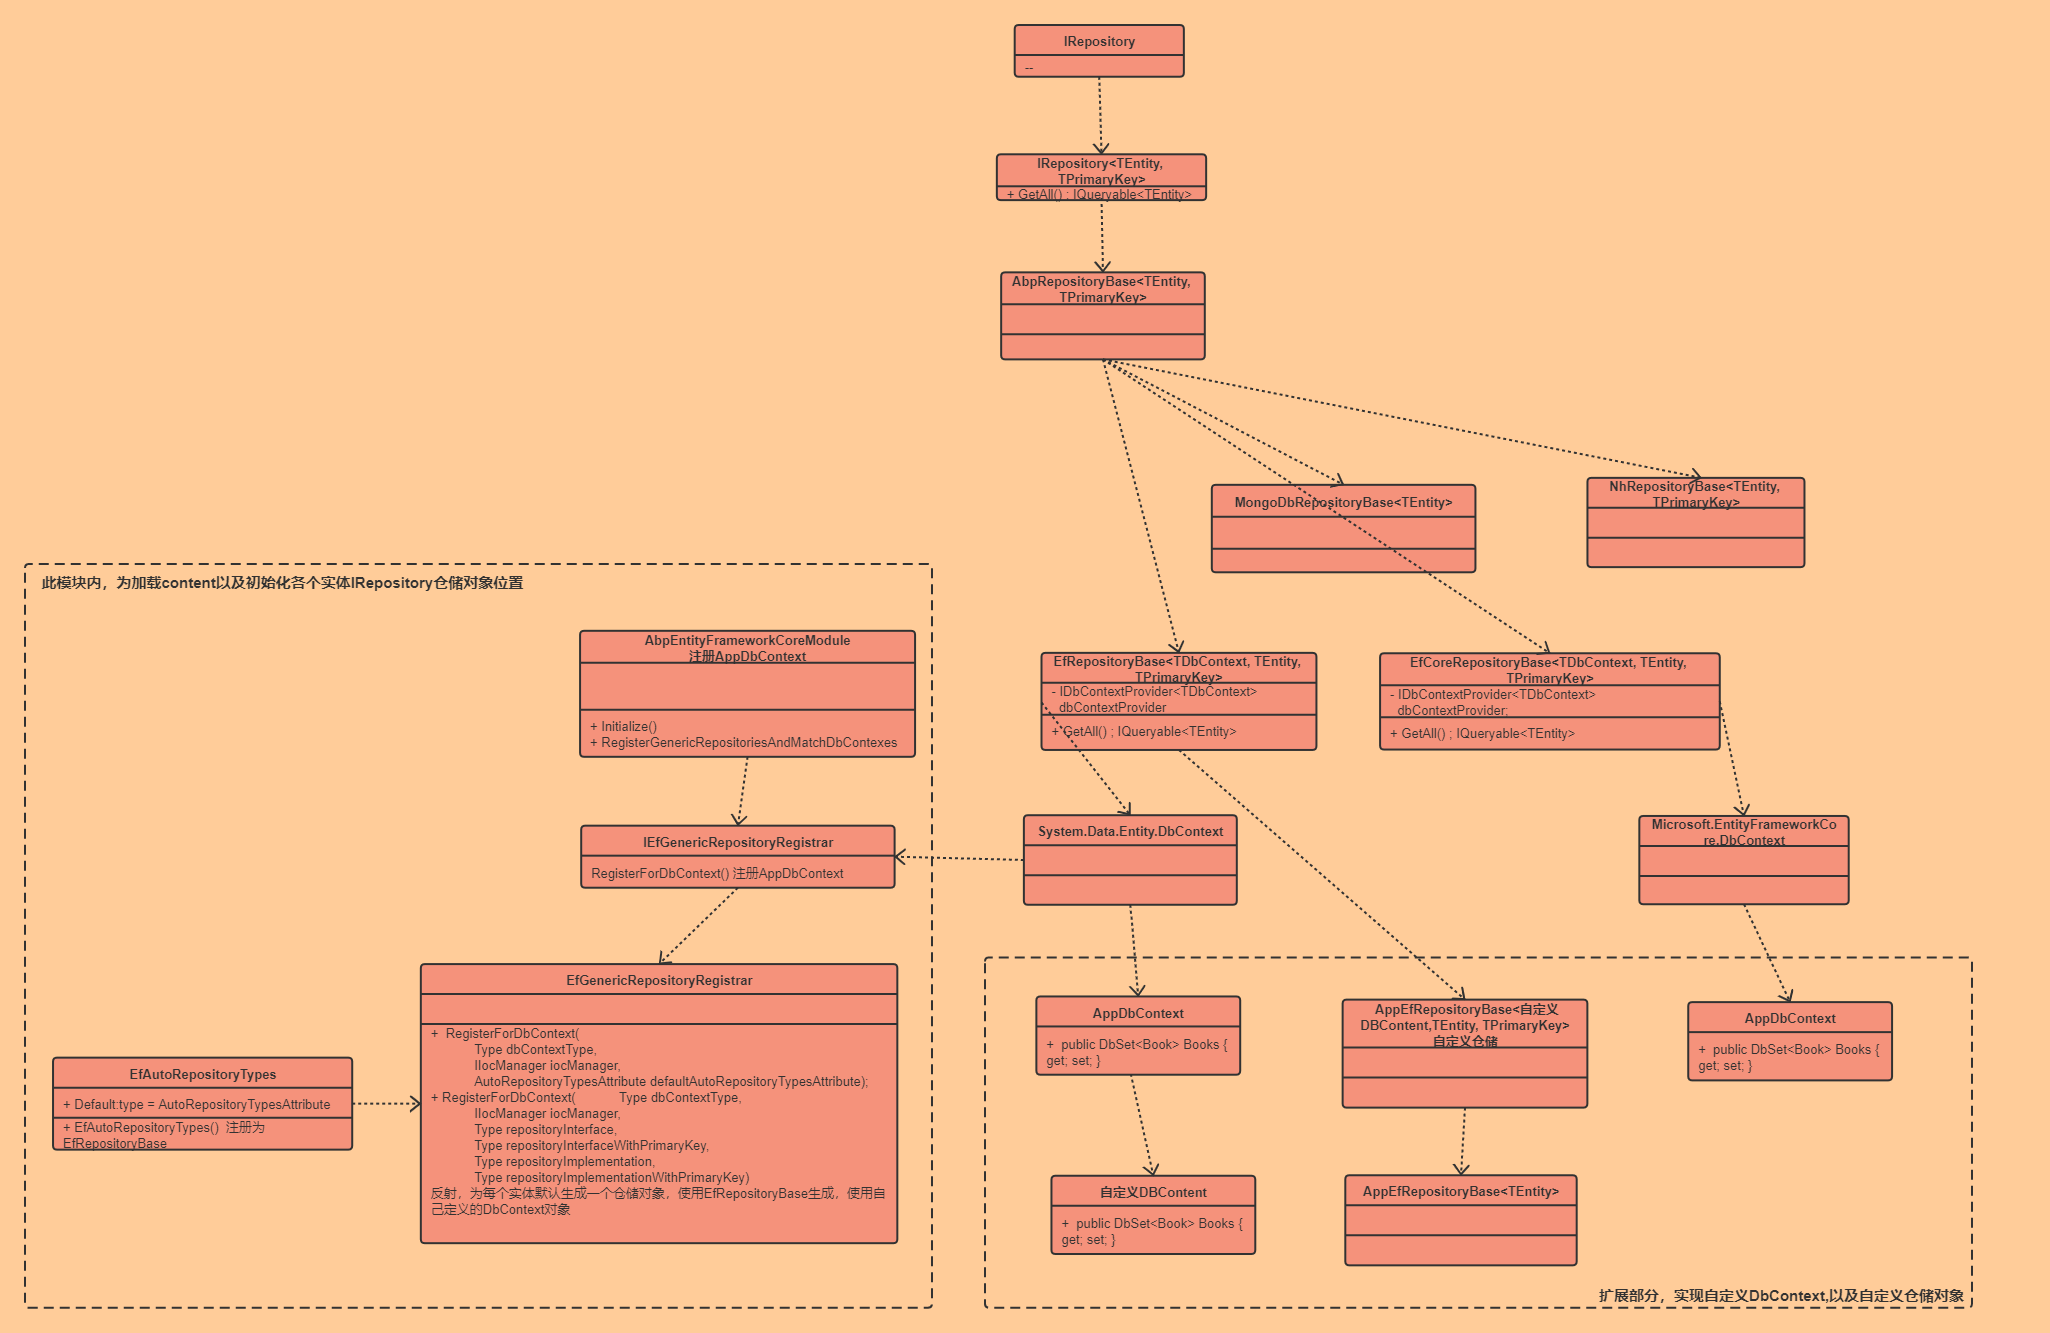
基于这个类图,我们再来分析下ABP的仓储访问;
1.IRepository 整体结构
按照我的理解,可以简单分为三部分;
1.整体接口以及抽象父类定义
2.自定义DbContext,Repository,实体
3.自动注册实体仓储
1.整体接口以及抽象父类定义
这部分内容整体包含在IRepository,IRepository<TEntity,TprimaryKey>,AbpRepositoryBase中,也就是图中为包含在虚线框的内容;
IRepository:仓储的接口,接口中未定义方方法
IRepository<TEntity, TPrimaryKey> :定义仓储对象的相关查询方法,GetAll(),Get()等方法
AbpRepositoryBase<TEntity, TPrimaryKey> :抽象类,封装了一些公共方法但是并未有具体实现,实现留在了具体的调用层,例如 EF,EfCore,Dapper等
接口实现
EfCoreRepositoryBase<TDbContext, TEntity, TPrimaryKey> :
实现AbpRepositoryBase<TEntity, TPrimaryKey>
1.EFCore的内部核心查询全部就依赖于 DbContext,DbSet来操作数据;
2.EFCore的DbContext引用来源Microsoft.EntityFrameworkCore.DbContext,而Ef的DbContext依赖引用System.Data.Entity.DbContext,Core的底层依赖就全部替换了
AbpDbContext :ABP默认的EFCore的DBContext封装,包含一些公共方法,要在ABP框架下使用DbContext,需要继承 AbpDbContext
2.自定义DbContext,Repository,实体
实现DBContext:
 public class SampleAppDbContext : AbpZeroDbContext<Tenant, Role, User, SampleAppDbContext>, IAbpPersistedGrantDbContext

    {

        public DbSet<PersistedGrantEntity> PersistedGrants { get; set; }

        public DbSet<Advertisement> Advertisements { get; set; }

        public DbSet<Blog> Blogs { get; set; }

        public DbSet<Post> Posts { get; set; }

        public DbSet<Category> Categories { get; set; }

        public DbSet<Comment> Comments { get; set; }

        public DbSet<Product> Products { get; set; }

        public DbSet<ProductTranslation> ProductTranslations { get; set; }

        public DbSet<Author> Authors { get; set; }

        public DbSet<Store> Stores { get; set; }

        public DbSet<Order> Orders { get; set; }

        public DbSet<OrderTranslation> OrderTranslations { get; set; }

        public DbSet<UserTestEntity> UserTestEntities { get; set; }

        public DbSet<Country> Countries { get; set; }

        public SampleAppDbContext(DbContextOptions<SampleAppDbContext> options)

            : base(options)

        {

        }

        protected override void OnModelCreating(ModelBuilder modelBuilder)

        {

            base.OnModelCreating(modelBuilder);

            modelBuilder.ConfigurePersistedGrantEntity();

            modelBuilder.Entity<Blog>().OwnsOne(x => x.More);

            modelBuilder.Entity<Blog>().OwnsMany(x => x.Promotions, b =>

            {

                b.WithOwner().HasForeignKey(bp => bp.BlogId);

                b.Property<int>("Id");

                b.HasKey("Id");

                b.HasOne<Blog>()

                 .WithOne()

                 .HasForeignKey<BlogPromotion>(bp => bp.AdvertisementId)

                 .IsRequired();

            });

            modelBuilder.Entity<Advertisement>().OwnsMany(a => a.Feedbacks, b =>

            {

                b.WithOwner().HasForeignKey(af => af.AdvertisementId);

               b.Property<int>("Id");

                b.HasKey("Id");

                b.HasOne<Comment>()

                 .WithOne()

                 .HasForeignKey<AdvertisementFeedback>(af => af.CommentId);

            });

            modelBuilder.Entity<Book>().ToTable("Books");

            modelBuilder.Entity<Book>().Property(e => e.Id).ValueGeneratedNever();

            modelBuilder.Entity<Store>().Property(e => e.Id).HasColumnName("StoreId");

        }

    }

}
DbContext中需要定义实体的DBSet,因为数据操作都是基于DbSet来完成
个性化仓储:
第一步,设置自定义仓储接口
  public interface IPostRepository : IRepository<Post, Guid>

    {

    }
这里继承IRepository<Entity,PrimaryKey>,说明实体主键并非Int类型,所以需要重新实现
第二步,继承 EfCoreRepositoryBase,实现自定义仓储方法
 public class PostRepository : EfCoreRepositoryBase<BloggingDbContext, Post, Guid>,

IPostRepository

    {

        public PostRepository(IDbContextProvider<BloggingDbContext> dbContextProvider)

            : base(dbContextProvider)

        {

        }

        public override int Count()

        {

            throw new Exception("can not get count of posts");

        }

    }
第三步,注册自定义仓储,注册代码写在自定义模块中
注意:自定义模块的注册必须依赖 AbpEntityFrameworkCoreModule 模块先注册 这里留着后面来解释,为什么一定要依赖
//Custom repository

            Configuration.ReplaceService<IRepository<Post, Guid>>(() =>

            {

                IocManager.IocContainer.Register(

                    Component.For<IRepository<Post, Guid>, IPostRepository,

PostRepository>()

                        .ImplementedBy<PostRepository>()

                        .LifestyleTransient()

                );

            });
3.自动注册实体仓储
首先来看下,我们定义好DbContext后,如果使用自己的仓储服务呢?
在类里面定义属性仓储
private readonly IRepository<EntityDynamicParameter> _entityDynamicParameterRepository;
大家有没有考虑过,为什么我们可以直接使用实体的仓储类,在哪里实例化的呢? 这是ABP自动完成的,会反射获取所有的实体服务,并自动为其注册仓储服务,我们一起来分析下自动注册的内容
AbpEntityFrameworkCoreModule.cs
public override void Initialize()

        {

IocManager.RegisterAssemblyByConvention(typeof(AbpEntityFrameworkCoreModule).GetAssembly());

            IocManager.IocContainer.Register(

                Component.For(typeof(IDbContextProvider<>))

           .ImplementedBy(typeof(UnitOfWorkDbContextProvider<>))

                    .LifestyleTransient()

                );

            RegisterGenericRepositoriesAndMatchDbContexes();

        }
调用 RegisterGenericRepositoriesAndMatchDbContexes 方法
        private void RegisterGenericRepositoriesAndMatchDbContexes()

        {

            var dbContextTypes =

                _typeFinder.Find(type =>

                {

                    var typeInfo = type.GetTypeInfo();

                    return typeInfo.IsPublic &&

                           !typeInfo.IsAbstract &&

                           typeInfo.IsClass &&

                           typeof(AbpDbContext).IsAssignableFrom(type);

                });

            if (dbContextTypes.IsNullOrEmpty())

            {

                Logger.Warn("No class found derived from AbpDbContext.");

                return;

            }

            using (IScopedIocResolver scope = IocManager.CreateScope())

            {

                foreach (var dbContextType in dbContextTypes)

                {

                    Logger.Debug("Registering DbContext: " + dbContextType.AssemblyQualifiedName);

                    scope.Resolve<IEfGenericRepositoryRegistrar>().RegisterForDbContext(dbContextType, IocManager, EfCoreAutoRepositoryTypes.Default);

                    IocManager.IocContainer.Register(

                    Component.For<ISecondaryOrmRegistrar>()

                            .Named(Guid.NewGuid().ToString("N"))

                            .Instance(new EfCoreBasedSecondaryOrmRegistrar(dbContextType, scope.Resolve<IDbContextEntityFinder>()))

                            .LifestyleTransient()

                    );

                }

                scope.Resolve<IDbContextTypeMatcher>().Populate(dbContextTypes);

            }

        }
1.首先加载所有的AbpDbContext
2.对AbpDbContext循环进行注册
这里的注册依赖接口
scope.Resolve().RegisterForDbContext(dbContextType, IocManager, EfCoreAutoRepositoryTypes.Default);
我们来看下这个具体实现逻辑,依赖接口 IEfGenericRepositoryRegistrar
EfGenericRepositoryRegistrar.cs
public void RegisterForDbContext(

            Type dbContextType,

            IIocManager iocManager,

            AutoRepositoryTypesAttribute defaultAutoRepositoryTypesAttribute)

        {

            var autoRepositoryAttr = dbContextType.GetTypeInfo().GetSingleAttributeOrNull<AutoRepositoryTypesAttribute>() ?? defaultAutoRepositoryTypesAttribute;

            RegisterForDbContext(

                dbContextType,

                iocManager,

                autoRepositoryAttr.RepositoryInterface,

                autoRepositoryAttr.RepositoryInterfaceWithPrimaryKey,

                autoRepositoryAttr.RepositoryImplementation,

                autoRepositoryAttr.RepositoryImplementationWithPrimaryKey

            );

            if (autoRepositoryAttr.WithDefaultRepositoryInterfaces)

            {

                RegisterForDbContext(

                    dbContextType,

                    iocManager,

                    defaultAutoRepositoryTypesAttribute.RepositoryInterface,

                    defaultAutoRepositoryTypesAttribute.RepositoryInterfaceWithPrimaryKey,

                    autoRepositoryAttr.RepositoryImplementation,

                    autoRepositoryAttr.RepositoryImplementationWithPrimaryKey

                );

            }

        }
private void RegisterForDbContext(

            Type dbContextType,

            IIocManager iocManager,

            Type repositoryInterface,

            Type repositoryInterfaceWithPrimaryKey,

            Type repositoryImplementation,

            Type repositoryImplementationWithPrimaryKey)

        {

            foreach (var entityTypeInfo in _dbContextEntityFinder.GetEntityTypeInfos(dbContextType))

            {

                var primaryKeyType = EntityHelper.GetPrimaryKeyType(entityTypeInfo.EntityType);

                if (primaryKeyType == typeof(int))

                {

                    var genericRepositoryType = repositoryInterface.MakeGenericType(entityTypeInfo.EntityType);

                    if (!iocManager.IsRegistered(genericRepositoryType))

                    {

                        var implType = repositoryImplementation.GetGenericArguments().Length == 1 ? repositoryImplementation.MakeGenericType(entityTypeInfo.EntityType) : repositoryImplementation.MakeGenericType(entityTypeInfo.DeclaringType,

                                entityTypeInfo.EntityType);

                        iocManager.IocContainer.Register(

                            Component

                                .For(genericRepositoryType)

                                .ImplementedBy(implType)

                                .Named(Guid.NewGuid().ToString("N"))

                                .LifestyleTransient()

                        );

                    }

                }

                var genericRepositoryTypeWithPrimaryKey =

repositoryInterfaceWithPrimaryKey.MakeGenericType(entityTypeInfo.EntityType,primaryKeyType);

                if (!iocManager.IsRegistered(genericRepositoryTypeWithPrimaryKey))

                {

                    var implType =

repositoryImplementationWithPrimaryKey.GetGenericArguments().Length == 2? repositoryImplementationWithPrimaryKey.MakeGenericType(entityTypeInfo.EntityType, primaryKeyType) : repositoryImplementationWithPrimaryKey.MakeGenericType(entityTypeInfo.DeclaringType, entityTypeInfo.EntityType, primaryKeyType);

                    iocManager.IocContainer.Register(

                        Component

                            .For(genericRepositoryTypeWithPrimaryKey)

                            .ImplementedBy(implType)

                            .Named(Guid.NewGuid().ToString("N"))

                            .LifestyleTransient()

                    );

                }

            }

        }
来分析下具体的实现逻辑
foreach (var entityTypeInfo in _dbContextEntityFinder.GetEntityTypeInfos(dbContextType))
_dbContextEntityFinder.GetEntityTypeInfos(dbContextType) 这里获取的就是DbContext定义的实体DbSet,从而获取到每个实体,用来做后续的仓储注入;例如:获取到了 PersonEntity
var primaryKeyType = EntityHelper.GetPrimaryKeyType(entityTypeInfo.EntityType);
获取实体主键
if (primaryKeyType == typeof(int))
判断主键是否为int,如果是int,则继承 IRepository,否则继承IRepository<Entity,PrimaryKey>用来重写主键
那是通过什么类来实现的IRepository呢?
public static AutoRepositoryTypesAttribute Default { get; }

        static EfCoreAutoRepositoryTypes()

        {

            Default = new AutoRepositoryTypesAttribute(

                typeof(IRepository<>),

                typeof(IRepository<,>),

                typeof(EfCoreRepositoryBase<,>),

                typeof(EfCoreRepositoryBase<,,>)

            );

        }
这是默认的实体继承的仓储类,EfCoreRepositoryBase 类
好了,实体的默认仓储就介绍完毕了。。。 不对啊,这里可以满足我们的DbContext里面所有的实体,但是万一有了自定义仓储呢?怎么注册自己的仓储呢?
哈哈,其实还是有个方法的,而且还不只一个。。。
1.DbContext打标记,用来替换默认的AutoRepositoryTypesAttribute
[AutoRepositoryTypes(

            typeof(IMyModuleRepository<>),

            typeof(IMyModuleRepository<,>),

            typeof(MyModuleRepositoryBase<>),

            typeof(MyModuleRepositoryBase<,>)

            )]
2.第二种就是替换已经注册的实体仓储服务
回到上面问题,AbpEntityFrameworkCoreModule 模块先注册 ? 其实上面写到了,在我们自定义的模块注册时,可以重新注册仓储服务
//Custom repository

            Configuration.ReplaceService<IRepository<Post, Guid>>(() =>

            {

                IocManager.IocContainer.Register(

                    Component.For<IRepository<Post, Guid>, IPostRepository,

PostRepository>()

                        .ImplementedBy<PostRepository>()

                        .LifestyleTransient()

                );

            });
就是要必须在 AbpEntityFrameworkCoreModule 注册之后,否则就会被覆盖哦,这里也就呼应了上面的问题了
仓储三要素:
- 仓储的生命周期:仓储都是临时性的,需要的时候创建,用完销毁。
- 数据库的连接和管理仓储的方法中,数据库的连接和管理都是由ABP框架自动处理的。当方法被调用的时候,ABP自动开启数据库的连接同时开启事务,当方法结束后,ABP会将实体数据保存,然后断开连接。当在仓储方法中调用仓储方法的时候,此时只会创建一个数据库连接,他们共同享用数据库连接和事务,由最上层的那个仓储方法进行管理。
- 仓储的最佳实践在ABP框架初始化的时候已经为每一个实体类都默认的实现了相应的仓储,这些仓储里的方法基本可以满足日常的开发需求,所以不要自己手动创建仓储
ABP 数据访问 - IRepository 仓储的更多相关文章
- 基于 abp vNext 和 .NET Core 开发博客项目 - 数据访问和代码优先
上一篇文章(https://www.cnblogs.com/meowv/p/12909558.html)完善了项目中的代码,接入了Swagger.本篇主要使用Entity Framework Core ...
- ABP框架之——数据访问基础架构
大家好,我是张飞洪,感谢您的阅读,我会不定期和你分享阅读心得,希望我的文章能成为你成长路上的一块垫脚石,我们一起精进. 几乎所有的业务应用程序都要适用一种数据库基础架构,用来实现数据访问逻辑,以便从数 ...
- 同时支持EF+Dapper的混合仓储,助你快速搭建数据访问层
背景 17年开始,公司开始向DotNet Core转型,面对ORM工具的选型,当时围绕Dapper和EF发生了激烈的讨论.项目团队更加关注快速交付,他们主张使用EF这种能快速开发的ORM工具:而在线业 ...
- 项目架构开发:数据访问层之Repository
接上文 项目架构开发:数据访问层之Logger 本章我们继续IRepository开发,这个仓储与领域模式里边的仓储有区别,更像一个工具类,也就是有些园友说的“伪仓储”, 这个仓储只实现单表的CURD ...
- ASP.NET Core模块化前后端分离快速开发框架介绍之3、数据访问模块介绍
源码 GitHub:https://github.com/iamoldli/NetModular 演示地址 地址:https://nm.iamoldli.com 账户:admin 密码:admin 前 ...
- 数据访问层之Repository
数据访问层之Repository 接上文 项目架构开发:数据访问层之Logger 本章我们继续IRepository开发,这个仓储与领域模式里边的仓储有区别,更像一个工具类,也就是有些园友说的“伪 ...
- ABP领域层定义仓储并实现
原文作者:圣杰 原文地址:ABP入门系列(3)——领域层定义仓储并实现 在原文作者上进行改正,适配ABP新版本.内容相同 一.先来介绍下仓储 仓储(Repository): 仓储用来操作数据库进行数据 ...
- 数据访问模式之Repository模式
数据访问模式之Repository模式 数据访问层无非就是对数据进行增删改查,其中增.删.改等我们可以抽象出来写一个公共的接口或抽象类来定义这些方法,并采用一个基类实现这些方法,这样该基类派生的子 ...
- 项目架构开发:数据访问层之UnitOfWork
接上文 项目架构开发:数据访问层之IQuery 本章我们继续IUnitOfWork的开发,从之前的IRepository接口中就可以看出,我们并没有处理单元事务, 数据CUD每次都是立即执行的,这样有 ...
随机推荐
- pytest封神之路第六步 断言技巧
pytest的断言把Python语言简洁的优点发挥的淋漓尽致,因为它用的就是Python的标准断言assert. assert基础 assert用法 assert_stmt ::= "ass ...
- 基于vue2定义自己的图表echart组件
先安装echarts cnpm i echarts -S,然后定义父组件 <template> <div> <echarts :option="echartOp ...
- Python-in is == 区别
in 判断单个元素是否在序列中, 对字典来说只能判断key,在不在关系 print("ab" in "abcdefg") print("abc&quo ...
- mysql-17-procedure
#存储过程 /* 一组预先编译好的sql语句集合,理解成批处理语句 好处: 1.提高代码重用性 2.简化操作 3.减少了编译次数并减少了和数据库服务器的连接次数,提高了效率 */ #一.创建 /* c ...
- MySQL的8小时连接超时时间,导致系统过夜即崩溃,报错Could not roll back Hibernate transaction
2014年3月开始给单位开发<机关规范化管理网络平台>,10月底成功上线运行,但是存在一个bug: 部署环境: apache tomcat 6.0.41 + mysql5.5 + jbpm ...
- 00 what is C Programming?C编程是什么?
C语言简介 C is a programming language that lets us give a computer very specifio commands. C语言是一种编程语言,它让 ...
- C\C++中strcat()函数
转载:https://blog.csdn.net/smf0504/article/details/52055971 C\C++中strcat()函数 ...
- 创建好maven项目以后发现无法创建scala文件
今天创建了一个maven项目 然后准备创建scala文件的时候发现没有Scala 然后只好上网上找方法了 下面是一种解决方法 1.点击file,选择settings 进去之后,选择build 进去 ...
- map的自动扩容与手动缩容
map的自动扩容与手动缩容 首先还是提出问题:扩容和缩容有什么用?为什么需要扩容和缩容? 在想解答这个问题之前,首先还是需要了解一下go语言中的map go语言中的map与Java中的map实现还是有 ...
- 洛谷 CF1012C Hills(动态规划)
题目大意: 有几座山,如果一座山左右两边的山比它矮,那么可以在这个山上建房子,你有一台挖掘机,每天可以挖一座山一米,问你需要花多少代价可以分别盖1.2.3--座房子.(给出山的数量,以及每座山的高度) ...