jenkins:实现Jenkinsfile与Json的转换
实现Jenkinsfile与Json的转换
最近在做个需求,需要支持Jenkinsfile和json的转换。
方法1:使用现有的jenkins插件
参考的是这篇文章。下面介绍一下将插件打包成镜像的步骤:
本地安装jdk和maven,jdk建议采用的版本为8(该工程会依赖一个名为
tools.jar的包,jdk 9之后移除了该包)如果本地没有找到
tools.jar,可以下载一个1.8版本的jdk,然后在pom.xml中增加如下依赖<dependency>
<groupId>jdk.tools</groupId>
<artifactId>jdk.tools</artifactId>
<version>1.8.0</version>
<scope>system</scope>
<systemPath>/root/jdk1.8.0_271/lib/tools.jar</systemPath>
</dependency>
clone pipeline-model-definition-plugin工程
在/root/.m2/目录下创建
settings.xml,内容来自Jenkins官方:<settings>
<pluginGroups>
<pluginGroup>org.jenkins-ci.tools</pluginGroup>
</pluginGroups> <profiles>
<!-- Give access to Jenkins plugins -->
<profile>
<id>jenkins</id>
<activation>
<activeByDefault>true</activeByDefault> <!-- change this to false, if you don't like to have it on per default -->
</activation>
<repositories>
<repository>
<id>repo.jenkins-ci.org</id>
<url>https://repo.jenkins-ci.org/public/</url>
</repository>
</repositories>
<pluginRepositories>
<pluginRepository>
<id>repo.jenkins-ci.org</id>
<url>https://repo.jenkins-ci.org/public/</url>
</pluginRepository>
</pluginRepositories>
</profile>
</profiles>
<mirrors>
<mirror>
<id>repo.jenkins-ci.org</id>
<url>https://repo.jenkins-ci.org/public/</url>
<mirrorOf>m.g.o-public</mirrorOf>
</mirror>
</mirrors>
</settings>
执行
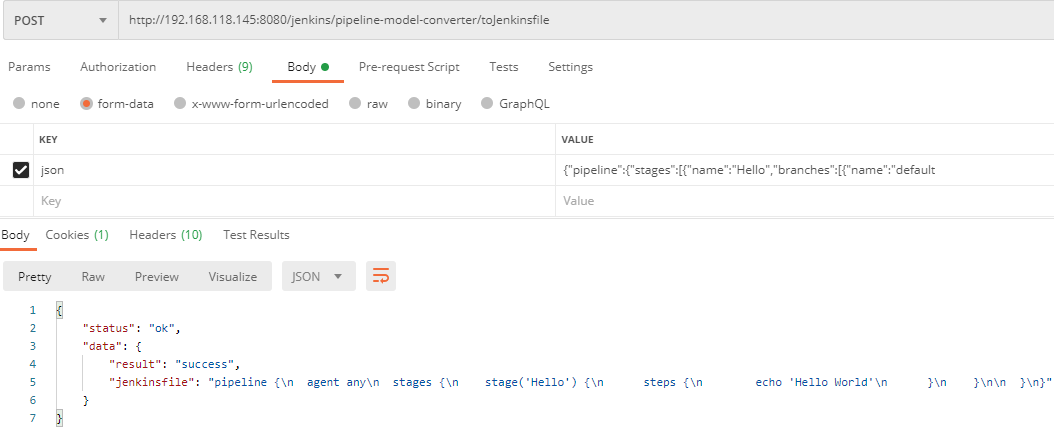
mvn install进行编译由于主要用到的是Jenkinsfile和json之间的转换关系,因此主要用的是如下两个REST API:
Conversion to JSON representation from Jenkinsfile
- URL:
JENKINS_URL/pipeline-model-converter/toJson - Parameters:
jenkinsfile- theJenkinsfilecontents - Info: Takes a
Jenkinsfileand converts it to the JSON representation for itspipelinestep. - Returns: JSON with a
resultfield that will either besuccessorfailure. Ifsuccess, the JSON representation will be in thejsonfield. Iffailure, there'll be an additional array in theerrorsfield of the error messages encountered.
- URL:
Conversion to Jenkinsfile from JSON representation
- URL:
JENKINS_URL/pipeline-model-converter/toJenkinsfile - Parameters:
json- the JSON representation of the model - Info: Takes the JSON representation of the model and converts it to the contents for a
Jenkinsfileinvoking thepipelinestep. - Returns: JSON with a
resultfield that will either besuccessorfailure. Ifsuccess, theJenkinsfilecontents will be in thejenkinsfilefield. Iffailure, there'll be an additional array in theerrorsfield of the error messages encountered.
- URL:
上述两个API在
pipeline-model-definition-plugin/pipeline-model-definition目录下,因此在该目录下直接运行:mvn hpi:run -Dhost=0.0.0.0 -Djetty.port=8080即可。将json转换为Jenkinsfile的操作如下:
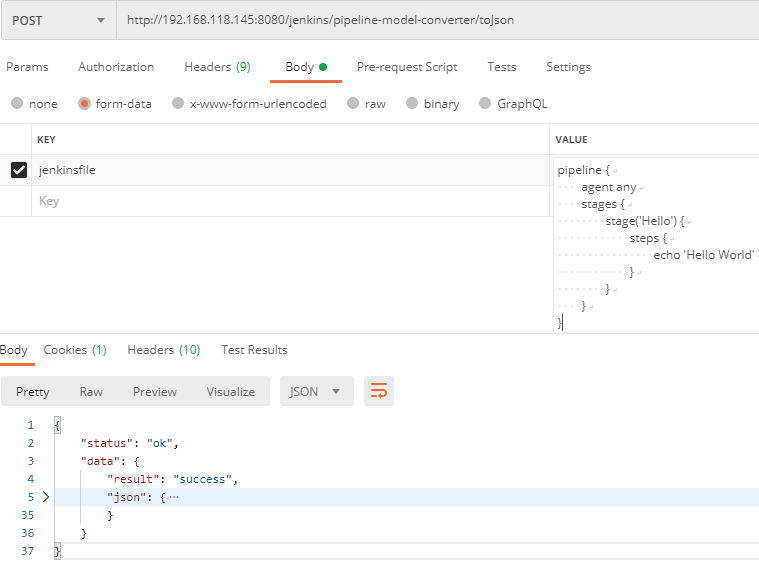
完整的返回值如下:
{

    "status": "ok",

    "data": {

        "result": "success",

        "json": {

            "pipeline": {

                "stages": [

                    {

                        "name": "Hello",

                        "branches": [

                            {

                                "name": "default",

                                "steps": [

                                    {

                                        "name": "echo",

                                        "arguments": [

                                            {

                                                "key": "message",

                                                "value": {

                                                    "isLiteral": true,

                                                    "value": "Hello World"

                                                }

                                            }

                                        ]

                                    }

                                ]

                            }

                        ]

                    }

                ],

                "agent": {

                    "type": "any"

                }

            }

        }

    }

}
将Jenkinsfile转换为json的操作如下
制作容器镜像时,只需要将本地工程和
/root/.m2上传到容器,生成对应的镜像即可,下面Dockerfile假设生成的镜像为pipeline-model-definition-plugin:latestFROM pipeline-model-definition-plugin:latest
WORKDIR /usr/pipeline-model-definition-plugin/pipeline-model-definition
ENV PATH=$PATH:/usr/local/bin/maven-3.6.3/bin
ENTRYPOINT ["sh", "-c", "mvn hpi:run -Dhost=0.0.0.0"]
我自己打包了一个镜像:
docker pull quay.io/woodliu/pipeline-model-definition-plugin
需要注意的是,本插件提供的转换API toJenkinsfile和toJson并不是万能的,只能支持jenkins标准的参数类型,例如对于gitParameter这样的参数就无法解析(扩展功能),一种解决方式是独立解析扩展的参数,然后将其插入解析好的标准JenkinsFile中;另外一个方式就是写一个jenkinsfile的解析器。
参考
mvn hpi的命令可以参考官方文档
可以运行
mvn hpi:hpi生成对应的hpi文件,如:/pipeline-model-definition-plugin/pipeline-model-definition/target/pipeline-model-definition.hpi
方法2:解析原生的jenkinsfile文件
在GitHub上有一个支持jenkinsfile解析的项目,该项目使用rust的pest crate来编写jenkinsfile的语法,支持对jenkinsfile的格式验证。Pest官方文档中给出了一个非常好的对json语法的解析例子,主要是使用递归的方式来解析语法。
pest官方提供了一个编辑器,可以使用该编辑器查看经过pest解析之后的字段,对了解pest的工作方式非常有用。如,使用jdp项目提供的pest文件解析如下jenkinsfile:
pipeline {

    agent {

        docker {

            reuseNode true

            image 'maven:3-alpine'

            label 'my-defined-label'

            args  '-v /tmp:/tmp'

            registryUrl 'https://myregistry.com/'

            registryCredentialsId 'myPredefinedCredentialsInJenkins'

        }

    }

    stages {

        stage('Build') {

            steps { sh 'make' }

        }

    }

}
对应的解析结果如下:
- preceeding_junk: ""

- opening_brace: "{"

- agentDecl > agentBlock

  - opening_brace: "{"

  - dockerAgent

    - opening_brace: "{"

    - bool: "true"

    - string > single_quoted

      - single_quote: "\'"

      - inner_single_str: "maven:3-alpine"

      - single_quote: "\'"

    - string > single_quoted

      - single_quote: "\'"

      - inner_single_str: "my-defined-label"

      - single_quote: "\'"

    - string > single_quoted

      - single_quote: "\'"

      - inner_single_str: "-v /tmp:/tmp"

      - single_quote: "\'"

    - string > single_quoted

      - single_quote: "\'"

      - inner_single_str: "https://myregistry.com/"

      - single_quote: "\'"

    - string > single_quoted

      - single_quote: "\'"

      - inner_single_str: "myPredefinedCredentialsInJenkins"

      - single_quote: "\'"

    - closing_brace: "}"

  - closing_brace: "}"

- stagesDecl

  - opening_brace: "{"

  - stage

    - string > single_quoted

      - single_quote: "\'"

      - inner_single_str: "Build"

      - single_quote: "\'"

    - opening_brace: "{"

    - stepsDecl

      - opening_brace: "{"

      - step > simple_step

        - IDENT: "sh"

        - args > string > single_quoted

          - single_quote: "\'"

          - inner_single_str: "make"

          - single_quote: "\'"

      - closing_brace: "}"

    - closing_brace: "}"

  - closing_brace: "}"

- closing_brace: "}"

- ending_junk: ""

- EOI: ""
Pest语法重点标注:
当使用静默规则时,解析结果中将不会出现该规则字段。当解析下面规则时,解析结果中将不会存在silent,即
parsed.as_rule()中不会存在silentsilent = _{ ... }
当使用原子语法时,整个规则体将视为一个规则,如double_quoted = ${ (quote ~ inner_double_str ~ quote) },在解析时会将
quote ~ inner_double_str ~ quote视为一个规则,而不是三个。这有利于获取一段完整的字符串。atomic = @{ ... }
compound_atomic = ${ ... }
我尝试使用该项目解析jenkinsfile,但发现实现起来太过复杂,且jenkinsFile的语法也是一言难尽。如下,当step中带括号和不带括号混用时会导致解析错误。
steps {

    echo 'test'

    dir('command') {

		sh "sh ./saas.sh ${params.channel} ${params.buildType} "

	}

}
有精力的大神可以在此基础上实现解析JenkinsFile的功能。
参考
- pest文档
jenkins:实现Jenkinsfile与Json的转换的更多相关文章
- Jenkinsfile与Json的转换
前段时间调研了下青云的kubesphere,意外的发现了一个插件,pipeline-model-definition-plugin,用了将jenkins的pipeline.json互相转换的,以前可能 ...
- json日期转换
//调用 ChangeDateFormat(CreatTime) //json日期转换 function ChangeDateFormat(jsondate) { jsondate = jsondat ...
- java中Array/List/Map/Object与Json互相转换详解
http://blog.csdn.net/xiaomu709421487/article/details/51456705 JSON(JavaScript Object Notation): 是一种轻 ...
- Json格式转换
验证Json格式可以进入 http://json.cn/ json简单说就是javascript中的对象和数组,所以这两种结构就是对象和数组两种结构,通过这两种结构可以表示各种复杂的结构1.对象:对象 ...
- JSON.stringify转换Date不正确的解決方法
JSON.stringify转换Date不正确的原因:国际时区(UTC)和中国时区(GMT)的原因,东八区+8等于国际时区. 解决方法,重新Es5的Date.prototype.toJSON方法,代码 ...
- 使用js进行string和json之间转换的方法
在数据传输过种中,json是以文本,即字符串的形式传递,字符串形似Json对象: var str1 = '{ "name": "Amy", "sex& ...
- 前台 JSON对象转换成字符串 相互转换 的几种方式
在最近的工作中,使用到JSON进行数据的传递,特别是从前端传递到后台,前台可以直接采用ajax的data函数,按json格式传递,后台Request即可,但有的时候,需要传递多个参数,后台使用requ ...
- C#中服务端接受前端JSON字符串转换成字典集合
我们是否可以把从前端接受的JSON字符串转换成字典集合呢? 比如从前端接收:{'size':'10', 'weight':'10kg'} 在服务端转换成:[{size:"10"}, ...
- json格式转换成Map的应用
jsp 1.引用json.js(将json格式转换成字符串) 2. var name = document.getElementById("name").value; var re ...
随机推荐
- 【Linux】常用的Linux可插拔认证模块(PAM)应用举例:pam_limits.so、pam_rootok.so和pam_userdb.so模块
常用的Linux可插拔认证模块(PAM)应用举例:pam_limits.so.pam_rootok.so和pam_userdb.so模块 pam_limits.so模块: pam_limits.so模 ...
- kubernets之向外部应用暴露应用
一 通过NodePort来暴露服务 前面已经介绍的服务的一些作用,例如将集群内部的应用暴露给集群内部的pod使用,将外部的应用通过服务暴露给内部应用使用,但是服务最大的作用不仅仅是这些 而是将集群内 ...
- 使用sqluldr2进行oracle数据库抽取时执行后无反应,也无日志
使用sqluldr2进行oracle数据库表数据抽取时遇到执行后无反应,也不报错,也无日志输出的情况. 经过排查之后发现时由于oracle账户密码快要过期导致的(这也能出问题,我服,类似的plsql连 ...
- 【一天一个知识点系列】- Http之状态码
状态码 简介 HTTP 状态码负责表示客户端 HTTP 请求的返回结果. 标记服务器端的处理是否正常. 通知出现的错误等工作 作用及类别 作用:状态码告知从服务器端返回的请求结果 状态码的类别 注意: ...
- Docker 如何动态给SpringBoot项目传参
关于SpringBoot配置数据源 在项目开发中,我们往往需要配置多套不同的配置环境例如:本地开发.测试环境.部署环境.每一个环境的数据源配置可能都不同,因此需要写不同的数据源配置.如果用Docker ...
- Python爬虫:数据分析小能手:JSON库的用法
JSON(JavaScript Object Notation) 是一种轻量级的数据交换格式,易于人阅读和编写. 给大家推荐一个Python交流的q裙,大家在学习遇到了什么问题都可以进群一起交流,大家 ...
- 一篇文章带你初步了解—CSS特指度
CSS特指度 说明 这篇博客在在两台电脑上分别完成的,故而有些截图是Firefox,有些是Chrome,有些改动了浏览器的用户样式表,有些没改,但不会影响阅读,特此说明,勿怪. CSS选择器 单个CS ...
- Golang拼接字符串的5种方法及其效率_Chrispink-CSDN博客_golang 字符串拼接效率 https://blog.csdn.net/m0_37422289/article/details/103362740
Different ways to concatenate two strings in Golang - GeeksforGeeks https://www.geeksforgeeks.org/di ...
- Java面向对象(一)----初次见面
面向对象 面向过程:根据业务逻辑从上到下写代码 函数式编程:对一些功能的代码封装到函数中,日后无需重复编写,直接调用函数就可以了 面向对象:将所有的功能进行封装,面对的事封装了功能的实体(对象),即面 ...
- XA Transactions
XA Transactions XA is a two-phase commit protocol that is natively supported by many databases and t ...