
docker安装gitlab并部署CICD
摘要
本文主要实现了在docker下安装gitlab,将gitlab绑定在宿主机的180端口,将gitlab的clone的URL添加指定端口号;部署了CI/CD,并公布了测试项目。
安装docker[1]
- 删除旧版本的docker(如果未安装则忽略)
sudo apt-get remove docker docker-engine docker.io containerd runc
安装依赖
sudo apt-get update

sudo apt-get install \

    apt-transport-https \

    ca-certificates \

    curl \

    gnupg-agent \

    software-properties-common
Add Docker’s official GPG key
curl -fsSL https://download.docker.com/linux/ubuntu/gpg | sudo apt-key add -
添加仓库
# x86_64

sudo add-apt-repository \

   "deb [arch=amd64] https://download.docker.com/linux/ubuntu \

   $(lsb_release -cs) \

   stable"

# armf

sudo add-apt-repository \

   "deb [arch=armhf] https://download.docker.com/linux/ubuntu \

   $(lsb_release -cs) \

   stable"

# arm64

sudo add-apt-repository \

   "deb [arch=arm64] https://download.docker.com/linux/ubuntu \

   $(lsb_release -cs) \

   stable"
安装
sudo apt-get update

sudo apt-get install docker-ce docker-ce-cli containerd.io
docker换源
注册阿里云账号
选择容器镜像服务
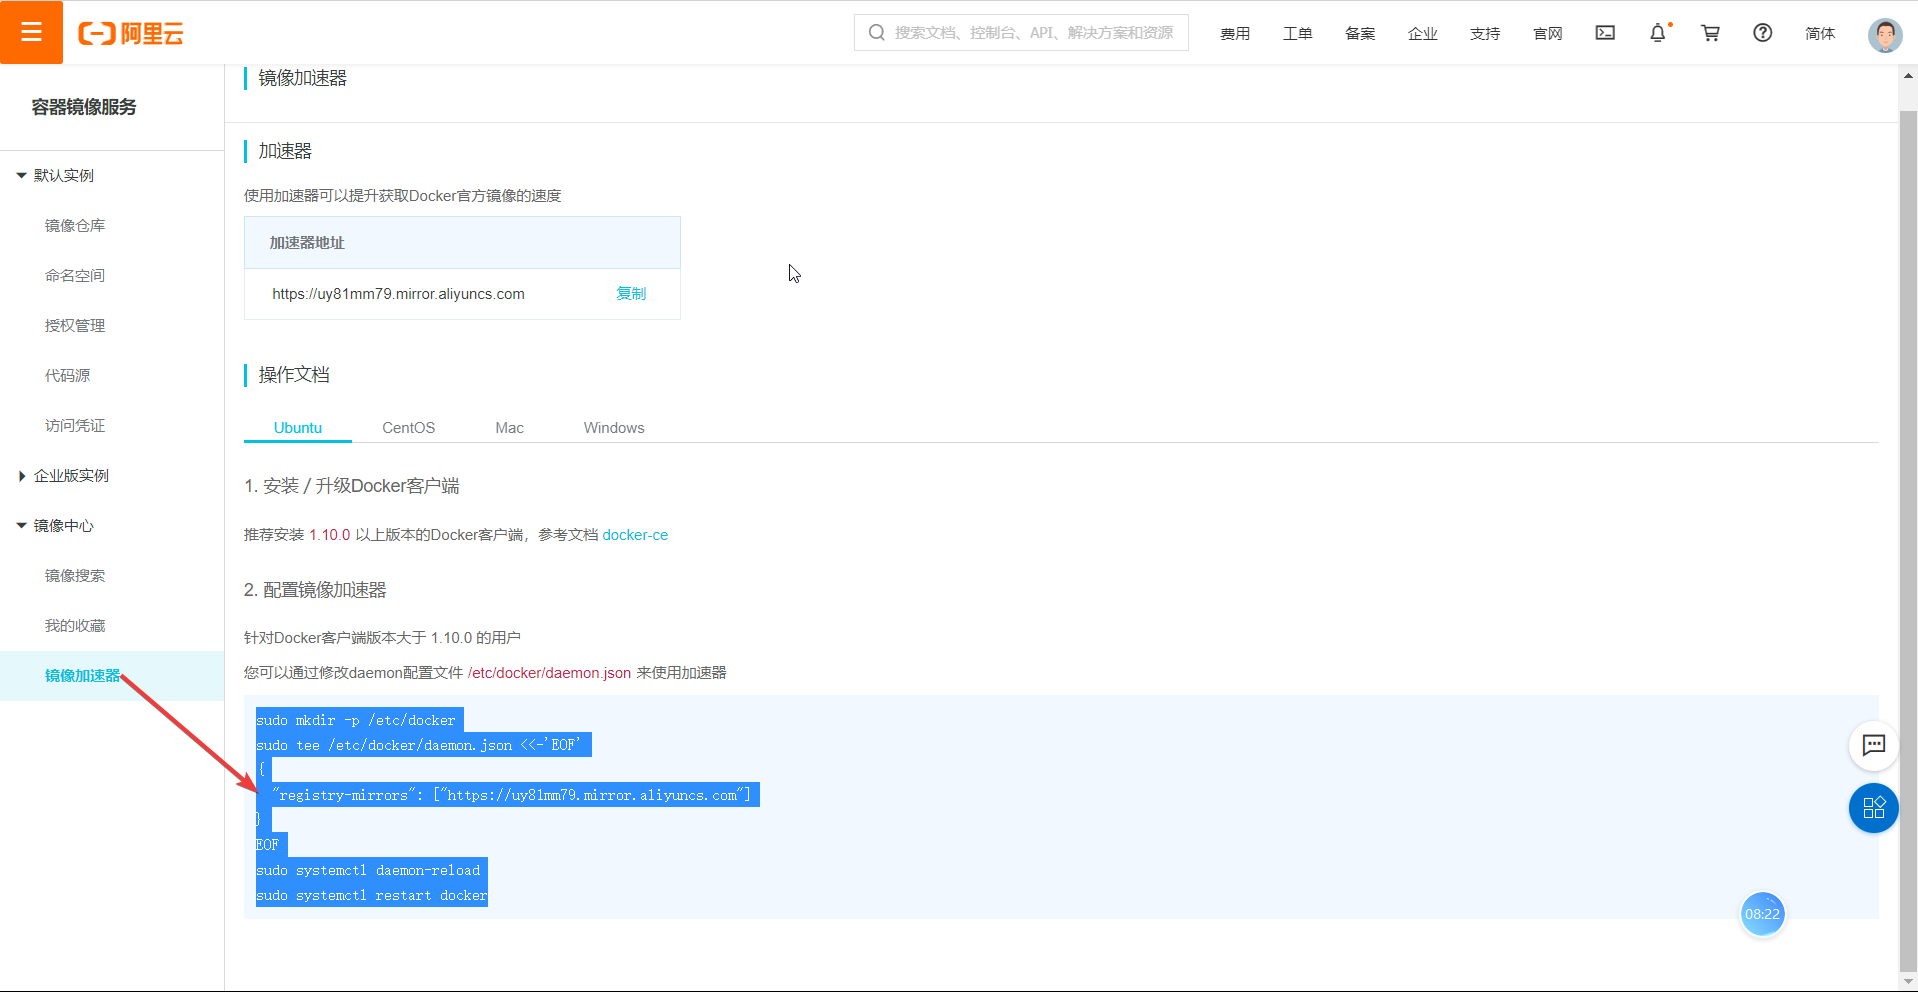
执行命令
sudo mkdir -p /etc/docker

sudo tee /etc/docker/daemon.json <<-'EOF'

{

  "registry-mirrors": ["https://uy81mm79.mirror.aliyuncs.com"]

}

EOF

sudo systemctl daemon-reload

sudo systemctl restart docker
docker安装gitlab[2] [3]
创建运行目录
sudo mkdir /opt/gitlab_docker

cd /opt/gitlab_docker
安装docker-compose
sudo apt install docker-compose
编写docker-compose.yml
version: '3.1'

services:

 gitlab:

  image: 'gitlab/gitlab-ce'

  container_name: "gitlab"

  restart: always

  privileged: true

  hostname: 'gitlab'

  environment:

   TZ: 'Asia/Shanghai'

   GITLAB_OMNIBUS_CONFIG: |

    external_url 'http://192.168.196.1'

    gitlab_rails['time_zone'] = 'Asia/Shanghai'

    gitlab_rails['smtp_enable'] = true

    gitlab_rails['gitlab_shell_ssh_port'] = 22

  ports:

   - '181:80'

   - '180:180'

   - '1443:443'

   - '22:22'

  volumes:

   - /opt/gitlab_docker/config:/etc/gitlab

   - /opt/gitlab_docker/data:/var/opt/gitlab

   - /opt/gitlab_docker/logs:/var/log/gitlab
安装gitlab镜像
sudo docker-compose up -d
修改文件配置
sudo vim /opt/gitlab_docker/config/gitlab.rb
修改
nginx['listen_port']nginx['listen_port'] = 180
修改
external_urlexternal_url 'http://192.168.196.1:180'
重新启动
sudo docker exec -it $CONTINER_ID gitlab-ctl restart
CI/CD依赖
使用docker安装gitlab-runner也是可以的,但是感觉有bug,可能会不成功,这里介绍了我成功的方法。
安装gitlab-runner
找到对应包下载安装。下载地址https://gitlab-runner-downloads.s3.amazonaws.com/latest/index.html.
sudo dpkg -i gitlab-runner_amd64.deb
启动运行gitlab-runner
# 允许开机自启动

systemctl enable gitlab-runner

# 启动服务

systemctl start gitlab-runner
项目测试
创建项目
新建项目,项目文件如下:
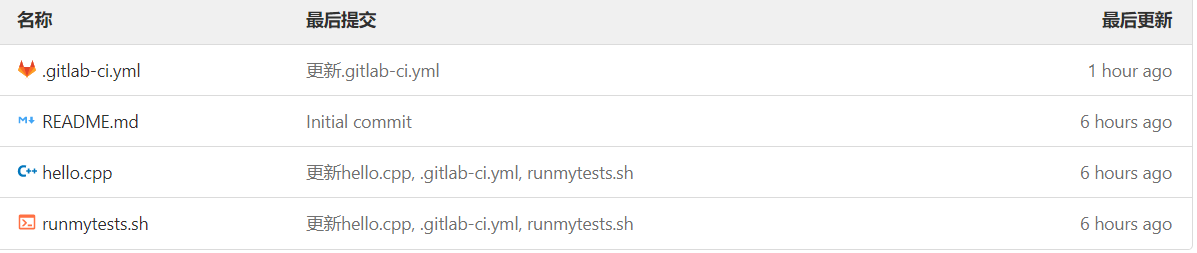
.gitlab-ci.yml
# This file is a template, and might need editing before it works on your project.

# use the official gcc image, based on debian

# can use verions as well, like gcc:5.2

# see https://hub.docker.com/_/gcc/

image: ubuntu:bionic

build:

  stage: build

  # instead of calling g++ directly you can also use some build toolkit like make

  # install the necessary build tools when needed

  # before_script:

  #   - apt update && apt -y install make autoconf

  script:

    - g++ hello.cpp -o mybinary

  artifacts:

    paths:

      - mybinary

      # depending on your build setup it's most likely a good idea to cache outputs to reduce the build time

      # cache:

      #   paths:

      #     - "*.o"

# run tests using the binary built before

test:

  stage: test

  script:

    - chmod +x runmytests.sh

    - ./runmytests.sh
hello.cpp
#include <iostream>

using namespace std;

int main()

{

    cout << "hello world" << endl;

    return 0;

}
runmytests.sh
./mybinary
项目文件说明
.gitlab-ci.yml就是自动化测试的配置文件,相关内容可参见[4],建议大家仔细阅读该配置文件即可理解该项目。
gitlab-runner注册
查找api
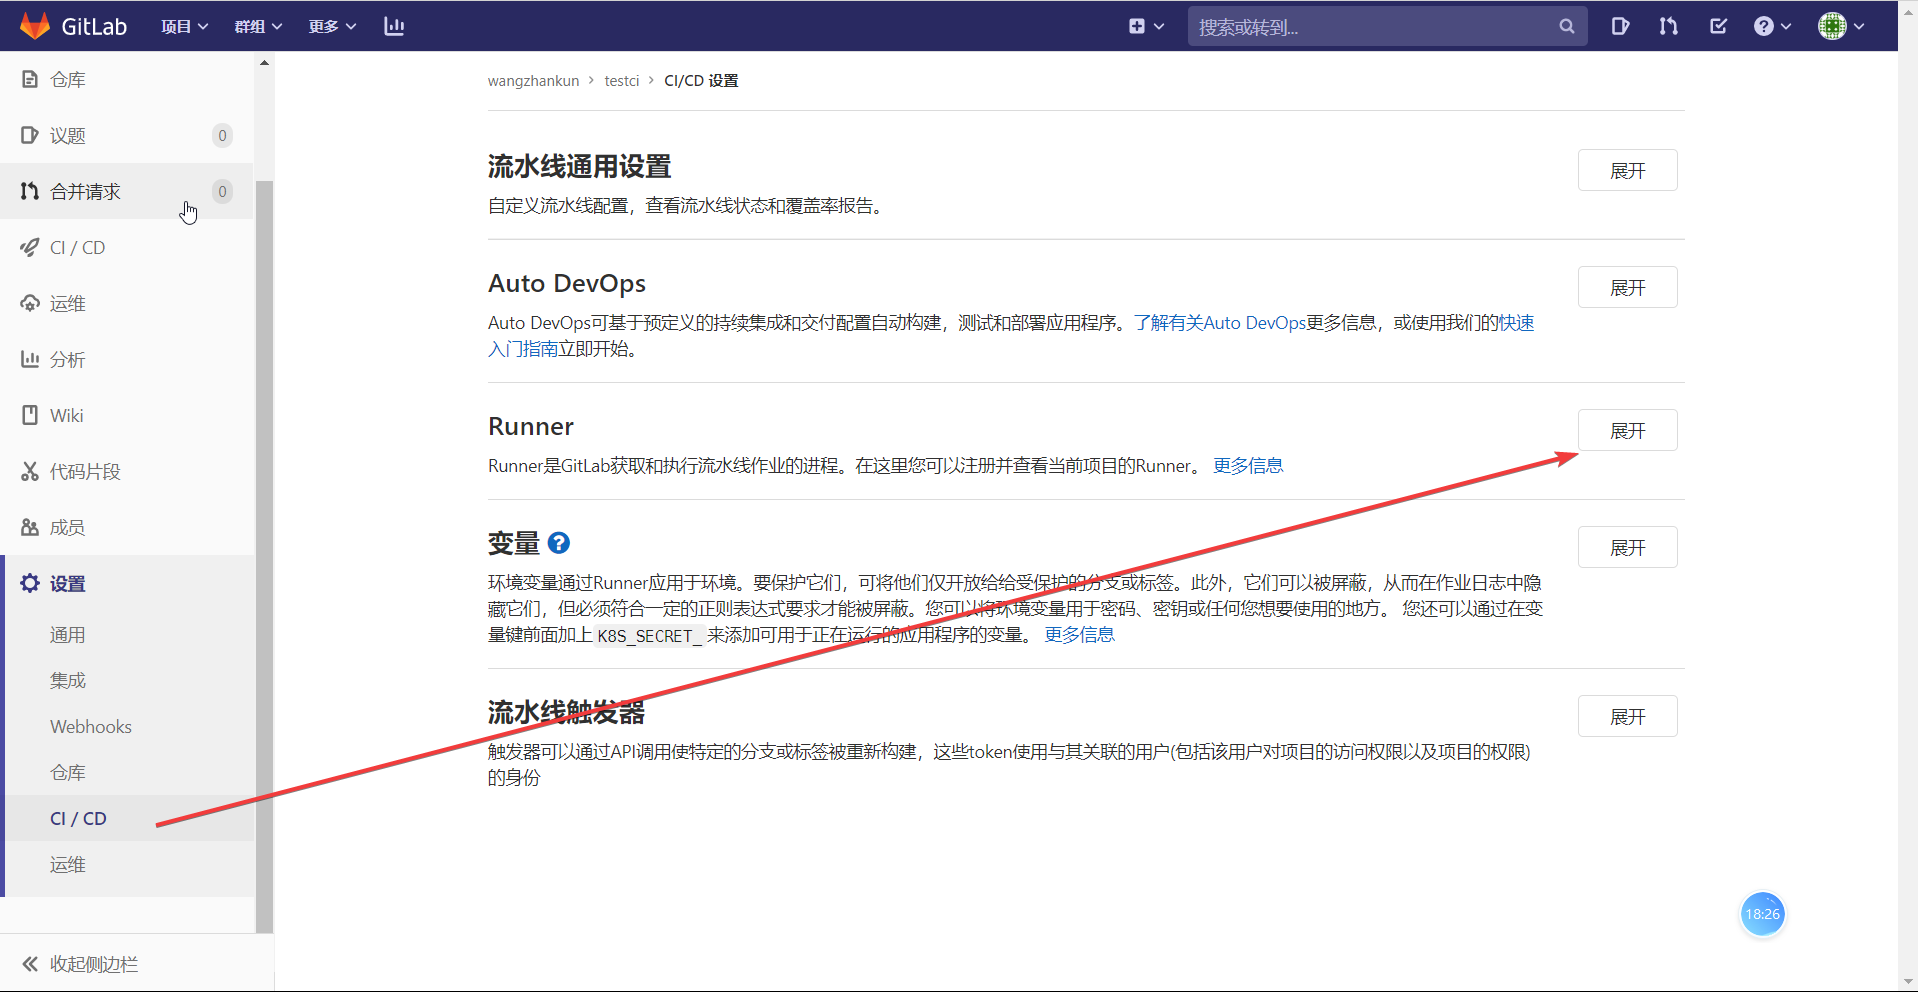
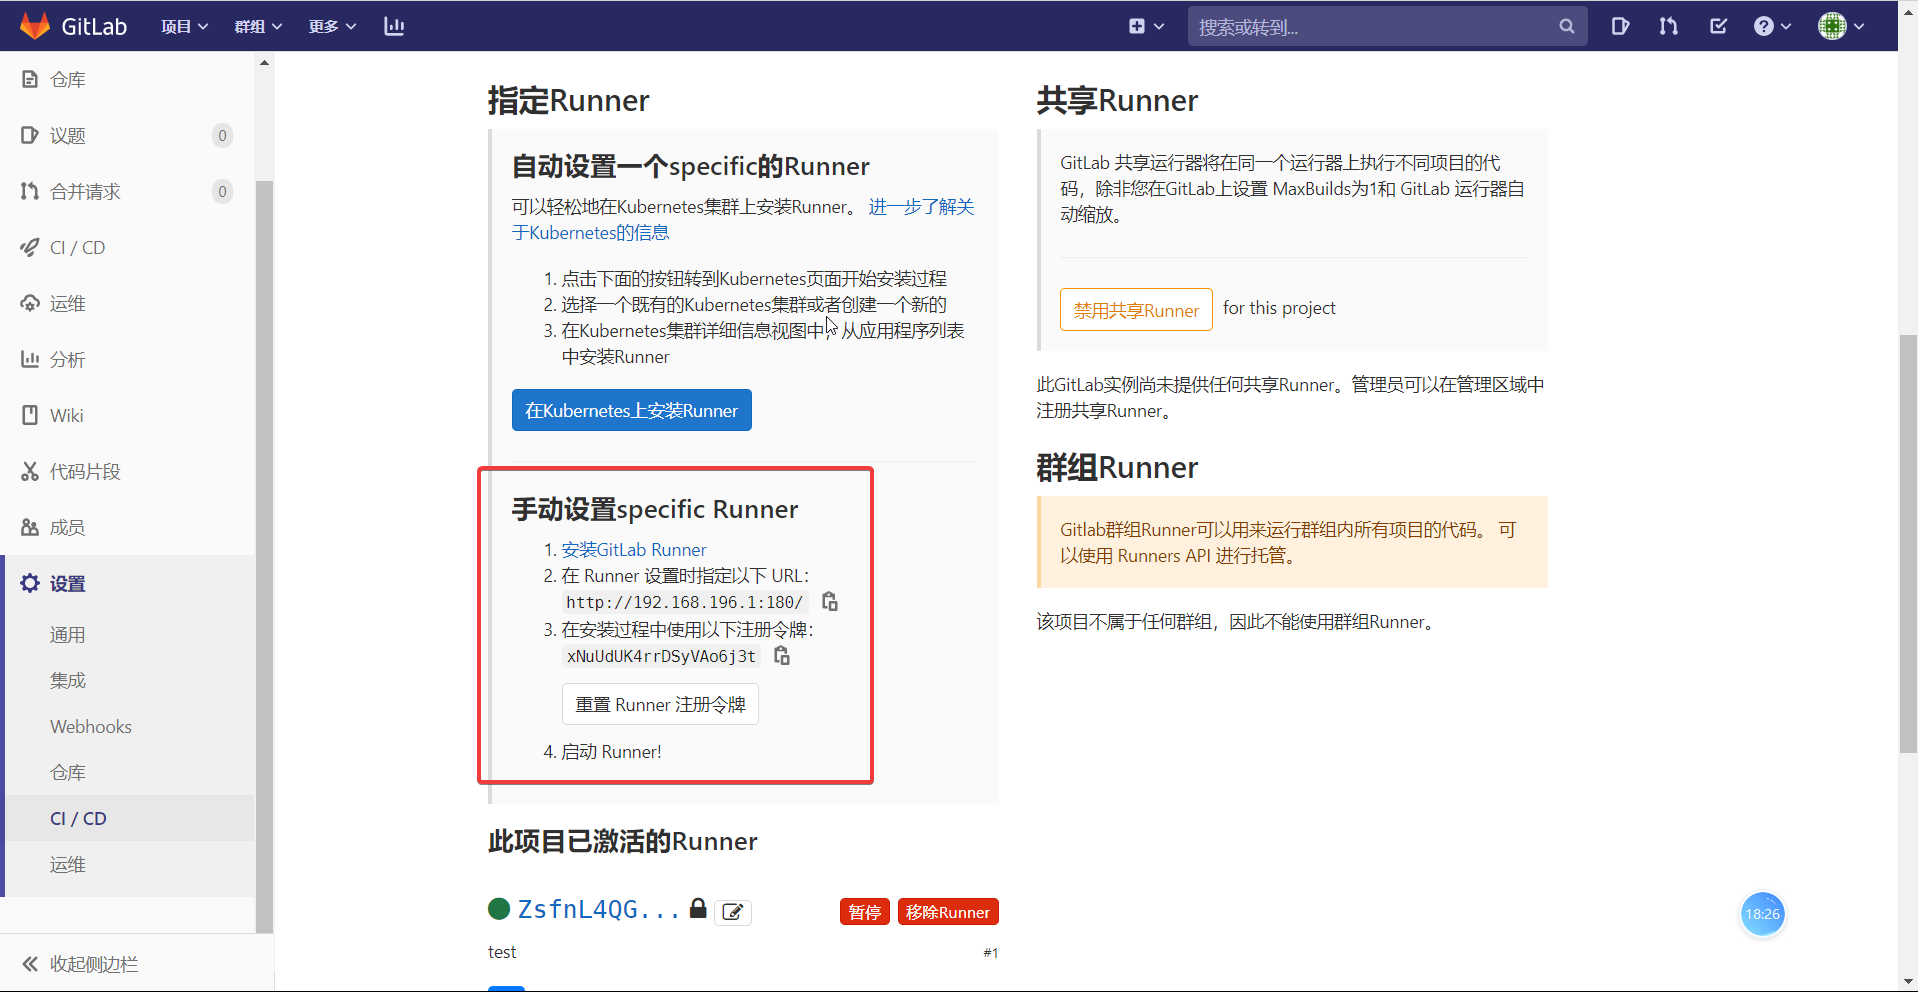
注册
执行命令:
sudo gitlab-runner register
输入相关参数,下面内容引用自[2:1]
# 输入 GitLab 地址

Please enter the gitlab-ci coordinator URL (e.g. https://gitlab.com/):

http://192.168.199.109/

# 输入 GitLab Token

Please enter the gitlab-ci token for this runner:

1Lxq_f1NRfCfeNbE5WRh

# 输入 Runner 的说明

Please enter the gitlab-ci description for this runner:

可以为空

# 设置 Tag,可以用于指定在构建规定的 tag 时触发 ci

Please enter the gitlab-ci tags for this runner (comma separated):

deploy

# 这里选择 true ,可以用于代码上传后直接执行(根据版本,也会没有此选项)

Whether to run untagged builds [true/false]:

true

# 这里选择 false,可以直接回车,默认为 false(根据版本,也会没有此选项)

Whether to lock Runner to current project [true/false]:

false

# 选择 runner 执行器,这里我们选择的是 shell

Please enter the executor: virtualbox, docker+machine, parallels, shell, ssh, docker-ssh+machine, kubernetes, docker, docker-ssh:

shell
重启gitlab-runner
systemctl restart gitlab-runner
自动测试
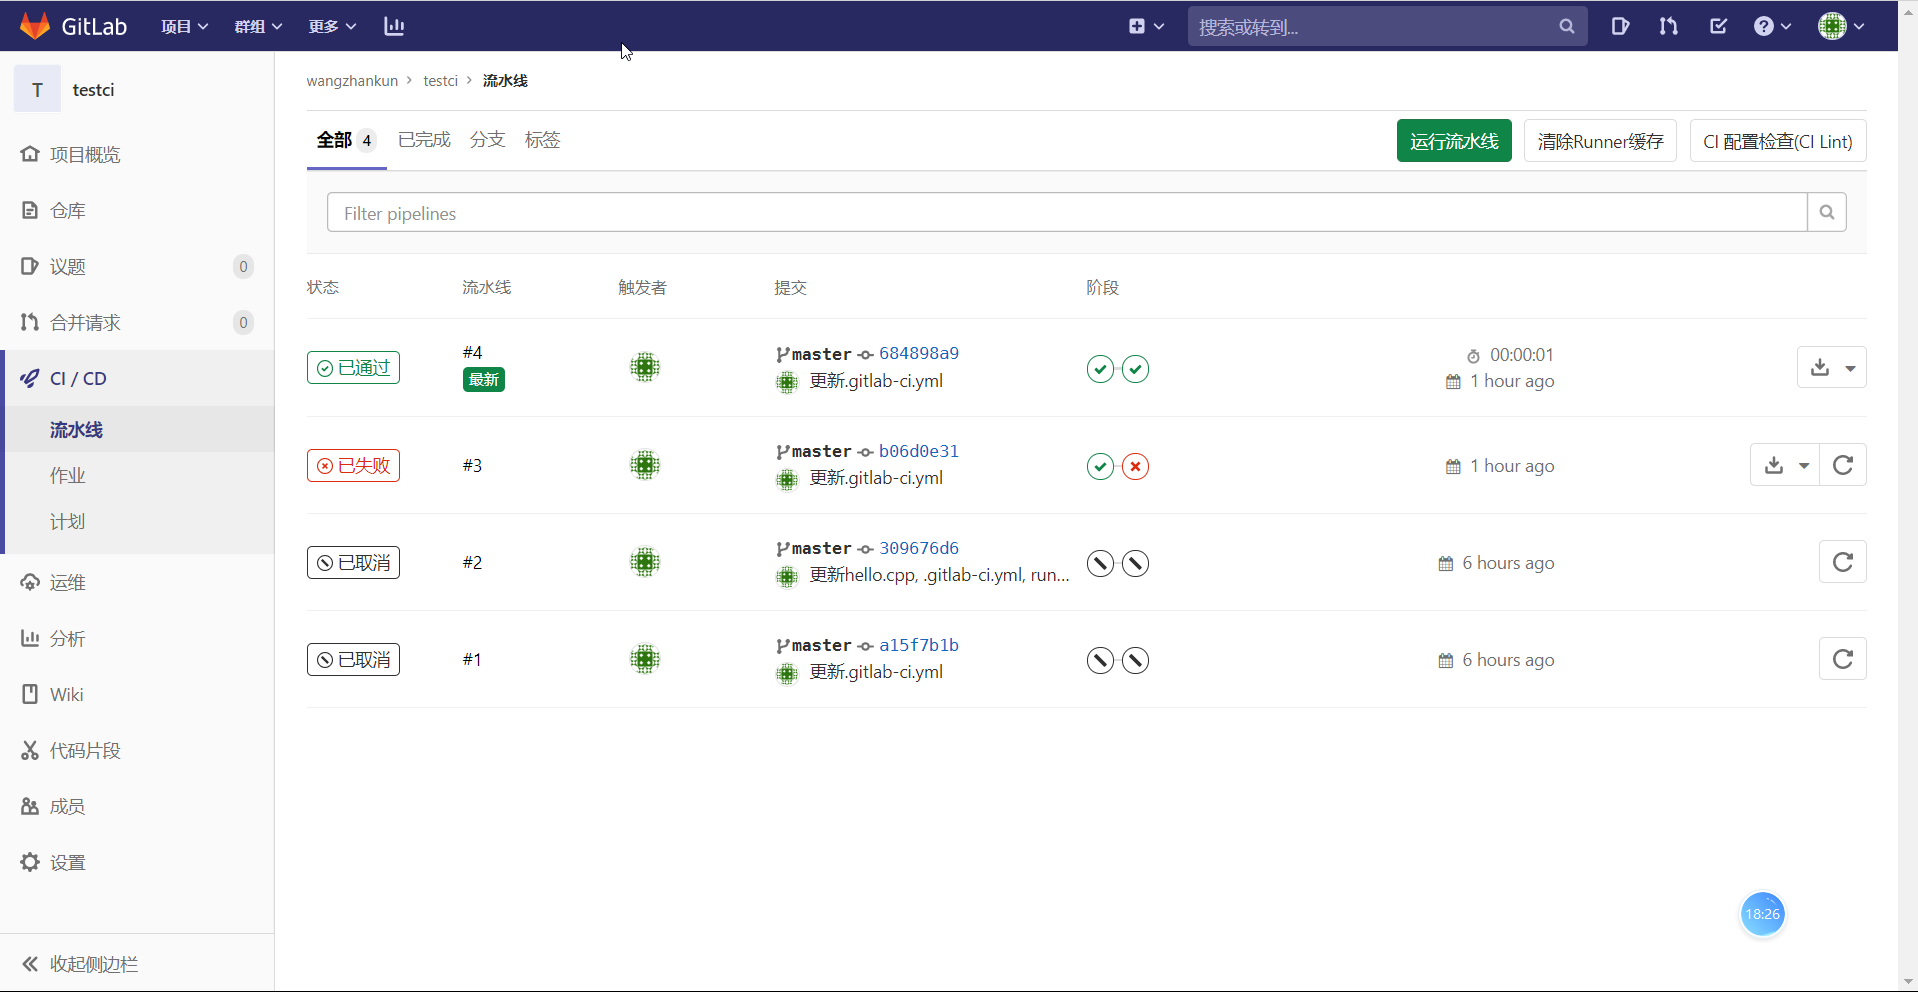
此时,应该是已经自动进行了测试了:
参考文献
注意:[2:2]是[3:1]的视频笔记,因此需要配合[3:2]使用。
docker安装gitlab并部署CICD的更多相关文章
- 解决 Windows Docker 安装 Gitlab Volume 权限问题
本文首发于我的个人博客,解决 Windows Docker 安装 Gitlab Volume 权限问题 ,欢迎访问! 记录一下 Windows10 下 Docker 安装 Gitlab 的步骤. Ca ...
- Docker安装Gitlab
一.Ubuntu16.4上Docker安装Gitlab 1.安装docker 参见:https://docs.docker.com/engine/installation/linux/ubuntuli ...
- 利用docker安装gitlab
安装docker 安装 virtualbox 下载 dockertoolbox并安装 官网的服务器一直连不上, 幸亏还有这个 https://get.daocloud.io/toolbox/ 比 ht ...
- docker 安装gitlab
# docker 安装gitlab # 一.安装镜像(官网文档) export GITLAB_HOME=/srv/gitlab # 必须先设置它,它就是你存储代码仓库的位置.以后要移植的时候直接把这个 ...
- Docker安装GitLab与Runner(网关),常规设置,自动化用到k8s+token
[转]图文详解k8s自动化持续集成之GitLab CI/CD Windows里面使用Debian命令行工具完成 和Docker网络相关的命令 查看某一个容器的网络 docker inspect 容器I ...
- centos7下使用docker安装gitlab
环境背景: Docker化已经成为一种热门,记录一下使用docker引擎安装gitlab的过程. 测试环境: 系统 软件 依赖 CentOS 7.4 GitLab(latest) docker-ce ...
- Debian9 使用 Docker 安装 gitlab完整过程
一. 安装Docker CE (参考 官网指南) 1. 卸载老版本 sudo apt-get remove docker docker-engine docker.io 2. Update the ...
- docker安装Tomcat软件,部署项目
1 搜索tomcat镜像 $ sudo docker search tomcat NAME DESCRIPTION STARS OFFICIAL AUTOMATED tomcat Apache Tom ...
- Centos7 docker安装GitLab
*先决条件系统已安装Docker 1.查询GitLab镜像 docker search gitlab 2.现在GitLab镜像 3.创建文件夹 mkdir -p /software/gitlab/co ...
随机推荐
- java 面向对象(十七):单元测试方法
* Java中的JUnit单元测试 * * 步骤: * 1.中当前工程 - 右键择:build path - add libraries - JUnit 4 - 下一步 * 2.创建Java类,进行单 ...
- Python Ethical Hacking - NETWORK_SCANNER(1)
NETWORK_SCANNER Discover all devices on the network. Display their IP address. Display their MAC add ...
- 05 ES6模块化规范基础详解
ES6模块规范 1.1 ES6规范说明 历史上,JavaScript 一直没有模块(module)体系,无法将一个大程序拆分成互相依赖的小文件,再用简单的方法拼装起来.其他语言都有这项功能,比如 Ru ...
- 最小割树(Gomory-Hu Tree)
当我们遇到这样的问题: 给定一个 \(n\) 个点 \(m\) 条边的无向连通图,多次询问两点之间的最小割 我们通常要用到最小割树. 博客 建树 分治.记录当前点集,然后随便找俩点当 \(s\) 和 ...
- 华为云如何使用二次验证码/虚拟MFA/两步验证/谷歌验证器?
一般点账户名——设置——安全设置中开通虚拟MFA两步验证 具体步骤见链接 华为云如何使用二次验证码/虚拟MFA/两步验证/谷歌验证器? 二次验证码小程序于谷歌身份验证器APP的优势 1.无需下载ap ...
- [leetcode/lintcode 题解] Amazon面试题:连接棒材的最低费用
为了装修新房,你需要加工一些长度为正整数的棒材 sticks. 如果要将长度分别为 X 和 Y 的两根棒材连接在一起,你需要支付 X + Y 的费用. 由于施工需要,你必须将所有棒材连接成一根. 返回 ...
- SQL语法入门
SQL语句概述 ·SQL定义:是一种特定目的编程语言,用于管理关系数据库 ·GaussDB T是一种关系数据库,SQL语句包括 1.DDL 数据定义语言,用于定义或修改数据库中的对象(表,视图,序列, ...
- date 常用格式化输出
date "+%Y-%m-%d" 2013-02-19 date "+%H:%M:%S" 13:13:59 date "+%Y-%m-%d %H:%M ...
- Python JSON的基本使用
Python JSON的基本使用 一.json格式介绍 JSON(JavaScript Object Notation) 通用的数据类型,易于人阅读和编写. 跟字典有些类似,形式也是key-value ...
- LFM oversea投资笔记、思摩尔、移卡、建业新生活、鑫苑物业
LFM oversea 1.公司简介 2.业务展望 3. 投资策略 LFM oversea介绍 LFM oversea是在开曼成立的投资基金, 专注于中国优质企业在香港和美国IPO过程中的 基石.锚定 ...