手把手教你写VueRouter
Vue-Router提供了俩个组件 `router-link` `router-view`, 提供了俩个原型上的属性`$route` `$router` ,我现在跟着源码来把它实现一下
开始
先看平时使用的 `Vue-Router` ,引入`Router` , `Vue.use` 注册插件。直接从这里开始入手
使用场景
import Vue from 'vue'

import Router from "../vue-router"

import routes from './routes'

Vue.use(Router)

let router =  new Router({

  routes

})
index
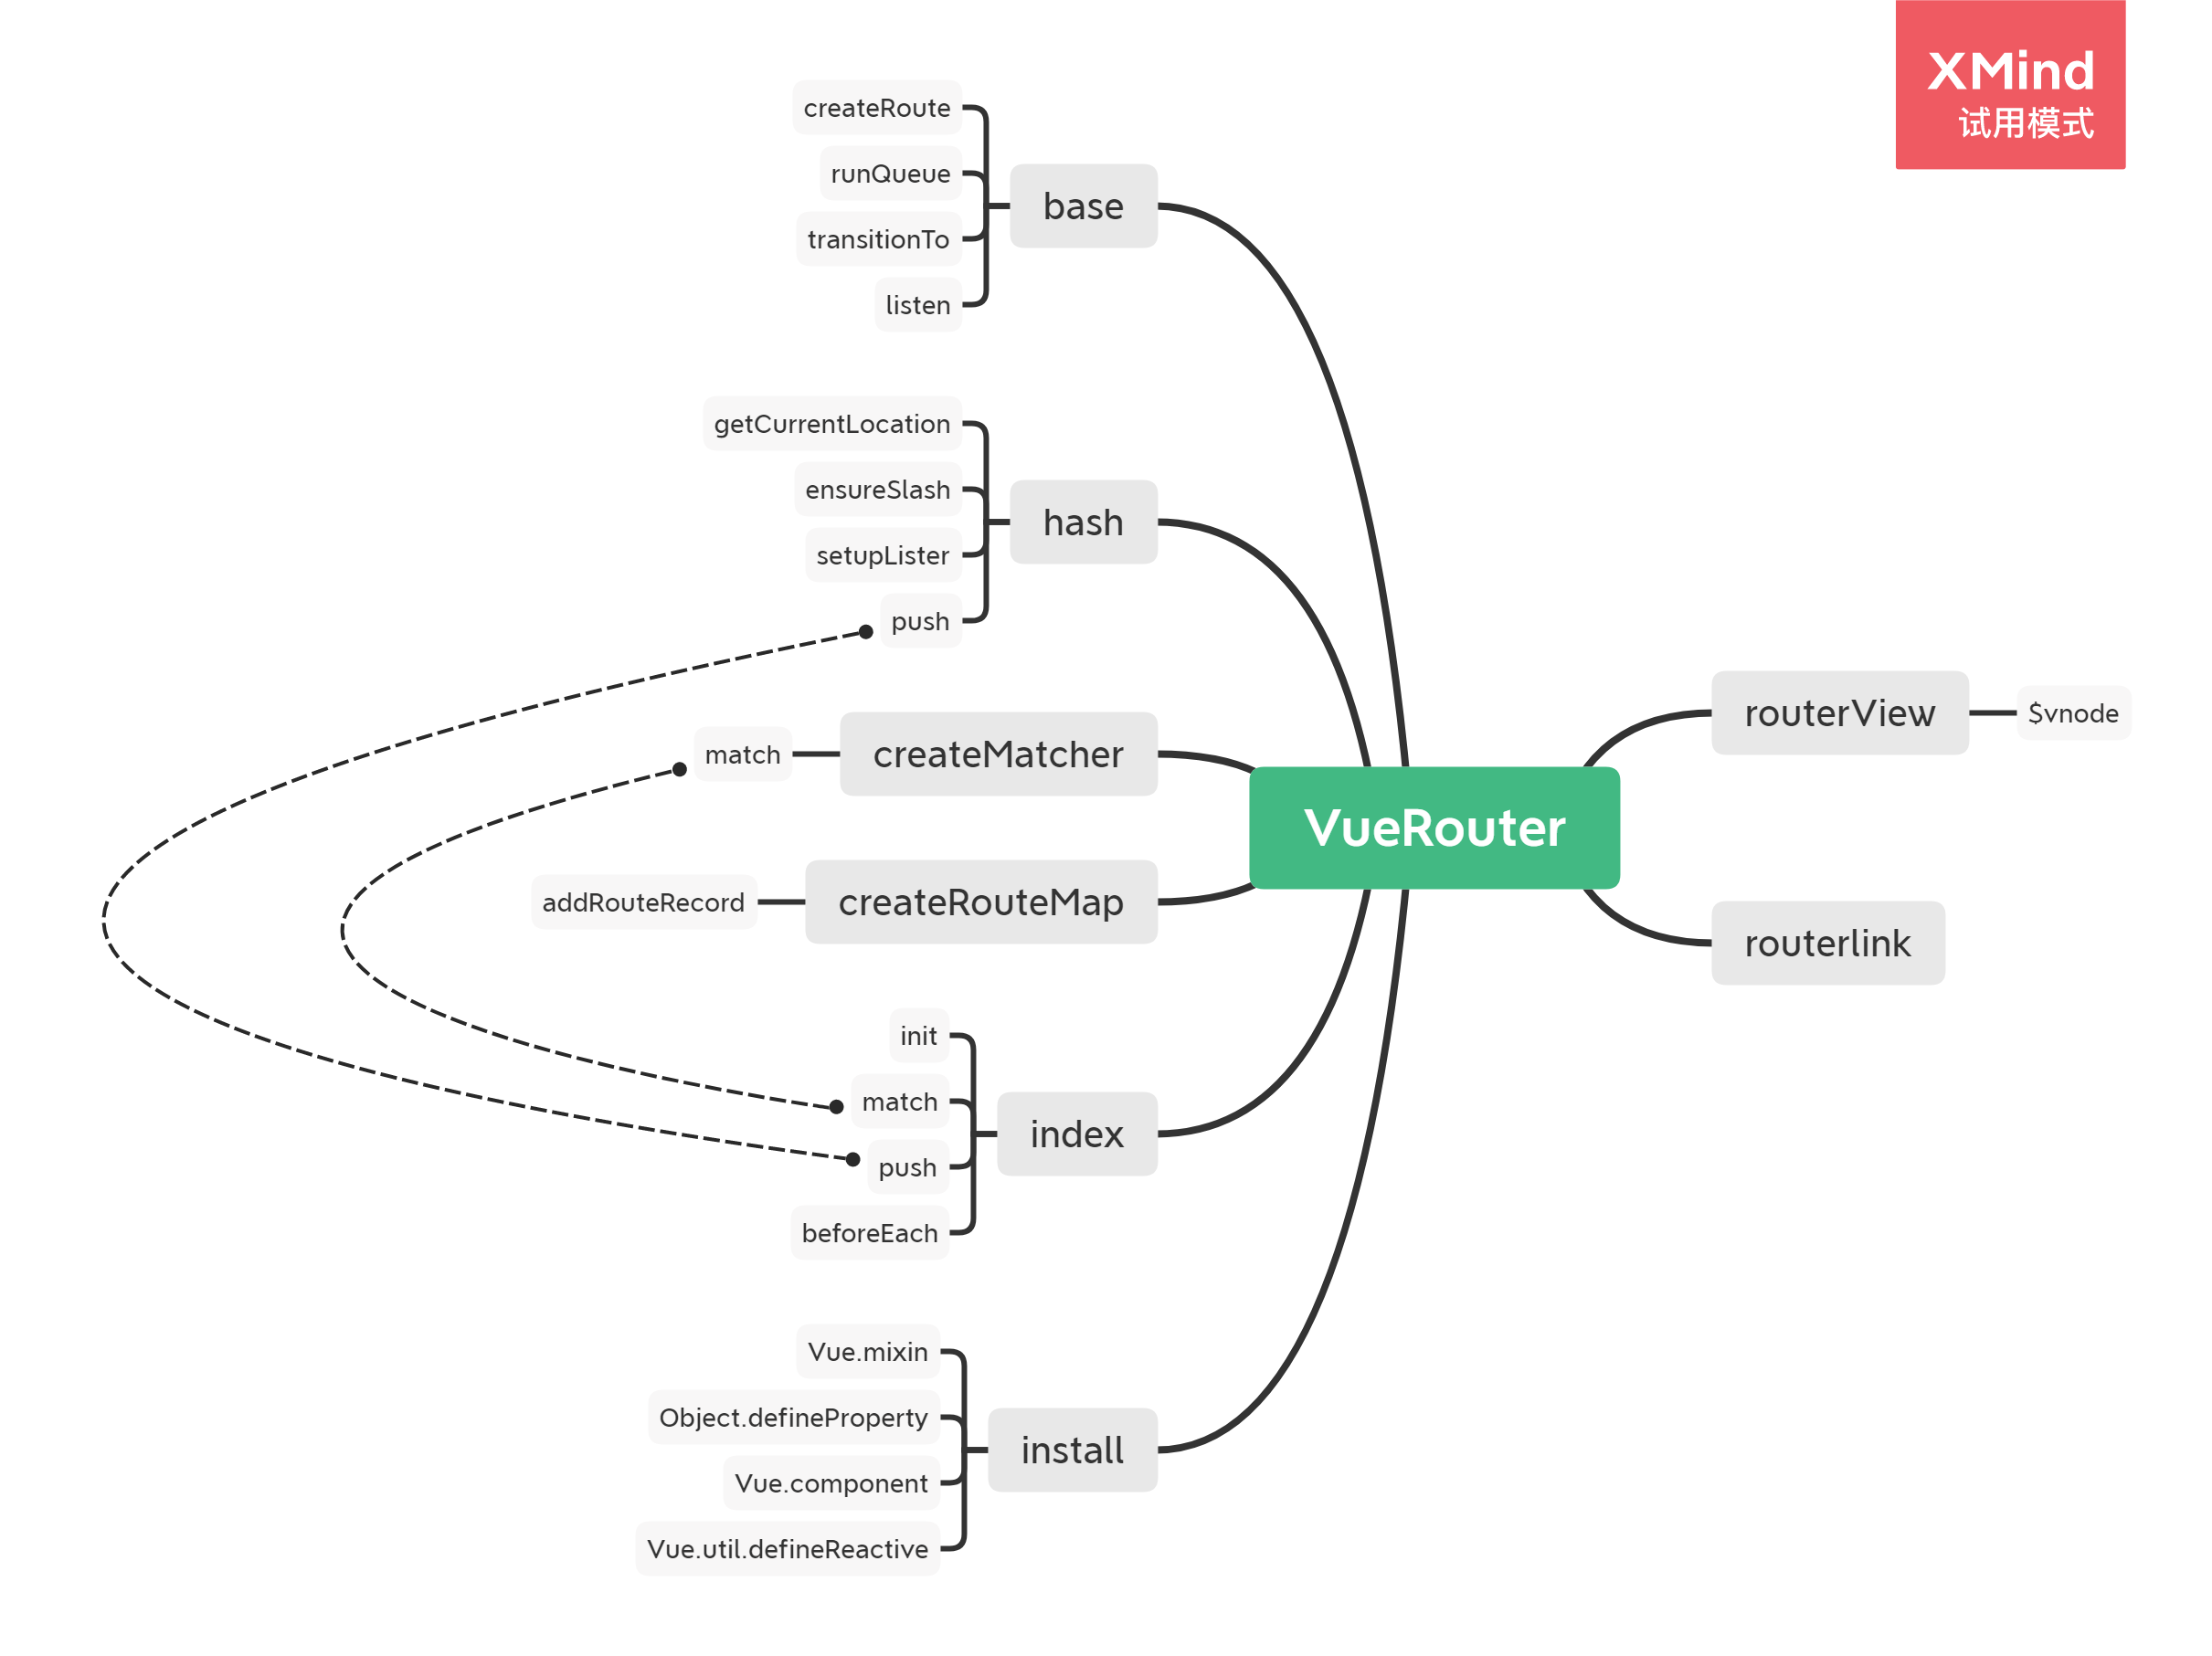
先看`vue-router.js`文件,先生成一个`VueRouter`类,然后导入`install`方法,因为`Vue-Router`的`install`方法比`Vuex`复杂一些,所以将`install`单独作为一个文件。
import install from './install';

class VueRouter {

    constructor(options) {

    }

}

VueRouter.install = install;

export default VueRouter
Vue.use()
来先看 `Vue.use()`的源码中的一部分,这里面判断注册的插件里的`install`是不是一个函数,有就执行插件里的`install`函数。或者判断插件本身是不是一个函数,有就执行插件本身。这里本质上是没有区别,有没有`install`都可以。而`VueRouter`使用了`install`,目的是为了将`install`作为入口函数,方便封装,同时也将`install`和其他代码分开。
if (typeof plugin.install === 'function') {

      plugin.install.apply(plugin, args)

 } else if (typeof plugin === 'function') {

      plugin.apply(null, args)

 }
install
上述已经将`vue-router`的类构建好,现在`VueRouter`实例已经有了,然后执行`vue.use()`,然后会执行`VueRouter`类里的`install`函数,那来看`install.js`。
install里使用了`Vue.mixin`,混入代码,下面代码是在当前组件生命周期`beforeCreate`里混入代码,代码逻辑是判断当前组件是否为根组件,如果是则将`_routerRoot`作为键放入当前组件中,值为`Vue`实例。再将`_router`作为键放入当前组件中,值为`VueRouter`实例。然后执行初始化操作。
如果不为当前组件不是根组件,则该组件为根组件的子组件。将`_routerRoot`作为键放入当前组件中,值为父组件的`_routerRoot`,从父亲身上获取.
`$route`和`$router`是利用`Object.definePropert`代理`_routerRoot`里的`_router`和`_route`,访问到的。
接着注册全局组件`router-view`和`router-link`
import RouterView from '../components/router-view'

import RouterLink from '../components/router-link'

const install = (_Vue, s) => {

    _Vue.mixin({

        beforeCreate() {

            if (this.$options.router) {      // 判断是不是根组件

                this._routerRoot = this;              // 把vue实例放在当前组件的——routerRoot属性上

                this._router = this.$options.router   // 这里直接获取根实例

                this._router.init(this);      // 初始化

                _Vue.util.defineReactive(this, '_route', this._router.history.current)  // 将属性_route成为响应式属性

            } else {

                this._routerRoot = this.$parent && this.$parent._routerRoot   // 这里的是从父亲最顶层获取Router实例

            }

        }

    })

    Object.defineProperty(_Vue.prototype, '$route', {    // 代理$route

        get() {

            return this._routerRoot._route

        }

    })

    Object.defineProperty(_Vue.prototype, '$router', {  // 代理$router

        get() {

            return this._routerRoot._router

        }

    })

    _Vue.component('router-view', RouterView)   // 注册组件router-view

    _Vue.component('router-link', RouterLink)   // 注册组件router-view

}

export default install
init
vue-router 默认 hash 模式 —— 使用 URL 的 hash 来模拟一个完整的 URL,于是当 URL 改变时,页面不会重新加载。
然后回到`VueRouter`类中,此时多了个`init`函数。目前做的路由方式是`hash`方式,还有另外俩种方式,`history`,`abstract`。因为有三种方式,所以`Vue-Router`做了一个父类`base`执行同样的逻辑,子类三种方式继承父类`base`,再独自执行自己方式的代码。
通过`new HashHistory` 获取 `history`实例,初始化`init`执行`history`实例对应函数。将目光放到`history`实例上,这些函数来自于`base.js`和`hash.js`。
import install from './install';

class VueRouter {

    constructor(options) {

        this.history = new HashHistory(this);

    }

    init(app) {

        const history = this.history;

        const setupHashLister = () => {

            history.setupLister(); // hash的跳转

        }

        history.transitionTo(

            history.getCurrentLocation(),

            setupHashLister

        )

        history.listen((route) => {

            app._route = route

        })

    }

}

VueRouter.install = install;

export default VueRouter
base.js
先看构造函数`construcror`,将`router`作为键放在自身实例上,值为`VueRouter`实例,`curent`为当前导航正要离开的路由,也就是路由守卫的参数里的`from`<br/>
1.`transitionTo()`为跳转后立即执行的函数,传入当前路径和回调函数,`r`为`$route`,是扁平化后的配置,也就是即将要进入的目标 路由对象<br/>
2.`cb`是`History`的`listen()`函数,将`$route`放入当前组件上供用户使用。<br/>
3.`callback`是执行`HashHistory`的`setupHashLister()`函数,是给当前`window`添加监听事件`onhashChange`,`onhashChange`后续通过`hash`变化执行`transitionTo`进行更新。<br/>
4.最后将`r`赋值给`current`,更新路由信息。
class History {

    constructor(router) {

        this.router = router;

        this.current = createRoute(null, {

            path: '/'

        })

    }

    transitionTo(location, callback) {

        let r = this.router.match(location)

        if (location == this.current.path && r.matched.length == this.current.matched.length) { // 防止重复跳转

            return

        }

        this.cb && this.cb(r);

        callback && callback();

        this.current = r;

    }

    listen(cb) {

        this.cb = cb;

    }

}
hash.js
`hash`方式的函数就简单介绍一下,看构造函数`constructor`,跟父类一样赋值`router`。执行`ensureSlash`函数,因为`hash`相比其他函数,一进入页面就会多个#。所以就初始化的时候处理一下。`getCurrentLocation`函数是获取当前路径的,`push`是`hash`方式的跳转,`setupLister`函数是刚刚所述的监听函数`hashchange`。
import Histroy from './base';

function ensureSlash() {

    if (window.location.hash) {

        return

    }

    window.location.hash = '/';

}

class HashHistory extends Histroy {

    constructor(router) {

        super();

        this.router = router;

        ensureSlash();

    }

    getCurrentLocation() {

        return window.location.hash.slice(1);

    }

    push(location){

        this.transitionTo(location,()=>{

            window.location.hash = location

        })

    }

    setupLister() {

        window.addEventListener('hashchange', () => {

            this.transitionTo(window.location.hash.slice(1));

        })

    }

}

export default HashHistory
扁平化
刚刚`base.js`里执行的`this.router.match(location)`以及`createRoute()`,都是需要建立在扁平化配置基础之上的。
平时配置的路由是这样的,需要将配置进行扁平化,才能用得上。
 [

    {

        path: '/',

        name: 'home',

        component: Home

    },

    {

        path: '/about',

        name: 'about',

        component: About,

        children: [

            {

                path: 'add',

                name: 'add',

                component: Add

            },

            {

                path: 'bull',

                name: 'bull',

                component: Bull

            }

        ]

    }

]
扁平化后是这样的
/: {path: "/", component: {…}, parnent: undefined}

/about: {path: "about", component: {…}, parnent: {…}}

/about/add: {path: "add", component: {…}, parnent: {…}}

/about/bull: {path: "bull", component: {…}, parnent: {…}}
接着看扁平化函数createMatcher以及createRouteMap
createMatcher
`createMatcher`返回一个`match`函数,`match`方法是匹配路径,根据路径拿扁平化对象里的配置,然后执行`createRoute`方法,将其转化为`route`,返回。`pathMap`由`createRouteMap`生成
import createRouteMap from './create-route-map'

import { createRoute } from './history/base';

export default function createMatcher(routes) {

    let { pathList, pathMap } = createRouteMap(routes);

    function match(location) {

        console.log(pathMap)

        let record = pathMap[location];

        return createRoute(record,{

            path: location

        })

    }

    return {

        match

    }

}
createRouteMap
将`routes`配置传入`createRouteMap`中,遍历`routes`,进行扁平化操作
`pathMap`以路径为键名,值为一个对象包裹着路径,组件,父组件。
将路径匹配上父组件的路径和自身的路径
如果有子组件就进行递归,全部转为扁平化返回。
export default function createRouteMap(routes, oldPathList, oldpathMap) {

    let pathList = oldPathList || [];

    let pathMap = oldpathMap || Object.create(null);

    routes.forEach(route => {

        addRouteRecord(route, pathList, pathMap);

    })

    return {

        pathList,

        pathMap

    }

}

function addRouteRecord(route, pathList, pathMap,parnent) {

    let path = parnent ? `${parnent.path}/${route.path}`: route.path;

    let record = {

        path: route.path,

        component: route.component,

        parnent

    }

    if (!pathMap[path]) {

        pathList.push(path);

        pathMap[path] = record;

    }

    if(route.children){

        route.children.forEach(route=>{

            addRouteRecord(route, pathList, pathMap,record)

        })

    }

}
createRoute
`createRoute`是生成`$route`的函数,传入参数为扁平化配置,路径。将`res`作为空数组,如果传进来的扁平化配置有值,则进行`while`循环,将自己从数组头部插入,取出父组件再从头部插入,如此反复,得到一个含着层次关系的数组。将`loaction`和数组包裹为对象返回。
export function createRoute(record, location) {

    let res = [];

    if (record) {

        while (record) {

            res.unshift(record)

            record = record.parnent

        }

    }

    return {

        ...location,

        matched: res

    }

}
router-view
然后在来看看`routerview`
是一个函数式组件,
返回`render`方法
进行`while`循环,遍历出嵌套的`routerview`
用`depth`作为深度,也是`matched`的`index`.
每遍历一次,就在`$vnode.data.rouView` 改为`true`,将深度加1
返回对应的组件即可
export default {

    name:'routerView',

    functional: true,

    render(h,{parent,data}) {

        let route = parent.$route

        let depth = 0;

        while (parent) {

            if (parent.$vnode && parent.$vnode.data.routeView) {

                depth++;

            }

            parent = parent.$parent;

        }

        data.routeView = true;

        let record = route.matched[depth];

        if (!record) {

            return h();

        }

        return h(record.component, data);

    }

}
router-link
再来看看`routerlink`
没什么东西就返回一个`a`标签,用插槽把对应的文本显示出来,在添加的跳转事件
调用`$router`的`push`方法,也就是`Router`类上的`push`
export default {

    name: 'routerLink',

    props: {

        to: {

            type: String,

            required: true

        },

        tag: {

            type: String,

            default: 'a'

        }

    },

    methods: {

        handler(to) {

            this.$router.push(to)   // 路由跳转

        }

    },

    render() {

        return <a onClick={this.handler.bind(this,this.to)}>{this.$slots.default[0].text}</a>

    }

}
vuerouter草稿:https://juejin.im/post/6862215979745673224
手把手教你写VueRouter的更多相关文章
- 手把手教你写Sublime中的Snippet
手把手教你写Sublime中的Snippet Sublime Text号称最性感的编辑器, 并且越来越多人使用, 美观, 高效 关于如何使用Sublime text可以参考我的另一篇文章, 相信你会喜 ...
- 手把手教你写LKM rookit! 之 第一个lkm程序及模块隐藏(一)
唉,一开始在纠结起个什么名字,感觉名字常常的很装逼,于是起了个这<手把手教你写LKM rookit> 我觉得: 你们觉得:...... 开始之前,我们先来理解一句话:一切的操作都是系统调用 ...
- 手把手教你写电商爬虫-第三课 实战尚妆网AJAX请求处理和内容提取
版权声明:本文为博主原创文章,未经博主允许不得转载. 系列教程: 手把手教你写电商爬虫-第一课 找个软柿子捏捏 手把手教你写电商爬虫-第二课 实战尚妆网分页商品采集爬虫 看完两篇,相信大家已经从开始的 ...
- 手把手教你写电商爬虫-第四课 淘宝网商品爬虫自动JS渲染
版权声明:本文为博主原创文章,未经博主允许不得转载. 系列教程: 手把手教你写电商爬虫-第一课 找个软柿子捏捏 手把手教你写电商爬虫-第二课 实战尚妆网分页商品采集爬虫 手把手教你写电商爬虫-第三课 ...
- 只有20行Javascript代码!手把手教你写一个页面模板引擎
http://www.toobug.net/article/how_to_design_front_end_template_engine.html http://barretlee.com/webs ...
- [原创]手把手教你写网络爬虫(4):Scrapy入门
手把手教你写网络爬虫(4) 作者:拓海 摘要:从零开始写爬虫,初学者的速成指南! 封面: 上期我们理性的分析了为什么要学习Scrapy,理由只有一个,那就是免费,一分钱都不用花! 咦?怎么有人扔西红柿 ...
- [原创]手把手教你写网络爬虫(5):PhantomJS实战
手把手教你写网络爬虫(5) 作者:拓海 摘要:从零开始写爬虫,初学者的速成指南! 封面: 大家好!从今天开始,我要与大家一起打造一个属于我们自己的分布式爬虫平台,同时也会对涉及到的技术进行详细介绍.大 ...
- [原创]手把手教你写网络爬虫(7):URL去重
手把手教你写网络爬虫(7) 作者:拓海 摘要:从零开始写爬虫,初学者的速成指南! 封面: 本期我们来聊聊URL去重那些事儿.以前我们曾使用Python的字典来保存抓取过的URL,目的是将重复抓取的UR ...
- Android开发之手把手教你写ButterKnife框架(三)
欢迎转载,转载请标明出处: http://blog.csdn.net/johnny901114/article/details/52672188 本文出自:[余志强的博客] 一.概述 上一篇博客讲了, ...
随机推荐
- .Net Core Controller
[HttpGet] public async Task<ActionResult<IEnumerable<ABBUserModel>>> GetUser() { / ...
- 数据结构C语言实现----树
树的基本知识点 树的定义 树的ADT(抽象数据类型) 树的储存结构 二叉树的定义 二叉树的储存结构 遍历二叉树 二叉树的建立 二叉树的ADT typedef struct BiTNode { Elem ...
- CORS跨域操作cookie
CORS 跨域 在服务端设置响应头 ACAO( Access-Control-Allow-Origin )即可 前端代码,运行在 8080 端口上 $.ajax({ url:'http://local ...
- List接口(动态数组)
List接口(动态数组) List集合类中元素有序且可重复 ArrayList(重要) 作为List接口的主要实现类 线程不安全的,效率高 底层使用Object[] elementData数组存储 A ...
- Day15_redis安装及配置
学于黑马和传智播客联合做的教学项目 感谢 黑马官网 传智播客官网 微信搜索"艺术行者",关注并回复关键词"乐优商城"获取视频和教程资料! b站在线视频 redi ...
- ES6标准入门 2/26
第一章 ECMAScript6 简介 1.首先经典开头,ECMAScript跟JavaScript的关系,前者是后者的规格,后者是前者的一种实现.在日常场合中,这两个词是可以互换的. 2.ES6可以泛 ...
- PHP date_default_timezone_set() 函数
------------恢复内容开始------------ 实例 设置默认时区: <?php date_default_timezone_set("Asia/Shanghai&quo ...
- PHP imagealphablending - 设定图像的混色模式
imagealphablending — 设定图像的混色模式.高佣联盟 www.cgewang.com 语法 bool imagealphablending ( resource $image , b ...
- [转] 总结了N个真实线上故障
以下文章来源于架构师进阶之路 ,作者二马读书 1. JVM频繁FULL GC快速排查 在分享此案例前,先聊聊哪些场景会导致频繁Full GC: 内存泄漏(代码有问题,对象引用没及时释放,导致对象不能及 ...
- day15.递归函数
一.递归函数 """ 自己调用自己的函数就是递归 递: 去 归: 回 一去一回就是递归 """ 例. def digui(n): print ...