<canvas>中isPointInPath()方法在不同绘制内容中的效果
<canvas>是HTML5中新增加的一个元素,我们可以使用脚本(通常使用JavaScript)在上面绘制图形,就像个画布一样。我们可以用它来绘制图表、制作一些动画。默认大小为300px × 150px。
在<canvas>中绘制图形的方法中,isPointInPath()方法用于检测指定的点是否在绘制图形的路径中,存在返回ture,不存在返回false。
注:在代码部分,红色加粗部分是重点要注意的内容哦!
在矩形中
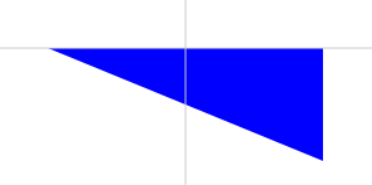
在画布上绘制一个空心矩形,然后指定一个点,如果这个点在矩形的路径中,矩形的颜色为蓝色,否则为黑色。为了能清楚的看到那个点在哪里,我们后面再画上两条灰色的线,交叉的位置就是我们指定的点:
 <body>

     <canvas id="drawEle">

         您的浏览器不支持该标签

     </canvas>

     <script>

         var c = document.getElementById("drawEle");

         ctx = c.getContext("2d");

         //矩形

         ctx.beginPath();

         ctx.rect(10,20,280,20);           //绘制矩形区域

         if(ctx.isPointInPath(50,25)) {      //判断(50,25)是否在矩形路径中

             ctx.strokeStyle = "#0000FF";    //在则矩形是蓝色

         }

         else {

             ctx.strokeStyle = "#000000";    //不在则矩形是黑色

         }

         ctx.stroke();

         //绘制定位用的直线

         ctx.beginPath();

         ctx.strokeStyle = "#CCCCCC";

         ctx.moveTo(50,0);

         ctx.lineTo(50,150);

         ctx.stroke();

         ctx.beginPath();

         ctx.moveTo(0,25);

         ctx.lineTo(300,25);

         ctx.stroke();

     </script>

 </body>
运行效果如下:
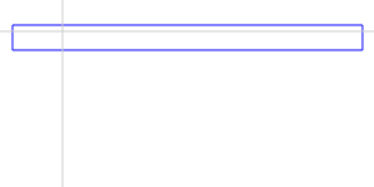
可以看到,我们定位的点再矩形区域内部,矩形的颜色变成了蓝色,也就是说这个点的位置在矩形的路径中。
在弧/曲线区域中
那我们再arc()创建的弧/曲线区域中定位试试看。之后也是使用两条灰色线交叉定位我们判断的点:
 <body>

     <canvas id="drawEle">

         您的浏览器不支持该标签

     </canvas>

     <script>

         var c = document.getElementById("drawEle");

         ctx = c.getContext("2d");

         //弧/曲线

         ctx.beginPath();

         ctx.arc(150,75,50,0,1.5 * Math.PI);    //绘制圆形区域

         if(ctx.isPointInPath(170,55)) {        //判断(170,55)是否在矩形路径中

             ctx.strokeStyle = "#0000FF";      //在则曲线是蓝色

         }

         else {

             ctx.strokeStyle = "#000000";       //不在则曲线是黑色

         }

         ctx.stroke();

         //绘制定位用的直线

         ctx.beginPath();

         ctx.strokeStyle = "#CCCCCC";

         ctx.moveTo(170,0);

         ctx.lineTo(170,150);

         ctx.stroke();

         ctx.beginPath();

         ctx.moveTo(0,55);

         ctx.lineTo(300,55);

         ctx.stroke();

     </script>

 </body>
运行效果如下: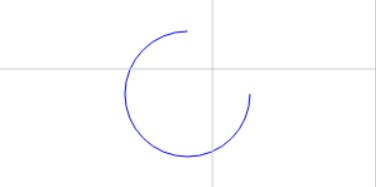
哦,圆还是蓝色的,说明定位是在路径中的。。。不对,这样子看上去好像没有闭合啊,那我们给它填充一下颜色(换成fill()):
 <body>

     <canvas id="drawEle">

         您的浏览器不支持该标签

     </canvas>

     <script>

         var c = document.getElementById("drawEle");

         ctx = c.getContext("2d");

         //弧/曲线

         ctx.beginPath();

         ctx.arc(150,75,50,0,1.5 * Math.PI);  //绘制圆形区域

         if(ctx.isPointInPath(170,55)) {      //判断(170,55)是否在矩形路径中

             ctx.fillStyle = "#0000FF";       //在则曲线是蓝色

         }

         else {

             ctx.fillStyle = "#000000";      //不在则曲线是黑色

         }

         ctx.fill();

         //绘制定位用的直线

         ctx.beginPath();

         ctx.strokeStyle = "#CCCCCC";

         ctx.moveTo(170,0);

         ctx.lineTo(170,150);

         ctx.stroke();

         ctx.beginPath();

         ctx.moveTo(0,55);

         ctx.lineTo(300,55);

         ctx.stroke();

     </script>

 </body>

嗯,是没有超过区域,那我们让超过区域看看
 <body>

     <canvas id="drawEle">

         您的浏览器不支持该标签

     </canvas>

     <script>

         var c = document.getElementById("drawEle");

         ctx = c.getContext("2d");

         //弧/曲线

         ctx.beginPath();

         ctx.arc(150,75,50,0,1.5 * Math.PI);    //绘制圆形区域

         if(ctx.isPointInPath(180,45)) {        //判断(180,45)是否在矩形路径中

             ctx.fillStyle = "#0000FF";        //在则曲线是蓝色

         }

         else {

             ctx.fillStyle = "#000000";        //不在则曲线是黑色

         }

         ctx.fill();

         //绘制定位用的直线

         ctx.beginPath();

         ctx.strokeStyle = "#CCCCCC";

         ctx.moveTo(180,0);

         ctx.lineTo(180,150);

         ctx.stroke();

         ctx.beginPath();

         ctx.moveTo(0,45);

         ctx.lineTo(300,45);

         ctx.stroke();

     </script>

 </body>

变黑了,说明这个点不再路径中。
在直线中
接下来就到最简单的线条了。其实写这个笔记就是因为这个线条来着┑( ̄ ▽  ̄)┍
使用moveTo()和lineTo()结合,创建一根直线,定位点在路径中直线为蓝色,否则为黑色。使用一条灰色线交叉定位我们判断的点:
 <body>

     <canvas id="drawEle">

         您的浏览器不支持该标签

     </canvas>

     <script>

         var c = document.getElementById("drawEle");

         ctx = c.getContext("2d");

         //直线

         ctx.beginPath();

         ctx.moveTo(40,40);

         ctx.lineTo(260,40);

         if(ctx.isPointInPath(150,40)) {        //判断(150,40)是否在矩形路径中

             ctx.strokeStyle = "#0000FF";       //在则直线是蓝色

         }

         else {

             ctx.strokeStyle = "#000000";       //不在则直线是黑色

         }

         ctx.stroke();

         //绘制定位用的直线

         ctx.beginPath();

         ctx.strokeStyle = "#CCCCCC";

         ctx.moveTo(150,0);

         ctx.lineTo(150,150);

         ctx.stroke();

     </script>

 </body>
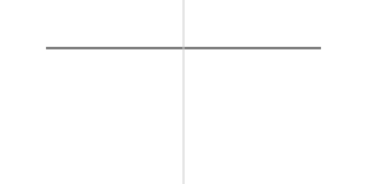
欸,怎么是黑色的啊,我不是定位点的y轴和线条两个点的y轴都重合了么?
就是这个情况,定位点如果定位在使用moveTo()和lineTo()绘制的直线中间自动生成的线上,是会返回false的!
那把定位点完全重合moveTo()的点试试看:
 <body>

     <canvas id="drawEle">

         您的浏览器不支持该标签

     </canvas>

     <script>

         var c = document.getElementById("drawEle");

         ctx = c.getContext("2d");

         //直线

         ctx.beginPath();

         ctx.moveTo(40,40);

         ctx.lineTo(260,40);

         if(ctx.isPointInPath(40,40)) {        //判断(40,40)是否在直线路径中

             ctx.strokeStyle = "#0000FF";    //在则直线是蓝色

         }

         else {

             ctx.strokeStyle = "#000000";    //不在则直线是黑色

         }

         ctx.stroke();

         //绘制定位用的直线

         ctx.beginPath();

         ctx.strokeStyle = "#CCCCCC";

         ctx.moveTo(40,0);

         ctx.lineTo(40,150);

         ctx.stroke();

     </script>

 </body>
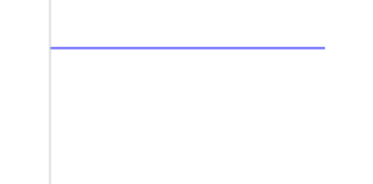
蓝了,蓝了,它蓝了!
那接下来我们用moveTo()和lineTo()做一个闭合的图形康康,定位就设在一条边中间,用两条灰色的线条交叉标记我们定位的点:
 <body>

     <canvas id="drawEle">

         您的浏览器不支持该标签

     </canvas>

     <script>

         var c = document.getElementById("drawEle");

         ctx = c.getContext("2d");

         //直线

         ctx.beginPath();

         ctx.moveTo(40,40);

         ctx.lineTo(260,40);

         ctx.lineTo(260,130);

         ctx.closePath();

         if(ctx.isPointInPath(150,40)) {        //判断(150,40)是否在路径中

             ctx.fillStyle = "#0000FF";    //在则直线是蓝色

         }

         else {

             ctx.fillStyle = "#000000";    //不在则直线是黑色

         }

         ctx.fill();

         //绘制定位用的直线

         ctx.beginPath();

         ctx.strokeStyle = "#CCCCCC";

         ctx.moveTo(150,0);

         ctx.lineTo(150,150);

         ctx.stroke();

         ctx.beginPath();

         ctx.moveTo(0,40);

         ctx.lineTo(300,40);

         ctx.stroke();

     </script>

 </body>
这个区域这个时候是蓝的了。也就是说不是闭合区域的时候,moveTo()和lineTo()中的线条是不算在区域内的,得闭合后才算。(对于这个观点,其实我是觉得有点怪怪的,感觉这个观点应该是接近正确答案但它不是正确答案)
在加粗的直线末端中
假如线条宽度有20px,上面我们知道只有和路径点重合了才算,那加粗的线条还是和路径点重合了算还是路径点y轴(假设是横线,那么就当它是长方形吧,竖这的边上任意一点)也算,这也是刚刚突然想到的,试试看:
 <body>

     <canvas id="drawEle">

         您的浏览器不支持该标签

     </canvas>

     <script>

         var c = document.getElementById("drawEle");

         ctx = c.getContext("2d");

         //直线

         ctx.beginPath();

         ctx.moveTo(40,40);

         ctx.lineTo(260,40);

         ctx.lineWidth = 40;

         if(ctx.isPointInPath(40,35)) {        //判断(40,35)是否在矩形路径中

             ctx.strokeStyle = "#0000FF";    //在则直线是蓝色

         }

         else {

             ctx.strokeStyle = "#000000";    //不在则直线是黑色

         }

         ctx.stroke();

         //绘制定位用的直线

         ctx.beginPath();

         ctx.lineWidth = 1;

         ctx.strokeStyle = "#CCCCCC";

         ctx.moveTo(40,0);

         ctx.lineTo(40,150);

         ctx.stroke();

         ctx.beginPath();

         ctx.moveTo(0,35);

         ctx.lineTo(300,35);

         ctx.stroke();

     </script>

 </body>
看起来还是得和路径点重合。
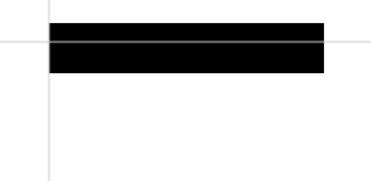
那加粗后闭合呢?
 <body>

     <canvas id="drawEle">

         您的浏览器不支持该标签

     </canvas>

     <script>

         var c = document.getElementById("drawEle");

         ctx = c.getContext("2d");

         //直线

         ctx.beginPath();

         ctx.moveTo(40,40);

         ctx.lineTo(260,40);

         ctx.lineTo(260,130);

         ctx.closePath();

         ctx.lineWidth = 40;

         if(ctx.isPointInPath(40,35)) {        //判断(40,35)是否在矩形路径中

             ctx.f = "#0000FF";    //在则直线是蓝色

         }

         else {

             ctx.strokeStyle = "#000000";    //不在则直线是黑色

         }

         ctx.stroke();

         //绘制定位用的直线

         ctx.beginPath();

         ctx.lineWidth = 1;

         ctx.strokeStyle = "#CCCCCC";

         ctx.moveTo(40,0);

         ctx.lineTo(40,150);

         ctx.stroke();

         ctx.beginPath();

         ctx.moveTo(0,35);

         ctx.lineTo(300,35);

         ctx.stroke();

     </script>

 </body>

没有区别,也就是说加粗的部分并不算在路径内。
参考资料:MDN - CanvasRenderingContext2D.isPointInPath() : https://developer.mozilla.org/zh-CN/docs/Web/API/CanvasRenderingContext2D/isPointInPath
<canvas>中isPointInPath()方法在不同绘制内容中的效果的更多相关文章
- jquery中Live方法不可用,Jquery中Live方法失效
jquery中Live方法不可用,Jquery中Live方法失效 >>>>>>>>>>>>>>>>> ...
- Properties集合中的方法store和Properties集合中的方法load
Properties集合中的方法store public class Demo01Properties { public static void main(String[] args) throws ...
- C#后台程序与HTML页面中JS方法互调(功能类似于Ajax中的DWR)
此方法适用于 C#中嵌入WebBrowser(浏览器) 通过浏览器中加载的页面与C#的后台代码进行交互. 一.C#程序 1.在C#窗体中添加WebBrowser(浏览器),将页面的URL添加到浏览器中 ...
- ①创建项目testpackage ②在pack2.B中添加方法f ③在类A中添加如下三个成员变量:int型的私有变量i float型的变量f double型的公有变量d 在pack1.B的main方法中为对象a的成员变量f和d分别赋值为2和3 在pack2.C的main方法中为对象a的成员变量d赋值为3
package pack1; public class A { private int i; float f; public double d; public float getF() { retur ...
- JS中substring()方法(用于提取字符串中介于两个指定下标之间的字符)
<!DOCTYPE html> <html> <head> <meta charset="UTF-8"> <title> ...
- Java中wait()方法为什么要放在同步块中?(lost wake-up 问题)
问题起源 事情得从一个多线程编程里面臭名昭著的问题"Lost wake-up problem"说起. 这个问题并不是说只在Java语言中会出现,而是会在所有的多线程环境下出现. 假 ...
- 在eclipse中查找一个类中的方法在其他哪个类中被调用了
选中你所要查看的方法名,ctrl+shift+G就可以查看所有调用过该方法的地方了.在Search视图里面可以查看得到这个样子是可以的,你也可以按Ctrl+H全文检索一下
- 关于tx:method和pointcut中的方法,即事务管理中的方法和切入点表达式中的方法具体如何执行
<tx:advice id="transaction" tranction-manager="transactionManager"> <tx ...
- jQuery中的方法
jQuery中的方法来操作HTML标签中的属性 attr(name) 获取当前对象的指定的属性的值 attr(key,value) 给当前对象设置属性值 attr(properties) 一 ...
随机推荐
- Echarts扩展地图文字位置错乱的问题
最近在弄echarts 因为要用到扩展地图,所以在官网下载了相应的json文件 ,引入之后发现文字位置错乱 于是查找网上资料 发现 textFixed : { ...
- 解决Visual C++ for Linux: -L"~/projects/path_to_lib_folder" 无法设置library search path的问题
最近倒腾Linux C/C++项目.以目前的情况来说,要生成编译(build)一个Linux工程脚本,首选的工具必定是CMake.这也是我之前Linux项目的首选.不过自从VS IDE支持Linux ...
- 【SoftwareTesting】Homework2
For the Program1, For Question1: The fault is that in the loop condition, ' i ' should be not less t ...
- python的列表生成式
列表生成式 列表生成式即List Comprehensions,是Python内置的非常简单却强大的可以用来创建list的生成式. 举个例子,要生成list [1, 2, 3, 4, 5, 6, 7, ...
- python并发_协程
在操作系统中进程是资源分配的最小单位, 线程是CPU调度的最小单位. 协程:是单线程下的并发,又称微线程,纤程.英文名Coroutine.一句话说明:协程是一种用户态的轻量级线程,即协程是由用户程序自 ...
- div css 图片和文字上下居中对齐
想要图片和文字水平居中对齐很容易,可今天做这个树的时候,遇到了要将图片上下居中.这下就不知道怎么搞. 拿手册看也看不出所以然来,不同的浏览器对DIV的支持不一个,目前最好的浏览器是Firefox. 这 ...
- Python 从入门到实践 试一试 参考代码
这两天学习Python 看了python从入门到实践的书籍,里面有课后题“试一试” 然后就跟着写了,代码在以下地址,如果需要自取 https://files.cnblogs.com/files/fud ...
- java后端的知识学习
有良好的计算机基础知识,熟悉计算机网络技术以及常用的设计模式:有扎实的 Java 语言基础,熟悉 Java 多线程编程技术.JVM 虚拟机原理:熟悉J2EE体系架构,熟悉WebService.Spri ...
- JAVA对mongodb的基本操作
public class test3 { //连接数据库(不需要验证,用于测试连接本地的mongodb) public static MongoDatabase getDatabase(String ...
- React Native 获取组件(Component)在屏幕上的位置
年后主客户端的需求以及老的业务迁移RN,现在疯狂的在学RN.在迁移需求的时候遇到需要获取组件在屏幕上的绝对位置.页面如下: 就需要展开的时候获取sectionHeader(默认排序)在屏幕上的具体位置 ...