
用vue2.x注册一个全局的弹窗alert组件、confirm组件
一、在实际的开发当中,弹窗是少不了的,默认系统的弹窗样式太丑,难以满足项目的实际需求,所以需要自己定义弹窗组件,把弹窗组价定义为全局的,这样减少每次使用的时候引入麻烦,节省开发时间。本文将分享如何定义一个全局的弹窗组件。下边开始上代码。
二、实际代码如下:
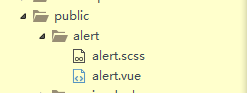
1.在components目录下的public目录新建一个文件夹alert,然后新建两个文件alert.vue和alert.scss。组件的样式代码我喜欢跟组件放到一起,这样按模块去划分管理。公共的样式就放到公共的样式文件里就行了。
2.alert.vue代码如下
<template>

  <div class="alertModal" ref="alert">

    <!--social post弹框-->

      <transition name="fade">

          <div v-if="modelFlag==1" class="alertbox">

            <div class="alert-dialog">

              <div class="alert-content">

                <div class="alert-header">

                    <span  class="alertclose" @click="close">×</span>

                    <span class="alert-title">

                       {{modelTitle}}

                    </span>

                </div>

                <div class="alert-body">

                    {{modelContent}}

                </div>

                <div class="alert-footer">

                    <button class="alertbtn"  @click="close">{{modelClose}}</button>

                    <button class="alertbtn alert-info" @click="submit">{{modelSave}}</button>

                </div>

              </div>

            </div>

        </div>

      </transition>

      <div v-if="modelFlag==1" class="modal-backdrop"></div>

  </div>

</template>

<script>

export default {

    data(){

        return{

            modelFlag:0,//0为消失,1为显示

            modelTitle:'Alert',//弹窗标题

            modelClose:'取消',//取消按钮文字

            modelContent:'',//弹窗内容

            modelSave:'确定',//确定按钮文字

            callBack:null,//是否需要回调函数

        }

    },

    methods:{

        //回调函数

        doCallBack(){

            if(typeof this.callBack == 'function'){

                this.callBack()

                this.callBack=null;

            }

        },

        //关闭弹窗,数据重置

        close(){

           this.modelFlag=0;

           this.modelTitle='Alert';

           this.modelClose='取消';

           this.modelContent='';

           this.modelSave='确定';

           this.callBack=null;

        },

        //点击确定按钮弹窗消失

        submit(){
            this.doCallBack()

            this.close()

        },

        //显示弹窗,记性复制

        show(options){

            if(this.modelFlag==1){return};

            this.modelTitle=options.modelTitle||this.modelTitle;

            this.modelContent=options.modelContent;

            this.modelFlag=1;

            this.modelSave=options.modelSave||this.modelSave;

            this.modelClose=options.modelClose||this.modelClose;

            if(options.callBack){

                this.callBack=options.callBack;

            }

        },

    },

    watch:{

    }

}

</script>

<!-- Add "scoped" attribute to limit CSS to this component only -->

<style lang="sass" scoped>

@import 'alert.scss'

</style>
3.在App.vue中引入组件并注册,
import alert from 'components/public/alert/alert.vue'
mounted(){

        Vue.prototype.$alert=this.$refs.alert;

    },

  components:{

      alert

  }
<alert ref='alert'></alert>
在外层div下加上组件。
4.使用弹窗
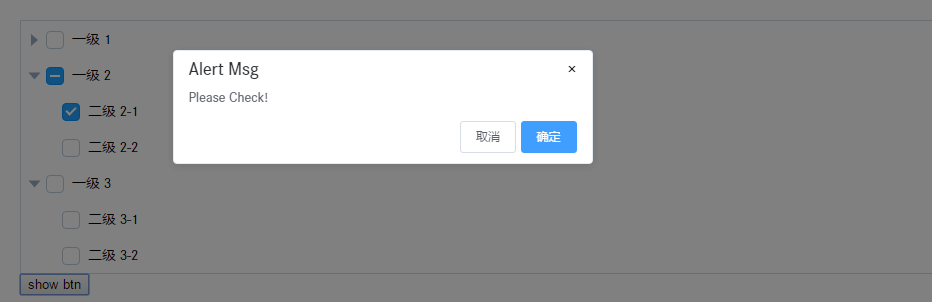
比如我在一个页面那里点击一个button然后调用显示这弹窗,则:
<button @click="showalert">show alert</button>

methods:{

        showalert(){

               this.$alert.show({modelTitle:"Alert Msg",

                          modelContent:'Please Check!'})

        }

    },
this.$alert.show({modelTitle:"Alert Msg",modelContent:'Please Check!'}),show方法里边传一个对象,里边是相应的配置。
这样就可以使用啦!
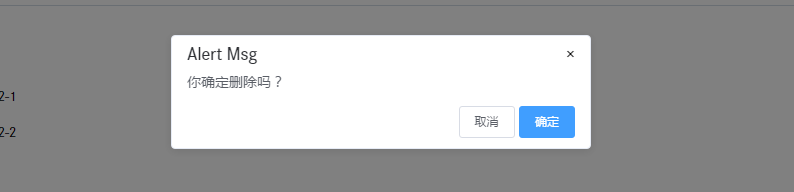
5.使用confirm功能,在对象里加入callBack回调函数:
showalert(){

               this.$alert.show({modelTitle:"Alert Msg",modelContent:'你确定删除吗?',callBack:()=>{

                   alert(1)

               }})

        }
结果如下:
6.最后附上样式代码
.modal.fade .alert-dialog {

  -webkit-transition: -webkit-transform .3s ease-out;

       -o-transition:      -o-transform .3s ease-out;

          transition:         transform .3s ease-out;

  -webkit-transform: translate(0, -25%);

      -ms-transform: translate(0, -25%);

       -o-transform: translate(0, -25%);

          transform: translate(0, -25%);

}

.modal.in .alert-dialog {

  -webkit-transform: translate(0, 0);

      -ms-transform: translate(0, 0);

       -o-transform: translate(0, 0);

          transform: translate(0, 0);

}

.alertbox{

    position: fixed;

    top:;

    bottom:;

    left:;

    right:;

    text-align: center;

    z-index:;

}

.alert-dialog{

    display: inline-block;

    width: 420px;

    padding-bottom: 10px;

    vertical-align: middle;

    background-color: #fff;

    border-radius: 4px;

    border: 1px solid #e6ebf5;

    font-size: 18px;

    box-shadow: 0 2px 12px 0 rgba(0,0,0,.1);

    text-align: left;

    overflow: hidden;

    backface-visibility: hidden;

    position: relative;

    top: 140px;

    padding: 10px 15px;

}

.modal-backdrop.fade {

  filter: alpha(opacity=0);

  opacity:;

}

.modal-backdrop.in {

  filter: alpha(opacity=50);

  opacity: .5;

}

.alert-footer{

    float: right;

    margin-top: 5px;

}

.alert-scrollbar-measure {

  position: absolute;

  top: -9999px;

  width: 50px;

  height: 50px;

  overflow: scroll;

}

.fade-enter-active, .fade-leave-active {

  transition: opacity .5s

}

.fade-enter, .fade-leave-to /* .fade-leave-active in <2.1.8 */ {

  opacity: 0

}

.modal-backdrop {

    position: fixed;

    top:;

    right:;

    bottom:;

    left:;

    z-index:;

    background-color: #000;

    opacity: 0.5;

}

.el-icon-date{

    cursor: pointer;

}

.alert-header{

}

.alert-title{

    font-size: 18px;

    line-height:;

    color: #2d2f33;

}

.alert-body{

    padding: 10px 0px;

    color: #5a5e66;

    font-size: 14px;

    line-height: 17px;

}

.alertbtn{

    text-align: center;

    font-weight:;

    cursor: pointer;

    padding: 9px 15px;

    font-size: 12px;

    border-radius: 3px;

    line-height:;

    background: #fff;

    border: 1px solid #d8dce5;

    border-color: #d8dce5;

    color: #5a5e66;

}

.alert-info{

    color: #fff;

    background-color: #409eff;

    border-color: #409eff;

}

.alertclose{

    float: right;

    cursor: pointer;

}
希望对大家有用。
用vue2.x注册一个全局的弹窗alert组件、confirm组件的更多相关文章
- 用vue2.x注册一个全局的弹窗alert组件
一.在实际的开发当中,弹窗是少不了的,默认系统的弹窗样式太丑,难以满足项目的实际需求,所以需要自己定义弹窗组件,把弹窗组价定义为全局的,这样减少每次使用的时候引入麻烦,节省开发时间.本文将分享如何定义 ...
- vue中封装一个全局的弹窗js
/** * Created by yx on 2017/12/21. */ export default { /** * 带按钮的弹框 * <!--自定义提示标题,内容,单个按钮事件--> ...
- Vue全局弹窗:一次注册,全局可弹
Vue全局弹窗 今天来搞一个全局弹窗,不用每个文件都引入,只在main.js里作为全局原型引入就好了 先新建弹窗组件 toast.vue <template></template&g ...
- vue插件 使用use注册Vue全局组件和全局指令
插件一般会注册到全局使用 官方编辑插件介绍:https://vuefe.cn/v2/guide/plugins.html 全局组件: .首先建一个自定义组件的文件夹,比如叫loading,里面有一个i ...
- 在Form Load中设置showInTaskBar =false 或 隐藏窗口 this.Hide()时会导致注册的全局快捷键无效
在Form Load中设置showInTaskBar =false 或 隐藏窗口 this.Hide() 会导致注册的全局快捷键无效. 反正是其中一个,有点记不清了. 在Form Shown中s ...
- 【Head First Servlets and JSP】笔记7:如何创建一个全局的dog?
重定向与请求分派 “局部”参数——ServletConfig——servlet初始化参数 “全局”参数——ServletContext——上下文初始化参数 Web app的“构造器”——Servlet ...
- 使用gacutil把COM组件注册到全局缓存GAC中
我们在编写软件的时候,有时候需要调用COM组件,那就需要注册了,注册有两种,一种是使用regasm 在程序运行的时候注册,参考“pb调用C#编写的DLL类库“,不过受路径的限制.还有一种注册方式,使用 ...
- mappers:将sql映射注册到全局配置中
<!-- 将我们写好的sql映射文件(EmployeeMapper.xml)一定要注册到全局配置文件(mybatis-config.xml)中 --> <!-- 6.mappers: ...
- vue 复习篇. 注册全局组件,和 组件库
初篇 ============================================================== 1. 编写loading组件(components/Loading/ ...
随机推荐
- HDU 3718 Similarity(KM最大匹配)
HDU 3718 Similarity 题目链接 题意:给定一个标准答案字符串,然后以下每一行给一个串.要求把字符一种相应一种,要求匹配尽量多 思路:显然的KM最大匹配问题,位置相应的字符连边权值+1 ...
- HDU5489 LIS变形
Removed Interval Problem Description Given a sequence of numbers A=a1,a2,…,aN , a subsequence b1,b2, ...
- 支付宝即时到帐接口的python实现,演示样例採用django框架
因工作须要研究了支付宝即时到帐接口.并成功应用到站点上,把过程拿出来分享. 即时到帐仅仅是支付宝众多商家服务中的一个,表示客户付款,客户用支付宝付款.支付宝收到款项后,立即通知你,而且此笔款项与交易脱 ...
- git fetch批处理,遍历一个文件夹下的所有子目录,执行git fetch --all
echo off for /d %%i in (*) do ( echo %%i cd %%i git fetch --all cd .. ) 判断子目录是否有.git文件夹 echo off for ...
- Error-MySQL:2005 - Unknown MySQL server host 'localhost'(0)
ylbtech-Error-MySQL:2005 - Unknown MySQL server host 'localhost'(0) 1.返回顶部 1. 今天在外面开navicat for mysq ...
- 1961 躲避大龙(dfs)
1961 躲避大龙 时间限制: 1 s 空间限制: 128000 KB 题目等级 : 钻石 Diamond 题目描述 Description 你早上起来,慢悠悠地来到学校门口,发现已经是 ...
- WebService开发-Hessian
Hessian 开发Web Service 一.关于Hessian Hessian是一个轻量级的remoting on http工具,使用简单的方法提供了RMI的功能. 相比WebService,He ...
- [SGU 199] Beautiful People
[SGU 199] Beautiful People The most prestigious sports club in one city has exactly N members. Each ...
- HBase的集群搭建(1、3、5节点都适用)
见 5 hbase-shell + hbase的java api
- 5.7 Maven通俗讲解
好的东西只适合ctry+c+v 原文地址:https://blog.csdn.net/shuzhe66/article/details/45009175 Maven通俗讲解 也许是本人不才,初识Mav ...