
用Azure上Cognitive Service的Face API识别人脸
Azure在China已经发布了Cognitive Service,包括人脸识别、计算机视觉识别和情绪识别等服务。
本文将介绍如何用Face API识别本地或URL的人脸。
一 创建Cognitive Service
1 在Azure上创建Cognitive Service的Face服务:
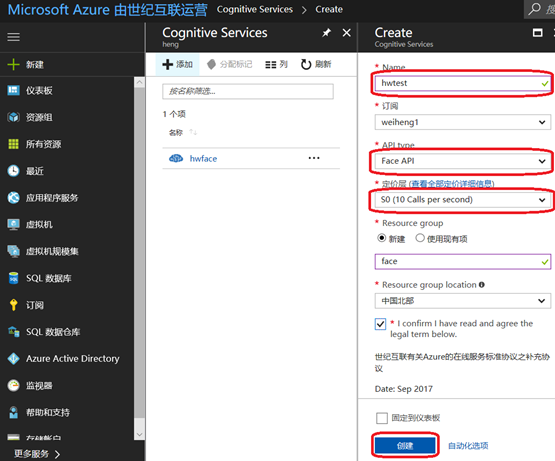
2 获取服务的链接和key:
创建成功后,在overview的页面上可以看到服务链接,已经Key:
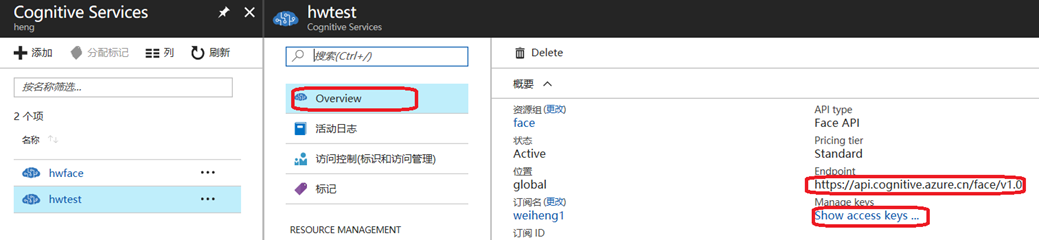
有了这些信息后,就可以开始进入coding的阶段了。
二 Python code
1 通过URL链接实现人脸识别
关于Azure 人脸识别的API内容可以参考:
https://docs.microsoft.com/en-us/azure/cognitive-services/Face/APIReference
中的:
部分。
具体python的实现如下:
#!/usr/bin/python

# -*- coding: utf-8 -*-

#导入相关模块

import httplib, urllib, json

#Face API相关的Key和Endpoint

subscription_key = '30a236e53b924f2c943892711d8d0e45'

uri_base = 'api.cognitive.azure.cn'

#定义html的header,这里Content-type决定了body中的类型,是URL还是文件类型的,这里的Json支持URL模式

headers = {

    'Content-Type': 'application/json',

    'Ocp-Apim-Subscription-Key': subscription_key,

}

#定义返回的内容,包括FaceId,年龄、性别等等

params = urllib.urlencode({

    'returnFaceId': 'true',

    'returnFaceLandmarks': 'false',

    'returnFaceAttributes': 'age,gender,headPose,smile,facialHair,glasses,emotion,hair,makeup,occlusion,accessories,blur,exposure,noise',

})

#图片的URL

body = "{'url':'http://www.bidmc.org/~/media/Images/Research_NotDepartmentResearch/ResearchCenters/Cancer%20Research%20Institute/Wenyi%20Wei%20250.jpg'}"

#Call Face API,进行人脸识别

try:

    conn = httplib.HTTPSConnection('api.cognitive.azure.cn')

    conn.request("POST", "/face/v1.0/detect?%s" % params, body, headers)

    response = conn.getresponse()

    data = response.read()

    parsed = json.loads(data)

    print ("Response:")

    print (json.dumps(parsed, sort_keys=True, indent=2))

    conn.close()

except Exception as e:

    print("[Errno {0}] {1}".format(e.errno, e.strerror))
输出结果如下:
[

    {

    "faceAttributes": {

        "age": 45.5,

        ...

        "gender": "male",

        "faceId": "b15284c9-ce1c-40eb-a76b-99d5ce381081",

        "faceRectangle": {

            "height": 56,

            "left": 155,

            "top": 50,

            "width": 56

            }

        }

    }

]
可以看到是一个Json的输出,里面包含有FaceId,年龄,性别等各种信息。
2 用本地文件作为源文件进行图片识别
具体的代码如下:
#!/usr/bin/python

# -*- coding: utf-8 -*-

#导入相关模块

import httplib, urllib, json

from os.path import expanduser

#Face API相关的Key和Endpoint

subscription_key = '30a236e53b924f2c943892711d8d0e45'

uri_base = 'api.cognitive.azure.cn'

#定义html的header,这里Content-type决定了body中的类型,是URL还是文件类型的,这里的Json支持URL模式

headers = {

    'Content-Type': 'application/octet-stream',

    'Ocp-Apim-Subscription-Key': subscription_key,

}

#定义返回的内容,包括FaceId,年龄、性别等等

params = urllib.urlencode({

    'returnFaceId': 'true',

    'returnFaceLandmarks': 'false',

    'returnFaceAttributes': 'age,gender,headPose,smile,facialHair,glasses,emotion,hair,makeup,occlusion,accessories,blur,exposure,noise',

})

#打开本地图片

img = open(expanduser('D:\\Heng\\Pictures\\100EOS5D\\C5D_5131.JPG'), 'rb')

#Call Face API,进行人脸识别

try:

    conn = httplib.HTTPSConnection('api.cognitive.azure.cn')

    conn.request("POST", "/face/v1.0/detect?%s" % params, img, headers)

    response = conn.getresponse()

    data = response.read()

    parsed = json.loads(data)

    print ("Response:")

    print (json.dumps(parsed, sort_keys=True, indent=2))

    conn.close()

except Exception as e:

    print("[Errno {0}] {1}".format(e.errno, e.strerror))
输出和前面的类似。
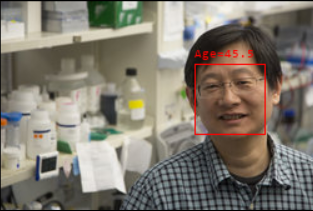
3 给图片中的人脸打框,并表示年龄
根据前面的人脸识别,可以根据返回值,对人脸进行打框,并标识其返回的年龄,具体Python程序如下:
#!/usr/bin/python

# -*- coding: utf-8 -*-

#导入相关模块

import httplib, urllib, json

from os.path import expanduser

from PIL import Image, ImageDraw, ImageFont

def getRectangle(mydata):

    left = mydata[u'left']

    top = mydata[u'top']

    bottom = left + mydata[u'height']

    right = top + mydata[u'width']

    return ((left, top), (bottom, right))

#Face API相关的Key和Endpoint

subscription_key = '30a236e53b924f2c943892711d8d0e45'

uri_base = 'api.cognitive.azure.cn'

#定义html的header,这里Content-type决定了body中的类型,是URL还是文件类型的,这里的Json支持URL模式

headers = {

    'Content-Type': 'application/octet-stream',

    'Ocp-Apim-Subscription-Key': subscription_key,

}

#定义返回的内容,包括FaceId,年龄、性别等等

params = urllib.urlencode({

    'returnFaceId': 'true',

    'returnFaceLandmarks': 'false',

    'returnFaceAttributes': 'age,gender,headPose,smile,facialHair,glasses,emotion,hair,makeup,occlusion,accessories,blur,exposure,noise',

})

#打开本地图片

#imgfile = 'D:\\Heng\\Pictures\\C5D_3966.JPG'

imgfile = 'D:\\Heng\\desktop\\face.JPG'

img = open(expanduser(imgfile), 'rb')

#Call Face API,进行人脸识别

try:

    conn = httplib.HTTPSConnection('api.cognitive.azure.cn')

    conn.request("POST", "/face/v1.0/detect?%s" % params, img, headers)

    response = conn.getresponse()

    data = response.read()

    parsed = json.loads(data)

    conn.close()

except Exception as e:

    print("[Errno {0}] {1}".format(e.errno, e.strerror))

#新建一个文件

newimg = Image.open(imgfile)

draw = ImageDraw.Draw(newimg)

#判断其大小

size = len(str(newimg.size[0]))

#根据大小分配字体大小和字的位置

if size>= 4:

    fs = 50

    ps = 130

else:

    fs = 10

    ps = 13

#图片的字体和颜色

font = ImageFont.truetype("consola.ttf", fs)

draw.ink = 255 + 0 * 256 + 0 * 256 * 256

#给每个识别出的人脸画框、并标识年龄

for a in parsed:

    b = a[u'faceRectangle']

    c = getRectangle(b)

    draw.rectangle(c, outline='red')

    draw.text([c[0][0],c[0][1]-ps],"Age="+str(a[u'faceAttributes'][u'age']),font=font)

newimg.show()
其输出是一张如下d 照片:
总结:
通过Azure的Cognitive Service的Face API可以非常方便的进行人脸识别的工作。
用Azure上Cognitive Service的Face API识别人脸的更多相关文章
- 使用Python结合Face++ API识别人脸
Face++是北京旷视科技旗下的视觉服务平台,可以进行人脸识别.检测等功能.其人脸识别技术据悉在目前准确率较高,其API非常友好,免费使用,功能众多,而且调用几乎没有限制.这里我使用了Python调用 ...
- 如何通过Azure Service Management REST API管理Azure服务
通过本文你将了解: 什么是Azure Service Management REST API 如何获取微软Azure 订阅号 如何获取Azure管理证书 如何调用Azure Service Manag ...
- 【认知服务 Azure Cognitive Service】使用认知服务的密钥无法访问语音服务[ErrorCode=AuthenticationFailure] (2020-08时的遇见的问题,2020-09月已解决)
问题情形 根据微软认知服务的文档介绍,创建认知服务(Cognitive Service)后,可以调用微软的影像(计算机视觉,人脸),语言(LUIS, 文本分析,文本翻译),语音(文本转语音,语音转文本 ...
- 【应用服务 App Service】发布到Azure上的应用显示时间不是本地时间的问题,修改应用服务的默认时区
问题情形 应用程序发布到App Service后,时间显示不是北京时间,默认情况为UTC时间,比中国时间晚 8 个小时. 详细日志 无 问题原因 Azure 上所有的服务时间都采用了 UTC 时间. ...
- 下一个时代,对话即平台 —— 开始使用Bot Framework和Cognitive Service来打造你的智能对话服务
在16年3月30号微软的全球开发者大会Build上发布了Bot Framework,微软认为下一个big thing是Conversation as a Platform,简称CaaP,中文应该叫做& ...
- Azure 上通过 SendGrid 发送邮件
SendGrid 是什么? SendGrid 是架构在云端的电子邮件服务,它能提供基于事务的可靠的电子邮件传递. 并且具有可扩充性和实时分析的能力.常见的用例有: 自动回复用户的邮件 定期发送信息给用 ...
- 在公有云AZURE上部署私有云AZUREPACK以及WEBSITE CLOUD(一)
(一)前言 本文主要介绍了实践部署AzurePack的Website Cloud的过程.在部署之前, 首先要对AzurePack有个基本的了解. Azure Pack是微软的私有云方案,具有弹性. ...
- 在Azure上部署IPv6的App通过IOS App Store审核
随着中国企业出海Go Global,越来越多的用户开始在Global Azure部署自己的应用.由于对Global Azure功能和文档的不熟悉,使用过程中或多或少遇到了一些坑.事实上呢,这些并不是坑 ...
- SharePoint 2013 APP 开发示例 (六)服务端跨域访问 Web Service (REST API)
上个示例(SharePoint 2013 APP 开发示例 (五)跨域访问 Web Service (REST API))是基于JavaScript,运行在web browser内去访问REST AP ...
随机推荐
- package.json字段简要解析
name 必填 应用名称 version 必填 应用版本 description 选填 应用描述,多用于搜索,在npm search 时可以用到 keywords 选填 应用关键字,也多用于搜索 sc ...
- SpringBoot2.0之整合Kafka
maven依赖: <project xmlns="http://maven.apache.org/POM/4.0.0" xmlns:xsi="http://www. ...
- PHP(Zend Studio)入门视频
视频地址: http://www.ev-get.com/article/2014/5/9/20962.html (去掉地址中的减号-:可以看视频) Zend Studio教学视频之Zend Studi ...
- Spark常用算子-value数据类型的算子
package com.test; import java.util.ArrayList; import java.util.Arrays; import java.util.Iterator; im ...
- JavaScript -- 节点操作, 事件触发, 表单伸缩
<!DOCTYPE html PUBLIC "-//W3C//DTD XHTML 1.0 Transitional//EN" "http://www.w3.org/ ...
- Linux嵌入式 -- Bootloader , Uboot
1. Bootloader作用 PC机中的引导加载程序由BIOS(其本质是一段固件程序)和GRUB或LILO一起组成.BIOS在完成硬件检测和资源分配后,将硬盘中的引导程序读到系统内存中然后将控制权交 ...
- cern-cloud-architecture
规模: 总体: 有26个Cell 一个数据中心运行控制节点,另外一个仅仅运行nova cell 统一,灵活 nova-api运行在VM中,当然需要至少一个部署在物理机上来启动VM. 每个cell只有一 ...
- TCP/IP详解学习笔记(2)-数据链路层【转】
转自:http://blog.csdn.net/goodboy1881/article/details/665061 数据链路层有三个目的: 为IP模块发送和 接收IP数据报. 为ARP模块发送ARP ...
- Rainmeter如何打开控制面板的小程序
控制面板功能都是通过访问cpl文件来关联它们的,假设你的系统盘在C盘,那么它们的本地在C:\Windows\System32\ Rainmeter通过使用这个应用程序C:\Windows\System ...
- LeetCode OJ:Balanced Binary Tree(平衡二叉树)
Given a binary tree, determine if it is height-balanced. For this problem, a height-balanced binary ...