$Android AlertDialog的各种用法总结
Refer:http://www.2cto.com/kf/201205/131876.html
(一)最简单的用法(详见注释)
 1         // 1、创建简单的AlertDialog // AlertDialog的构造方法全部是Protected的,

 2             // 所以不能直接通过new一个AlertDialog来创建出一个AlertDialog; //

 3             // (1)要创建一个AlertDialog,就要用到AlertDialog.Builder

 4             AlertDialog.Builder dialog = new AlertDialog.Builder(this);

 5

 6             // (2)设置各种属性 // 注:不设置哪项属性,这个属性就默认不会显示出来

 7             dialog.setTitle("这是一个简单的对话框");

 8             dialog.setIcon(R.drawable.dictation2_64);

 9             dialog.setMessage("欢迎使用!");

10

11             // (3)设置dialog可否被取消

12             dialog.setCancelable(true);

13

14             // (4)显示出来

15             dialog.show();
效果如下:

(二)带按钮的AlertDialog
// 2、带按钮的AlertDialog
AlertDialog.Builder dialog = new AlertDialog.Builder(this);
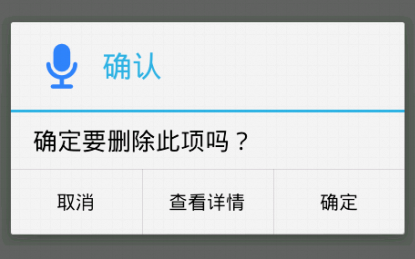
dialog.setTitle("确认");
dialog.setIcon(R.drawable.dictation2_64);
dialog.setMessage("确定要删除此项吗?"); // 设置“确定”按钮,使用DialogInterface.OnClickListener接口参数
dialog.setPositiveButton("确定",
new DialogInterface.OnClickListener() { @Override
public void onClick(DialogInterface dialog, int which) {
Log.d("Dialog", "点击了“确认”按钮");
}
}); // 设置“查看详情”按钮,使用DialogInterface.OnClickListener接口参数
dialog.setNeutralButton("查看详情",
new DialogInterface.OnClickListener() { @Override
public void onClick(DialogInterface dialog, int which) {
Log.d("Dialog", "点击了“查看详情”按钮");
}
}); // 设置“取消”按钮,使用DialogInterface.OnClickListener接口参数
dialog.setNegativeButton("取消",
new DialogInterface.OnClickListener() { @Override
public void onClick(DialogInterface dialog, int which) {
Log.d("Dialog", "点击了“取消”按钮");
}
}); dialog.show();
效果如下:
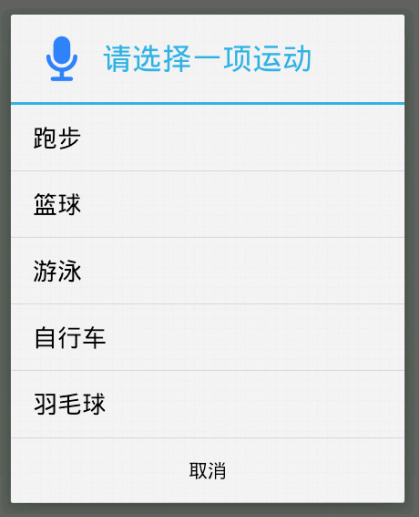
(三)类似于ListView的AlertDialog
用setItems(CharSequence[] items, final OnClickListener listener)方法来实现类似ListView的AlertDialog。
         // 3、类似ListView的AlertDialog

             AlertDialog.Builder dialog = new AlertDialog.Builder(this);

             dialog.setTitle("请选择一项运动");

             dialog.setIcon(R.drawable.dictation2_64);

             // 设置为false说明当前dialog是不能用返回键取消的

             dialog.setCancelable(false);

             // 列表字符串数组

             final String[] sportsArray = new String[] { "跑步", "篮球", "游泳",

                     "自行车", "羽毛球" };

             // 用于在item的点击事件中,记录选择的是哪一项,初始值设为0.这里用final数组只是因为匿名内部类中只能使用外部终态的变量

             final int selectedIndex[] = { 0 };

             // 用setItems方法来实现

             dialog.setItems(sportsArray, new DialogInterface.OnClickListener() {

                 @Override

                 public void onClick(DialogInterface dialog, int which) {

                     selectedIndex[0] = which;

                     Log.d("Dialog", "选择了:" + sportsArray[selectedIndex[0]]);

                 }

             });

             dialog.setNegativeButton("取消",

                     new DialogInterface.OnClickListener() {

                         @Override

                         public void onClick(DialogInterface dialog, int which) {

                             Log.d("Dialog", "点击了“取消”按钮");

                         }

                     });

             dialog.show();
效果如下:
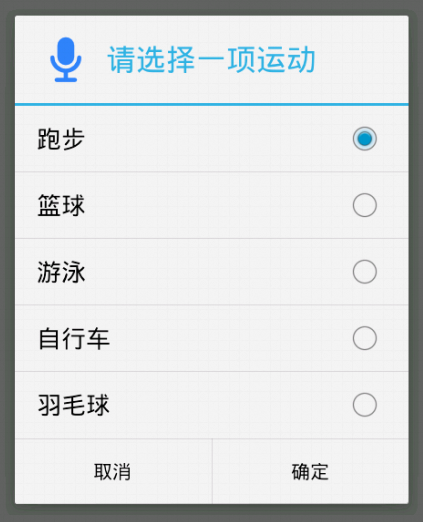
(四)类似RadioButton的AlertDialog
用setSingleChoiceItems(CharSequence[] items, int checkedItem, final OnClickListener listener)方法来实现类似RadioButton的AlertDialog
第一个参数是要显示的数据的数组,第二个参数是初始值(初始被选中的item),第三个参数是点击某个item的触发事件
         // 4、类似RadioButton的AlertDialog

             AlertDialog.Builder dialog = new AlertDialog.Builder(this);

             dialog.setTitle("请选择一项运动");

             dialog.setIcon(R.drawable.dictation2_64);

             // 列表字符串数组

             final String[] sportsArray = new String[] { "跑步", "篮球", "游泳",

                     "自行车", "羽毛球" };

             // 用于在item的点击事件中,记录选择的是哪一项,初始值设为0.这里用final数组只是因为匿名内部类中只能使用外部终态的变量

             final int selectedIndex[] = { 0 };

             // 用setSingleChoiceItems方法来实现

             dialog.setSingleChoiceItems(sportsArray, 0,

                     new DialogInterface.OnClickListener() {

                         @Override

                         public void onClick(DialogInterface dialog, int which) {

                             selectedIndex[0] = which;

                         }

                     });

             dialog.setPositiveButton("确定",

                     new DialogInterface.OnClickListener() {

                         @Override

                         public void onClick(DialogInterface dialog, int which) {

                             Log.d("Dialog", "选择了:"

                                     + sportsArray[selectedIndex[0]]);

                         }

                     });

             dialog.setNegativeButton("取消",

                     new DialogInterface.OnClickListener() {

                         @Override

                         public void onClick(DialogInterface dialog, int which) {

                             Log.d("Dialog", "点击了“取消”按钮");

                         }

                     });

             dialog.show();
效果如下:
(五)类似CheckBox的AlertDialog
用setMultiChoiceItems(CharSequence[] items, boolean[] checkedItems, final OnMultiChoiceClickListener listener)方法来实现类似CheckBox的AlertDialog
第一个参数是要显示的数据的数组,第二个参数是选中状态的数组,第三个参数是点击某个item的触发事件
         // 5、类似CheckBox的AlertDialog

             AlertDialog.Builder dialog = new AlertDialog.Builder(this);

             dialog.setTitle("请选择喜欢的运动(可多选)");

             dialog.setIcon(R.drawable.dictation2_64);

             // 列表字符串数组

             final String[] sportsArray = new String[] { "跑步", "篮球", "游泳",

                     "自行车", "羽毛球" };

             // 用于在item的点击事件中,记录选择了哪些项.

             final boolean[] selectedIndex = { true, true, false, false, false };

             // 用setMultiChoiceItems方法来实现

             dialog.setMultiChoiceItems(sportsArray, selectedIndex,

                     new DialogInterface.OnMultiChoiceClickListener() {

                         @Override

                         public void onClick(DialogInterface dialog, int which,

                                 boolean isChecked) {

                             selectedIndex[which] = isChecked;

                         }

                     });

             dialog.setPositiveButton("确定",

                     new DialogInterface.OnClickListener() {

                         @Override

                         public void onClick(DialogInterface dialog, int which) {

                             for (int i = 0; i < selectedIndex.length; i++) {

                                 if (selectedIndex[i]) {

                                     Log.d("Dialog", "选择了:" + sportsArray[i]);

                                 }

                             }

                         }

                     });

             dialog.setNegativeButton("取消",

                     new DialogInterface.OnClickListener() {

                         @Override

                         public void onClick(DialogInterface dialog, int which) {

                             Log.d("Dialog", "点击了“取消”按钮");

                         }

                     });

             dialog.show();
效果如下:

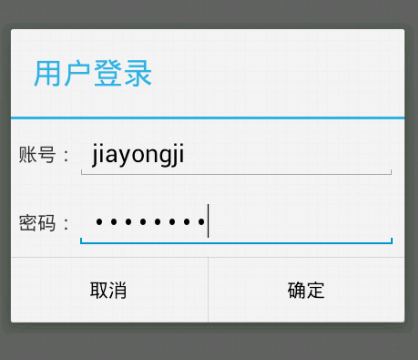
(六)自定义View的AlertDialog
有时候系统自带的AlertDialog风格不能满足我们的需求,就比如说我们要实现一个Login画面,有用户名和密码,这时我们就要用到自定义View的AlertDialog
1、先创建自定义登录框的布局文件my_login_view.xml:
 <?xml version="1.0" encoding="utf-8"?>

 <LinearLayout xmlns:android="http://schemas.android.com/apk/res/android"

     android:layout_width="match_parent"

     android:layout_height="match_parent"

     android:orientation="vertical" >

     <LinearLayout

         android:layout_width="fill_parent"

         android:layout_height="wrap_content"

         android:gravity="center"

         android:padding="5dp" >

         <TextView

             android:layout_width="wrap_content"

             android:layout_height="wrap_content"

             android:text="账号:" />

         <EditText

             android:id="@+id/my_login_account_et"

             android:layout_width="0dip"

             android:layout_height="wrap_content"

             android:layout_weight="1" />

     </LinearLayout>

     <LinearLayout

         android:layout_width="fill_parent"

         android:layout_height="wrap_content"

         android:gravity="center"

         android:padding="5dp" >

         <TextView

             android:layout_width="wrap_content"

             android:layout_height="wrap_content"

             android:text="密码:" />

         <EditText

             android:id="@+id/my_login_password_et"

             android:layout_width="0dip"

             android:layout_height="wrap_content"

             android:layout_weight="1"

             android:inputType="numberPassword" />

     </LinearLayout>

 </LinearLayout>
2、在Activity的合适地方创建自定义的AlertDialog(比如按钮的点击事件中):
// 6、自定义View的AlertDialog
AlertDialog.Builder dialog = new AlertDialog.Builder(this);
dialog.setTitle("用户登录"); // 取得自定义View
LayoutInflater layoutInflater = LayoutInflater.from(this);
final View myLoginView = layoutInflater.inflate(
R.layout.my_login_view, null);
dialog.setView(myLoginView); dialog.setPositiveButton("确定",
new DialogInterface.OnClickListener() { @Override
public void onClick(DialogInterface dialog, int which) {
EditText loginAccountEt = (EditText) myLoginView
.findViewById(R.id.my_login_account_et);
EditText loginPasswordEt = (EditText) myLoginView
.findViewById(R.id.my_login_password_et);
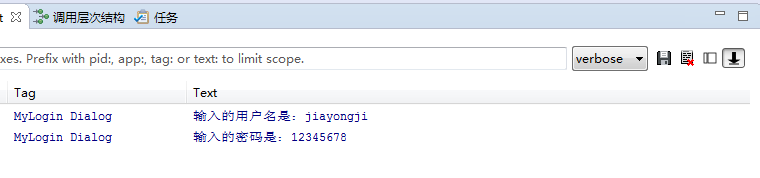
Log.d("MyLogin Dialog", "输入的用户名是:"
+ loginAccountEt.getText().toString());
Log.d("MyLogin Dialog", "输入的密码是:"
+ loginPasswordEt.getText().toString());
}
}); dialog.setNegativeButton("取消",
new DialogInterface.OnClickListener() { @Override
public void onClick(DialogInterface dialog, int which) { }
}); dialog.show();
效果如下:
点击“确定”按钮后LogCat中的内容:
随机推荐
- 一起talk C栗子吧(第八十七回:C语言实例--使用管道进行进程间通信概述)
各位看官们,大家好.上一回中咱们说的是进程间通信的样例.这一回咱们说的样例是:使用管道进行进程间通信. 闲话休提,言归正转. 让我们一起talk C栗子吧! 我们在前面的的章回中介绍了使用管道进行进程 ...
- Python Socket 网络编程 (服务器端编程)
服务器端主要做以下工作: 打开 socket 绑定到特定的地址以及端口上 监听连接 建立连接 接收/发送数据 上面已经介绍了如何创建 socket 了,下面一步是绑定. 绑定 socket 函数 bi ...
- CMakeList相关
cmake使用示例与整理总结 http://blog.csdn.net/wzzfeitian/article/details/40963457/ 对应的demo:https://github.com/ ...
- Laravel5.1 模型--ModelFactory
今天要说的是模型工厂,它是可以快速生成一些测试数据的东西,之前我们介绍过Seeder,当我们使用模型访问数据时 可以用模型工厂搭配Seeder使用. 1 编写一个ModelFactory ModelF ...
- 第8章 Docker Compose 相关问题
8.1 你那个LNMP例子中的docker-compose.yml中有好多networks,都是什么意思啊? 我写的 LNMP 多容器互通的例子:https://coding.net/u/twang2 ...
- webservice 使用axis2实现
Axis2 是Apache的:使用下载 :org.apache.axis2.eclipse.service.plugin_1.6.2.jar org.apache.axis2.eclipse.code ...
- ubuntu环境初始化
0. 在Ubuntu系统中永久修改主机名也比较简单.主机名存放在/etc/hostname文件中,修改主机名时,编辑hostname文件,在文件中输入新的主机名并保存该文件即可 1.打开termini ...
- Sharepoint server 2016自定义作业不能部署
最近帮客户部署SharePoint server 2016生产环境,自定义作业总是不能部署上,原来我在部署过程中MinRole选的是Web前端服务器:经过几天的测试研究,发现要有single serv ...
- jQuery之获取checkbox选中的值
<mce:script src="jquery.js" mce_src="jquery.js"></mce:script><!-- ...
- javascript数组遍历for与for in区别详解
js中遍历数组的有两种方式 复制代码代码如下: var array=['a']//标准的for循环for(var i=1;i<array.length;i++){ alert(array[ ...