
OpenCV入门:(六:基础画图函数)
有时程序中需要画一些基础的图形,例如直线,矩形,椭圆以及多边形。OpenCV中当然有此类函数。
1.函数介绍
直线line:
void line(Mat& img, Point pt1, Point pt2, const Scalar& color, int thickness=1, int lineType=8, int shift=0)

img – 图像

pt1 – 直线起点

pt2 – 直线终点

color – 颜色

thickness – 粗细

lineType – 直线类型,可以是如下值

8 (or omitted) - 8-connected 线

4 - 4-connected 线.

CV_AA - 抗锯齿线.

shift – 分位的点坐标
椭圆ellipse:
void ellipse(Mat& img, Point center, Size axes, double angle, double startAngle, double endAngle, const Scalar& color, int thickness=1, int lineType=8, int shift=0)

void ellipse(Mat& img, const RotatedRect& box, const Scalar& color, int thickness=1, int lineType=8)

参数说明:

img – 图像

center – 椭圆中心

axes – 椭圆主半轴长度

angle –旋转角度

startAngle – 椭圆弧起始角度

endAngle – 椭圆弧终止角度

box – Alternative ellipse representation via RotatedRect or CvBox2D. This means that the function draws an ellipse inscribed in the rotated rectangle.

color – 颜色

thickness –  粗细,如果小于0,表示填充椭圆

lineType – 和line函数一样,直线类型

shift – 部分点位坐标
矩形rectangle:
void rectangle(Mat& img, Point pt1, Point pt2, const Scalar& color, int thickness=1, int lineType=8, int shift=0)

void rectangle(Mat& img, Rect rec, const Scalar& color, int thickness=1, int lineType=8, int shift=0 )

参数说明:

img – 图像

pt1 – 顶点坐标

pt2 – 与p1相对的顶点坐标

rec – 矩形的选择规范

color – 矩形的颜色或亮度

thickness – 和椭圆函数一样

lineType – 和line函数一样

shift – 部分点位坐标
圆circle:
void circle(Mat& img, Point center, int radius, const Scalar& color, int thickness=1, int lineType=8, int shift=0)

参数说明:

img – Image where the circle is drawn.

center – Center of the circle.

radius – Radius of the circle.

color – Circle color.

thickness – Thickness of the circle outline, if positive. Negative thickness means that a filled circle is to be drawn.

lineType – Type of the circle boundary. See the line() description.

shift – Number of fractional bits in the coordinates of the center and in the radius value.
多边形fillPoly:
void fillPoly(Mat& img, const Point** pts, const int* npts, int ncontours, const Scalar& color, int lineType=8, int shift=0, Point offset=Point() )

参数说明:

img – Image.

pts – Array of polygons where each polygon is represented as an array of points.

npts – Array of polygon vertex counters.

ncontours – Number of contours that bind the filled region.

color – Polygon color.

lineType – Type of the polygon boundaries. See the line() description.

shift – Number of fractional bits in the vertex coordinates.

offset – Optional offset of all points of the contours.
2.代码
#define w 400

/// 函数定义

void MyEllipse( Mat img, double angle );

void MyFilledCircle( Mat img, Point center );

void MyPolygon( Mat img );

void MyLine( Mat img, Point start, Point end );

int BasicDraw( void ){

  char atom_window[] = "Drawing 1: Atom";

  char rook_window[] = "Drawing 2: Rook";

  Mat atom_image = Mat::zeros( w, w, CV_8UC3 );

  Mat rook_image = Mat::zeros( w, w, CV_8UC3 );

  MyEllipse( atom_image, 90 );

  MyEllipse( atom_image, 0 );

  MyEllipse( atom_image, 45 );

  MyEllipse( atom_image, -45 );

  MyFilledCircle( atom_image, Point( w/2, w/2) );

  MyPolygon( rook_image );

  rectangle( rook_image,

         Point( 0, 7*w/8 ),

         Point( w, w),

         Scalar( 0, 255, 255 ),

         -1,

         8 );

  MyLine( rook_image, Point( 0, 15*w/16 ), Point( w, 15*w/16 ) );

  MyLine( rook_image, Point( w/4, 7*w/8 ), Point( w/4, w ) );

  MyLine( rook_image, Point( w/2, 7*w/8 ), Point( w/2, w ) );

  MyLine( rook_image, Point( 3*w/4, 7*w/8 ), Point( 3*w/4, w ) );

  imshow( atom_window, atom_image );

  moveWindow( atom_window, 0, 200 );

  imshow( rook_window, rook_image );

  moveWindow( rook_window, w, 200 );

  waitKey( 0 );

  return(0);

}

//画椭圆的函数

void MyEllipse( Mat img, double angle )

{

  int thickness = 2;

  int lineType = 8;

  ellipse( img,

       Point( w/2, w/2 ),

       Size( w/4, w/16 ),

       angle,

       0,

       360,

       Scalar( 255, 0, 0 ),

       thickness,

       lineType );

}

//画圆

void MyFilledCircle( Mat img, Point center )

{

  int thickness = -1;

  int lineType = 8;

  circle( img,

      center,

      w/32,

      Scalar( 0, 0, 255 ),

      thickness,

      lineType );

}

//画多边形

void MyPolygon( Mat img )

{

  int lineType = 8;

  /** Create some points */

  Point rook_points[1][20];

  rook_points[0][0]  = Point(    w/4,   7*w/8 );

  rook_points[0][1]  = Point(  3*w/4,   7*w/8 );

  rook_points[0][2]  = Point(  3*w/4,  13*w/16 );

  rook_points[0][3]  = Point( 11*w/16, 13*w/16 );

  rook_points[0][4]  = Point( 19*w/32,  3*w/8 );

  rook_points[0][5]  = Point(  3*w/4,   3*w/8 );

  rook_points[0][6]  = Point(  3*w/4,     w/8 );

  rook_points[0][7]  = Point( 26*w/40,    w/8 );

  rook_points[0][8]  = Point( 26*w/40,    w/4 );

  rook_points[0][9]  = Point( 22*w/40,    w/4 );

  rook_points[0][10] = Point( 22*w/40,    w/8 );

  rook_points[0][11] = Point( 18*w/40,    w/8 );

  rook_points[0][12] = Point( 18*w/40,    w/4 );

  rook_points[0][13] = Point( 14*w/40,    w/4 );

  rook_points[0][14] = Point( 14*w/40,    w/8 );

  rook_points[0][15] = Point(    w/4,     w/8 );

  rook_points[0][16] = Point(    w/4,   3*w/8 );

  rook_points[0][17] = Point( 13*w/32,  3*w/8 );

  rook_points[0][18] = Point(  5*w/16, 13*w/16 );

  rook_points[0][19] = Point(    w/4,  13*w/16 );

  const Point* ppt[1] = { rook_points[0] };

  int npt[] = { 20 };

  fillPoly( img,

        ppt,

        npt,

          1,

        Scalar( 255, 255, 255 ),

        lineType );

}

//画直线的函数

void MyLine( Mat img, Point start, Point end )

{

  int thickness = 2;

  int lineType = 8;

  line( img,

    start,

    end,

    Scalar( 0, 0, 0 ),

    thickness,

    lineType );

}
3.结果
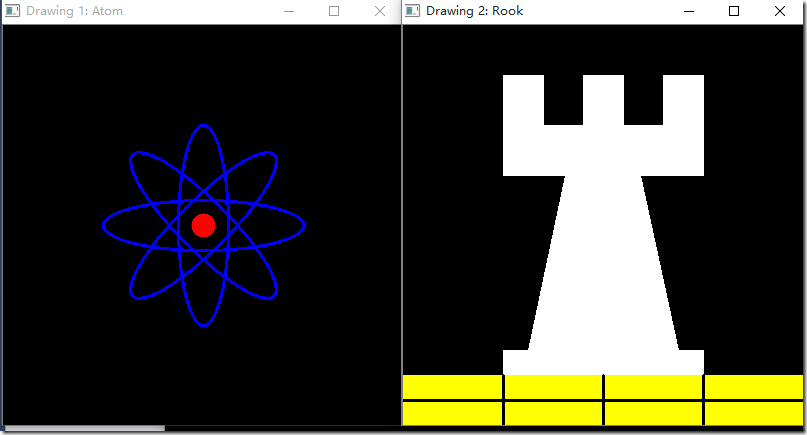
4.其他说明
Point结构:
定义一个”点“,x参数和y参数。
Scalar结构:
Scalar是有四个元素的容器,可以只使用其部分元素,例如上面使用Scalar(a,b,c)来表示颜色的RGB。
5.结束
OpenCV入门:(六:基础画图函数)的更多相关文章
- 数据分析与展示——Matplotlib基础绘图函数示例
Matplotlib库入门 Matplotlib基础绘图函数示例 pyplot基础图表函数概述 函数 说明 plt.plot(x,y,fmt, ...) 绘制一个坐标图 plt.boxplot(dat ...
- C#基础入门 六
C#基础入门 六 静态类进阶 静态构造方法 用于初始化任何静态数据,或用于执行仅需执行一次的特定操作,在创建第一个实例或引用任何静态成员之前,将自动调用静态构造函数,静态构造方法是无参数的. publ ...
- [易学易懂系列|rustlang语言|零基础|快速入门|(7)|函数Functions与闭包Closure]
[易学易懂系列|rustlang语言|零基础|快速入门|(7)函数Functions与闭包Closure] 有意思的基础知识 函数Functions与闭包Closure 我们今天再来看看函数. 在Ru ...
- [OpenCV入门教程之十二】OpenCV边缘检测:Canny算子,Sobel算子,Laplace算子,Scharr滤波器合辑
http://blog.csdn.net/poem_qianmo/article/details/25560901 本系列文章由@浅墨_毛星云 出品,转载请注明出处. 文章链接:http://blog ...
- 【OpenCV入门教程之十四】OpenCV霍夫变换:霍夫线变换,霍夫圆变换合辑
http://blog.csdn.net/poem_qianmo/article/details/26977557 本系列文章由@浅墨_毛星云 出品,转载请注明出处. 文章链接:http://blog ...
- 【OpenCV入门指南】第一篇 安装OpenCV
http://blog.csdn.net/morewindows/article/details/8225783/ win10下vs2015配置Opencv3.1.0过程详解(转) http://ww ...
- 【OpenCV入门教程之三】 图像的载入,显示和输出 一站式完全解析(转)
本系列文章由@浅墨_毛星云 出品,转载请注明出处. 文章链接:http://blog.csdn.net/poem_qianmo/article/details/20537737 作者:毛星云(浅墨) ...
- OpenCV入门学习笔记
OpenCV入门学习笔记 参照OpenCV中文论坛相关文档(http://www.opencv.org.cn/) 一.简介 OpenCV(Open Source Computer Vision),开源 ...
- opencv ,亮度调整【【OpenCV入门教程之六】 创建Trackbar & 图像对比度、亮度值调整
http://blog.csdn.net/poem_qianmo/article/details/21479533 [OpenCV入门教程之六] 创建Trackbar & 图像对比度.亮度值调 ...
随机推荐
- 【[ZJOI2014]力】
题目 好神仙啊 \[F_{j}=\sum_{i<j}\frac{q_iq_j}{(i-j)^2}-\sum_{j<i}\frac{q_iq_j}{(i-j)^2}\] 求\(\frac{F ...
- hack-checkbox
checkbox选择按钮要用我们自己的样式,看到这个的时候,很可能会以为需要checkbox才能实现,用css可能很难.其实狠简单. <style> .checkbox input{ di ...
- IDE设置jdk和maven
File->settings->Project Structure-ProjectFile->settings->Build,Execution,Deployment-> ...
- FMDB初步使用小结
频繁的网络请求会给用户不好的体验,在最近开发的一个项目中有一个获取个人详细信息的界面,由于是子页面,进入页面后需要重新加载数据并刷新页面,而,每一次请求服务器再返回数据不仅用户体验不好,也花费手机流量 ...
- PyCharm Notes | PyCharm 使用笔记(远程访问服务器code配置指南)
PyCharm is a strong IDE for python programmer. Not only because it has a similar face with VS or som ...
- Java面向对象知道这些就够了
面向对象 面向对象是一种思维方式,相对于面向过程而言的. 面向过程在流程中关注动作执行的每一个细节 — 自己动手做 面向对象重点找这个对象,只要找到了对象,那么这个对象所具有的功能就能够被使用 — 找 ...
- Spring的声明式事务----Annotation注解方式(1)
这里列一个小的demo工程,直接利用Spring的jdbcTemplate访问Mysql数据库. 工程结构: 数据库中的tbl_student表结构如下: 数据实体类Student.java代码如下: ...
- ABAP术语-ABAP Workbench
ABAP Workbench 原文:http://www.cnblogs.com/qiangsheng/archive/2007/12/10/989037.html Integrated graphi ...
- Eclipse工具查看依赖的JDK、Maven源码方法
一.Eclipse软件里查看JDK依赖源码 1.Window->Preferences->Java->Installed JREs 2.如图: 二.Eclipse软件里查看Maven ...
- linux下进程的最大线程数、进程最大数、进程打开的文件数
linux下进程的最大线程数.进程最大数.进程打开的文件数 ===========最大线程数============== linux 系统中单个进程的最大线程数有其最大的限制 PTHREAD_TH ...