CALayer简介(转)
一.简单介绍
在iOS中,你能看得见摸得着的东西基本上都是UIView,比如一个按钮,一个文本标签,一个文本输入框,一个图标等等,这些都是UIView。
其实UIView之所以能显示在屏幕上,完全是因为它内部的一个图层,在创建UIView对象时,UIView内部会自动创建一个图层(即CALayer对象),通过UIView的layer属性可以访问这个层。
当UIView需要显示到屏幕上时,会调用drawRect:方法进行绘图,并且会将所有内容绘制在自己的图层上,绘图完毕后,系统会将图层拷贝到屏幕上,于是就完成了UIView的显示。
换句话说,UIView本身不具备显示的功能,拥有显示功能的是它内部的图层。
二.简单使用
UIView之所以能够显示,完全是因为内部的CALayer对象。因此,通过操作这个CALayer对象,可以很方便地调整UIView的一些界面属性。比如:阴影,圆角大小,边框宽度和颜色等。
1.通过layer设置边框的宽度和颜色
#import "ViewController.h"

#define ScreenWidth          [UIScreen mainScreen].bounds.size.width

#define ScreenHeight         [UIScreen mainScreen].bounds.size.height

#define ViewWidth            100

#define ViewHeight           100

@interface ViewController ()

@property(nonatomic,strong) UIView *customView;

@end

@implementation ViewController

- (void)viewDidLoad {

    [super viewDidLoad];

    _customView = [[UIView alloc] initWithFrame:CGRectMake(ScreenWidth/ - ViewWidth/,

                                                           ScreenHeight/ - ViewHeight/,

                                                           ViewWidth,

                                                           ViewHeight)];

    [self.view addSubview:_customView];

    //设置边框的宽度为20

    _customView.layer.borderWidth = ;

    //设置边框的颜色

    _customView.layer.borderColor = [UIColor greenColor].CGColor;

}

- (void)didReceiveMemoryWarning {

    [super didReceiveMemoryWarning];

}

@end
2.通过layer设置边框为圆角
//设置layer的圆角

_customView.layer.cornerRadius = ;
3.在layer上添加一张图片
#import "ViewController.h"

#define ScreenWidth          [UIScreen mainScreen].bounds.size.width

#define ScreenHeight         [UIScreen mainScreen].bounds.size.height

#define ViewWidth            100

#define ViewHeight           100

@interface ViewController ()

@property(nonatomic,strong) UIView *customView;

@end

@implementation ViewController

- (void)viewDidLoad {

    [super viewDidLoad];

    self.view.backgroundColor = [UIColor yellowColor];

    _customView = [[UIView alloc] initWithFrame:CGRectMake(ScreenWidth/ - ViewWidth/,

                                                           ScreenHeight/ - ViewHeight/,

                                                           ViewWidth,

                                                           ViewHeight)];

    [self.view addSubview:_customView];

    //设置边框的宽度为5

    _customView.layer.borderWidth = ;

    //设置边框的颜色

    _customView.layer.borderColor = [UIColor blackColor].CGColor;

    //设置layer的圆角

    _customView.layer.cornerRadius = ;

    //在view的图层上添加一个image,contents表示接受内容

    _customView.layer.contents = (id)[UIImage imageNamed:@"logo.jpg"].CGImage;

}

- (void)didReceiveMemoryWarning {

    [super didReceiveMemoryWarning];

}

@end
说明:contents是id类型,可以接受内容。
上面的实例让layer显示一张图片,仔细观察可以发现四个圆角的部分露了一个角出来。
那是因为设置的image不是展示在主图层上的,而是显示在子图层上的。可以通过一个范围,设置超出主图层的部分把它给剪切掉。
有两种方法,建议使用layer中的方法
//第一种方法:UI框架中使用的方法

self.customView.clipsToBounds = YES;

//第二种方法

_customView.layer.masksToBounds = YES;
注意:layer中不能直接接受UI框架中的东西。
4.设置阴影
设置阴影,不光需要设置阴影颜色,还应该设置阴影的偏移位和透明度。
因为如果不设置偏移位的话,那么阴影和layer完全重叠,且默认透明度为0(即完全透明)。
- (void)viewDidLoad {

    [super viewDidLoad];

    self.view.backgroundColor = [UIColor yellowColor];

    _customView = [[UIView alloc] initWithFrame:CGRectMake(ScreenWidth/ - ViewWidth/,

                                                           ScreenHeight/ - ViewHeight/,

                                                           ViewWidth,

                                                           ViewHeight)];

    [self.view addSubview:_customView];

    //设置layer的颜色

    _customView.layer.backgroundColor = [UIColor whiteColor].CGColor;

    //设置阴影的颜色

    _customView.layer.shadowColor = [UIColor blackColor].CGColor;

    //设置阴影的偏移量,如果为正数,则代表为往右边偏移

    _customView.layer.shadowOffset = CGSizeMake(, );

    //设置阴影的透明度(0~1之间,0表示完全透明)

    _customView.layer.shadowOpacity = 0.6f;

}
补充说明:如果设置了超过主图层的部分剪掉,则设置阴影不会有显示效果。
5.设置图片的形变属性(transform)
@implementation ViewController

- (void)viewDidLoad {

    [super viewDidLoad];

    self.view.backgroundColor = [UIColor yellowColor];

    _customView = [[UIView alloc] initWithFrame:CGRectMake(ScreenWidth/ - ViewWidth/,

                                                           ScreenHeight/ - ViewHeight/,

                                                           ViewWidth,

                                                           ViewHeight)];

    [self.view addSubview:_customView];

    //设置layer的颜色

    _customView.layer.backgroundColor = [UIColor whiteColor].CGColor;

}

- (void)didReceiveMemoryWarning {

    [super didReceiveMemoryWarning];

}

- (void)touchesBegan:(NSSet<UITouch *> *)touches withEvent:(UIEvent *)event{

    //通过UIView设置(2D效果)

    //_customView.transform = CGAffineTransformMakeTranslation(0, -100);

    //通过layer来设置(3D效果,x,y,z三个方向)

    _customView.layer.transform = CATransform3DMakeTranslation(,,);

}

@end
6.使用KVC进行设置
@interface ViewController ()

@property(nonatomic,strong) UIView *customView;

@end

@implementation ViewController

- (void)viewDidLoad {

    [super viewDidLoad];

    self.view.backgroundColor = [UIColor yellowColor];

    _customView = [[UIView alloc] initWithFrame:CGRectMake(ScreenWidth/ - ViewWidth/,

                                                           ScreenHeight/ - ViewHeight/,

                                                           ViewWidth,

                                                           ViewHeight)];

    [self.view addSubview:_customView];

    //设置layer的颜色

    _customView.layer.backgroundColor = [UIColor whiteColor].CGColor;

}

- (void)didReceiveMemoryWarning {

    [super didReceiveMemoryWarning];

}

- (void)touchesBegan:(NSSet<UITouch *> *)touches withEvent:(UIEvent *)event{

    //通过KVC来设置

    //NSValue *v = [NSValue valueWithCATransform3D:CATransform3DMakeTranslation(100,20,0)];

    //[_customView.layer setValue:v forKey:@"transform"];

    //如果是只需要设置在某一个方向上的移动,可以参考下面的代码

    //在x的方向上向左移动100

    [_customView.layer setValue:@(-) forKeyPath:@"transform.translation.x"];

}

@end
下面的属性都可以通过KVC进行设置。
7.简单实例
旋转一个弧度
@interface ViewController ()

@property(nonatomic,strong) UIView *customView;

@end

@implementation ViewController

- (void)viewDidLoad {

    [super viewDidLoad];

    self.view.backgroundColor = [UIColor yellowColor];

    _customView = [[UIView alloc] initWithFrame:CGRectMake(ScreenWidth/ - ViewWidth/,

                                                           ScreenHeight/ - ViewHeight/,

                                                           ViewWidth,

                                                           ViewHeight)];

    [self.view addSubview:_customView];

    //设置layer的颜色

    _customView.layer.backgroundColor = [UIColor whiteColor].CGColor;

}

- (void)didReceiveMemoryWarning {

    [super didReceiveMemoryWarning];

}

- (void)touchesBegan:(NSSet<UITouch *> *)touches withEvent:(UIEvent *)event{

    _customView.layer.transform = CATransform3DMakeRotation(M_PI_4, , , 0.5);

}

@end
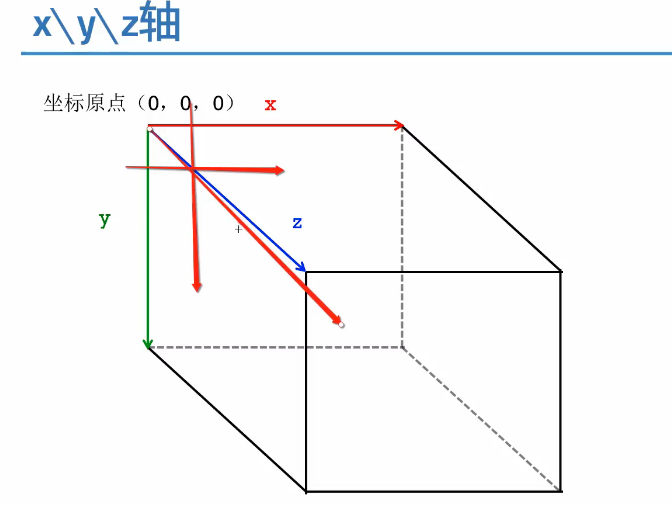
补充:三维坐标系
CALayer简介(转)的更多相关文章
- iOS开发UI篇—CALayer简介
iOS开发UI篇—CALayer简介 一.简单介绍 在iOS中,你能看得见摸得着的东西基本上都是UIView,比如一个按钮.一个文本标签.一个文本输入框.一个图标等等,这些都是UIView. 其实 ...
- CALayer简介
一.什么是CALayer * 在iOS系统中,你能看得见摸得着的东西基本上都是UIView,比如一个按钮.一个文本标签.一个文本输入框.一个图标等等,这些都是UIView. * 其实UIView之所以 ...
- iOS开发——UI进阶篇(十七)CALayer,核心动画基本使用
一.CALayer简介 1.CALayer在iOS中,文本输入框.一个图标等等,这些都是UIView你能看得见摸得着的东西基本上都是UIView,比如一个按钮.一个文本标签.一个其实UIView之所以 ...
- <极客学院>视频教程学习笔记-iOS中CALayer的使用
<1>CALayer简介 1.CALayer一般作为UIView的容器而使用. 2.CALayer是一个管理者图片载体(image-based content)的层结构 3.直接修改单独创 ...
- CALayer的基本操作
CALayer简介: CALayer又称为层. 在每一个UIView内部都有一个Layer这样的属性. UIView之所以能够显示,就是因为它里面有这个一个层,才具有显示的功能. 我们通过操作C ...
- iOS基础 - CALayer
一.CALayer简介 Core Animation是跨平台的,支持iOS环境和Mac OS X环境 凡是支持跨平台的框架,都不能直接使用UIKit框架,因为UIKit框架只能应用在iOS而不能用于M ...
- CALayer---iOS-Apple苹果官方文档翻译之CALayer
CHENYILONG Blog CALayer---iOS-Apple苹果官方文档翻译之CALayer CALayer /*技术博客http://www.cnblogs.com/ChenYilong/ ...
- ios开发之图层与核心动画一:图层CALayer的认识
#import "ViewController.h" @interface ViewController () @property (weak, nonatomic) IBOutl ...
- 转载:iOS开发之让你的应用“动”起来
在iOS中随处都可以看到绚丽的动画效果,实现这些动画的过程并不复杂,今天将带大家一窥iOS动画全貌.在这里你可以看到iOS中如何使用图层精简非交互式绘图,如何通过核心动画创建基础动画.关键帧动画.动画 ...
随机推荐
- .net 金额中文大写 日期转中文
金额中文大写 #region 中文大写 /// <summary> /// 返回中文数字 ,如壹佰元整 /// </summary> /// <param name=&q ...
- [转]谷歌Chrome浏览器开发者工具教程—JS调试篇
来源:http://blog.csdn.net/cyyax/article/details/51242720 上一篇我们学习了谷歌Chrome浏览器开发者工具的基础功能,下面介绍的是Chrome开发工 ...
- 深入Java字符串
深入Java字符串 Java字符串类(java.lang.String)是Java中使用最多的类,也是最为特殊的一个类,很多时候,我们对它既熟悉又陌生. 一.从根本上认识java.lang ...
- Word中划线的方法(五种)
Word中划线的方法(五种): 1. 按CTRL+F9,在出现的黑底花括号内,如图输入内容, 最后按SHIFT+F9(或者右键菜单点切换域代码),以后可以反复按ALT+F9在代码与结果之间切换. 注: ...
- 用户选择wordpress程序建站需要知道的一些事情 - 安全、优化速度、配置
WordPress是我们使用最多的CMS程序之一,无论是我们的个人博客,还是企业网站,甚至中小型站点,我们都可以用WP程序部署.我们看到海外网站的时候,大部分都是用的WORDPRESS程序.在我们国人 ...
- LeetCode刷题系列——Add Two Numbers
题目链接 这个题目很简单,归并而已,好久没练编程,居然忘了在使用自定义类型前,要进行初始化(new操作). class ListNode{ int val; ListNode next; ListNo ...
- dialog和dialogFragment的使用及常用问题
今天比较懒,只是列举了一些网址 弹窗之一:dialogFragment的使用 https://blog.csdn.net/sinat_31057219/article/details/76979246 ...
- 获取cookie信息
随着网络安全(例如:登录安全等)要求的不断提升,越来越多的登录应用在登录时添加了验证码登录,而验证码生成算法也在不断的进化,因而对含登录态的自动化测试脚本运行造成了一定程度的困扰,目前解决此种问题的方 ...
- matlab练习程序(差异演化DE)
这两天在看M.Tim Jones的<人工智能>,书中不只介绍原理,而且都有相应的c代码实现. 虽然代码不完全,不过缺少的部分完全可以自己补完. 差异演化和昨天实现的PSO很类似,都属于优化 ...
- SQL Server ->> 存储过程sp_rename重命名数据对象
1) 表转移Schema和重命名表 ALTER SCHEMA Stage TRANSFER dbo.Stage_AAA; EXEC sp_rename 'Stage.Stage_AAA', 'AAA' ...