CALayer简介(转)
一.简单介绍
在iOS中,你能看得见摸得着的东西基本上都是UIView,比如一个按钮,一个文本标签,一个文本输入框,一个图标等等,这些都是UIView。
其实UIView之所以能显示在屏幕上,完全是因为它内部的一个图层,在创建UIView对象时,UIView内部会自动创建一个图层(即CALayer对象),通过UIView的layer属性可以访问这个层。
当UIView需要显示到屏幕上时,会调用drawRect:方法进行绘图,并且会将所有内容绘制在自己的图层上,绘图完毕后,系统会将图层拷贝到屏幕上,于是就完成了UIView的显示。
换句话说,UIView本身不具备显示的功能,拥有显示功能的是它内部的图层。
二.简单使用
UIView之所以能够显示,完全是因为内部的CALayer对象。因此,通过操作这个CALayer对象,可以很方便地调整UIView的一些界面属性。比如:阴影,圆角大小,边框宽度和颜色等。
1.通过layer设置边框的宽度和颜色
#import "ViewController.h"

#define ScreenWidth          [UIScreen mainScreen].bounds.size.width

#define ScreenHeight         [UIScreen mainScreen].bounds.size.height

#define ViewWidth            100

#define ViewHeight           100

@interface ViewController ()

@property(nonatomic,strong) UIView *customView;

@end

@implementation ViewController

- (void)viewDidLoad {

    [super viewDidLoad];

    _customView = [[UIView alloc] initWithFrame:CGRectMake(ScreenWidth/ - ViewWidth/,

                                                           ScreenHeight/ - ViewHeight/,

                                                           ViewWidth,

                                                           ViewHeight)];

    [self.view addSubview:_customView];

    //设置边框的宽度为20

    _customView.layer.borderWidth = ;

    //设置边框的颜色

    _customView.layer.borderColor = [UIColor greenColor].CGColor;

}

- (void)didReceiveMemoryWarning {

    [super didReceiveMemoryWarning];

}

@end
2.通过layer设置边框为圆角
//设置layer的圆角

_customView.layer.cornerRadius = ;
3.在layer上添加一张图片
#import "ViewController.h"

#define ScreenWidth          [UIScreen mainScreen].bounds.size.width

#define ScreenHeight         [UIScreen mainScreen].bounds.size.height

#define ViewWidth            100

#define ViewHeight           100

@interface ViewController ()

@property(nonatomic,strong) UIView *customView;

@end

@implementation ViewController

- (void)viewDidLoad {

    [super viewDidLoad];

    self.view.backgroundColor = [UIColor yellowColor];

    _customView = [[UIView alloc] initWithFrame:CGRectMake(ScreenWidth/ - ViewWidth/,

                                                           ScreenHeight/ - ViewHeight/,

                                                           ViewWidth,

                                                           ViewHeight)];

    [self.view addSubview:_customView];

    //设置边框的宽度为5

    _customView.layer.borderWidth = ;

    //设置边框的颜色

    _customView.layer.borderColor = [UIColor blackColor].CGColor;

    //设置layer的圆角

    _customView.layer.cornerRadius = ;

    //在view的图层上添加一个image,contents表示接受内容

    _customView.layer.contents = (id)[UIImage imageNamed:@"logo.jpg"].CGImage;

}

- (void)didReceiveMemoryWarning {

    [super didReceiveMemoryWarning];

}

@end
说明:contents是id类型,可以接受内容。
上面的实例让layer显示一张图片,仔细观察可以发现四个圆角的部分露了一个角出来。
那是因为设置的image不是展示在主图层上的,而是显示在子图层上的。可以通过一个范围,设置超出主图层的部分把它给剪切掉。
有两种方法,建议使用layer中的方法
//第一种方法:UI框架中使用的方法

self.customView.clipsToBounds = YES;

//第二种方法

_customView.layer.masksToBounds = YES;
注意:layer中不能直接接受UI框架中的东西。
4.设置阴影
设置阴影,不光需要设置阴影颜色,还应该设置阴影的偏移位和透明度。
因为如果不设置偏移位的话,那么阴影和layer完全重叠,且默认透明度为0(即完全透明)。
- (void)viewDidLoad {

    [super viewDidLoad];

    self.view.backgroundColor = [UIColor yellowColor];

    _customView = [[UIView alloc] initWithFrame:CGRectMake(ScreenWidth/ - ViewWidth/,

                                                           ScreenHeight/ - ViewHeight/,

                                                           ViewWidth,

                                                           ViewHeight)];

    [self.view addSubview:_customView];

    //设置layer的颜色

    _customView.layer.backgroundColor = [UIColor whiteColor].CGColor;

    //设置阴影的颜色

    _customView.layer.shadowColor = [UIColor blackColor].CGColor;

    //设置阴影的偏移量,如果为正数,则代表为往右边偏移

    _customView.layer.shadowOffset = CGSizeMake(, );

    //设置阴影的透明度(0~1之间,0表示完全透明)

    _customView.layer.shadowOpacity = 0.6f;

}
补充说明:如果设置了超过主图层的部分剪掉,则设置阴影不会有显示效果。
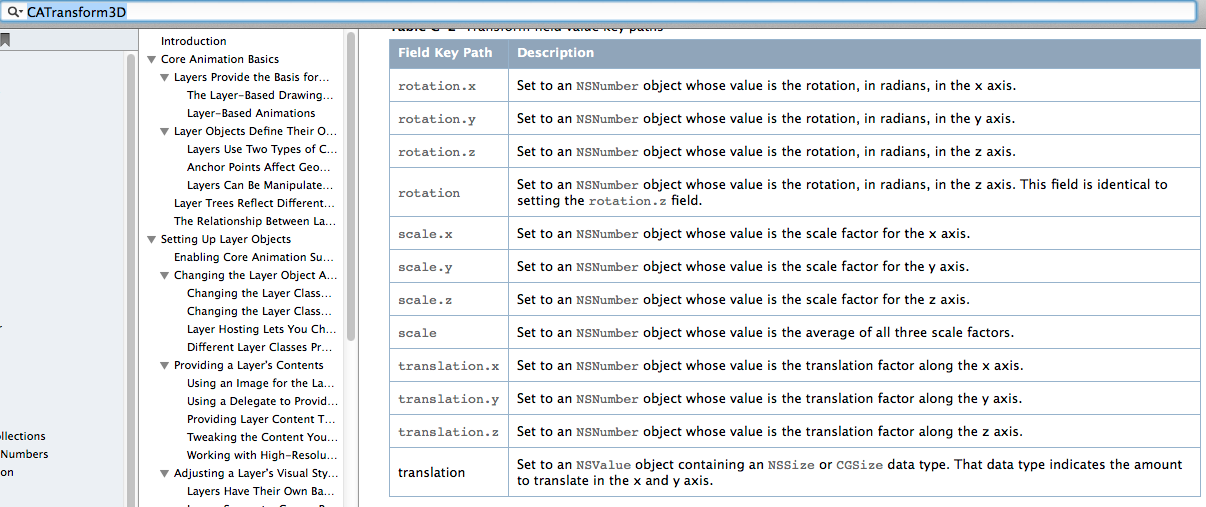
5.设置图片的形变属性(transform)
@implementation ViewController

- (void)viewDidLoad {

    [super viewDidLoad];

    self.view.backgroundColor = [UIColor yellowColor];

    _customView = [[UIView alloc] initWithFrame:CGRectMake(ScreenWidth/ - ViewWidth/,

                                                           ScreenHeight/ - ViewHeight/,

                                                           ViewWidth,

                                                           ViewHeight)];

    [self.view addSubview:_customView];

    //设置layer的颜色

    _customView.layer.backgroundColor = [UIColor whiteColor].CGColor;

}

- (void)didReceiveMemoryWarning {

    [super didReceiveMemoryWarning];

}

- (void)touchesBegan:(NSSet<UITouch *> *)touches withEvent:(UIEvent *)event{

    //通过UIView设置(2D效果)

    //_customView.transform = CGAffineTransformMakeTranslation(0, -100);

    //通过layer来设置(3D效果,x,y,z三个方向)

    _customView.layer.transform = CATransform3DMakeTranslation(,,);

}

@end
6.使用KVC进行设置
@interface ViewController ()

@property(nonatomic,strong) UIView *customView;

@end

@implementation ViewController

- (void)viewDidLoad {

    [super viewDidLoad];

    self.view.backgroundColor = [UIColor yellowColor];

    _customView = [[UIView alloc] initWithFrame:CGRectMake(ScreenWidth/ - ViewWidth/,

                                                           ScreenHeight/ - ViewHeight/,

                                                           ViewWidth,

                                                           ViewHeight)];

    [self.view addSubview:_customView];

    //设置layer的颜色

    _customView.layer.backgroundColor = [UIColor whiteColor].CGColor;

}

- (void)didReceiveMemoryWarning {

    [super didReceiveMemoryWarning];

}

- (void)touchesBegan:(NSSet<UITouch *> *)touches withEvent:(UIEvent *)event{

    //通过KVC来设置

    //NSValue *v = [NSValue valueWithCATransform3D:CATransform3DMakeTranslation(100,20,0)];

    //[_customView.layer setValue:v forKey:@"transform"];

    //如果是只需要设置在某一个方向上的移动,可以参考下面的代码

    //在x的方向上向左移动100

    [_customView.layer setValue:@(-) forKeyPath:@"transform.translation.x"];

}

@end
下面的属性都可以通过KVC进行设置。
7.简单实例
旋转一个弧度
@interface ViewController ()

@property(nonatomic,strong) UIView *customView;

@end

@implementation ViewController

- (void)viewDidLoad {

    [super viewDidLoad];

    self.view.backgroundColor = [UIColor yellowColor];

    _customView = [[UIView alloc] initWithFrame:CGRectMake(ScreenWidth/ - ViewWidth/,

                                                           ScreenHeight/ - ViewHeight/,

                                                           ViewWidth,

                                                           ViewHeight)];

    [self.view addSubview:_customView];

    //设置layer的颜色

    _customView.layer.backgroundColor = [UIColor whiteColor].CGColor;

}

- (void)didReceiveMemoryWarning {

    [super didReceiveMemoryWarning];

}

- (void)touchesBegan:(NSSet<UITouch *> *)touches withEvent:(UIEvent *)event{

    _customView.layer.transform = CATransform3DMakeRotation(M_PI_4, , , 0.5);

}

@end
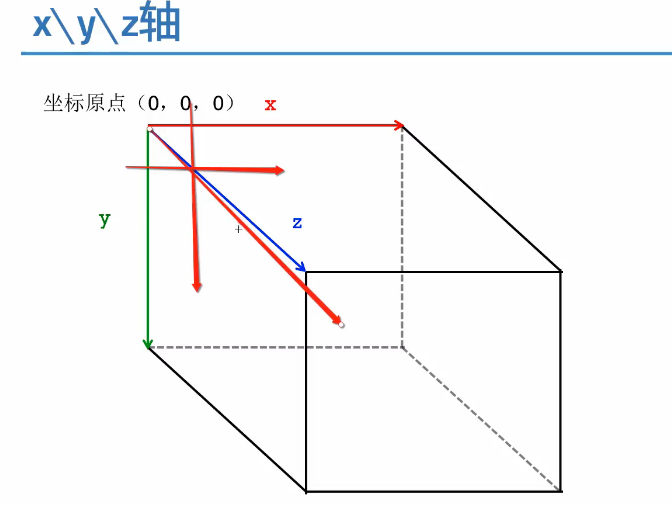
补充:三维坐标系
CALayer简介(转)的更多相关文章
- iOS开发UI篇—CALayer简介
iOS开发UI篇—CALayer简介 一.简单介绍 在iOS中,你能看得见摸得着的东西基本上都是UIView,比如一个按钮.一个文本标签.一个文本输入框.一个图标等等,这些都是UIView. 其实 ...
- CALayer简介
一.什么是CALayer * 在iOS系统中,你能看得见摸得着的东西基本上都是UIView,比如一个按钮.一个文本标签.一个文本输入框.一个图标等等,这些都是UIView. * 其实UIView之所以 ...
- iOS开发——UI进阶篇(十七)CALayer,核心动画基本使用
一.CALayer简介 1.CALayer在iOS中,文本输入框.一个图标等等,这些都是UIView你能看得见摸得着的东西基本上都是UIView,比如一个按钮.一个文本标签.一个其实UIView之所以 ...
- <极客学院>视频教程学习笔记-iOS中CALayer的使用
<1>CALayer简介 1.CALayer一般作为UIView的容器而使用. 2.CALayer是一个管理者图片载体(image-based content)的层结构 3.直接修改单独创 ...
- CALayer的基本操作
CALayer简介: CALayer又称为层. 在每一个UIView内部都有一个Layer这样的属性. UIView之所以能够显示,就是因为它里面有这个一个层,才具有显示的功能. 我们通过操作C ...
- iOS基础 - CALayer
一.CALayer简介 Core Animation是跨平台的,支持iOS环境和Mac OS X环境 凡是支持跨平台的框架,都不能直接使用UIKit框架,因为UIKit框架只能应用在iOS而不能用于M ...
- CALayer---iOS-Apple苹果官方文档翻译之CALayer
CHENYILONG Blog CALayer---iOS-Apple苹果官方文档翻译之CALayer CALayer /*技术博客http://www.cnblogs.com/ChenYilong/ ...
- ios开发之图层与核心动画一:图层CALayer的认识
#import "ViewController.h" @interface ViewController () @property (weak, nonatomic) IBOutl ...
- 转载:iOS开发之让你的应用“动”起来
在iOS中随处都可以看到绚丽的动画效果,实现这些动画的过程并不复杂,今天将带大家一窥iOS动画全貌.在这里你可以看到iOS中如何使用图层精简非交互式绘图,如何通过核心动画创建基础动画.关键帧动画.动画 ...
随机推荐
- 6、图标:icon
1.图标 /* ---html----*/ <ion-content text-center class="icons-basic-page"> <ion-row ...
- main方法击破
什么是main方法? 是类中的一段代码,可以让程序独立运行. public class HelloWord{ public static void main(String[] args) { for ...
- spring boot 2.0.0 + mybatis 报:Property 'sqlSessionFactory' or 'sqlSessionTemplate' are required
spring boot 2.0.0 + mybatis 报:Property 'sqlSessionFactory' or 'sqlSessionTemplate' are required 无法启动 ...
- 前端框架——Bootstrap
一.Bootstrap介绍 凡是使用过bootstrap的开发者,不外乎做这么两件事情:复制and粘贴. Bootstrap官方网址:http://www.bootcss.com Bootstrap, ...
- mysql什么情况下会触发表锁
锁是计算机协调多个进程或线程并发访问某一资源的机制.在数据库中,除传统的计算资源(如CPU.RAM.I/O等)的争用以外,数据也是一种供许多用户共享的资源.如何保证数据并发访问的一致性.有效性是所有数 ...
- 什么是SQL注入?什么是XSS攻击?什么是CSRF攻击?
1. XSS(Cross Site Script,跨站脚本攻击) 是向网页中注入恶意脚本在用户浏览网页时在用户浏览器中执行恶意脚本的攻击方式. 1.1跨站脚本攻击分有两种形式: 反射型攻击(诱使用户点 ...
- Android SharedPreferences存储map的方法
在网上查了一些资料后,精简改写后得出自己想用的形式,记录一下 public static void putHashMapData(Context context, String key, Map< ...
- 如何设置树莓派的VNC开机时启动
转载:http://www.linuxidc.com/Linux/2016-12/138793.htm 下面正式开始配置 首先 sudo nano /etc/init.d/vncserver 然后 复 ...
- Mantis去掉登录界面的“注册一个新账号”链接
Mantis1.1.2主界面提供了新账号注册功能,但是只能注册默认权限的帐号.不是很实用,那就干脆去掉吧. (1) 打开Mantis目录下的login_page.php和lost_pwd_page.p ...
- input file 类型为excel表格
以下为react写法,可自行改为html的 <div className="flag-tip"> 请上传excel表格, 后缀名为.csv, .xls, .xlsx的都 ...