Linux下安装Nginx并配置一个图片服务器
首先安装nginx安装环境
nginx是C语言开发,建议在linux上运行,本教程使用Centos6.5作为安装环境。
- gcc
安装nginx需要先将官网下载的源码进行编译,编译依赖gcc环境,如果没有gcc环境,需要安装gcc:
yum install gcc-c++
- PCRE
PCRE(Perl Compatible Regular Expressions)是一个Perl库,包括 perl 兼容的正则表达式库。nginx的http模块使用pcre来解析正则表达式,所以需要在linux上安装pcre库。
yum install -y pcre pcre-devel
注:pcre-devel是使用pcre开发的一个二次开发库。nginx也需要此库。
- zlib
zlib库提供了很多种压缩和解压缩的方式,nginx使用zlib对http包的内容进行gzip,所以需要在linux上安装zlib库。
yum install -y zlib zlib-devel
- openssl
OpenSSL 是一个强大的安全套接字层密码库,囊括主要的密码算法、常用的密钥和证书封装管理功能及SSL协议,并提供丰富的应用程序供测试或其它目的使用。
nginx不仅支持http协议,还支持https(即在ssl协议上传输http),所以需要在linux安装openssl库。
yum install -y openssl openssl-devel
然后安装nginx
到Nginx官网下载tar.gz格式的安装包,这里下载的是nginx-1.10.3版本,环境使用centos的虚拟机
1、将安装包上传,解压,命令tar -zxvf nginx-1.10.3.tar.gz
2、自定义创建一个文件夹作为Nginx安装目录,这里在home下创建nginx文件夹;
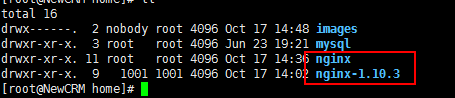
3、在解压的文件夹(nginx-1.10.3)下执行./configure --prefix=/home/nginx 命令。
意思即配置安装环境,将会把Nginx安装到/home/nginx下;
4、编译:在解压的文件夹下先后执行make 和 make install 命令
执行make

然后执行make install

5、Nginx默认使用端口是80,这里直接先把Nginx端口改为8088,
vi /home/nginx/conf/nginx.conf,修改server的端口,并配置一个图片服务器
#user  nobody;

worker_processes  1;

#error_log  logs/error.log;

#error_log  logs/error.log  notice;

#error_log  logs/error.log  info;

#pid        logs/nginx.pid;

events {

    worker_connections  1024;

}

http {

    include       mime.types;

    default_type  application/octet-stream;

    #log_format  main  '$remote_addr - $remote_user [$time_local] "$request" '

    #                  '$status $body_bytes_sent "$http_referer" '

    #                  '"$http_user_agent" "$http_x_forwarded_for"';

    #access_log  logs/access.log  main;

    sendfile        on;

    #tcp_nopush     on;

    #keepalive_timeout  0;

    keepalive_timeout  65;

    #gzip  on;

    server {

        listen       8088;#写内网端口,访问时用外网端口进行映射访问

        server_name  localhost;

        #charset koi8-r;

        #access_log  logs/host.access.log  main;

        location ~ .*\.(gif|jpg|jpeg|png)$ {

            expires 24h;

            root /home/images/;#指定图片存放路径

            access_log /home/nginx/logs/images.log;#图片 日志路径

            proxy_store on;

            proxy_store_access user:rw group:rw all:rw;

            proxy_temp_path         /home/images/;#代理临时路径

            proxy_redirect          off;

            proxy_set_header        Host 127.0.0.1;

            proxy_set_header        X-Real-IP $remote_addr;

            proxy_set_header        X-Forwarded-For $proxy_add_x_forwarded_for;

            client_max_body_size    10m;

            client_body_buffer_size 1280k;

            proxy_connect_timeout   900;

            proxy_send_timeout      900;

            proxy_read_timeout      900;

            proxy_buffer_size       40k;

            proxy_buffers           40 320k;

            proxy_busy_buffers_size 640k;

            proxy_temp_file_write_size 640k;

            if ( !-e $request_filename)

            {

                 proxy_pass  http://127.0.0.1:8088;#代理访问地址,和上面的端口一致

            }

        }

        location / {

            root   html;

            index  index.html index.htm;

        }

        #error_page  404              /404.html;

        # redirect server error pages to the static page /50x.html

        #

        error_page   500 502 503 504  /50x.html;

        location = /50x.html {

            root   html;

        }

        # proxy the PHP scripts to Apache listening on 127.0.0.1:80

        #

        #location ~ \.php$ {

        #    proxy_pass   http://127.0.0.1;

        #}

        # pass the PHP scripts to FastCGI server listening on 127.0.0.1:9000

        #

        #location ~ \.php$ {

        #    root           html;

        #    fastcgi_pass   127.0.0.1:9000;

        #    fastcgi_index  index.php;

        #    fastcgi_param  SCRIPT_FILENAME  /scripts$fastcgi_script_name;

        #    include        fastcgi_params;

        #}

        # deny access to .htaccess files, if Apache's document root

        # concurs with nginx's one

        #

        #location ~ /\.ht {

        #    deny  all;

        #}

    }

    # another virtual host using mix of IP-, name-, and port-based configuration

    #

    #server {

    #    listen       8000;

    #    listen       somename:8080;

    #    server_name  somename  alias  another.alias;

    #    location / {

    #        root   html;

    #        index  index.html index.htm;

    #    }

    #}

    # HTTPS server

    #

    #server {

    #    listen       443 ssl;

    #    server_name  localhost;

    #    ssl_certificate      cert.pem;

    #    ssl_certificate_key  cert.key;

    #    ssl_session_cache    shared:SSL:1m;

    #    ssl_session_timeout  5m;

    #    ssl_ciphers  HIGH:!aNULL:!MD5;

    #    ssl_prefer_server_ciphers  on;

    #    location / {

    #        root   html;

    #        index  index.html index.htm;

    #    }

    #}

}
server下listen的端口改为8088,并增加一个location配置,用于访问图片文件,这一串配置有#号在前面的注释掉的都可以删掉,免得看起来又长又乱。
6、启动命令: /home/nginx/sbin/nginx -c /home/nginx/conf/nginx.conf
打开防火墙对应端口供访问,8088,当然也可以直接关了防火墙。
若修改了nginx.conf配置,则需要重启才生效,命令:/home/nginx/sbin/nginx -s reload
7、访问。
输入ifconfig命令查看虚拟机ip,测试:
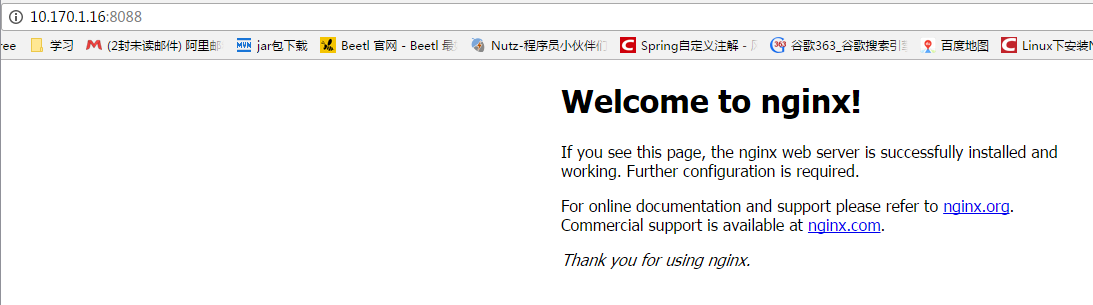
在/home/images下放张图片,测试访问:


有时候会出现禁止访问的情况,可能是权限不足,可以修改配置

Linux下安装Nginx并配置一个图片服务器的更多相关文章
- linux下安装nginx和配置
1.系统:centos6.8 2.安装准备: 安装nginx前,我们首先要确保系统安装了g++.gcc.openssl-devel.pcre-devel和zlib-devel软件,可通过如图所示命令进 ...
- linux下安装nginx与配置
linux系统为Centos 64位 第一步:从http://nginx.org/download/上下载相应的版本(或者wget http://nginx.org/download/nginx-1. ...
- Nginx(一):linux下安装nginx与配置
linux系统为Centos 64位 准备目录 [root@instance-3lm099to ~]# mkdir /usr/local/nginx [root@instance-3lm099to ~ ...
- nginx(五)- linux下安装nginx与配置
linux系统为Centos 64位 准备目录 [root@instance-3lm099to ~]# mkdir /usr/local/nginx [root@instance-3lm099to ~ ...
- Nginx:Linux下安装Nginx与配置
准备目录 [root@sijizhen ~]# mkdir /usr/local/nginx [root@sijizhen ~]# cd /usr/local/nginx/ 下载 1.Nginx,在h ...
- 【转】linux 编译安装nginx,配置自启动脚本
linux 编译安装nginx,配置自启动脚本 本文章来给各位同学介绍一篇关于linux 编译安装nginx,配置自启动脚本教程,希望有需要了解的朋友可一起来学习学习哦. 在公司的suse服务器装ng ...
- linux 编译安装nginx,配置自启动脚本
本文章来给各位同学介绍一篇关于linux 编译安装nginx,配置自启动脚本教程,希望有需要了解的朋友可一起来学习学习哦. 在公司的suse服务器装nginx,记录下安装过程: 参照这篇文章:Linu ...
- linux 下安装jdk及配置jdk环境图解
linux 下安装jdk及配置jdk环境图解 一:先检測是否已安装了JDK 运行命令: # rpm -qa|grep jdk 或 # rpm -q jdk 或 #find / -name j ...
- Linux下的Nginx的配置+Tomcat启动
Linux下的Nginx的配置 首次如果你只仅主机模式,那么请你切换到桥接模式或者net模式. 1.安装编译工具及库文件 yum -y install make zlib zlib-devel gcc ...
随机推荐
- Ubuntu安装apache+Yii2
1.下载Yii2 https://www.yiichina.com/download 2.将解压后的文件放在指定的位置,这里是/home/www/yii/ 3.安装apache2 sudo apt-g ...
- July 05th. 2018, Week 27th. Thursday
Pleasure in the job puts perfection in the work. 乐于工作才能有完美表现. From Aristole. Do you want promotion? ...
- 基于开源CA系统ejbca community 6.3.1.1构建私有CA管理数字证书
最后更新于2017年01月24日 一.为什么 为什么写这篇文章?ca是什么?数字证书是什么?ejbca又是什么? 让我们从http与https说起.http是超文本传输协议(HyperText Tra ...
- Kali Linux 渗透测试手册(1.1)安装虚拟机
翻译来自:掣雷小组 成员信息: thr0cyte, Gr33k, 花花, 小丑, R1ght0us, 7089bAt, 一.配置KALI Linux和渗透测试环境 在这一章,我们将覆盖以下内容: 在W ...
- vue项目向小程序迁移调研
概述 今天调研了一下vue项目怎么向小程序迁移,有些心得,记录下来,供以后开发时参考,相信对其他人也有用. 基本上vue项目向小程序迁移不外乎2种方法,一种是用小程序的web-view组件,另一种是用 ...
- height:auto 火狐没边框
css高度设置为auto后,设置的边框 ie正常 火狐 就没有边框了,解决方法 之前是这样写的 #right_bottom { width: 790px; height:auto; border: # ...
- LongLightUtils【保持屏幕常亮工具类】
版权声明:本文为HaiyuKing原创文章,转载请注明出处! 前言 这里只是简单记录下保持屏幕常亮工具类LongLightUtils的使用,具体请阅读参考资料<Android屏幕常亮,其实很简单 ...
- Nginx反向代理后,java获取客户端真实IP地址
一般情况下,java获取客户端IP地址的方法为request.getRemoteAddr();但这只是在没有网关或者代理的情况下,如果客户端将请求发送到nginx,再由nginx进行反向代理到目标服务 ...
- netstat命令总结
nestat介绍 netstat是一款命令行工具,可用于列出系统上所有的网络套接字连接情况,包括 tcp, udp 以及 unix 套接字,另外它还能列出处于监听状态(即等待接入请求)的套接字. 使用 ...
- 浅谈Google Chrome浏览器(理论篇)
注解:各位读者,经博客园工作人员反馈,hosts涉及违规问题,我暂时屏蔽了最新hosts,若已经获取最新hosts的朋友们,注意保密,不要外传.给大家带来麻烦,对此非常抱歉!!! 开篇概述 1.详解g ...