better-scroll 源码分析
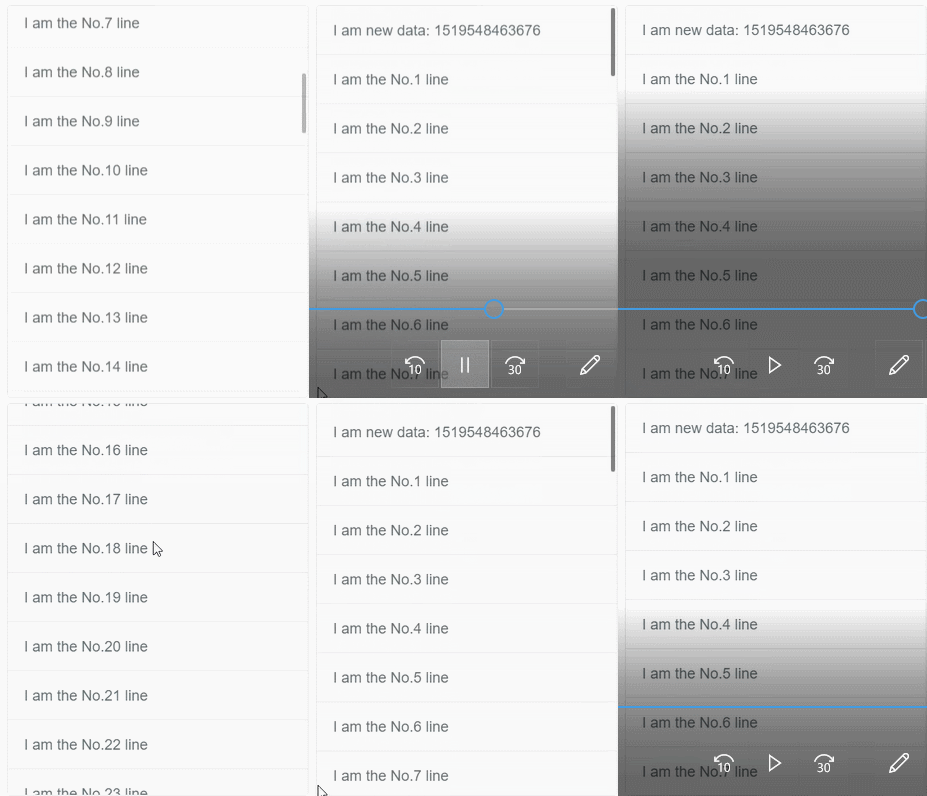
我写该文章,主要是想结合代码探究 better-scroll 是如何处理下列操作的。该过程如下图,用文字描述为:手指触摸屏幕,向上快速滑动,最后在手指离开屏幕后,内容获得动量继续滚动,若内容滚动超越顶部边界会回弹。

我们从整体开始一步一步来探究。better-scroll 包装了一个 BScroll 类以提供功能,我们可以在 better-scroll/src/index.js 文件中看到,它的构造器中传入两个参数 el 和 options。在构造函数中,比较重要的是执行_init(el, options)方法,如下所示。
function BScroll(el, options) {

    // ...

    this._init(el, options)

}
_init(el, options)方法在better-scroll/src/scroll/init.js文件中定义,相关代码如下。
BScroll.prototype._init = function (el, options) {

    // ...

    this._addDOMEvents() // 添加事件处理函数

    this._initExtFeatures() // 初始化特性操作,如下拉刷新

    this._watchTransition()

    // ...

}
因为如何实现特性操作并不是我的主要目的,所以 _initExtFeatures() 我们忽略掉。先来看一下 _watchTransition() 方法,该方法的代码如下。
BScroll.prototype._watchTransition = function ()  {

    // ...

    let me = this

    let isInTransition = false

    Object.defineProperty(this, 'isInTransition', {

        get () {

            return isInTransition

        },

        set (newVal) {

            isInTransition = newVal

            let el = me.scroller.children.length ? me.scroller.children : [me.scroller]

            let pointerEvents = (isTransition && !me.pulling) ? 'none' : 'auto'

            for (let i = 0; i < le.length; i++) {

                el[i].style.pointerEvents = pointerEvents

            }

        }

    })

}
此方法的功能主要是为BScroll类的实例,使用Object.defineProperty()增加一个isInTransition属性。当将该属性赋值为true时,将会使滚动元素下的子元素的pointerEvents样式属性赋值为none,以此子元素无法点击。该处理将用在元素滚动等状态时,用户的触摸的期望应该触发的是滚动停止等操作,而不是子元素点击事件。
_addDOMEvents()方法主要用来绑定事件处理程序,其中在源码中还定义了_removeDOMEvents()方法,它们都会调用_handleDOMEvents(eventOperation)方法。不同的是,_addDOMEvents中eventOperation = addEvent,_removeDOMEvents中eventOperation = removeEvent。

addEvent和removeEvent只是包装了DOM 2级事件处理方法。
function addEvent(el, type, fn, capture) {

  el.addEventListener(type, fn, {passive: false, capture: !!capture})

}

function removeEvent(el, type, fn, capture) {

  el.removeEventListener(type, fn, {passive: false, capture: !!capture})

}
看一下_handleDOMEvents(eventOperation)方法的源码,可以看到eventOperation方法像下面这样调用。
BScroll.prototype._handleDOMEvents = function (eventOperation) {

    // ...

    eventOperation(window, 'resize', this)

    // ...

}
可以看到,参数fn被传入的是BScroll类实例的this指针,而不是一个方法。其实是在BScroll类中定义了一个handleEvent方法根据事件类型来处理所有事件。这是HTML5的一个特性,具体介绍可以参照该博文 http://www.ayqy.net/blog/handleevent%E4%B8%8Eaddeventlistener/
handleEvent方法的源码如下。
BScroll.prototype.handleEvent = function (e) {

  switch (e.type) {

    case 'touchstart':

    case 'mousedown':

      this._start(e)

      break

    case 'touchmove':

    case 'mousemove':

      this._move(e)

      break

    case 'touchend':

    case 'mouseup':

    case 'touchcancel':

    case 'mousecancel':

      this._end(e)

      break

    case 'orientationchange':

    case 'resize':

      this._resize()

      break

    case 'transitionend':

    case 'webkitTransitionEnd':

    case 'oTransitionEnd':

    case 'MSTransitionEnd':

      this._transitionEnd(e)

      break

    case 'click':

      if (this.enabled && !e._constructed) {

        if (!preventDefaultException(e.target, this.options.preventDefaultException)) {

          e.preventDefault()

          e.stopPropagation()

        }

      }

      break

    case 'wheel':

    case 'DOMMouseScroll':

    case 'mousewheel':

      this._onMouseWheel(e)

      break

  }

}
最终处理事件的方法落在_start、_move、_end、_transitionEnd。即,手指触摸时 _start 函数进行处理,手指移动时 _move 函数进行处理,手指离开时 _end 函数进行处理,移动到最远距离后 _transitionEnd 函数处理以进行回弹。
_start 函数中记录了 e.touches[0].pageX 与 e.touches[0].pageY。
let point = e.touches ? e.touches[0] : e

this.startX = this.x
this.startY = this.y
this.absStartX = this.x
this.absStartY = this.y
this.pointX = point.pageX
this.pointY = point.pageY
先来看一下 _move 中的主要代码。
let point = e.touches ? e.touches[0] : e

let deltaX = point.pageX - this.pointX

let deltaY = point.pageY - this.pointY

this.pointX = point.pageXthis.pointY = point.pageY

this.distX += deltaXthis.distY += deltaY

let absDistX = Math.abs(this.distX)

let absDistY = Math.abs(this.distY)

let timestamp = getNow()

// 我们需要移动最小的距离(单位px)为momentumLimitDistance
if (timestamp - this.endTime > this.options.momentumLimitTime && (absDistY < this.options.momentumLimitDistance && absDistX < this.options.momentumLimitDistance)) {

    return

}

let newX = this.x + deltaX

let newY = this.y + deltaY

if (newX > 0 || newX < this.maxScrollX) {

    if (this.options.bounce) {

        newX = this.x + deltaX / 3

    } else {

        newX = newX > 0 ? 0 : this.maxScrollX

    }

}if (newY > 0 || newY < this.maxScrollY) {

    if (this.options.bounce) {

        newY = this.y + deltaY / 3

    } else {

        newY = newY > 0 ? 0 : this.maxScrollY

    }

}

this._translate(newX, newY)

if (timestamp - this.startTime > this.options.momentumLimitTime) {

    this.startTime = timestamp

    this.startX = this.x

    this.startY = this.y

}
为了防止用户触摸时的抖动,要求移动的最小距离要大于 momentumLimitDistance。
接着处理移动边缘,若移动到上下边缘,那么内容移动的距离将为手指移动距离的1/3,使用户产生拥有阻力的感觉。
接着使用 _translate(newX, newY) 函数改变内容块的 transition css属性来产生移动效果。
接下来的代码的作用是为了获取手指离开屏幕时的瞬时速度,我们都知道速度等于距离/时间,当采样的时间越小,计算出的速度更接近瞬时速度。better-scroll 的采样时间要求小于 momentumLimitTime。
最后在 _end 函数中是如何计算出动量的。
// start momentum animation if needed

if (this.options.momentum && duration < this.options.momentumLimitTime && (absDistY > this.options.momentumLimitDistance || absDistX > this.options.momentumLimitDistance)) {

  let momentumX = this.hasHorizontalScroll ? momentum(this.x, this.startX, duration, this.maxScrollX, this.options.bounce ? this.wrapperWidth : 0, this.options)

    : {destination: newX, duration: 0}

  let momentumY = this.hasVerticalScroll ? momentum(this.y, this.startY, duration, this.maxScrollY, this.options.bounce ? this.wrapperHeight : 0, this.options)

    : {destination: newY, duration: 0}

  newX = momentumX.destination

  newY = momentumY.destination

  time = Math.max(momentumX.duration, momentumY.duration)

  this.isInTransition = true

}
使用 momentum 函数来计算动量,我们接下来看一下 momentu 函数,在 better-scroll/src/util/momentum.js 文件中。
export function momentum(current, start, time, lowerMargin, wrapperSize, options) {

  let distance = current - start

  let speed = Math.abs(distance) / time

  let {deceleration, itemHeight, swipeBounceTime, wheel, swipeTime} = options

  let duration = swipeTime

  let rate = wheel ? 4 : 15

  let destination = current + speed / deceleration * (distance < 0 ? -1 : 1)

  if (wheel && itemHeight) {

    destination = Math.round(destination / itemHeight) * itemHeight

  }

  if (destination < lowerMargin) {

    destination = wrapperSize ? lowerMargin - (wrapperSize / rate * speed) : lowerMargin

    duration = swipeBounceTime

  } else if (destination > 0) {

    destination = wrapperSize ? wrapperSize / rate * speed : 0

    duration = swipeBounceTime

  }

  return {

    destination: Math.round(destination),

    duration

  }

}
在该函数中计算步骤如此,首先常规计算出 destination = current + speed / deceleration * (distance < 0 ? -1 : 1)。接着判断按照该结果内容是否超越滚动边界,destination < lowerMargin 时超越滚动下边界,destination > 0 超出滚动上边界。然后再分别使用新的公式计算,注意的是该两个公式使用整个滚动内容的大小,即滚动的范围为公式中的元素,以此保证无法超越滚动边界过多距离。
最后当动量移动结束时,在 _transitionEnd 方法中重新置位即可,关键代码如下。
BScroll.prototype._transitionEnd = function (e) {

  if (e.target !== this.scroller || !this.isInTransition) {

    return

  }

  this._transitionTime()

  if (!this.pulling && !this.resetPosition(this.options.bounceTime, ease.bounce)) {

    this.isInTransition = false

    if (this.options.probeType !== 3) {

      this.trigger('scrollEnd', {

        x: this.x,

        y: this.y

      })

    }

  }

}
BScroll.prototype.resetPosition = function (time = 0, easeing = ease.bounce) {

    let x = this.x

    let roundX = Math.round(x)

    if (!this.hasHorizontalScroll || roundX > 0) {

      x = 0

    } else if (roundX < this.maxScrollX) {

      x = this.maxScrollX

    }

    let y = this.y

    let roundY = Math.round(y)

    if (!this.hasVerticalScroll || roundY > 0) {

      y = 0

    } else if (roundY < this.maxScrollY) {

      y = this.maxScrollY

    }

    if (x === this.x && y === this.y) {

      return false

    }

    this.scrollTo(x, y, time, easeing)

    return true

  }
better-scroll 源码分析的更多相关文章
- [Android实例] Scroll原理-附ScrollView源码分析
想象一下你拿着放大镜贴很近的看一副巨大的清明上河图, 那放大镜里可以看到的内容是很有限的, 而随着放大镜的上下左右移动,就可以看到不同的内容了 android中手机屏幕就相当于这个放大镜, 而看到的内 ...
- [Android实例] Scroll原理-附ScrollView源码分析 (转载)
想象一下你拿着放大镜贴很近的看一副巨大的清明上河图, 那放大镜里可以看到的内容是很有限的, 而随着放大镜的上下左右移动,就可以看到不同的内容了 android中手机屏幕就相当于这个放大镜, 而看到的内 ...
- jQuery 2.0.3 源码分析 事件体系结构
那么jQuery事件处理机制能帮我们处理那些问题? 毋容置疑首先要解决浏览器事件兼容问题 可以在一个事件类型上添加多个事件处理函数,可以一次添加多个事件类型的事件处理函数 提供了常用事件的便捷方法 支 ...
- BOOtstrap源码分析之 tooltip、popover
一.tooltip(提示框) 源码文件: Tooltip.jsTooltip.scss 实现原理: 1.获取当前要显示tooltip的元素的定位信息(top.left.bottom.right.wid ...
- bootstrap源码分析之scrollspy(滚动侦听)
源码文件: Scrollspy.js 实现功能 1.当滚动区域内设置的hashkey距离顶点到有效位置时,就关联设置其导航上的指定项2.导航必须是 .nav > li > a 结构,并且a ...
- jQuery.lazyload使用及源码分析
前言: 貌似以前自己也写过图片懒加载插件,但是新公司使用的是jQuery.lazyload插件,为了更好的运用,自己还是把源码看了遍,分别记录了如何使用, 插件原理,各个配置属性的完整解释,demo实 ...
- gomoblie flappy 源码分析:游戏逻辑
本文主要讨论游戏规则逻辑,具体绘制技术请参看相关文章: gomoblie flappy 源码分析:图片素材和大小的处理 http://www.cnblogs.com/ghj1976/p/5222289 ...
- Robotium源码分析之运行原理
从上一章<Robotium源码分析之Instrumentation进阶>中我们了解到了Robotium所基于的Instrumentation的一些进阶基础,比如它注入事件的原理等,但Rob ...
- 手机自动化测试:appium源码分析之bootstrap十二
手机自动化测试:appium源码分析之bootstrap十二 poptest是国内唯一一家培养测试开发工程师的培训机构,以学员能胜任自动化测试,性能测试,测试工具开发等工作为目标.如果对课程感兴趣 ...
- 一个普通的 Zepto 源码分析(三) - event 模块
一个普通的 Zepto 源码分析(三) - event 模块 普通的路人,普通地瞧.分析时使用的是目前最新 1.2.0 版本. Zepto 可以由许多模块组成,默认包含的模块有 zepto 核心模块, ...
随机推荐
- JavaSE笔记-异常
Java 异常 Throwable类的体系结构(一些常用的) 异常分类 checked,unchecked 区分:RuntimeException及其子类,Error类及其子类,是unchecked ...
- virtuoso装载大的rdf文件的方法
本文详细介绍了将一个比较大的rdf文件装载到virtuoso数据库的过程.参考virtuoso网站的文档说明,通过实践,将一个大约4.6G左右的nt文件装载到virtuoso数据库中,用了大概6个多小 ...
- python爬虫知乎
在之前写过一篇使用python爬虫爬取电影天堂资源的博客,重点是如何解析页面和提高爬虫的效率.由于电影天堂上的资源获取权限是所有人都一样的,所以不需要进行登录验证操作,写完那篇文章后又花了些时间研究了 ...
- 黑窗口输入确定数字弹MessageBox(VirtualProtect())
今天有人说到这个就想的弹一下,刚开始弄了一下,发现内存访问有问题想到可能与读写保护有关,所以用了VirtualProtect函数,得到了正确结果 网上这个小东西我自己没发现,就贴一下.. void m ...
- Web Magic设计思想
1.1 设计思想 1. 一个框架,一个领域 一个好的框架必然凝聚了领域知识.WebMagic的设计参考了业界最优秀的爬虫Scrapy,而实现则应用了HttpClient.Jsoup等Java世界最成熟 ...
- 使用telnet发送HTTP请求
使用telnet发送HTTP请求 写这篇博客,其实没有太大的实际意义,但是还是很有必要的,如果用好Telnet指令,就可以很好的理解HTTP的一些概念,特别是http1.1的持续链接. 要想使用Tel ...
- linkin大话面向对象--GC和jar包
GC java的垃圾回机制是java语言的重要机制之一.当程序创建对象,数组等引用类型实体时,系统都会在堆内存中为之分配一块内存区,对象就保存在这块内存区中.当这块内存不再被任何变量引用时,这块内存就 ...
- 错误:java.lang.NoClassDefFoundError: com/project/common/exception/ServiceException 的解决
问题: 项目编译通过,启动报错误信息java.lang.NoClassDefFoundError: com/project/common/exception/ServiceException. 解决方 ...
- IO (五)
1 序列化和反序列化 1.1 ObjectOutputStream 序列化 1.1.1 概述 ObjectOutputStream将Java对象的基本数据写入OutputStream,可以使用Obje ...
- CentOS 通过yum来升级php到php5.6
在文章中,我们将展示在centOS系统下如果将php升级到5.6,之前通过yum来安装lamp环境,直接升级的话,提示没有更新包,也就是说默认情况下php5.3.3是最新 1.查看已经安装的php版本 ...
