Orchestrator
MYSQL5.7下搭建Orchestrator
环境说明
在主机1,主机2,主机3上安装MySQL服务端和客户端。
|
主机1 |
主机2 |
主机3 |
|
|
操作系统 |
CentOS7.4 |
CentOS7.4 |
CentOS7.4 |
|
主机名 |
mydb1 |
mydb2 |
mydb3 |
|
IP |
192.168.1.101 |
192.168.1.102 |
192.168.1.103 |
|
角色 |
拓扑库 |
3306主,3307从 |
3306从,3307主,3308从 |
|
Orchestrator |
Orchestrator |
Orchestrator |
|
|
数据库软件版本 |
mysql5.7.22 |
mysql5.7.22 |
mysql5.7.22 |
|
MySQL配置文件 |
/app/mysqldata/3306/ my.cnf |
/app/mysqldata/3306/ my.cnf |
/app/mysqldata/3306/ my.cnf |
|
Orchestrator配置文件 |
/usr/local/orchestrator/orchestrator.conf.json |
/usr/local/orchestrator/orchestrator.conf.json |
/usr/local/orchestrator/orchestrator.conf.json |
|
Orchestrator安装包 |
orchestrator-3.0.11-1.x86_64.rpm orchestrator-client-3.0.11-1.x86_64.rpm |
orchestrator-3.0.11-1.x86_64.rpm orchestrator-client-3.0.11-1.x86_64.rpm |
orchestrator-3.0.11-1.x86_64.rpm orchestrator-client-3.0.11-1.x86_64.rpm |
一. 主从复制配置
Install_CentOS7_MySQL57_multi_instance.sh
MySQL5.7-GTID-mysqldump,xtrabackup搭建.txt
大规模插入数据.txt
做成快照Orchestrator
二.开始配置Orchestrator
mydb1上操作
https://github.com/github/orchestrator/releases/download/v3.0.11/orchestrator-3.0.11-1.x86_64.rpm
https://github.com/github/orchestrator/releases/download/v3.0.11/orchestrator-client-3.0.11-1.x86_64.rpm
安装:
# rpm -ivh orchestrator-3.0.11-1.x86_64.rpm
# rpm -ivh orchestrator-client-3.0.11-1.x86_64.rpm
安装完成后,目录在/usr/local/orchestrator
MySQL配置文件加一个report_host参数,report_host为只读参数,必须重启才可生效
report_host=192.168.1.102 //ip为自身的ip
说明:不加report_host ,show slave hosts 不会显示host,会导致程序报错的
"DiscoverByShowSlaveHosts": false 也可以,这样就不需要设置report_host了
拓扑库上
CREATE DATABASE IF NOT EXISTS orchestrator;
GRANT ALL PRIVILEGES ON `orchestrator`.* TO 'orche'@'192.168.1.%' IDENTIFIED BY 'msds007';
mydb2,mydb3上操作
主从复制上,3306和3307上分别操作
GRANT SUPER, PROCESS, REPLICATION SLAVE, RELOAD ON *.* TO 'orche'@'192.168.1.%' IDENTIFIED BY 'msds007';
GRANT SELECT ON mysql.slave_master_info TO 'orche'@'192.168.1.%';
mydb1上操作
配置文件
# cd /usr/local/orchestrator/
# cp orchestrator-sample.conf.json orchestrator.conf.json
"MySQLTopologyUser": "orche",
"MySQLTopologyPassword": "msds007",
"MySQLOrchestratorHost": "192.168.1.101",
"MySQLOrchestratorPort": 3306,
"MySQLOrchestratorDatabase": "orchestrator",
"MySQLOrchestratorUser": "orche",
"MySQLOrchestratorPassword": "msds007",
启动orchestrator
# cd /usr/local/orchestrator/
# ./orchestrator --debug http &
发现实例
# ./orchestrator -c discover -i mydb2:3306
# ./orchestrator -c discover -i mydb3:3306
# ./orchestrator -c discover -i mydb3:3307
# ./orchestrator -c discover -i mydb2:3307
# ./orchestrator -c discover -i mydb3:3308
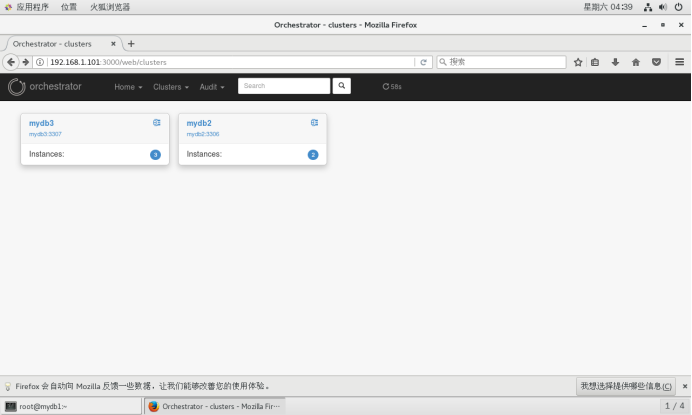
# ./orchestrator -c clusters
Web页面:http://192.168.1.101:3000
打印拓扑树
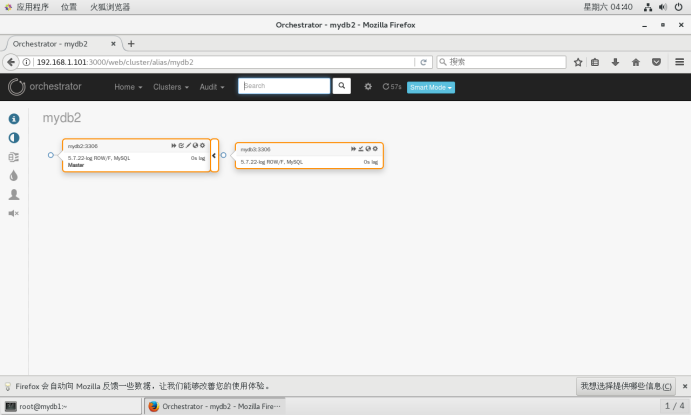
# ./orchestrator -c topology -i mydb2:3306
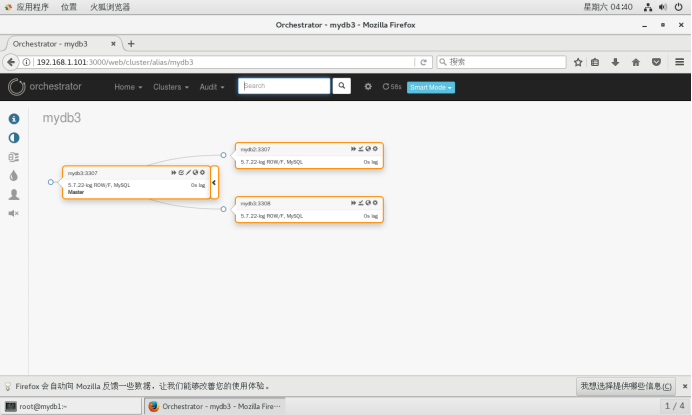
# ./orchestrator -c topology -i mydb3:3307
使用relocate移动一个副本,如:有A-B-C可以变为 A-B、A-C
# ./orchestrator -c relocate -i mydb3:3308 -d mydb2:3307
# ./orchestrator -c relocate -i mydb3:3308 -d mydb3:3307
使实例只读或者只写
# ./orchestrator -c set-read-only -i mydb2:3307
# ./orchestrator -c set-writeable -i mydb2:3307
Start/stop slave
# ./orchestrator -c stop-slave -i mydb3:3308
# ./orchestrator -c start-slave -i mydb3:3308
配置orchestrator-client(mydb1,mydb2,mydb3都可)
配置环境
# export ORCHESTRATOR_API=http://192.168.1.101:3000/api
linux下安装json解析工具jq
# wget https://github.com/stedolan/jq/releases/download/jq-1.5/jq-1.5.tar.gz
# tar zxvf jq-1.5.tar.gz
# cd jq-1.5
# ./configure && make && make install
基础命令
# orchestrator-client -c help
# orchestrator-client -c which-api
# orchestrator-client -c clusters
# orchestrator-client -c all-clusters-masters
# orchestrator-client -c all-instances
# orchestrator-client -c api -path clusters
# orchestrator-client -c api -path leader-check
故障转移
不管主库是否正常,强制主从切换,-i指定集群中任一实例,-d 指定新主库, 注意切换后旧主库不会指向新主库,需要手动操作
# orchestrator-client -c force-master-takeover -i mydb2:3306 -d mydb3:3306
主从切换,旧主库会指向新主库,但是复制线程是停止的,需要人工手动执行start slave,恢复复制。
# orchestrator-client -c graceful-master-takeover -i mydb2:3306 -d mydb3:3306
自动故障切换
Orchestrator能够配置成自动检测主库故障,并完成故障切换。
以http方式启动后台Web服务
./orchestrator --config=./orchestrator.conf.json --debug http &
成功启动后,可通过浏览器访问Web页面:
http://192.168.1.101:3000
参数配置
"RecoverMasterClusterFilters": ["*"],
"RecoverIntermediateMasterClusterFilters": ["*"],
"FailureDetectionPeriodBlockMinutes": 60,
"RecoveryPeriodBlockSeconds": 3600
RecoverMasterClusterFilters 和 RecoverIntermediateMasterClusterFilters 必须配置为["*"],否则自动切换不会触发。
FailureDetectionPeriodBlockMinutes 和 RecoveryPeriodBlockSeconds 参数默认值为1个小时,也就是如果发生了故障切换,在1个小时之内,该主库再次出现故障,将不会被监测到,也不会触发故障切换。
三.高可用Orchestrator
Orchestrator多节点部署,通过raft一致性协议实现自身高可用。
例如在如下3台机器部署Orchestrator节点:
192.168.1.101
192.168.1.102
192.168.1.103
在每个节点上修改orchestrator.conf.json配置文件:
"RaftEnabled": true,
"RaftDataDir": "/var/lib/orchestrator",
"RaftBind": "192.168.1.101",
"DefaultRaftPort": 10008,
"RaftNodes": [ "192.168.1.101", "192.168.1.102", "192.168.1.103" ],
RaftBind配置为当前节点ip,在每个节点上启动orchestrator服务:
./orchestrator --config=./orchestrator.conf.json --debug http
在浏览器中访问:
http://192.168.1.101:3000/api/leader-check
返回 "OK",当前leader为192.168.1.101
http://192.168.1.101:3000/api/raft-health
返回 "healthy"
http://192.168.1.102:3000/api/leader-check
返回 "Not leader"
http://192.168.1.102:3000/api/raft-health
返回 "healthy"
关闭192.168.1.101节点上的orchestrator服务,leader自动切换到192.168.1.102或者192.168.1.103,如果192.168.1.101重新启动后,加入集群,它将作为follower。
https://segmentfault.com/u/lindaling 可以学很多东西
https://segmentfault.com/a/1190000017838535 很重要
https://riverdba.github.io/ 可以学很多东西
https://riverdba.github.io/2019/03/19/orchestrator/
https://www.jianshu.com/p/62e95a131028 很重要
https://github.com/outbrain/orchestrator/wiki/Orchestrator-Manual
https://www.cnblogs.com/zhoujinyi/p/10387581.html
https://www.cnblogs.com/zhoujinyi/p/10394389.html
Orchestrator的更多相关文章
- vmware vcenter orchestrator configuration提示“用户名密码错误或登录失败超过次数被锁定”
首次登录,使用默认用户密码登录vmware/vmware vmware vcenter orchestrator configuration提示"用户名密码错误或登录失败超过次数被锁定&qu ...
- 一步步使用BMC Atrium Orchestrator Vmware Infrastructure Event Monitor
本教程将一步步演示怎么使用BMC Atrium Orchestrator (BAO) Vmware Infrastructure Event Monitor来监控VSphere Webservice的 ...
- MySQL高可用复制管理工具 —— Orchestrator使用
背景 在上一篇「MySQL高可用复制管理工具 —— Orchestrator介绍」中大致介绍了Orchestrator的功能.配置和部署,当然最详细的说明可以查阅官方文档.本文开始对Orchestra ...
- MySQL高可用复制管理工具 —— Orchestrator介绍
背景 在MySQL高可用架构中,目前使用比较多的是Percona的PXC,Galera以及MySQL 5.7之后的MGR等,其他的还有的MHA,今天介绍另一个比较好用的MySQL高可用复制管理工具:O ...
- orchestrator HTTP接口forget-cluster误下线集群问题
orchestrator 提供了"forget-cluster"HTTP接口用于下线集群.该接口可以根据提供的参数,推测可能的集群名cluster name,然后使用cluster ...
- MySQL高可用工具--orchestrator
orchestrator是一款MySQL高可用工具,其支持: 集群拓扑探测 集群拓扑重塑 故障恢复 提供3种使用方式: 命令行 HTTP API web页面 orchestator github地址
- Scalable MySQL Cluster with Master-Slave Replication, ProxySQL Load Balancing and Orchestrator
MySQL is one of the most popular open-source relational databases, used by lots of projects around t ...
- VMware vCenter Orchestrator
使用范例: VMware Automation with vCenter Orchestrator http://www.rodmach.com/blog/?p=46 直接从 VSPHERE CLIE ...
- vCenter Server 6.7 集成 vRealize Orchestrator 7.5
第一步,安装独立Orchestrator 7.5,并初始化 Orchestrator ova导入和初始化步骤省略...请参考官方文档... Orchestrator 初始化中的认证源需要和vCen ...
- UiPath Platform注册 登录 及 访问 Orchestrator
相关步骤: 1.https://platform.uipath.com/portal_/cloudrpa 注册 及 登录 2. Login后 通过Services 连接 访问 UiPath Orche ...
随机推荐
- [python]有中文字符程序异常的解决方案
一. 含有中文字符无法运行 在python3中用的是Unicode编码,Unicode号称万国码,可以向所有的编码进行兼容.不会出现这种问题. Python2中使用的是ASCII编码,会出现这种问题. ...
- Codeforces 1205C Palindromic Paths (交互题、DP)
题目链接 http://codeforces.com/contest/1205/problem/C 题解 菜鸡永远做着变巨的梦 然而依然连div1BC题都不会做 要是那天去打cf怕是又要1题滚粗了.. ...
- 【Android】【踩坑日记】RecyclerView获取子View的正确姿势
开发过程中发现RecyclerView.getChildAt(position)为空的情况,但是明明这个position却没有越界. 解决办法:用recycler.getLayoutManager() ...
- 2018-2019-2 20175227张雪莹《Java程序设计》实验四 《Android程序设计》
2018-2019-2 20175227张雪莹<Java程序设计> 实验四 <Android程序设计> 实验报告封面 课程:Java程序设计 班级:1752班 姓名:张雪莹 学 ...
- 关于Date
1.java DateUtil工具包可将"Wed, 21 Dec 2022 14:20:00 GMT"格式的字符串专程Date类型: Date expiration = DateU ...
- HttpClient提交数据
用代码模拟浏览器的行为 * 轻量级的开源的框架 * Android在6.0 23 以后移除了httpclient ,所以开发中用的少了 * 编写步骤: 1. 打开浏览器 2. 输入网址 3. 敲回车 ...
- python写入csv方法总结
最常用的一种方法,利用pandas包 import pandas as pd #任意的多组列表 a = [1,2,3] b = [4,5,6] #字典中的key值即为csv中列名 dataframe ...
- 小D课堂-SpringBoot 2.x微信支付在线教育网站项目实战_2-4.后端项目分层分包及资源文件处理
笔记 4.后端项目分层分包及资源文件处理 简介:项目基本目录结构,包名称建立,配置文件建立 1.基本目录结构 controller se ...
- java错误与异常
java异常处理机制 异常处理机制能让程序在异常发生时,按照代码的预先设定的异常处理逻辑,针对性地处理异常, 让程序尽最大可能恢复正常并继续执行,且保持代码的清晰.Java中的异常可以是函数中的语句执 ...
- 微服务的脚手架Jhipster使用(一)
随着微服务的普及以及docker容器的广泛应用,有传统的soa服务衍生出微服务的概念,微服务强调的是服务的独立性,屏蔽底层物理平台的差异,此时你会发现微服务跟容器技术完美契合.在此基础上衍生出的云原生 ...