Spring Boot源码分析-启动过程
Spring Boot作为目前最流行的Java开发框架,秉承“约定优于配置”原则,大大简化了Spring MVC繁琐的XML文件配置,基本实现零配置启动项目。
本文基于
Spring Boot 2.1.0.RELEASE版本了解Spring Boot如何启动
首先让我们看一下最简单的Spring Boot启动代码
@SpringBootApplication
public class DemoApplication {

    public static void main(String[] args) {
        SpringApplication.run(DemoApplication.class, args);
    }
}每一个使用过Spring Boot的同学对于上面的代码应该都非常熟悉了,通过这段代码即可启动Spring Boot应用。那么SpringApplication.run(DemoApplication.class, args)内部到底做了什么事情呢?
在查看具体代码之前,我们先了解一下SpringApplication内部大概的执行流程,如下图
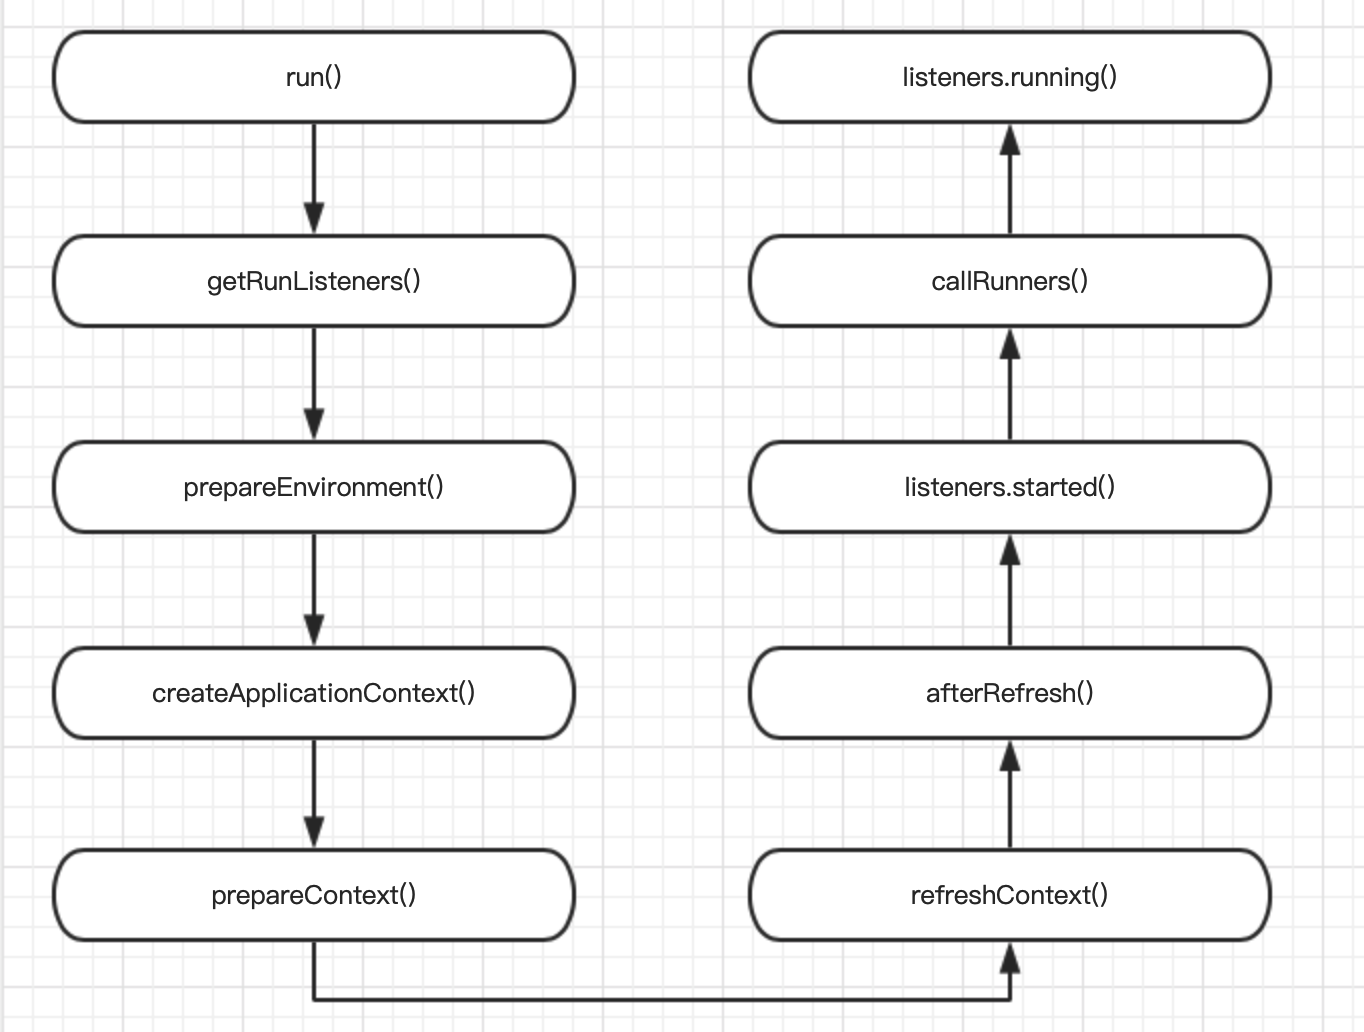
从上图中可以看出run()是整个应用的入口,接着初始化SpringApplicationRunListener,Environment等实例,然后创建应用上下文对象,“准备”并“刷新”上下文,到这里Spring容器已基本启动完成,最后发送事件通知各个组件作出相应动作。
源码分析
在了解完大概的流程之后,下面开始深入源码分析Spring Boot具体的启动过程,首先进入入口方法run
public ConfigurableApplicationContext run(String... args) {
    StopWatch stopWatch = new StopWatch();
    stopWatch.start();
    ConfigurableApplicationContext context = null;
    Collection<SpringBootExceptionReporter> exceptionReporters = new ArrayList<>();
    configureHeadlessProperty();
    SpringApplicationRunListeners listeners = getRunListeners(args);
    listeners.starting();
// ...StopWatch主要是用来统计每项任务执行时长,例如Spring Boot启动占用总时长。
Started DemoApplication in 4.241 seconds (JVM running for 5.987)
getRunListeners()完成了SpringApplicationRunListener实例化工作,如何完成的呢?进入方法内部查看
private SpringApplicationRunListeners getRunListeners(String[] args) {
        Class<?>[] types = new Class<?>[] { SpringApplication.class, String[].class };
    return new SpringApplicationRunListeners(logger, getSpringFactoriesInstances(
                SpringApplicationRunListener.class, types, this, args));
}
SpringApplicationRunListeners和SpringApplicationRunListener不是同一个类,它们名称非常相似
查看SpringApplicationRunListeners源码
SpringApplicationRunListeners(Log log,
            Collection<? extends SpringApplicationRunListener> listeners) {
    this.log = log;
    this.listeners = new ArrayList<>(listeners);
}

public void starting() {
    for (SpringApplicationRunListener listener : this.listeners  {
        listener.starting();
    }
}
public void environmentPrepared() {
    // ....
}
public void contextPrepared() {
    // ....
}
public void contextLoaded() {
    // ....
}
public void started() {
    // ....
}
public void running() {
    // ....
}
它是
SpringApplicationRunListener的一个集合
观察SpringApplicationRunListeners所有方法,可以看出,它实际是一个用来发送SpringApplicationRunListener相关事件的工具类
接着继续观察getSpringFactoriesInstances源码,看它是如何实例化对象的(此方法后续多处使用)
private <T> Collection<T> getSpringFactoriesInstance(Class<T> type,
        Class<?>[] parameterTypes, Object... args) {
    ClassLoader classLoader = getClassLoader();
    // 加载对象名称
    Set<String> names = new LinkedHashSet<>(
            SpringFactoriesLoader.loadFactoryNames(type,classLoader));
    List<T> instances = createSpringFactoriesInstances(type parameterTypes,
            classLoader, args, names);
    AnnotationAwareOrderComparator.sort(instances);
    return instances;
}这里通过SpringFactoriesLoader.loadFactoryNames获取type对应的FactoryNames,不明白有什么用处?进入方法内部查看
public static List<String> loadFactoryNames(Class<?>factoryClass, @Nullable ClassLoader classLoader) {
    String factoryClassName = factoryClass.getName();
    return loadSpringFactories(classLoader).getOrDefaul(factoryClassName, Collections.emptyList());
}继续进入loadSpringFactories方法内部
public static final String FACTORIES_RESOURCE_LOCATION ="META-INF/spring.factories";
private static Map<String, List<String>> loadSpringFactorie(@Nullable ClassLoader classLoader) {
    MultiValueMap<String, String> result = cache.ge(classLoader);
    if (result != null) {
        return result;
    }
    try {
        // 获取 META-INF/spring.factories 对应的资源
        Enumeration<URL> urls = (classLoader != null ?
                classLoader.getResource(FACTORIES_RESOURCE_LOCATION) :
                ClassLoader.getSystemResource(FACTORIES_RESOURCE_LOCATION));
        result = new LinkedMultiValueMap<>();
        while (urls.hasMoreElements()) {
            URL url = urls.nextElement();
            UrlResource resource = new UrlResource(url);
            // 读取文件内容
            Properties properties =PropertiesLoaderUtils.loadProperties(resource);
            for (Map.Entry<?, ?> entry : properties.entrySe()) {
                String factoryClassName = ((String)entry.getKey()).trim();
                for (String factoryName :StringUtils.commaDelimitedListToStringArray(String) entry.getValue())) {
                    // 获取 factoryClassName 对应的多个valu(多个value用逗号分隔)
                    result.add(factoryClassName,factoryName.trim());
                }
            }
        }
        // 缓存已经读取到的内容
        cache.put(classLoader, result);
        return result;
    }
    catch (IOException ex) {
        throw new IllegalArgumentException("Unable to loadfactories from location [" +
                FACTORIES_RESOURCE_LOCATION + "]", ex);
    }
}看到这里可能会疑惑META-INF/spring.factories文件在哪里?文件里面有什么内容?
其实这个文件存放在Spring Boot和Spring Boot autoconfigure的jar包内部(有兴趣的同学可以自行下载jar包并解压查看),Spring Boot中的文件内容如下:
# 完整内容请查看原文件

# Run Listeners
org.springframework.boot.SpringApplicationRunListener=\
org.springframework.boot.context.event.EventPublishingRunListener

# Application Listeners
org.springframework.context.ApplicationListener=\
org.springframework.boot.ClearCachesApplicationListener,\
org.springframework.boot.builder.ParentContextCloserApplicationListener,\
org.springframework.boot.context.FileEncodingApplicationListener,\
org.springframework.boot.context.config.AnsiOutputApplicationListener,\
org.springframework.boot.context.config.ConfigFileApplicationListener,\
org.springframework.boot.context.config.DelegatingApplicationListener,\
org.springframework.boot.context.logging.ClasspathLoggingApplicationListener,\
org.springframework.boot.context.logging.LoggingApplicationListener,\
org.springframework.boot.liquibase.LiquibaseServiceLocatorApplicationListener可以看到SpringApplicationRunListener对应的值是EventPublishingRunListener
回到SpringFactoriesLoader.loadFactoryNames方法内部,可以发现方法获取的值实际上是factoryClass在META-INF/spring.factories中对应的实现类的集合
明白这个方法之后,再回到getSpringFactoriesInstances方法
private <T> Collection<T> getSpringFactoriesInstance(Class<T> type,
        Class<?>[] parameterTypes, Object... args) {
    ClassLoader classLoader = getClassLoader();
    // 获取 SpringApplicationRunListener 对应的实现类的名称集合
    Set<String> names = new LinkedHashSet<>(
            SpringFactoriesLoader.loadFactoryNames(type,classLoader));
    // 通过反射实例化对象
    List<T> instances = createSpringFactoriesInstances(type parameterTypes,
            classLoader, args, names);
    AnnotationAwareOrderComparator.sort(instances);
    return instances;
}到此为止getRunListeners完成了SpringApplicationRunListener对应实现类的实例化,并回调其starting方法
SpringApplicationRunListeners listeners getRunListeners(args);
listeners.starting();从上面分析得知,实际上调用的是EventPublishingRunListener的starting方法,那么方法内部做了什么呢?
public void starting() {
    this.initialMulticaster.multicastEvent(
            new ApplicationStartingEvent(this.application,this.args));
}发送了一个ApplicationStartingEvent事件
继续查找ApplicationStartingEvent事件的消费者,从spring.factories中可以找到所有预定义的事件消费者
# Application Listeners
org.springframework.context.ApplicationListener=\
org.springframework.boot.ClearCachesApplicationListener,\
org.springframework.boot.builder.ParentContextCloserApplicationListener,\
org.springframework.boot.context.FileEncodingApplicationListener,\
org.springframework.boot.context.config.AnsiOutputApplicationListener,\
org.springframework.boot.context.config.ConfigFileApplicationListener,\
org.springframework.boot.context.config.DelegatingApplicationListener,\
org.springframework.boot.context.logging.ClasspathLoggingApplicationListener,\
org.springframework.boot.context.logging.LoggingApplicationListener,\
org.springframework.boot.liquibase.LiquibaseServiceLocatorApplicationListener
# Application Listeners
org.springframework.context.ApplicationListener=\
org.springframework.boot.autoconfigure.BackgroundPreinitializer接下来要做的就是从这些消费者中找出ApplicationStartingEvent事件的消费者(查找过程省略),找到以下两个消费者
LoggingApplicationListener
初始化日志系统LiquibaseServiceLocatorApplicationListener
(参数liquibase.servicelocator.ServiceLocator)如果存在,则使用springboot相关的版本进行替代
了解完ApplicationStartingEvent事件之后,回到run方法继续往下探究prepareEnvironment
private ConfigurableEnvironment prepareEnvironment(
        SpringApplicationRunListeners listeners,
        ApplicationArguments applicationArguments) {
    // 创建Environment对象
    ConfigurableEnvironment environment =getOrCreateEnvironment();
    configureEnvironment(environment,applicationArguments.getSourceArgs());
    // 发布ApplicationEnvironmentPreparedEvent事件
    listeners.environmentPrepared(environment);
    bindToSpringApplication(environment);
    if (!this.isCustomEnvironment) {
        environment = new EnvironmentConverte(getClassLoader())
                .convertEnvironmentIfNecessary(environment,deduceEnvironmentClass());
    }
    ConfigurationPropertySources.attach(environment);
    return environment;
}这里又发布了一个ApplicationEnvironmentPreparedEvent事件,继续查找事件监听对象
- FileEncodingApplicationListener
检查系统文件编码格式是否符合环境变量中配置的文件编码格式(如果存在相关设置 - spring.mandatory-file-encoding),如果编码不符合,则抛出异常阻止Spring启动 - AnsiOutputApplicationListener
是否开启AnsiOutput - DelegatingApplicationListener
代理context.listener.classes配置的监听者 - ClasspathLoggingApplicationListener
日志输出classpath - LoggingApplicationListener
配置日志系统,logging.config, logging.level...等 - ConfigFileApplicationListener
这是一个比较重要的监听对象,具体的方法实现如下
private void onApplicationEnvironmentPreparedEvent(
        ApplicationEnvironmentPreparedEvent event) {
    List<EnvironmentPostProcessor> postProcessors =loadPostProcessors();
    postProcessors.add(this);
    AnnotationAwareOrderComparator.sort(postProcessors);
    for (EnvironmentPostProcessor postProcessor :postProcessors) {
        postProcessor.postProcessEnvironmen(event.getEnvironment(),
                event.getSpringApplication());
    }
}

List<EnvironmentPostProcessor> loadPostProcessors() {
    return SpringFactoriesLoader.loadFactorie(EnvironmentPostProcessor.class,
            getClass().getClassLoader());
}通过spring.factories,可以看到这里加载以下EnvironmentPostProcessor对象
- CloudFoundryVcapEnvironmentPostProcessor
- SpringApplicationJsonEnvironmentPostProcessor
- SystemEnvironmentPropertySourceEnvironmentPostProcessor
- ConfigFileApplicationListener
很多同学可能会疑问ConfigFileApplicationListener并不存在spring.factories文件中,这里为什么会有它呢?
实际上ConfigFileApplicationListener在onApplicationEnvironmentPreparedEvent方法中,将自身添加到EnvironmentPostProcessor对象列表中。
我们主要关注ConfigFileApplicationListener的postProcessEnvironment方法
public void postProcessEnvironment(ConfigurableEnvironmentenvironment,
        SpringApplication application) {
    addPropertySources(environment,application.getResourceLoader());
}
protected void addPropertySources(ConfigurableEnvironmentenvironment,
        ResourceLoader resourceLoader) {
    RandomValuePropertySource.addToEnvironment(environment);
    // 读取applicaiton.yml, application.properties等配置文件
    new Loader(environment, resourceLoader).load();
}
ConfigFileApplicationListener监听到ApplicationEnvironmentPreparedEvent事件之后开始读取本地配置文件
关于Spring如何读取本地配置文件,请前往Spring Boot源码分析-配置文件加载原理
创建ApplicationContext对象
protected ConfigurableApplicationContextcreateApplicationContext() {
    Class<?> contextClass = this.applicationContextClass;
    if (contextClass == null) {
        try {
            // 根据webApplicationType创建对应上下文对象
            switch (this.webApplicationType) {
            case SERVLET:
                contextClass = Class.forNam(DEFAULT_SERVLET_WEB_CONTEXT_CLASS);
                break;
            case REACTIVE:
                contextClass = Class.forNam(DEFAULT_REACTIVE_WEB_CONTEXT_CLASS);
                break;
            default:
                contextClass = Class.forNam(DEFAULT_CONTEXT_CLASS);
            }
        }
        catch (ClassNotFoundException ex) {
            throw new IllegalStateException(
                    "Unable create a defaultApplicationContext, "
                            + "please specify anApplicationContextClass",
                    ex);
        }
    }
    return (ConfigurableApplicationContext)BeanUtils.instantiateClass(contextClass);
}这里是根据webApplicationType决定创建什么类型的ApplicationContext对象,那么webApplicationType是何时赋值的呢?
public SpringApplication(ResourceLoader resourceLoader,Class<?>... primarySources) {
    this.resourceLoader = resourceLoader;
    Assert.notNull(primarySources, "PrimarySources must notbe null");
    this.primarySources = new LinkedHashSet<>(Arrays.asLis(primarySources));
    // 初始化webApplicationType
    this.webApplicationType =WebApplicationType.deduceFromClasspath();
    setInitializers((Collection) getSpringFactoriesInstance(
            ApplicationContextInitializer.class));
    setListeners((Collection) getSpringFactoriesInstance(ApplicationListener.class));
    this.mainApplicationClass = deduceMainApplicationClass(;
}从上面可以看出是通过WebApplicationType.deduceFromClasspath方法初始化的webApplicationType,继续跟踪代码
private static final String WEBFLUX_INDICATOR_CLASS = "org."
            + "springframework.web.reactive.DispatcherHandler";
private static final String WEBMVC_INDICATOR_CLASS = "org.springframework."
            + "web.servlet.DispatcherServlet";
private static final String JERSEY_INDICATOR_CLASS = "org.glassfish.jersey.servlet.ServletContainer";
private static final String[] SERVLET_INDICATOR_CLASSES = { "javax.servlet.Servlet",
            "org.springframework.web.context.ConfigurableWebApplicationContext" };

static WebApplicationType deduceFromClasspath() {
    if (ClassUtils.isPresent(WEBFLUX_INDICATOR_CLASS, null)
            && !ClassUtils.isPresent(WEBMVC_INDICATOR_CLASS null)
            && !ClassUtils.isPresent(JERSEY_INDICATOR_CLASS null)) {
        return WebApplicationType.REACTIVE;
    }
    for (String className : SERVLET_INDICATOR_CLASSES) {
        if (!ClassUtils.isPresent(className, null)) {
            return WebApplicationType.NONE;
        }
    }
    return WebApplicationType.SERVLET;
}从上面代码中可以看出Spring是通过当前classpath下是否存在相应的类,从而决定webApplicationType类型
初始化ApplicationContext对象
private void prepareContext(ConfigurableApplicationContextcontext,
        ConfigurableEnvironment environment,SpringApplicationRunListeners listeners,
        ApplicationArguments applicationArguments, BannerprintedBanner) {
    // 初始化context
    context.setEnvironment(environment);
    postProcessApplicationContext(context);
    applyInitializers(context);
    // 发送ApplicationContextInitializedEvent消息
    listeners.contextPrepared(context);
    if (this.logStartupInfo) {
        logStartupInfo(context.getParent() == null);
        logStartupProfileInfo(context);
    }
    // Add boot specific singleton beans
    ConfigurableListableBeanFactory beanFactory =context.getBeanFactory();
    beanFactory.registerSingleto("springApplicationArguments", applicationArguments);
    if (printedBanner != null) {
        beanFactory.registerSingleton("springBootBanner",printedBanner);
    }
    if (beanFactory instanceof DefaultListableBeanFactory) {
        ((DefaultListableBeanFactory) beanFactory)
                .setAllowBeanDefinitionOverridin(this.allowBeanDefinitionOverriding);
    }
    Set<Object> sources = getAllSources();
    Assert.notEmpty(sources, "Sources must not be empty");
    // 注册DemoApplication
    load(context, sources.toArray(new Object[0]));
    listeners.contextLoaded(context);
}这里注册了DemoApplication到Spring容器中,为后续bean扫描做准备
接下来继续深入refreshContext方法,可以发现实际上是执行了AbstractApplicationContext.refresh方法
public void refresh() throws BeansException,IllegalStateException {
    synchronized (this.startupShutdownMonitor) {
        prepareRefresh();
        ConfigurableListableBeanFactory beanFactory =obtainFreshBeanFactory();
        prepareBeanFactory(beanFactory);
        try {
            postProcessBeanFactory(beanFactory);
            // 完成bean的加载
            invokeBeanFactoryPostProcessors(beanFactory);
            registerBeanPostProcessors(beanFactory);
            initMessageSource();
            initApplicationEventMulticaster();
            onRefresh();
            registerListeners();
            finishBeanFactoryInitialization(beanFactory);
            finishRefresh();
        }
        catch (BeansException ex) {
            if (logger.isWarnEnabled()) {
                logger.warn("Exception encountered duringcontext initialization - " +
                        "cancelling refresh attempt: " + ex;
            }
            destroyBeans();
            cancelRefresh(ex);
            throw ex;
        }
        finally {
            resetCommonCaches();
        }
    }
}refresh方法内部做了很多事情。比如:完成BeanFactory设置,BeanFactoryPostProcessor、BeanPostProcessor接口回调,Bean加载,国际化配置等。
到此为止Spring基本完成了容器的初始化工作,最后在调用callRunners方法,执行ApplicationRunner、CommandLineRunner接口。
private void callRunners(ApplicationContext context,ApplicationArguments args) {
    List<Object> runners = new ArrayList<>();
    runners.addAll(context.getBeansOfTyp(ApplicationRunner.class).values());
    runners.addAll(context.getBeansOfTyp(CommandLineRunner.class).values());
    AnnotationAwareOrderComparator.sort(runners);
    for (Object runner : new LinkedHashSet<>(runners)) {
        if (runner instanceof ApplicationRunner) {
            callRunner((ApplicationRunner) runner, args);
        }
        if (runner instanceof CommandLineRunner) {
            callRunner((CommandLineRunner) runner, args);
        }
    }
}整个启动过程的核心方法是refresh,此方法内部承载大部分容器启动所需的工作。由于篇幅原因,后续再进行refresh内部源码分析,了解Spring Boot加载Bean的整个过程。
本文由博客一文多发平台 OpenWrite 发布!
Spring Boot源码分析-启动过程的更多相关文章
- Spring Boot源码分析-配置文件加载原理
在Spring Boot源码分析-启动过程中我们进行了启动源码的分析,大致了解了整个Spring Boot的启动过程,具体细节这里不再赘述,感兴趣的同学可以自行阅读.今天让我们继续阅读源码,了解配置文 ...
- 精尽Spring Boot源码分析 - SpringApplication 启动类的启动过程
该系列文章是笔者在学习 Spring Boot 过程中总结下来的,里面涉及到相关源码,可能对读者不太友好,请结合我的源码注释 Spring Boot 源码分析 GitHub 地址 进行阅读 Sprin ...
- 精尽Spring Boot源码分析 - Jar 包的启动实现
该系列文章是笔者在学习 Spring Boot 过程中总结下来的,里面涉及到相关源码,可能对读者不太友好,请结合我的源码注释 Spring Boot 源码分析 GitHub 地址 进行阅读 Sprin ...
- 精尽Spring Boot源码分析 - 序言
该系列文章是笔者在学习 Spring Boot 过程中总结下来的,里面涉及到相关源码,可能对读者不太友好,请结合我的源码注释 Spring Boot 源码分析 GitHub 地址 进行阅读 Sprin ...
- 精尽Spring Boot源码分析 - 文章导读
该系列文章是笔者在学习 Spring Boot 过程中总结下来的,里面涉及到相关源码,可能对读者不太友好,请结合我的源码注释 Spring Boot 源码分析 GitHub 地址 进行阅读 Sprin ...
- 精尽Spring Boot源码分析 - 内嵌Tomcat容器的实现
该系列文章是笔者在学习 Spring Boot 过程中总结下来的,里面涉及到相关源码,可能对读者不太友好,请结合我的源码注释 Spring Boot 源码分析 GitHub 地址 进行阅读 Sprin ...
- 精尽Spring Boot源码分析 - 支持外部 Tomcat 容器的实现
该系列文章是笔者在学习 Spring Boot 过程中总结下来的,里面涉及到相关源码,可能对读者不太友好,请结合我的源码注释 Spring Boot 源码分析 GitHub 地址 进行阅读 Sprin ...
- 精尽Spring Boot源码分析 - 剖析 @SpringBootApplication 注解
该系列文章是笔者在学习 Spring Boot 过程中总结下来的,里面涉及到相关源码,可能对读者不太友好,请结合我的源码注释 Spring Boot 源码分析 GitHub 地址 进行阅读 Sprin ...
- 精尽Spring Boot源码分析 - 配置加载
该系列文章是笔者在学习 Spring Boot 过程中总结下来的,里面涉及到相关源码,可能对读者不太友好,请结合我的源码注释 Spring Boot 源码分析 GitHub 地址 进行阅读 Sprin ...
随机推荐
- ACM之路(14)—— 线段树的日常(上)
我的线段树简直有毒,各种错误都能忙上半天.做了kuangbin的线段树专题的一半,还有一半留到以后去做. 链接:http://acm.hust.edu.cn/vjudge/contest/view.a ...
- AD域渗透总结
域渗透总结 学习并做了一段时间域网络渗透,给我直观的感受就是思路问题和耐心,这个不像技术研究,需要对一个点进行研究,而是遇到问题后要从多个方面思考,寻找"捷径"思路,只要思路正确, ...
- Leetcode题目200.岛屿数量(BFS+DFS+并查集-中等)
题目描述: 给定一个由 '1'(陆地)和 '0'(水)组成的的二维网格,计算岛屿的数量.一个岛被水包围,并且它是通过水平方向或垂直方向上相邻的陆地连接而成的.你可以假设网格的四个边均被水包围. 示例 ...
- js获取整个屏幕的尺寸
原文 首先获取屏幕宽度:window.screen.width; //整个屏幕的宽度. 然后获取屏幕高度:window.screen.height; //整个屏幕的高度. 获取可用工作区 ...
- JVM | JVM的核心技术
说到JVM,很多工作多年的老铁,可能就有点发憷了,因为搬砖多年,一直使用java这个工具,对于JVM没有了解过,有句话面试造航母,上班拧螺丝,要啥自行车啊,知道如何搬砖就可以了,为啥要懂这么多,如果你 ...
- [z]curl使用指南
https://www.jianshu.com/p/fc0eb6c60816 curl -X POST "http://aa/bb/cc" -H "accept:*/* ...
- WPF下如何去除WebBrowser的滚动条和捕获关闭事件
方法一:适用于VS2008 1.在解决方案中添加“引用” 选择 COM 下的 Microsoft html object library 2.引入命名空间 using mshtml; ...
- Http_urllib2
打印http消息在控制台httpHandler=urllib2.HTTPHandler(debuglevel=1)httpsHandler = urllib2.HTTPSHandler(debugle ...
- JAVA 基础编程练习题1 【程序 1 不死神兔】
1 [程序 1 不死神兔] 题目:古典问题:有一对兔子,从出生后第 3 个月起每个月都生一对兔子,小兔子长到第三个月后每个月 又生一对兔子,假如兔子都不死,问每个月的兔子对数为多少? 程序分析: 兔子 ...
- 【VS开发】使用CTabView分割多页卡窗口
一般书中介绍的是使用CSplitterWnd来拆分窗口实现多视图,CSplitterWnd中的CreateClient可以保存其创建的pCreateContext指针,以便子视图共享Document. ...