
opencv之dlib库人脸识别
基础知识
python知识:
  import os,shutil
  shutil.rmtree("C:\\Users\\yangwj\\Desktop\\test")  #删除目录
  os.remove("C:\\Users\\yangwj\\Desktop\\replay_pid28076.log") # 删除文件
  os.path.isfile() #  判断是否为文件
  os.listdir()  # 列出路径下的目录
1、从摄像头获取人脸图片
import dlib         # 人脸处理的库 Dlib

import numpy as np  # 数据处理的库 Numpy

import cv2          # 图像处理的库 OpenCv

import os           # 读写文件

import shutil       # 读写文件

# Dlib 正向人脸检测器 / frontal face detector

detector = dlib.get_frontal_face_detector()

# Dlib 68 点特征预测器 / 68 points features predictor

predictor = dlib.shape_predictor('data/data_dlib/shape_predictor_68_face_landmarks.dat')

# OpenCv 调用摄像头 use camera

cap = cv2.VideoCapture(0)

# 设置视频参数 set camera

cap.set(3, 480)

# 人脸截图的计数器 the counter for screen shoot

cnt_ss = 0

# 存储人脸的文件夹 the folder to save faces

current_face_dir = ""

# 保存 faces images 的路径 the directory to save images of faces

path_photos_from_camera = "data/data_faces_from_camera/"

# 新建保存人脸图像文件和数据CSV文件夹

# mkdir for saving photos and csv

def pre_work_mkdir():

    # 新建文件夹 / make folders to save faces images and csv

    if os.path.isdir(path_photos_from_camera):

        pass

    else:

        os.mkdir(path_photos_from_camera)

pre_work_mkdir()

##### optional/可选, 默认关闭 #####

# 删除之前存的人脸数据文件夹

# delete the old data of faces

def pre_work_del_old_face_folders():

    # 删除之前存的人脸数据文件夹

    # 删除 "/data_faces_from_camera/person_x/"...

    folders_rd = os.listdir(path_photos_from_camera)

    for i in range(len(folders_rd)):

        shutil.rmtree(path_photos_from_camera+folders_rd[i])

    if os.path.isfile("data/features_all.csv"):

        os.remove("data/features_all.csv")

# 这里在每次程序录入之前, 删掉之前存的人脸数据

# 如果这里打开,每次进行人脸录入的时候都会删掉之前的人脸图像文件夹 person_1/,person_2/,person_3/...

# If enable this function, it will delete all the old data in dir person_1/,person_2/,/person_3/...

# pre_work_del_old_face_folders()

##################################

# 如果有之前录入的人脸 / if the old folders exists

# 在之前 person_x 的序号按照 person_x+1 开始录入 / start from person_x+1

if os.listdir(path_photos_from_camera):

    # 获取已录入的最后一个人脸序号 / get the num of latest person

    person_list = os.listdir(path_photos_from_camera)

    person_num_list = []

    for person in person_list:

        person_num_list.append(int(person.split('_')[-1]))

    person_cnt = max(person_num_list)

# 如果第一次存储或者没有之前录入的人脸, 按照 person_1 开始录入

# start from person_1

else:

    person_cnt = 0

# 之后用来控制是否保存图像的 flag / the flag to control if save

save_flag = 1

# 之后用来检查是否先按 'n' 再按 's' / the flag to check if press 'n' before 's'

press_n_flag = 0

while cap.isOpened():

    flag, img_rd = cap.read()

    # print(img_rd.shape)

    # It should be 480 height * 640 width

    kk = cv2.waitKey(1)

    img_gray = cv2.cvtColor(img_rd, cv2.COLOR_RGB2GRAY)

    # 人脸数 faces

    faces = detector(img_gray, 0)

    # 待会要写的字体 / font to write

    font = cv2.FONT_HERSHEY_COMPLEX

    # 按下 'n' 新建存储人脸的文件夹 / press 'n' to create the folders for saving faces

    if kk == ord('n'):

        person_cnt += 1

        print("请输入名字")

        person_name = input()

        current_face_dir = path_photos_from_camera + "person_" + str(person_cnt)

        os.makedirs(current_face_dir)

        print('\n')

        print("新建的人脸文件夹 / Create folders: ", current_face_dir)

        cnt_ss = 0              # 将人脸计数器清零 / clear the cnt of faces

        press_n_flag = 1        # 已经按下 'n' / have pressed 'n'

    # 检测到人脸 / if face detected

    if len(faces) != 0:

        # 矩形框 / show the rectangle box

        for k, d in enumerate(faces):

            # 计算矩形大小

            # we need to compute the width and height of the box

            # (x,y), (宽度width, 高度height)

            pos_start = tuple([d.left(), d.top()])

            pos_end = tuple([d.right(), d.bottom()])

            # 计算矩形框大小 / compute the size of rectangle box

            height = (d.bottom() - d.top())

            width = (d.right() - d.left())

            hh = int(height/2)

            ww = int(width/2)

            # 设置颜色 / the color of rectangle of faces detected

            color_rectangle = (255, 255, 255)

            # 判断人脸矩形框是否超出 480x640

            if (d.right()+ww) > 640 or (d.bottom()+hh > 480) or (d.left()-ww < 0) or (d.top()-hh < 0):

                cv2.putText(img_rd, "OUT OF RANGE", (20, 300), font, 0.8, (0, 0, 255), 1, cv2.LINE_AA)

                color_rectangle = (0, 0, 255)

                save_flag = 0

                if kk == ord('s'):

                    print("请调整位置 / Please adjust your position")

            else:

                color_rectangle = (255, 255, 255)

                save_flag = 1

            # TODO 可以考虑不减 ,看效果---->结果是只有脸部图像

            cv2.rectangle(img_rd,

                          tuple([d.left() - ww, d.top() - hh]),

                          tuple([d.right() + ww, d.bottom() + hh]),

                          color_rectangle, 2)

            # 根据人脸大小生成空的图像 / create blank image according to the size of face detected

            im_blank = np.zeros((int(height*2), width*2, 3), np.uint8)

            if save_flag:

                # 按下 's' 保存摄像头中的人脸到本地 / press 's' to save faces into local images

                if kk == ord('s'):

                    # 检查有没有先按'n'新建文件夹 / check if you have pressed 'n'

                    if press_n_flag:

                        cnt_ss += 1

                        for ii in range(height*2):

                            for jj in range(width*2):

                                # 将人脸图像填充到空图像中

                                im_blank[ii][jj] = img_rd[d.top()-hh + ii][d.left()-ww + jj]

                        cv2.imwrite(current_face_dir + "/img_face_" + str(cnt_ss) + ".jpg", im_blank)

                        print("写入本地 / Save into:", str(current_face_dir) + "/img_face_" + str(cnt_ss) + ".jpg")

                    else:

                        print("请在按 'S' 之前先按 'N' 来建文件夹 / Please press 'N' before 'S'")

    # 显示人脸数 / show the numbers of faces detected

    cv2.putText(img_rd, "Faces: " + str(len(faces)), (20, 100), font, 0.8, (0, 255, 0), 1, cv2.LINE_AA)

    # 添加说明 / add some statements

    cv2.putText(img_rd, "Face Register", (20, 40), font, 1, (0, 0, 0), 1, cv2.LINE_AA)

    cv2.putText(img_rd, "N: New face folder", (20, 350), font, 0.8, (0, 0, 0), 1, cv2.LINE_AA)

    cv2.putText(img_rd, "S: Save current face", (20, 400), font, 0.8, (0, 0, 0), 1, cv2.LINE_AA)

    cv2.putText(img_rd, "Q: Quit", (20, 450), font, 0.8, (0, 0, 0), 1, cv2.LINE_AA)

    # 按下 'q' 键退出 / press 'q' to exit

    if kk == ord('q'):

        break

    # 如果需要摄像头窗口大小可调 / uncomment this line if you want the camera window is resizeable

    # cv2.namedWindow("camera", 0)

    cv2.imshow("camera", img_rd)

# 释放摄像头 / release camera

cap.release()

cv2.destroyAllWindows()
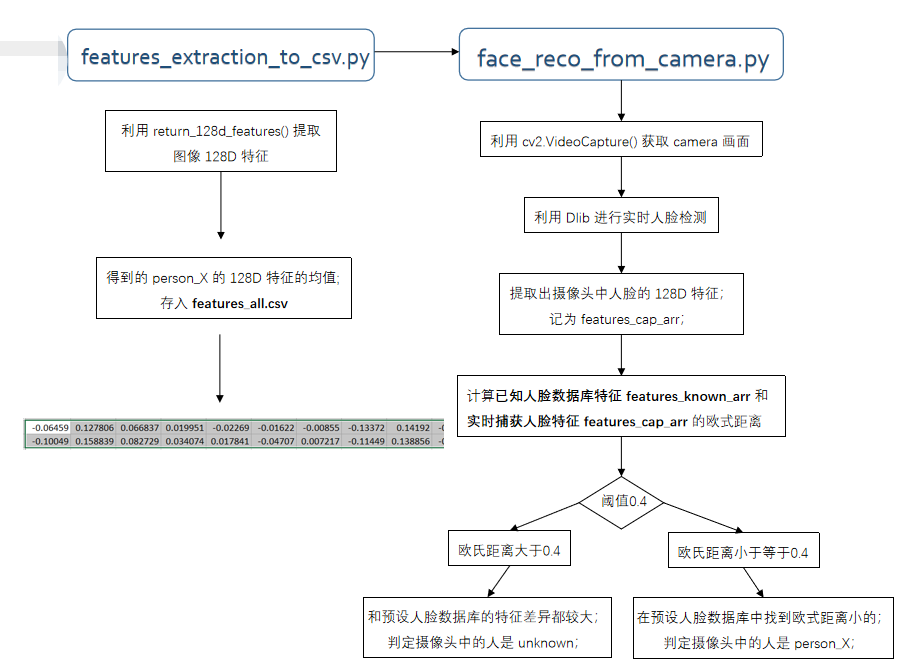
2、将获取的人脸图片转为csv文件
import cv2

import os

import dlib

from skimage import io

import csv

import numpy as np

# 要读取人脸图像文件的路径q

path_images_from_camera = "data/data_faces_from_camera/"

# Dlib 正向人脸检测器

detector = dlib.get_frontal_face_detector()

# Dlpredictorib 人脸预测器

predictor = dlib.shape_predictor("data/data_dlib/shape_predictor_68_face_landmarks.dat")

# Dlib 人脸识别模型

# Face recognition model, the object maps human faces into 128D vectors

#  shape_predictor_68_face_landmarks.dat

face_rec = dlib.face_recognition_model_v1("data/data_dlib/dlib_face_recognition_resnet_model_v1.dat")

# 返回单张图像的 128D 特征

def return_128d_features(path_img):

    img_rd = io.imread(path_img)

    img_gray = cv2.cvtColor(img_rd, cv2.COLOR_BGR2RGB)

    faces = detector(img_gray, 1)

    print("%-40s %-20s" % ("检测到人脸的图像 / image with faces detected:", path_img), '\n')

    # 因为有可能截下来的人脸再去,检测不出检测来人脸了

    # 所以要确保是 检测到人脸的人脸图像 拿去算特征

    if len(faces) != 0:

        shape = predictor(img_gray, faces[0])

        face_descriptor = face_rec.compute_face_descriptor(img_gray, shape)

        print("faces")

    else:

        face_descriptor = 0

        print("no face")

    return face_descriptor

# 将文件夹中照片特征提取出来, 写入 CSV

def return_features_mean_personX(path_faces_personX):

    features_list_personX = []

    photos_list = os.listdir(path_faces_personX)

    if photos_list:

        for i in range(len(photos_list)):

            # 调用return_128d_features()得到128d特征

            print("%-40s %-20s" % ("正在读的人脸图像 / image to read:", path_faces_personX + "/" + photos_list[i]))

            features_128d = return_128d_features(path_faces_personX + "/" + photos_list[i])

            #  print(features_128d)

            # 遇到没有检测出人脸的图片跳过

            if features_128d == 0:

                continue

            else:

                features_list_personX.append(features_128d)

    else:

        print("文件夹内图像文件为空 / Warning: No images in " + path_faces_personX + '/', '\n')

    # 计算 128D 特征的均值

    # personX 的 N 张图像 x 128D -> 1 x 128D

    if features_list_personX:

        features_mean_personX = np.array(features_list_personX).mean(axis=0)

    else:

        features_mean_personX = ''

    return features_mean_personX

# 获取已录入的最后一个人脸序号 / get the num of latest person

person_list = os.listdir("data/data_faces_from_camera/")

person_num_list = []

for person in person_list:

    person_num_list.append(int(person.split('_')[-1]))

person_cnt = max(person_num_list)

with open("data/features_all.csv", "w", newline="") as csvfile:

    writer = csv.writer(csvfile)

    for person in range(person_cnt):

        # Get the mean/average features of face/personX, it will be a list with a length of 128D

        print(path_images_from_camera + "person_"+str(person+1))

        features_mean_personX = return_features_mean_personX(path_images_from_camera + "person_"+str(person+1))

        writer.writerow(features_mean_personX)

        print("特征均值 / The mean of features:", list(features_mean_personX))

        print('\n')

    print("所有录入人脸数据存入 / Save all the features of faces registered into: data/features_all.csv")
3、人脸识别
import dlib          # 人脸处理的库 Dlib

import numpy as np   # 数据处理的库 numpy

import cv2           # 图像处理的库 OpenCv

import pandas as pd  # 数据处理的库 Pandas

# 人脸识别模型,提取128D的特征矢量

# face recognition model, the object maps human faces into 128D vectors

# Refer this tutorial: http://dlib.net/python/index.html#dlib.face_recognition_model_v1

facerec = dlib.face_recognition_model_v1("data/data_dlib/dlib_face_recognition_resnet_model_v1.dat")

# 计算两个128D向量间的欧式距离

# compute the e-distance between two 128D features

def return_euclidean_distance(feature_1, feature_2):

    feature_1 = np.array(feature_1)

    feature_2 = np.array(feature_2)

    dist = np.sqrt(np.sum(np.square(feature_1 - feature_2)))

    return dist

# 处理存放所有人脸特征的 csv

path_features_known_csv = "data/features_all.csv"

csv_rd = pd.read_csv(path_features_known_csv, header=None)

# 用来存放所有录入人脸特征的数组

# the array to save the features of faces in the database

features_known_arr = []

# 读取已知人脸数据

# print known faces

for i in range(csv_rd.shape[0]):

    features_someone_arr = []

    for j in range(0, len(csv_rd.ix[i, :])):

        features_someone_arr.append(csv_rd.ix[i, :][j])

    features_known_arr.append(features_someone_arr)

print("Faces in Database:", len(features_known_arr))

# Dlib 检测器和预测器

# The detector and predictor will be used

detector = dlib.get_frontal_face_detector()

predictor = dlib.shape_predictor('data/data_dlib/shape_predictor_68_face_landmarks.dat')

# 创建 cv2 摄像头对象

# cv2.VideoCapture(0) to use the default camera of PC,

# and you can use local video name by use cv2.VideoCapture(filename)

cap = cv2.VideoCapture(0)

# cap.set(propId, value)

# 设置视频参数,propId 设置的视频参数,value 设置的参数值

cap.set(3, 480)

# cap.isOpened() 返回 true/false 检查初始化是否成功

# when the camera is open

while cap.isOpened():

    flag, img_rd = cap.read()

    kk = cv2.waitKey(1)

    # 取灰度

    img_gray = cv2.cvtColor(img_rd, cv2.COLOR_RGB2GRAY)

    # 人脸数 faces

    faces = detector(img_gray, 0)

    # 待会要写的字体 font to write later

    font = cv2.FONT_HERSHEY_COMPLEX

    # 存储当前摄像头中捕获到的所有人脸的坐标/名字

    # the list to save the positions and names of current faces captured

    pos_namelist = []

    name_namelist = []

    # 按下 q 键退出

    # press 'q' to exit

    if kk == ord('q'):

        break

    else:

        # 检测到人脸 when face detected

        if len(faces) != 0:

            # 获取当前捕获到的图像的所有人脸的特征,存储到 features_cap_arr

            # get the features captured and save into features_cap_arr

            features_cap_arr = []

            for i in range(len(faces)):

                shape = predictor(img_rd, faces[i])

                features_cap_arr.append(facerec.compute_face_descriptor(img_rd, shape))

            # 遍历捕获到的图像中所有的人脸

            # traversal all the faces in the database

            for k in range(len(faces)):

                print("##### camera person", k+1, "#####")

                # 让人名跟随在矩形框的下方

                # 确定人名的位置坐标

                # 先默认所有人不认识,是 unknown

                # set the default names of faces with "unknown"

                name_namelist.append("unknown")

                # 每个捕获人脸的名字坐标 the positions of faces captured

                pos_namelist.append(tuple([faces[k].left(), int(faces[k].bottom() + (faces[k].bottom() - faces[k].top())/4)]))

                # 对于某张人脸,遍历所有存储的人脸特征

                # for every faces detected, compare the faces in the database

                e_distance_list = []

                for i in range(len(features_known_arr)):

                    # 如果 person_X 数据不为空

                    if str(features_known_arr[i][0]) != '0.0':

                        print("with person", str(i + 1), "the e distance: ", end='')

                        e_distance_tmp = return_euclidean_distance(features_cap_arr[k], features_known_arr[i])

                        print(e_distance_tmp)

                        e_distance_list.append(e_distance_tmp)

                    else:

                        # 空数据 person_X

                        e_distance_list.append(999999999)

                # Find the one with minimum e distance

                similar_person_num = e_distance_list.index(min(e_distance_list))

                print("Minimum e distance with person", int(similar_person_num)+1)

                if min(e_distance_list) < 0.4:

                    # 在这里修改 person_1, person_2 ... 的名字

                    # 可以在这里改称 Jack, Tom and others

                    # Here you can modify the names shown on the camera

                    name_namelist[k] = "Person "+str(int(similar_person_num)+1)

                    print("May be person "+str(int(similar_person_num)+1))

                else:

                    print("Unknown person")

                # 矩形框

                # draw rectangle

                for kk, d in enumerate(faces):

                    # 绘制矩形框

                    cv2.rectangle(img_rd, tuple([d.left(), d.top()]), tuple([d.right(), d.bottom()]), (0, 255, 255), 2)

                print('\n')

            # 在人脸框下面写人脸名字

            # write names under rectangle

            for i in range(len(faces)):

                cv2.putText(img_rd, name_namelist[i], pos_namelist[i], font, 0.8, (0, 255, 255), 1, cv2.LINE_AA)

    print("Faces in camera now:", name_namelist, "\n")

    cv2.putText(img_rd, "Press 'q': Quit", (20, 450), font, 0.8, (84, 255, 159), 1, cv2.LINE_AA)

    cv2.putText(img_rd, "Face Recognition", (20, 40), font, 1, (0, 0, 0), 1, cv2.LINE_AA)

    cv2.putText(img_rd, "Faces: " + str(len(faces)), (20, 100), font, 1, (0, 0, 255), 1, cv2.LINE_AA)

    # 窗口显示 show with opencv

    cv2.imshow("camera", img_rd)

# 释放摄像头 release camera

cap.release()

# 删除建立的窗口 delete all the windows

cv2.destroyAllWindows()
完毕!
声明:代码是github以为博主的,本人只是拿着学习人脸识别,为了尊重博主,贴出其代码地址:https://github.com/coneypo/Dlib_face_recognition_from_camera
opencv之dlib库人脸识别的更多相关文章
- OpenCV 和 Dlib 人脸识别基础
00 环境配置 Anaconda 安装 1 下载 https://repo.anaconda.com/archive/ 考虑到兼容性问题,推荐下载Anaconda3-5.2.0版本. 2 安装 3 测 ...
- 写个神经网络,让她认得我`(๑•ᴗ•๑)(Tensorflow,opencv,dlib,cnn,人脸识别)
训练一个神经网络 能让她认得我 阅读原文 这段时间正在学习tensorflow的卷积神经网络部分,为了对卷积神经网络能够有一个更深的了解,自己动手实现一个例程是比较好的方式,所以就选了一个这样比较有点 ...
- Opencv与dlib联合进行人脸关键点检测与识别
前言 依赖库:opencv 2.4.9 /dlib 19.0/libfacedetection 本篇不记录如何配置,重点在实现上.使用libfacedetection实现人脸区域检测,联合dlib标记 ...
- Python 实现的猫脸识别、人脸识别器。
代码地址如下:http://www.demodashi.com/demo/13071.html 前言: OpenCV是开源的跨平台计算机视觉库,提供了Python等语言的接口,实现了图像处理和计算机视 ...
- 05-人脸识别-FaceNet的感性认识
源码链接:https://github.com/davidsandberg/facenet 论文链接:https://arxiv.org/pdf/1503.03832.pdf B站大神视频解读论文:h ...
- OpenCV/Python/dlib眨眼检测
今天我们来使用面部标志和OpenCV 检测和计算视频流中的眨眼次数. 为了构建我们的眨眼检测器,我们将计算一个称为眼睛纵横比(EAR)的指标,由Soukupová和Čech在其2016年的论文&quo ...
- 利用face_recognition,dlib与OpenCV调用摄像头进行人脸识别
用已经搭建好 face_recognition,dlib 环境来进行人脸识别 未搭建好环境请参考:https://www.cnblogs.com/guihua-pingting/p/12201077. ...
- OpenCV学习 物体检测 人脸识别 填充颜色
介绍 OpenCV是开源计算机视觉和机器学习库.包含成千上万优化过的算法.项目地址:http://opencv.org/about.html.官方文档:http://docs.opencv.org/m ...
- 基于QT和OpenCV的人脸检測识别系统(2)
紧接着上一篇博客的讲 第二步是识别部分 人脸识别 把上一阶段检測处理得到的人脸图像与数据库中的已知 人脸进行比对,判定人脸相应的人是谁(此处以白色文本显示). 人脸预处理 如今你已经得到一张人脸,你能 ...
随机推荐
- Linux网络编程综合运用之MiniFtp实现(五)
转眼兴奋的五一小长假就要到来了,在放假前夕还是需要保持一颗淡定的心,上次中已经对miniFTP有基础框架进行了搭建,这次继续进行往上加代码,这次主要还是将经历投射到handle_child()服务进程 ...
- 哈希表(python)
# -*- coding: utf-8 -*- class Array(object): def __init__(self, size=32, init=None): self._size = si ...
- IntelliJ IDEA如何默认使用阿里云的Maven仓库
点击IntelliJ IDEA的config中的setting选项 在<mirrors>节点中加上一个子节点,然后保存即可: <mirror> <id>alimav ...
- TODO: Android UI测试 UIAutomator
前几天跑了一下UIAutomator的demo,忘记写下来了...真的日,有点忘了都. 待填坑
- 一、XML DOM、XMLDocument
一.XML DOM概述 XML 文档大小写敏感.属性用引号括起来,每一个标记都要闭合. DOM是XML文档的内存中树状的表示形式. 继承关系图: XmlNode;//XML节点 ......XmlDo ...
- Longest Continuous Increasing Subsequence
Description Give an integer array,find the longest increasing continuous subsequence in this array. ...
- SublimeCodeIntel 所有代码提示和补全插件 All Autocomplete 插件搜索所有打开的文件来寻找匹配的提示词
SublimeCodeIntelSublimeCodeIntel 作为一个代码提示和补全插件,支持 JavaScript.Mason.XBL.XUL.RHTML.SCSS.Python.HTML.Ru ...
- javascript权威指南第12章DOM2 DOM3 示例代码
<html xmlns="http://www.w3.org/1999/xhtml"> <head> <title> Example XHTML ...
- 【安卓笔记】Android保持Session
简介: Session的概念在Android开发中遇到概率还是比较少,之前遇到一个项目的登陆接口返回不是Token,而且自己需要和服务端保持是Session,虽然这种情景很少,但是有时候后端有这种要求 ...
- Oracle11g 新特性之动态变量窥视
从11g開始,这个尴尬的问题開始得到了改善.因此从11g開始,引入了所谓的自适应游标共享(Adaptive Cursor Sharing).该特性是一个很复杂的技术,用来平衡游标共享和SQL优化这两个 ...