【原创】go语言学习(二十)并发编程
目录
- 并发和并行
- Goroutine初探
- Goroutine实战
- Goroutine原理浅析
- Channel介绍
- Waitgroup介绍
- Workerpool的实现
并发和并行
1、概念
A. 并发:同一时间段内执行多个操作。
B. 并行:同一时刻执行多个操作。

Goroutine初探
1、多线程
A. 线程是由操作系统进行管理,也就是处于内核态。
B. 线程之间进行切换,需要发生用户态到内核态的切换。
C. 当系统中运行大量线程,系统会变的非常慢。
D. 用户态的线程,支持大量线程创建。也叫协程或goroutine。
2、 创建goroutine
package main

import (

    "fmt"

)

func hello() {

    fmt.Println("Hello world goroutine")

}

func main() {

    go hello()

    fmt.Println("main function")

}
3、修复代码:主进程存在,goroutine才能执行。
package main

import (

    "fmt“

    “time”

)

func hello() {

    fmt.Println("Hello world goroutine")

}

func main() {

    go hello()

    time.Sleep(1*time.Second)

    fmt.Println("main function")

}
Goroutine实战
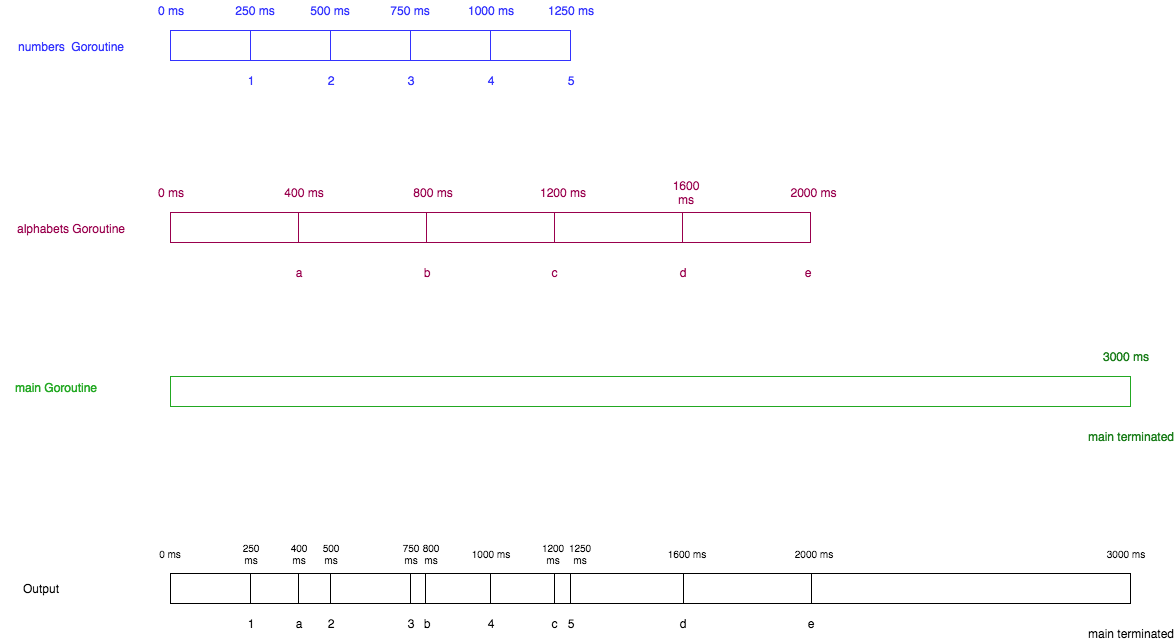
1、 启动多个goroutine
package main

import (

    "fmt"

    "time"

)

func numbers() {

    for i := 1; i <= 5; i++ {

        time.Sleep(250 * time.Millisecond)

        fmt.Printf("%d ", i)

    }

}

func alphabets() {

    for i := 'a'; i <= 'e'; i++ {

        time.Sleep(400 * time.Millisecond)

        fmt.Printf("%c ", i)

    }

}

func main() {

    go numbers()

    go alphabets()

    time.Sleep(3000 * time.Millisecond)

    fmt.Println("main terminated")

}
2、程序分析
3、 多核控制
A. 通过runtime包进行多核设置
B. GOMAXPROCS设置当前程序运行时占用的cpu核数
C. NumCPU获取当前系统的cpu核数
package main

import (

	"fmt"

	"time"

)

func hello(i int) {

	fmt.Println("hello goroutine", i)

}

func main() {

	//runtime.GOMAXPROCS(1)

	//fmt.Println(runtime.NumCPU())

	//单线程

	//hello()

	//fmt.Println("mainthread terminate")

	// go 多线程

	//go hello()

	//fmt.Println("mainthread terminate")

	//time.Sleep(time.Second)

	for i := 0; i < 10; i++ {

		go hello(i)

	}

	time.Sleep(time.Second)

}
Goroutine原理浅析
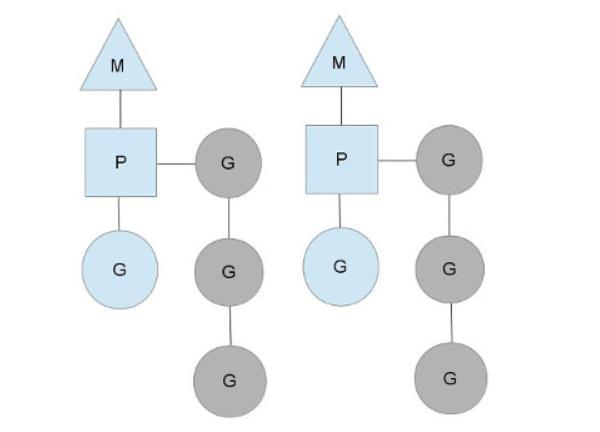
1、模型抽象
A. 操作系统线程: M
B. 用户态线程(goroutine): G
C. 上下文对象:P

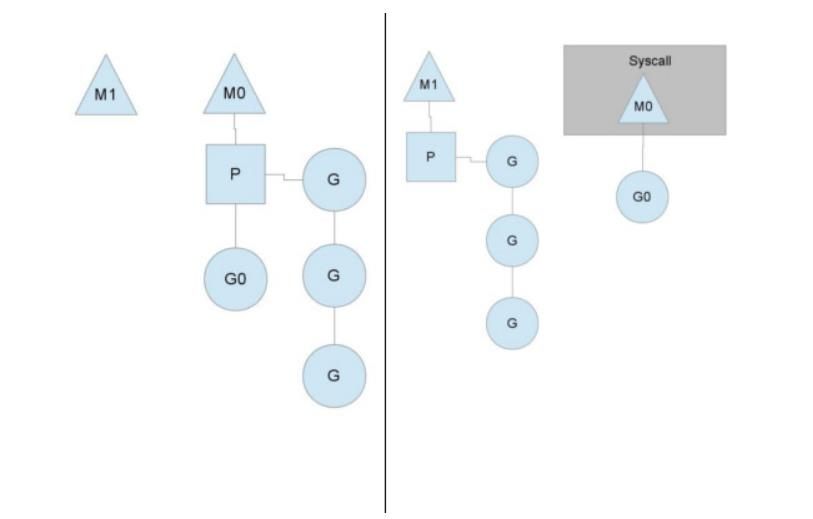
2、goroutine调度
3、系统调用怎么处理
Channel介绍
1、channel介绍
A. 本质上就是一个队列,是一个容器
B. 因此定义的时候,需要只定容器中元素的类型
C. var 变量名 chan 数据类型
package main

import "fmt"

func main() {

    var a chan int

    if a == nil {

        fmt.Println("channel a is nil, going to define it")

        a = make(chan int)

        fmt.Printf("Type of a is %T", a)

    }

}
2、元素入队和出队
A. 入队操作,a <- 100
B. 出队操作:data := <- a
package channel

import "fmt"

// 管道

func main() {

	var c chan int

	fmt.Printf("c=%v", c)

	// 初始化通道int型,10个元素

	c = make(chan int, 10)

	fmt.Printf("c=%v", c)

	// 插入数据

	c <- 100

	/*

		// 读取数据

		data := <- c

		fmt.Printf("data:%v\n", data)

	*/

	// 丢弃元素

	<-c

}
3、阻塞chan
package main

import "fmt"

func main() {

    var a chan int

    if a == nil {

        fmt.Println("channel a is nil, going to define it")

        a = make(chan int)

        a <- 10

        fmt.Printf("Type of a is %T", a)

    }

}
4、使用chan来进行goroutine同步
package main

import (

"fmt"

)

func hello(done chan bool) {

    fmt.Println("Hello world goroutine")

    done <- true

}

func main() {

    done := make(chan bool)

    go hello(done)

    <-done

    fmt.Println("main function")

}
5、使用chan来进行goroutine同步
package main

import (

    "fmt"

    "time"

)

func hello(done chan bool) {

    fmt.Println("hello go routine is going to sleep")

    time.Sleep(4 * time.Second)

    fmt.Println("hello go routine awake and going to write to done")

    done <- true

}

func main() {

    done := make(chan bool)

    fmt.Println("Main going to call hello go goroutine")

    go hello(done)

    <-done

    fmt.Println("Main received data")

}
6、单向chan
package main

import "fmt"

func sendData(sendch chan<- int) {

    sendch <- 10

}

func readData(sendch <-chan int) {

    sendch <- 10

}

func main() {

    chnl := make(chan int)

    go sendData(chnl)

    readData(chn1)

}
7、chan关闭
package main

import (

    "fmt"

)

func producer(chnl chan int) {

    for i := 0; i < 10; i++ {

        chnl <- i

    }

    close(chnl)

}

func main() {

    ch := make(chan int)

    go producer(ch)

    for {

        v, ok := <-ch

        if ok == false {

            break

        }

        fmt.Println("Received ", v, ok)

    }

}
8、 for range操作
package main

import (

    "fmt"

)

func producer(chnl chan int) {

    for i := 0; i < 10; i++ {

        chnl <- i

    }

    close(chnl)

}

func main() {

    ch := make(chan int)

    go producer(ch)

    for v := range ch {

        fmt.Println("Received ",v)

    }

}
9、 带缓冲区的chanel
A. Ch := make(chan type, capacity)
package main

import (

    "fmt"

)

func main() {

    ch := make(chan string, 2)

    ch <- “hello"

    ch <- “world"

    fmt.Println(<- ch)

    fmt.Println(<- ch)

}
package main

import (

    "fmt"

    "time"

)

func write(ch chan int) {

    for i := 0; i < 5; i++ {

        ch <- i

        fmt.Println("successfully wrote", i, "to ch")

    }

    close(ch)

}

func main() {

    ch := make(chan int, 2)

    go write(ch)

    time.Sleep(2 * time.Second)

    for v := range ch {

        fmt.Println("read value", v,"from ch")

        time.Sleep(2 * time.Second)

    }

}
10、channel的长度和容量
A. Ch := make(chan type, capacity)
package main

import (

    "fmt"

)

func main() {

    ch := make(chan string, 3)

    ch <- "naveen"

    ch <- "paul"

    fmt.Println("capacity is", cap(ch))

    fmt.Println("length is", len(ch))

    fmt.Println("read value", <-ch)

    fmt.Println("new length is", len(ch))

}
Waitgroup介绍
1、 如何等待一组goroutine结束?
A. 方法一,使用不带缓冲区的channel实现
package main

import (

    "fmt"

    "time"

)

func process(i int, ch chan bool) {

    fmt.Println("started Goroutine ", i)

    time.Sleep(2 * time.Second)

    fmt.Printf("Goroutine %d ended\n", i)

    ch <- true

}

func main() {

    no := 3

    exitChan := make(chan bool, no)

    for i := 0; i < no; i++ {

        go process(i, exitChan)

    }

    for i := 0; I < no;i++{

        <-exitChan

    }

    fmt.Println("All go routines finished executing")

}
B. 方法二,使用sync. WaitGroup实现
package main

import (

    "fmt"

    "sync"

    "time"

)

func process(i int, wg *sync.WaitGroup) {

    fmt.Println("started Goroutine ", i)

    time.Sleep(2 * time.Second)

    fmt.Printf("Goroutine %d ended\n", i)

        wg.Done()

    }

func main() {

    no := 3

    var wg sync.WaitGroup

    for i := 0; i < no; i++ {

        wg.Add(1)

        go process(i, &wg)

    }

    wg.Wait()

    fmt.Println("All go routines finished executing")

}
Workerpool的实现
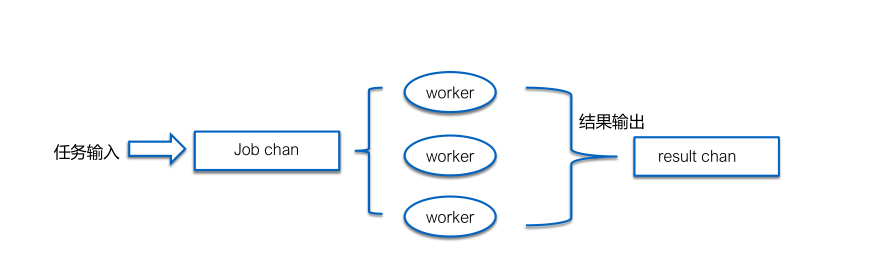
1、worker池的实现
A. 生产者、消费者模型,简单有效
B. 控制goroutine的数量,防止goroutine泄露和暴涨
C. 基于goroutine和chan,构建workerpool非常简单
package mail

import (

	"fmt"

	"math/rand"

)

// worker生产者消费者模型

type Job struct {

	Number int

	Id int

}

type Result struct {

	job *Job

	sum int

}

func calc(job *Job, result chan *Result){

	var sum int

	number := job.Number

	for number != 0 {

		tmp := number % 10

		sum += tmp

		number /= 10

	}

	r := &Result{

		job: job,

		sum: sum,

	}

	result <- r

}

func Worker(){

	for job:= range jobChan {

		calc(job, resultChan)

	}

}

func startWorkerPool(num int, JobChan chan *Job, resultChan *Result){

	for i := 0; i < num; i++ {

		go Worker(JobChan, resultChan)

	}

}

func printResult(resultChan chan*Result) {

	for result := range resultChan {

		fmt.Printf("job id:%v number:%v result:%d\n",result.job.Id, result.job.Number, result.sum)

	}

}

func main(){

	jobChan := make(chan *Job, 1000)

	resultChan := make(chan *Result, 1000)

	startWorkerPool(128, jobChan, resultChan)

	for i := 0; i < 128; i ++ {

		go calc()

	}

	go printResult(resultChan)

	var id int

	for {

		id++

		number := rand.Int()

		job := &Job {

			Id: id,

			Number: number,

		}

		jobChan <- job

	}

}
2、项目需求分析
A. 计算一个数字的各个位数之和,比如123,和等于1+2+3=6
B. 需要计算的数字使用随机算法生成
3、方案介绍
A. 任务抽象成一个个job
B. 使用job队列和result队列
C. 开一组goroutine进行实际任务计算,并把结果放回result队列
【原创】go语言学习(二十)并发编程的更多相关文章
- 《java学习二》并发编程
多线程创建方式 1.继承thread类,重写run方法 CreateThread createThread = new CreateThread(); ------createThread ...
- [CSAPP笔记][第十二章并发编程]
第十二章 并发编程 如果逻辑控制流在时间上是重叠,那么它们就是并发的(concurrent).这种常见的现象称为并发(concurrency). 硬件异常处理程序,进程和Unix信号处理程序都是大家熟 ...
- CSAPP:第十二章 并发编程
CSAPP:第十二章 并发编程 12.1 线程执行模型12.2 多线程之间并发通信12.3 其他并发问题 使用应用级并发的应用程序称为并发程序.现代操作系统提供三种基本的构造并发程序的方法: 进程 ...
- Go语言学习笔记十二: 范围(Range)
Go语言学习笔记十二: 范围(Range) rang这个关键字主要用来遍历数组,切片,通道或Map.在数组和切片中返回索引值,在Map中返回key. 这个特别像python的方式.不过写法上比较怪异使 ...
- Go语言学习笔记十: 结构体
Go语言学习笔记十: 结构体 Go语言的结构体语法和C语言类似.而结构体这个概念就类似高级语言Java中的类. 结构体定义 结构体有两个关键字type和struct,中间夹着一个结构体名称.大括号里面 ...
- 十二. Go并发编程--sync/errGroup
一.序 这一篇算是并发编程的一个补充,起因是当前有个项目,大概の 需求是,根据kafka的分区(partition)数,创建同等数量的 消费者( goroutine)从不同的分区中消费者消费数据,但是 ...
- (转)《深入理解java虚拟机》学习笔记10——并发编程(二)
Java的并发编程是依赖虚拟机内存模型的三个特性实现的: (1).原子性(Atomicity): 原子性是指不可再分的最小操作指令,即单条机器指令,原子性操作任意时刻只能有一个线程,因此是线程安全的. ...
- 深入理解计算机系统 第十二章 并发编程 part1 第二遍
三种构造并发程序的方法及其优缺点 1.进程 用这种方法,每个逻辑控制流都是一个进程,由内核来调度和维护.因为进程有独立的虚拟地址空间,想要和其他流通信,控制流必须使用某种显式的进程间通信机制. 优点: ...
- Java 面试知识点解析(二)——高并发编程篇
前言: 在遨游了一番 Java Web 的世界之后,发现了自己的一些缺失,所以就着一篇深度好文:知名互联网公司校招 Java 开发岗面试知识点解析 ,来好好的对 Java 知识点进行复习和学习一番,大 ...
- 二 python并发编程之多进程-重点
一 multiprocessing模块介绍 python中的多线程无法利用多核优势,如果想要充分地使用多核CPU的资源(os.cpu_count()查看),在python中大部分情况需要使用多进程.P ...
随机推荐
- java对日开发常用语(词汇)总结
日语 英语 中文 备注 並び順(ならびじゅん) order by 排序 項目(こうもく) field 字段,域 ...
- MySQL-8.0.16 的安装与配置
最近老是安装mysql, 但是由于各个环境下文件不互通,所以感觉笔记还是记录在这里比较方便.以下内容,是对网络上大家的笔记的搜集和整理,并经过自己的实践,记录下来.以便,让大家更好.更快的配置mysq ...
- K2 BPM_加班党们,说好不哭还是说好不秃?_流程管理
早上经过财务小陈的办公桌 看到她正边看手机边默默流泪 诶?这不是这两天刷屏的 周杰伦的<说好不哭>吗 小陈你怎么哭啦,这歌让你想到前男友了吗? ...... (摇头) 小陈擦擦眼泪 唱起了 ...
- 3-JavaSe-1-stream-1-流库特征
1.parallelStream可以让流库以并行方式来执行过滤和计数. String content=new String(Files.readAllBytes(Paths.get("D:\ ...
- Android笔记(三十二) Android中线程之间的通信(四)主线程给子线程发送消息
之前的例子都是我们在子线程(WorkerThread)当中处理并发送消息,然后在主线程(UI线程)中获取消息并修改UI,那么可以不可以在由主线程发送消息,子线程接收呢?我们按照之前的思路写一下代码: ...
- 2-3 查找树及其Java实现
2-3 查找树 定义(来源:wiki) 查找 插入 2-3 查找树 定义(来源:wiki) 2–3树是一种树型数据结构,内部节点(存在子节点的节点)要么有2个孩子和1个数据元素,要么有3个孩子和2个数 ...
- C++——重载原理分析
C不支持函数重载,C++支持 代码演示 main.c #include<stdio.h> void Max(int a, int b) { printf("%d ", ...
- 请求类型 GET 和 POST 的区别
一.GET 一个简单的 GET 请求: xmlhttp.open("GET","demo_get.asp",true); xmlhttp.send(); 在上面 ...
- JavaScript(ES6之前)数组方法总结
一.数组的创建 1.使用 Array 构造函数 var arr1 = new Array(); // 创建一个空数组 var arr2 = new Array(20); // 创建一个包含20项的数组 ...
- linux网络编程之简单的线程池实现
转眼间离15年的春节越来越近了,还有两周的工作时间貌似心已经不在异乡了,期待与家人团聚的日子,当然最后两周也得坚持站好最后一班岗,另外期待的日子往往是心里不能平静的,越是想着过年,反而日子过得越慢,于 ...