ActiveMQ的静态网络配置
static networkConnector是用于创建一个静态的配置对于网络中的多个Broker做集群,这种协议用于复合url,一个复合url包括多个url地址。
<networkConnectors>

             <networkConnector name="local network"  duplex="true"

              uri="static://(tcp://192.168.174.104:61616,tcp://192.168.174.104:61676)"/>

</networkConnectors>
常用networkConnector配置的可用属性:
conduitSubscriptions :默认true,是否把同一个broker的多个consumer当做一个来处理
duplex :默认false,设置是否能双向通信
消息发送代码
public class JmsSend {

    public static void main(String[] args) throws JMSException {

        ConnectionFactory connectionFactory=new ActiveMQConnectionFactory("tcp://192.168.174.104:61616");

        Connection connection = connectionFactory.createConnection();

        connection.start();

        Session session=connection.createSession(Boolean.TRUE, Session.AUTO_ACKNOWLEDGE);

        Destination queue=session.createQueue("my-queue4");

        MessageProducer producer=session.createProducer(queue);

        for(int i=0 ; i<20 ; i++){

             TextMessage message=session.createTextMessage("message"+i);

             //message.setStringProperty("queue", "queue"+i);

             //message.setJMSType("1");

             producer.send(message);

        }

        session.commit();

        session.close();

        connection.close();

    }

}
192.168.174.104:61616 broker1 接收测试代码
public class JmsReceiver1 {

    public static void main(String[] args) throws Exception {

        ConnectionFactory connectionFactory = new ActiveMQConnectionFactory(

                "tcp://192.168.174.104:61616");

        for (int i=0; i<10 ;i++){

            new Myhread1(connectionFactory).start();

            Thread.sleep(1000);

        }

    }

}

class Myhread1 extends Thread {

    private ConnectionFactory connectionFactory ;

    public Myhread1(ConnectionFactory connectionFactory) {

        super();

        this.connectionFactory = connectionFactory;

    }

    public void run() {

        try {

            final Connection connection = connectionFactory.createConnection();

            connection.start();

            final Session session = connection.createSession(Boolean.TRUE,

                    Session.AUTO_ACKNOWLEDGE);

            Destination queue = session.createQueue("my-queue4");

            MessageConsumer consumer = session.createConsumer(queue);

            consumer.setMessageListener(new MessageListener() {

                public void onMessage(Message message) {

                    TextMessage msg = (TextMessage) message;

                    try {

                        System.out.println("1======"+msg.getText());

                    } catch (JMSException e) {

                        // TODO Auto-generated catch block

                        e.printStackTrace();

                    }

                    try {

                        session.commit();

                    } catch (JMSException e) {

                        // TODO Auto-generated catch block

                        e.printStackTrace();

                    }

                    try {

                        session.close();

                    } catch (JMSException e) {

                        // TODO Auto-generated catch block

                        e.printStackTrace();

                    }

                    try {

                        connection.close();

                    } catch (JMSException e) {

                        // TODO Auto-generated catch block

                        e.printStackTrace();

                    }

                }

            });

        } catch (JMSException e) {

            e.printStackTrace();

        }

    }

}
192.168.174.104:61676 broker2 接收测试代码
public class JmsReceiver2 {

    public static void main(String[] args) throws Exception {

        ConnectionFactory connectionFactory = new ActiveMQConnectionFactory(

                "tcp://192.168.174.104:61676");

        for (int i=0; i<10 ;i++){

            new Myhread2(connectionFactory).start();

            Thread.sleep(1000);

        }

    }

}

class Myhread2 extends Thread {

    private ConnectionFactory connectionFactory ;

    public Myhread2(ConnectionFactory connectionFactory) {

        super();

        this.connectionFactory = connectionFactory;

    }

    public void run() {

        try {

            final Connection connection  = connectionFactory.createConnection();

            connection.start();

            final Session session = connection.createSession(Boolean.TRUE,

                    Session.AUTO_ACKNOWLEDGE);

            Destination queue = session.createQueue("my-queue4");

            MessageConsumer consumer = session.createConsumer(queue);

            consumer.setMessageListener(new MessageListener() {

                public void onMessage(Message message) {

                    TextMessage msg = (TextMessage) message;

                    try {

                        System.out.println("2======"+msg.getText());

                    } catch (JMSException e) {

                        // TODO Auto-generated catch block

                        e.printStackTrace();

                    }

                    try {

                        session.commit();

                    } catch (JMSException e) {

                        // TODO Auto-generated catch block

                        e.printStackTrace();

                    }

                    try {

                        session.close();

                    } catch (JMSException e) {

                        // TODO Auto-generated catch block

                        e.printStackTrace();

                    }

                    try {

                        connection.close();

                    } catch (JMSException e) {

                        // TODO Auto-generated catch block

                        e.printStackTrace();

                    }

                }

            });

        } catch (JMSException e) {

            e.printStackTrace();

        }

    }

}
“丢失”的消息
broker1和broker2通过networkConnector连接,一些consumers连接到broker2,消费broker1上的消息。消息先被broker2从broker1上消费掉,然后转发给这些consumers。不幸的是转发部分消息的时候broker2重启了,这些consumers发现broker2连接失败,通过failover连接到broker1上去了,但是有一部分他们还没有消费的消息被broker1已经分发到了broker2上去了。这些消息,就好像是消失了。
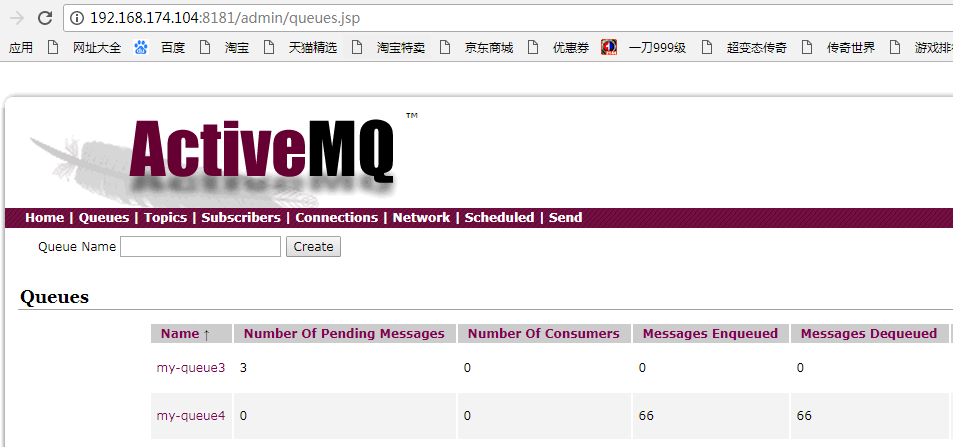
broker1 中my-queue4 接收到20条消息。

broker1通过静态网络与broker2连接,与broker2相连的消费者消费后,broker1中Number of Pending Messages为0,即消息先被broker2从broker1上消费掉。
一些consumers连接到broker1,没法从broker1获取消息消费。

针对“丢失”的消息,配置replayWhenNoConsumers选项
这个选项使得broker1上有需要转发的消息但是没有消费者时,把消息回流到它原始的broker。同时把enableAudit设置为false,为了防止消息回流后被当做重复消息而不被分发。
<policyEntries>

        <policyEntry queue=">" enableAudit="false">

                <networkBridgeFilterFactory>

                        <conditionalNetworkBridgeFilterFactory replayWhenNoConsumers="true"/>

                </networkBridgeFilterFactory>

        </policyEntry>

</policyEntries>
容错的链接--Failover
Failover协议实现了自动重新链接的逻辑。默认情况下,这种协议用于随机的去选择一个链接去链接,如果链接失败了,那么会链接到其他
的Broker上。默认的配置定义了延迟重新链接,意味着传输将会在10秒后自动的去重新链接可用的broker。当然所有的重新链接参数都可以根据应用的需要而配置。
ConnectionFactory connectionFactory=new ActiveMQConnectionFactory("failover:(tcp://192.168.174.104:61616,tcp://192.168.174.104:61676)?randomize=false");
randomize:使用随机链接,以达到负载均衡的目的,默认true。
ActiveMQ的静态网络配置的更多相关文章
- 分布式-信息方式-ActiveMQ的静态网络连接
ActiveMQ的静态网络连接 在一台服务器上启动多个Broker步骤如下:1:把整个conf文件夹复制一份,比如叫做conf22:修改里面的 activ ...
- ActiveMQ 集群配置 高可用
自从activemq5.9.0开始,activemq的集群实现方式取消了传统的Pure Master Slave方式,增加了基于zookeeper+leveldb的实现方式,其他两种方式:目录共享和数 ...
- ActiveMQ Cluster (ActiveMQ 集群) 配置
构建高可用的ActiveMQ系统在生产环境中是非常重要的,对于这个apache的消息中间件实现高可用非常简单,只要在Apache ActiveMQ单点基本配置基础上做一次配置变更(如果在一台设备上部署 ...
- centos7静态网络配置
centos7静态网络配置 cd /etc/sysconfig/network-scripts 找到当前网卡名字 vim ifcfg-ens33 TYPE="Ethernet" # ...
- spring+activemq实战之配置监听多队列实现不同队列消息消费
摘选:https://my.oschina.net/u/3613230/blog/1457227 摘要: 最近在项目开发中,需要用到activemq,用的时候,发现在同一个项目中point-to-po ...
- linux下activemq安装与配置activemq-5.15.2
linux下activemq安装与配置 前提 配置好jdk环境 一.下载:apache-activemq-5.15.2-bin.tar.gz https://archive.apache.org/ ...
- ActiveMQ的静态网络链接
-------------------------------------------------------------------- (1)ActiveMQ的networkConnector是什么 ...
- ActiveMQ (二) 常用配置简介
ActiveMQ的主要配置文件 ActiveMQ的一些常用的属性很多可以在对应的配置文件中进行配置的.比如访问web console的管理端的端口,用户名密码,连接MQ时的用户名和密码,持久化设置,是 ...
- linux下activemq安装与配置
一.下载:apache-activemq-5.14.0-bin.tar.gz http://activemq.apache.org/activemq-5140-release.html 二.安装a ...
随机推荐
- AHOI2012树屋阶梯
这玩意不是卡特兰的经典模型吗…… 我们设方案数为f(i),则f(0)=1,f(1)=1,f(2)=2,f(3)=5,(其实到这里你再手模一个就出来了)我们把左上角的矩形删掉,则会变成下方和右方两个更小 ...
- 查看linux系统版本相关信息
1.查看内核版本:cat /proc/version A机器 root@debian:~# cat /proc/version Linux version -- (ty@debian) ( (Debi ...
- Spring —— @Async注解的使用
参考文档 Spring Boot使用@Async实现异步调用:自定义线程池 Spring Boot使用@Async实现异步调用:ThreadPoolTaskScheduler线程池的优雅关闭
- mysql存储引擎介绍,索引
区别: MyISAM类型不支持事务处理等高级处理,而InnoDB类型支持.MyISAM类型的表强调的是性能,其执行数度比InnoDB类型更快,但是不提供事务支持,而InnoDB提供事务支持已经外部键等 ...
- Linux信号使用及自定义信号
linux自定义信号:https://www.cnblogs.com/bigben0123/p/3186661.html linux信号.值及解释:https://blog.csdn.net/luot ...
- wordpress插件开发从创建一个新的菜单开始
创建插件的目的 1.我们为什么要创建一个插件? IT界有一个知名的论调叫做不要造重复的轮子,如果有可能的话,你应该尽可能的从现有的网络资源上选择一个已有的插件来使用,而不是重新创造一个.它耗费的精力很 ...
- SQL-W3School-总结:SQL 快速参考
ylbtech-SQL-W3School-总结:SQL 快速参考 1.返回顶部 1. 来自 W3School 的 SQL 快速参考.可以打印它,以备日常使用. SQL 语句 语句 语法 AND / O ...
- angular中的动态路由
1.配置动态路由 const routes: Routes = [ {path: 'home', component: HomeComponent}, {path: 'news', component ...
- struct ifreq 获取IP 和mac和修改mac
2012-09-11 14:26 struct ifreq 获取IP 和mac和修改mac 配置ip地址和mask地址: ifconfig eth0 192.168.50.22 netmask 25 ...
- java中把文件拷贝到指定目录下最简单几种方法
java中把文件拷贝到指定目录下最简单几种方法 String savePath = "D:/file";// 文件保存到d盘的file目录下 File savefile = n ...