
曹工说Spring Boot源码(11)-- context:component-scan,你真的会用吗(这次来说说它的奇技淫巧)
写在前面的话
相关背景及资源:
曹工说Spring Boot源码(1)-- Bean Definition到底是什么,附spring思维导图分享
曹工说Spring Boot源码(2)-- Bean Definition到底是什么,咱们对着接口,逐个方法讲解
曹工说Spring Boot源码(3)-- 手动注册Bean Definition不比游戏好玩吗,我们来试一下
曹工说Spring Boot源码(4)-- 我是怎么自定义ApplicationContext,从json文件读取bean definition的?
曹工说Spring Boot源码(5)-- 怎么从properties文件读取bean
曹工说Spring Boot源码(6)-- Spring怎么从xml文件里解析bean的
曹工说Spring Boot源码(7)-- Spring解析xml文件,到底从中得到了什么(上)
曹工说Spring Boot源码(8)-- Spring解析xml文件,到底从中得到了什么(util命名空间)
曹工说Spring Boot源码(9)-- Spring解析xml文件,到底从中得到了什么(context命名空间上)
曹工说Spring Boot源码(10)-- Spring解析xml文件,到底从中得到了什么(context:annotation-config 解析)
工程结构图:

概要
本篇已经是spring源码第11篇,最近都在讲解:spring解析xml文件,到底获得了什么?获得了什么呢,感兴趣的可以挑选感兴趣的看;目前呢,已经讲到了context命名空间,接下来准备讲解component-scan,但是吧,这个真的是一个重量级的嘉宾,且不说原理,光是用法,就够我们感受感受啥叫主角了。
常规用法
我们在package:org.springframework.contextnamespace.componentscantest下存放了以下几个文件:
MainClassForTestComponentScan.java 测试类,包含main方法,不是bean
PersonTestController.java 使用了@Controller注解,里面使用@Autowired自动注入了PersonService
PersonService.java 使用了@Service注解
下边看下代码:
//定义一个bean

package org.springframework.contextnamespace.componentscantest;

import lombok.Data;

import lombok.extern.slf4j.Slf4j;

import org.springframework.beans.factory.annotation.Autowired;

import org.springframework.stereotype.Controller;

@Slf4j

@Data

@Controller

public class PersonTestController {

    @Autowired

    private PersonService personService;

}
// 再一个bean

package org.springframework.contextnamespace.componentscantest;

import org.springframework.stereotype.Service;

@Service

public class PersonService {

    private String personname;

}
//测试代码

package org.springframework.contextnamespace.componentscantest;

import com.alibaba.fastjson.JSONObject;

import lombok.extern.slf4j.Slf4j;

import org.springframework.beans.factory.config.BeanDefinition;

import org.springframework.context.support.ClassPathXmlApplicationContext;

import org.springframework.util.MyFastJson;

import java.util.List;

import java.util.Map;

@Slf4j

public class MainClassForTestComponentScan {

    public static void main(String[] args) {

        ClassPathXmlApplicationContext context = new ClassPathXmlApplicationContext(

                new String[]{"classpath:context-namespace-test-component-scan.xml"},false);

        context.refresh();

        List<BeanDefinition> list =

                context.getBeanFactory().getBeanDefinitionList();

        // 我自己的工具类,使用json输出bean definition

        MyFastJson.printJsonStringForBeanDefinitionList(list);

        Object bean = context.getBean(PersonTestController.class);

        System.out.println("PersonController bean:" + bean);

    }

}
xml文件如下:
<?xml version="1.0" encoding="UTF-8"?>

<beans xmlns="http://www.springframework.org/schema/beans"

       xmlns:xsi="http://www.w3.org/2001/XMLSchema-instance"

       xmlns:context="http://www.springframework.org/schema/context"

       xsi:schemaLocation="http://www.springframework.org/schema/beans

        http://www.springframework.org/schema/beans/spring-beans.xsd

                http://www.springframework.org/schema/context

                 http://www.springframework.org/schema/context/spring-context.xsd">

    <context:component-scan base-package="org.springframework.contextnamespace.componentscantest"/>

</beans>
输出:
PersonController bean:PersonTestController(personService=org.springframework.contextnamespace.componentscantest.PersonService@3e11f9e9)
可以看到,注入成功。
我代码里,其实还输出了全部的beanDefinition,我简单整理了一下,一共包含了如下几个:
| beanDefinition中的beanClass |
|---|
| org.springframework.context.annotation.CommonAnnotationBeanPostProcessor |
| org.springframework.contextnamespace.componentscantest.PersonService 我们自己的业务bean |
| org.springframework.contextnamespace.componentscantest.PersonTestController 业务bean |
| org.springframework.context.annotation.ConfigurationClassPostProcessor |
| org.springframework.beans.factory.annotation.RequiredAnnotationBeanPostProcessor |
| org.springframework.beans.factory.annotation.AutowiredAnnotationBeanPostProcessor |
| org.springframework.context.annotation.ConfigurationClassPostProcessor$ImportAwareBeanPostProcessor |
看来,一个简单的注解,背后却默默做了很多骚操作啊,除了自己的业务bean外,还有5个框架自带的bean,类型呢,从命名可以看出,都是些什么PostProcessor,有兴趣的,可以翻到我前一篇,里面讲解了AutowiredAnnotationBeanPostProcessor 。
阅读理解
我们从spring-context.xsd文件可以找到这个元素的官方说明。
Scans the classpath for annotated components that will be auto-registered as

Spring beans. By default, the Spring-provided @Component, @Repository,

@Service, and @Controller stereotypes will be detected.

Note: This tag implies the effects of the 'annotation-config' tag, activating @Required,

@Autowired, @PostConstruct, @PreDestroy, @Resource, @PersistenceContext and @PersistenceUnit

annotations in the component classes, which is usually desired for autodetected components

(without external configuration). Turn off the 'annotation-config' attribute to deactivate

this default behavior, for example in order to use custom BeanPostProcessor definitions

for handling those annotations.

Note: You may use placeholders in package paths, but only resolved against system

properties (analogous to resource paths). A component scan results in new bean definition

being registered; Spring's PropertyPlaceholderConfigurer will apply to those bean

definitions just like to regular bean definitions, but it won't apply to the component

scan settings themselves.

See Javadoc for org.springframework.context.annotation.ComponentScan for information

on code-based alternatives to bootstrapping component-scanning.
我用我的425分压线4级翻译了一下:
扫描类路径下的注解组件,它们将会被主动注册为spring bean。默认情况下,可以识别以下注解:
@Component, @Repository,@Service, and @Controller。注意:这个元素隐含了context:annotation-config的作用,会默认激活bean class类里的@Required,
@Autowired, @PostConstruct, @PreDestroy, @Resource, @PersistenceContext and @PersistenceUnit 注解,这个功能也是一般默认需要的。将annotation-config属性,设为false,可以关闭这项功能,比如想要自己定制处理这些注解的BeanPostProcessor时。注意:你可以使用在包路径里,使用placeholder,但是只能引用system property。 component scan会导致新的bean definition被注册,Spring的PropertyPlaceholderConfigurer对这些bean,依然生效,但是,PropertyPlaceholderConfigurer 不能对 component scan生效。
如果要基于注解启动component-scan,请查看org.springframework.context.annotation.ComponentScan
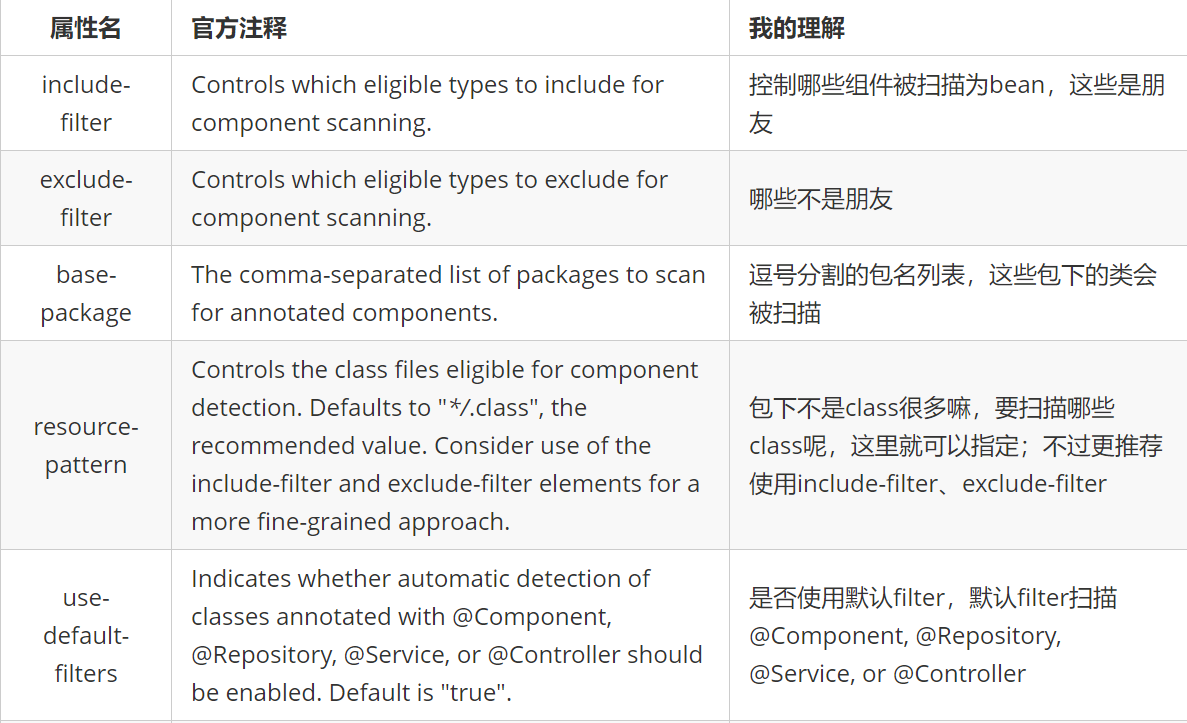
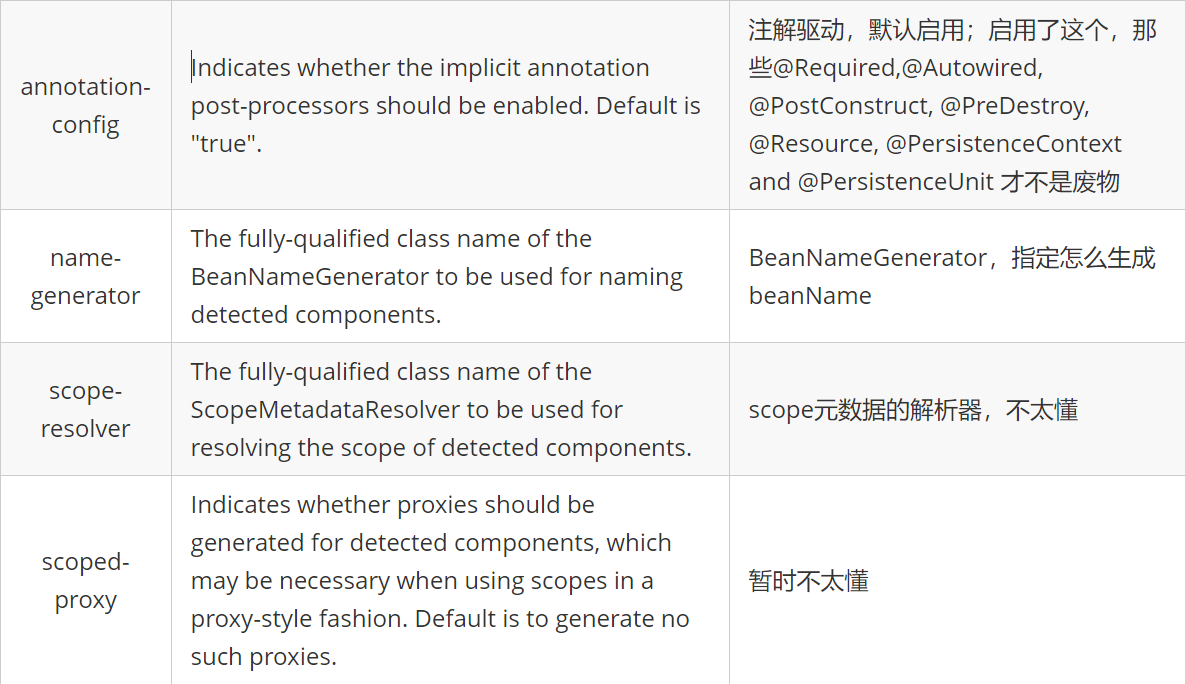
这个只是元素本身的介绍,你知道,这个元素的属性还是有辣么多的,我们用一个表格,来看看其属性的意思:
annotation-config属性的作用
这个属性的意思是,本来,component-scan不是默认包含了context:annotation-config的功能吗,所以才能够识别并解析@Autowired等注解,那要是我们关了这个功能,再试试还能不能注入呢?
<context:component-scan

	    //这里设为false,关闭@autowired等注解的解析功能

        annotation-config="false"

        base-package="org.springframework.contextnamespace.componentscantest"/>
再次测试,输出如下:
PersonController bean:PersonTestController(personService=null)
可以发现,注入没成功。
而且,这次,我的beanDefinition输出语句显示,一共只有两个beanDefinition,就是我们定义的那两个业务bean。
这么看来,annotation-config的魔术手被我们斩断了,当然,代价就是,不能自动注入了。
use-default-filters属性的作用
本来这个属性的作用吧,从字面上看是说:
Indicates whether automatic detection of classes annotated with @Component, @Repository, @Service,

or @Controller should be enabled. Default is "true".
即:是否自动检测注解了@Component, @Repository, @Service,or @Controller 的类。
后面翻看了一下源码,更加明确了意义:
在component-scan这个元素的解析器里(ComponentScanBeanDefinitionParser),有个属性:
private static final String USE_DEFAULT_FILTERS_ATTRIBUTE = "use-default-filters";
关键代码如下:
	protected ClassPathBeanDefinitionScanner configureScanner(ParserContext parserContext, Element element) {

		XmlReaderContext readerContext = parserContext.getReaderContext();

		boolean useDefaultFilters = true;

		if (element.hasAttribute(USE_DEFAULT_FILTERS_ATTRIBUTE)) {

			useDefaultFilters = Boolean.valueOf(element.getAttribute(USE_DEFAULT_FILTERS_ATTRIBUTE));

		}

		// 1.创建ClassPathBeanDefinitionScanner,下面的 2 3 4 等,代表一步一步跟代码的跳转顺序

		ClassPathBeanDefinitionScanner scanner = createScanner(readerContext, useDefaultFilters);

        ...

    }

	// 2.

	protected ClassPathBeanDefinitionScanner createScanner(XmlReaderContext readerContext, boolean useDefaultFilters) {

        // 3

		return new ClassPathBeanDefinitionScanner(readerContext.getRegistry(), useDefaultFilters);

	}

	// 3

	public ClassPathBeanDefinitionScanner(BeanDefinitionRegistry registry, boolean useDefaultFilters) {

		this(registry, useDefaultFilters, getOrCreateEnvironment(registry));

	}

	// 4

public ClassPathBeanDefinitionScanner(BeanDefinitionRegistry registry, boolean useDefaultFilters, Environment environment) {

         // 5

		super(useDefaultFilters, environment);

		Assert.notNull(registry, "BeanDefinitionRegistry must not be null");

		this.registry = registry;

		// Determine ResourceLoader to use.

		if (this.registry instanceof ResourceLoader) {

			setResourceLoader((ResourceLoader) this.registry);

		}

	}

	// 第5处,进入以下逻辑

	public ClassPathScanningCandidateComponentProvider(boolean useDefaultFilters, Environment environment) {

         // 如果使用默认filter,则注册默认filter

		if (useDefaultFilters) {

			registerDefaultFilters();

		}

		this.environment = environment;

	}
下边就是核心了:
protected void registerDefaultFilters() {

		/**

		 * 默认扫描Component注解

		 */

		this.includeFilters.add(new AnnotationTypeFilter(Component.class));

		ClassLoader cl = ClassPathScanningCandidateComponentProvider.class.getClassLoader();

		try {

            // 这里可以看到,还支持 ManagedBean 注解

			this.includeFilters.add(new AnnotationTypeFilter(

					((Class<? extends Annotation>) cl.loadClass("javax.annotation.ManagedBean")), false));

			logger.info("JSR-250 'javax.annotation.ManagedBean' found and supported for component scanning");

		}

		try {

             // 还支持 javax.inject.Named 注解

			this.includeFilters.add(new AnnotationTypeFilter(

					((Class<? extends Annotation>) cl.loadClass("javax.inject.Named")), false));

			logger.info("JSR-330 'javax.inject.Named' annotation found and supported for component scanning");

		}

	}
所以,这个属性的作用就是:假设指定的扫描包内有20个类,其中2个class注解了@component,则这两个类才是真正被扫描的类,至于具体的解析,这个属性就不关心了。
context:exclude-filter属性的作用
为什么不分析context:include-filter,因为假设某个类没有注解@component,按理说,是不加入扫描范围的;
如果我们的include-filter把这个类纳入范围,则还要自定义bean definition的解析逻辑才能将这个类变成bean。
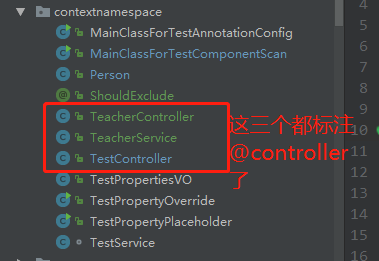
我们这里有个demo,其中TeacherController和TeacherService是注解了ShouldExclude的。
xml如下:
<context:component-scan

        use-default-filters="true"

        base-package="org.springframework.contextnamespace">

    // 我们这里使用了annotation类型,要把包含了ShouldExclude注解的,全部排除

    <context:exclude-filter type="annotation" expression="org.springframework.contextnamespace.ShouldExclude"></context:exclude-filter>

    // 这里使用regex类型,排除掉TestController

    <context:exclude-filter type="regex" expression="org.springframework.contextnamespace.TestController"></context:exclude-filter>

</context:component-scan>
所以,上面的xml,我们可以将3个bean全部排除。
context:include-filter属性的作用
在前面,我们说,这个属性不好测试,但我想到也许可以这样测:
   <context:component-scan

           use-default-filters="false"

           base-package="org.springframework.contextnamespace">

       <context:include-filter

               type="annotation"

               expression="org.springframework.stereotype.Component"/>

       <context:exclude-filter type="regex" expression="org.springframework.contextnamespace.TestController"/>

   </context:component-scan>
use-default-filters 这里设为false,排除掉默认的@component的include filter;
但是我们在下面,再通过include-filter来达到同样效果。
<context:include-filter

                type="annotation"

                expression="org.springframework.stereotype.Component"/>
经过上述改造后,运行正常。
注:以上部分是前两天写的(代码要后边上传,在家里电脑上),以下部分是公司电脑写的,前面的代码在家里,忘记提交了。所以demo会略微不一样,不过不影响实验。
前面我说不好测试,但我发现还是可以搞。我们将会单独定义一个自定义注解:
package org.springframework.contextnamespace;

import org.springframework.stereotype.Component;

import java.lang.annotation.*;

@Target({ElementType.TYPE})

@Retention(RetentionPolicy.RUNTIME)

@Documented

// 大家注意,这里的@component我注掉了

//@Component

public @interface DerivedComponent {

    /**

     * The value may indicate a suggestion for a logical component name,

     * to be turned into a Spring bean in case of an autodetected component.

     * @return the suggested component name, if any

     */

    String value() default "";

}
然后呢,下面这两个类我是使用上面的注解来标注了的:
@DerivedComponent

public class PersonService {

    private String personname1;

}
@DerivedComponent

public class PersonTestController {

//    @Autowired

    @Resource

    private PersonService personService;

}
xml如下:
<context:component-scan

        use-default-filters="false"

        base-package="org.springframework.contextnamespace.componentscan">

    <context:include-filter type="annotation" expression="org.springframework.contextnamespace.DerivedComponent"/>

</context:component-scan>
有必要解释下:
use-default-filters="false":为true时,会将注解了@component或者@controller等注解的class包含进候选bean;这里设为false,就不会进行上述行为;
context:include-filter:这里呢,类型为注解,注解类就是我们自定义的那个。
总体意思就是,扫描指定包下面的,带有@DerivedComponent注解的类;忽略带有@component等注解的类。
这样设置,我们的测试程序会如何:
PersonController bean:PersonTestController(personService=org.springframework.contextnamespace.componentscan.PersonService@4f615685)
it works!没想到,这样都可以。
我们看看他们的bean definition:
{

		"abstract":false,

		"autowireCandidate":true,

		"autowireMode":0,

		"beanClassName":"org.springframework.contextnamespace.componentscan.PersonService",

		"constructorArgumentValues":{

			"argumentCount":0,

			"empty":true,

			"genericArgumentValues":[],

			"indexedArgumentValues":{}

		},

		"dependencyCheck":0,

		"enforceDestroyMethod":false,

		"enforceInitMethod":false,

		"lazyInit":false,

		"lenientConstructorResolution":true,

		"metadata":{

			"abstract":false,

             // 这里可以看到,注解确实是DerivedComponent

			"annotationTypes":["org.springframework.contextnamespace.DerivedComponent"],

			"className":"org.springframework.contextnamespace.componentscan.PersonService",

			"concrete":true,

			"final":false,

			"independent":true,

			"interface":false,

			"interfaceNames":[],

			"memberClassNames":[],

			"superClassName":"java.lang.Object"

		},

		"methodOverrides":{

			"empty":true,

			"overrides":[]

		},

		"nonPublicAccessAllowed":true,

		"primary":false,

		"propertyValues":{

			"converted":false,

			"empty":true,

			"propertyValueList":[]

		},

		"prototype":false,

		"qualifiers":[],

		"resolvedAutowireMode":0,

		"resourceDescription":"file [F:\\work_java_projects\\spring-boot-first-version-learn\\all-demo-in-spring-learning\\spring-xml-demo\\target\\classes\\org\\springframework\\contextnamespace\\componentscan\\PersonService.class]",

		"role":0,

		"scope":"singleton",

		"singleton":true,

		"synthetic":false

	}
具体原理,下节具体分析,主要呢,context:component-scan 的解析代码,主要就是负责收集beandefinition,
而上面这种自定义注解收集的方式的缺点在于,不能像@component等注解那样,有很多的属性可以设置。我们的自定义注解,只能是使用默认的beanDefinition配置,比如默认单例,等等。当然,你也可以直接使用和@component一模一样的属性,不过那也没啥必要了,对吧。
这部分的源码,我放在了:
最后这个自定义注解的内容,小马哥的spring boot编程思想里也提到了,在161页,我手边没有电子版本,所以抱歉了。
总结
component-scan,用了这么些年,看来真的只是用,里面的原理还是一知半解,经过上面的分析,我也自己系统梳理了一遍。大家看看有啥问题的,欢迎指出来,一起进步。
曹工说Spring Boot源码(11)-- context:component-scan,你真的会用吗(这次来说说它的奇技淫巧)的更多相关文章
- 曹工说Spring Boot源码系列开讲了(1)-- Bean Definition到底是什么,附spring思维导图分享
写在前面的话&&About me 网上写spring的文章多如牛毛,为什么还要写呢,因为,很简单,那是人家写的:网上都鼓励你不要造轮子,为什么你还要造呢,因为,那不是你造的. 我不是要 ...
- 曹工说Spring Boot源码(12)-- Spring解析xml文件,到底从中得到了什么(context:component-scan完整解析)
写在前面的话 相关背景及资源: 曹工说Spring Boot源码(1)-- Bean Definition到底是什么,附spring思维导图分享 曹工说Spring Boot源码(2)-- Bean ...
- 曹工说Spring Boot源码(13)-- AspectJ的运行时织入(Load-Time-Weaving),基本内容是讲清楚了(附源码)
写在前面的话 相关背景及资源: 曹工说Spring Boot源码(1)-- Bean Definition到底是什么,附spring思维导图分享 曹工说Spring Boot源码(2)-- Bean ...
- 曹工说Spring Boot源码(14)-- AspectJ的Load-Time-Weaving的两种实现方式细细讲解,以及怎么和Spring Instrumentation集成
写在前面的话 相关背景及资源: 曹工说Spring Boot源码(1)-- Bean Definition到底是什么,附spring思维导图分享 曹工说Spring Boot源码(2)-- Bean ...
- 曹工说Spring Boot源码(15)-- Spring从xml文件里到底得到了什么(context:load-time-weaver 完整解析)
写在前面的话 相关背景及资源: 曹工说Spring Boot源码(1)-- Bean Definition到底是什么,附spring思维导图分享 曹工说Spring Boot源码(2)-- Bean ...
- 曹工说Spring Boot源码(16)-- Spring从xml文件里到底得到了什么(aop:config完整解析【上】)
写在前面的话 相关背景及资源: 曹工说Spring Boot源码(1)-- Bean Definition到底是什么,附spring思维导图分享 曹工说Spring Boot源码(2)-- Bean ...
- 曹工说Spring Boot源码(17)-- Spring从xml文件里到底得到了什么(aop:config完整解析【中】)
写在前面的话 相关背景及资源: 曹工说Spring Boot源码(1)-- Bean Definition到底是什么,附spring思维导图分享 曹工说Spring Boot源码(2)-- Bean ...
- 曹工说Spring Boot源码(18)-- Spring AOP源码分析三部曲,终于快讲完了 (aop:config完整解析【下】)
写在前面的话 相关背景及资源: 曹工说Spring Boot源码(1)-- Bean Definition到底是什么,附spring思维导图分享 曹工说Spring Boot源码(2)-- Bean ...
- 曹工说Spring Boot源码(19)-- Spring 带给我们的工具利器,创建代理不用愁(ProxyFactory)
写在前面的话 相关背景及资源: 曹工说Spring Boot源码(1)-- Bean Definition到底是什么,附spring思维导图分享 曹工说Spring Boot源码(2)-- Bean ...
随机推荐
- CodeForces 1216C(假的计算几何+扫描线)
传送门 •题意 给你三个矩形,依次编号为 1,2,3: 判断 矩形1 是否被 矩形2 和 矩形3 完全覆盖: 如果没有完全覆盖,输出 "YES",反之,输出 "NO&qu ...
- java 反射和泛型-反射来获取泛型信息
通过指定对应的Class对象,程序可以获得该类里面所有的Field,不管该Field使用private 方法public.获得Field对象后都可以使用getType()来获取其类型. Class&l ...
- 2018-10-19-C#-AddRange-添加位置
title author date CreateTime categories C# AddRange 添加位置 lindexi 2018-10-19 9:3:8 +0800 2018-2-13 17 ...
- linux一个例子驱动
我们介绍的驱动称为 short (Simple Hardware Operations and Raw Tests). 所有它做 的是读和写几个 8-位 端口, 从你在加载时选择的开始. 缺省地, 它 ...
- 基于bmob后端云小程序开发——口袋吉他
人的一生90%的时间都在做着无聊的事情,社会的发展使得我们的闲暇时间越来越多,我们把除了工作的其他时间放在各种娱乐活动上. 程序员有点特殊,他们把敲代码看成娱乐活动的一部分,以此打发时间的不占少数.这 ...
- C++Review2_代码复用
C++的一个重要目的是实现代码重用. 有哪些机制可以实现这个目标呢? 1.公有继承——is a的关系 2.包含 (新的类包含另一个类的对象)——has a的关系 3.私有继承/保护继承——has a的 ...
- 浮点数NaN和INF(#IND, #INF)
NaN&INF定义在一些情况会出现无效的浮点数,例如除0,例如负数求平方根等,像这类情况,获取到的浮点数的值是无效的. NaN 即 Not a Number 非数字 INF ...
- python类方法、类属性和静态方法
class Game(object): #类属性 num = 0 #实例方法 def __init__(self): #实例属性 self.name = "laowang" #类方 ...
- 洛谷$P4585\ [FJOI2015]$火星商店问题 线段树+$trie$树
正解:线段树+$trie$树 解题报告: 传送门$QwQ$ $umm$题目有点儿长我先写下题目大意趴$QwQ$,就说有$n$个初始均为空的集合和$m$次操作,每次操作为向某个集合内加入一个数$x$,或 ...
- Windows Live Writer 语法高亮
1.WindowsLiveWriter.CNBlogs.CodeHighlighter.rar 这个插件生成的高亮代码与网页上的一模一样,插入后即可立即显示效果,不过貌似它必须联网才能实时显示效果,因 ...