centos7下编译安装redis5.05

准备环境:
1、一台centos7机器,配置没有什么要求(能联网)
2、下载好redis压缩包
下载redis包:
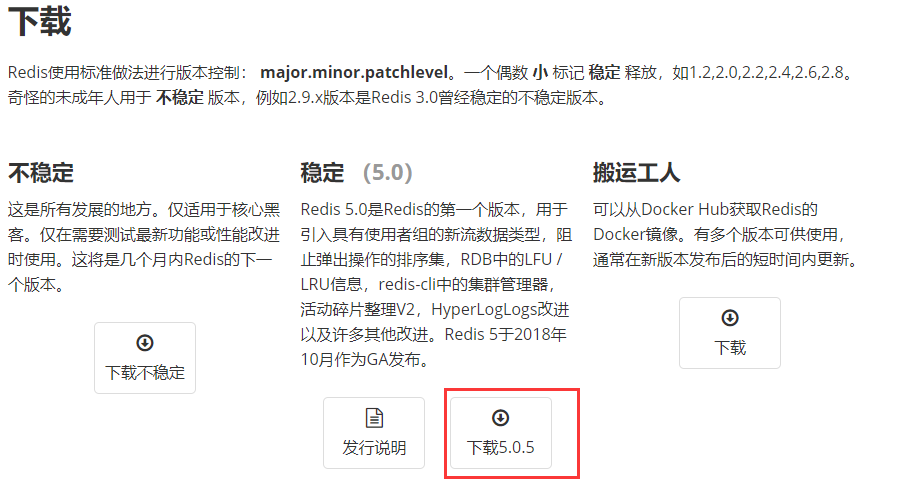
1、登录redis官网:
2、选择适合自己用的版本,一定要下载稳定版,不推荐下载最新版本
我这里就下载5.05版本作为案例:
下载其它版本:
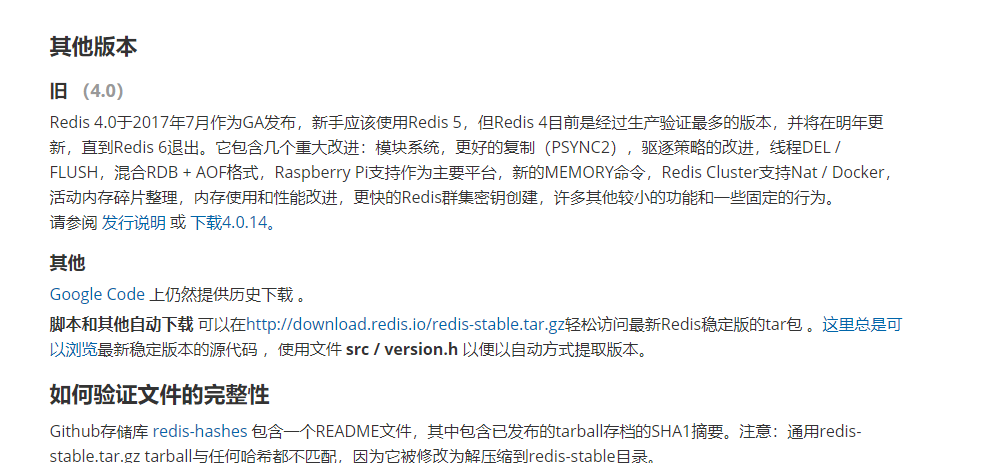
其它历史版本需要在google code上下载
官方的安装教程:
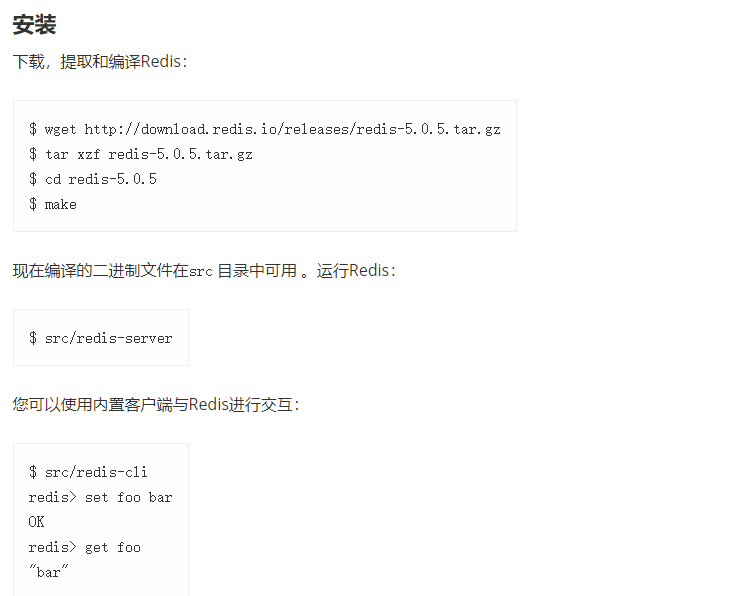
我这边直接按照提供操作步骤安装出现报错:
解压安装包到/usr/local目录下
进入解压目录:
执行编译:
提示未找到gcc命令:
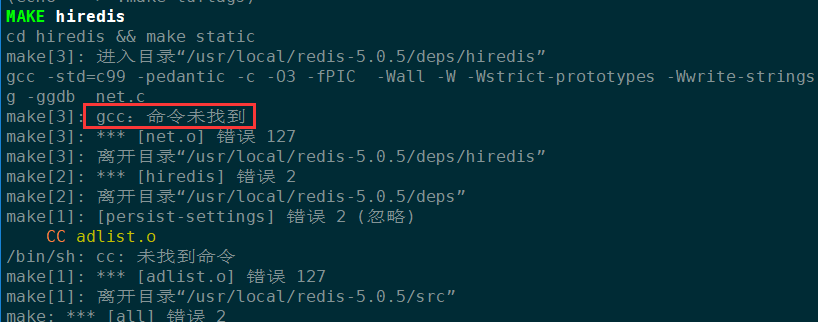
解决办法安装gcc命令:
# yum -y install gcc
gcc安装完成后从新执行make编译命令:
又出现报错:
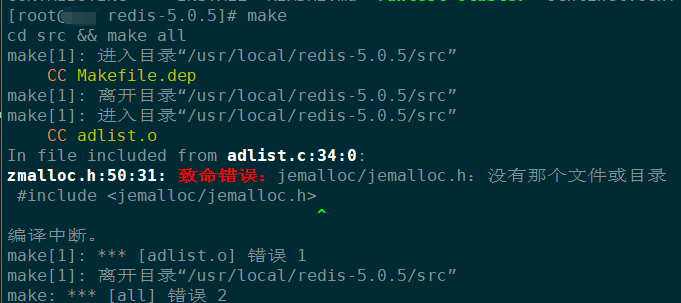
根据redis4.0的安装命令添加MALLOC=libc:
# make MALLOC=libc
执行成功:
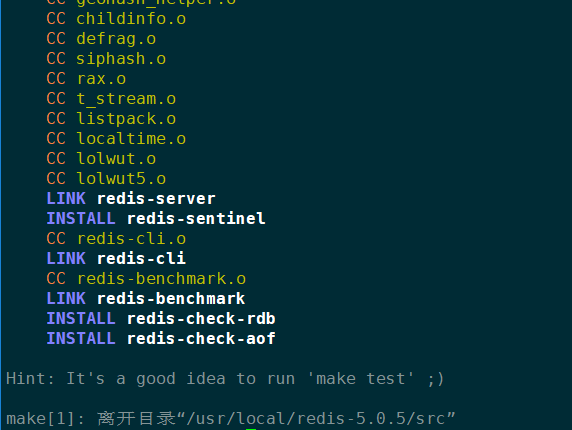
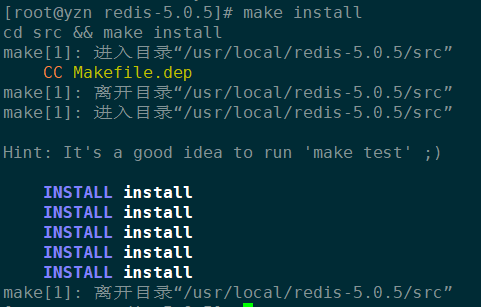
安装:
# make install
二、启动redis的三种方式:
切换到redis的src目录下:
[root@yzn redis-5.0.5]# cd src/
1、直接启动redis
[root@yzn src]# ./redis-server

12670:C 08 Jul 2019 15:17:07.387 # oO0OoO0OoO0Oo Redis is starting oO0OoO0OoO0Oo

12670:C 08 Jul 2019 15:17:07.387 # Redis version=5.0.5, bits=64, commit=00000000, modified=0, pid=12670, just started

12670:C 08 Jul 2019 15:17:07.387 # Warning: no config file specified, using the default config. In order to specify a config file use ./redis-server /path/to/redis.conf

12670:M 08 Jul 2019 15:17:07.389 * Increased maximum number of open files to 10032 (it was originally set to 1024).

                _._

           _.-``__ ''-._

      _.-``    `.  `_.  ''-._           Redis 5.0.5 (00000000/0) 64 bit

  .-`` .-```.  ```\/    _.,_ ''-._

 (    '      ,       .-`  | `,    )     Running in standalone mode

 |`-._`-...-` __...-.``-._|'` _.-'|     Port: 6379

 |    `-._   `._    /     _.-'    |     PID: 12670

  `-._    `-._  `-./  _.-'    _.-'

 |`-._`-._    `-.__.-'    _.-'_.-'|

 |    `-._`-._        _.-'_.-'    |           http://redis.io

  `-._    `-._`-.__.-'_.-'    _.-'

 |`-._`-._    `-.__.-'    _.-'_.-'|

 |    `-._`-._        _.-'_.-'    |

  `-._    `-._`-.__.-'_.-'    _.-'

      `-._    `-.__.-'    _.-'

          `-._        _.-'

              `-.__.-'

12670:M 08 Jul 2019 15:17:07.391 # WARNING: The TCP backlog setting of 511 cannot be enforced because /proc/sys/net/core/somaxconn is set to the lower value of 128.

12670:M 08 Jul 2019 15:17:07.391 # Server initialized

12670:M 08 Jul 2019 15:17:07.391 # WARNING overcommit_memory is set to 0! Background save may fail under low memory condition. To fix this issue add 'vm.overcommit_memory = 1' to /etc/sysctl.conf and then reboot or run the command 'sysctl vm.overcommit_memory=1' for this to take effect.

12670:M 08 Jul 2019 15:17:07.391 # WARNING you have Transparent Huge Pages (THP) support enabled in your kernel. This will create latency and memory usage issues with Redis. To fix this issue run the command 'echo never > /sys/kernel/mm/transparent_hugepage/enabled' as root, and add it to your /etc/rc.local in order to retain the setting after a reboot. Redis must be restarted after THP is disabled.

12670:M 08 Jul 2019 15:17:07.391 * Ready to accept connections
如图:redis启动成功,但是这种凡是需要一直打开窗口,不能进行其他操作,不方便
ctrl+c可以关闭程序
2、以后台进程方式启动redis
第一步:修改redis.conf文件
daemonize参数:

      redis.conf配置文件中daemonize守护进程,默认是NO。

      daemonize是用来指定redis是否要用守护进程的方式启动

daemonize设置yes或者no的区别:

  daemonize:yes:redis采用的是单进程多线程的模式,当redis.conf中选项daemonize参数为yes时,代表开启守护进程模式,该模式下,redis会在后台运行,并将进程pid号写入到redis.conf选项pidfile设置的文件中,此时redis将一直运行,除非手动kill该进程。

  daemonize:no:当daemonize选项设置为no时,当前界面将进入redis的命令界面,exit强制退出或者关闭连接工具(putty、xshell等工具)都会导致redis进程退出
redis的配置文件在redis的主目录下:
文件名:redis.conf
编辑文件:
# vim redis.conf

我们修改为yes:

绑定地址(默认仅主机可连接,修改为任意主机可以连接):
第二步:指定redis.conf文件启动
[root@yzn redis-5.0.5]# /usr/local/redis-5.0.5/src/redis-server /usr/local/redis-5.0.5/redis.conf
12706:C 08 Jul 2019 15:33:16.232 # oO0OoO0OoO0Oo Redis is starting oO0OoO0OoO0Oo
12706:C 08 Jul 2019 15:33:16.233 # Redis version=5.0.5, bits=64, commit=00000000, modified=0, pid=12706, just started
12706:C 08 Jul 2019 15:33:16.233 # Configuration loaded
查看程序是否启动

这里我们看到已经后台运行了,注意这里监听的地址为127.0.0.1:6379也就是只能本机连接需要局域网其它设别连接我们需要再修改配置文件修改bind参数
使用kill杀死进程:
# kill 12707
# 注意:这里的12707是进程id号,在ps命令中查到的
3、设置redis开机自启:
第一步、添加开机启动服务:
[root@yzn ~]# vim /etc/systemd/system/redis-server.service #文件不存在要编辑创建
[Unit]
Description=The redis-server Process Manager
After=syslog.target network.target
[Service]
Type=forking
PIDFile=/var/run/redis_6379.pid
ExecStart=/usr/local/redis-5.0.5/src/redis-server /usr/local/redis-5.0.5/redis.conf
PrivateTmp=True
[Install]
WantedBy=multi-user.target
设置为开机启动:
# systemctl daemon-reload
启动服务
# systemctl start redis-server
# 注:暂时没有添加暂停服务,后续会添加上
centos7下编译安装redis5.05的更多相关文章
- CentOS7下编译安装redis-5.0.9
CentOS7下编译安装redis-5.0.9 本文地址http://yangjianyong.cn/?p=171转载无需经过作者本人授权 下载redis #code start wget https ...
- centos7下编译安装php-7.0.15(PHP-FPM)
centos7下编译安装php-7.0.15(PHP-FPM) 一.下载php7源码包 http://php.net/downloads.php 如:php-7.0.15.tar.gz 二.安装所需依 ...
- CentOS7 下编译安装 Samba,什么是 SMB/CIFS 协议
目录 一.关于 Samba 1. SMB 2. Samba 二.yum 安装 Samba 1. 安装 Samba 2. 查看版本 3. 查看配置文件 4. 启动服务 5. 本地客户端验证 6. Win ...
- centos7下编译安装php7.3
一.下载php7.3的源码 https://www.php.net/downloads.php 下载php-7.3.4.tar.gz 二.安装gcc,gcc-c++,kernel-devel yum ...
- CentOS7下编译安装Python3.7.x【亲测有效】
所有操作都在root用户下操作 下载安装包 编译安装 建立软链接 验证 安装: 更新yum: yum update 安装Python依赖: yum install openssl-devel bzip ...
- centos7下编译安装nginx-1.16.0
一.下载nginx源码 http://nginx.org/en/download.html 如:nginx-1.16.0.tar.gz 二.创建用户和组,并解压 groupadd www userad ...
- Centos7下编译安装php扩展redis5.0.2
安装环境:centos7 + php 7.2.191. 下载地址:http://pecl.php.net/get/redis-5.0.2.tgz .tgz http://pecl.php.net/ge ...
- CentOS7中编译安装redis5.0
1. 环境介绍 CentOS7 (未安装Development Tools) 2. 下载Redis5.0-rc3 wget -O redis-5.0-rc3.tar.gz https://github ...
- centos7下编译安装python3.7,且与python2.7.5共存
环境:Centos7.6 x64 一.安装python3.7 下载python源码包: wget https://www.python.org/ftp/python/3.7.4/Python-3.7. ...
随机推荐
- PERC H310 配置详细步骤【阵列RAID创建】【阵列恢复】【阵列池创建】
机器配置: HP PRO6300 二手淘的201912,HP的主板芯片Intel Q75芯片组,集成显卡(集成显卡与H310阵列卡冲突),CPU Intel I5 3450 [raid5阵列创建] 1 ...
- ansible基本使用(一)
ansible是什么? ansible是新出现的自动化运维工具,基于Python开发,集合了众多运维工具(puppet.chef.func.fabric)的优点,实现了批量系统配置.批量程序部署.批量 ...
- hydra-爆破工具的使用
0x01简介 hydra 是一个支持众多协议的爆破工具,在kali上集成,但也可以在windows上下载运行: github上的源码: https://github.com/vanhauser-thc ...
- 吴裕雄--天生自然 R语言数据可视化绘图(3)
par(ask=TRUE) opar <- par(no.readonly=TRUE) # record current settings # Listing 11.1 - A scatter ...
- 清北学堂—2020.1提高储备营—Day 2 afternoon(线段树、树状数组)
qbxt Day 2 afternoon --2020.1.18 济南 主讲:李佳实 目录一览 1.线段树 2.二叉搜索树(略过) 3.树状数组 总知识点:基础数据结构(本人初学感觉好难) 一.线段树 ...
- UPAD for iCloud
UPAD for iCloud笔记软件 在笔记软件中创建文件夹橡皮:按两下橡皮就是清除整个屏幕导出笔记到pdf,或者直接导出到其他应用中打开在当前页面中新建一个页面删除某个页面
- VMware Workstation Pro工具
安装包 链接:https://pan.baidu.com/s/1n-URb83lHtric3Ds8UbF9Q 提取码:c9z5 密钥 FF31K-AHZD1-H8ETZ-8WWEZ-WUUVA CV7 ...
- 任意指定一个key获取该key所处在哪个node节点
需求:任意指定一个key获取该key所处在哪个node节点上. 说明:redis自带的命令可以知道一个key所属的slot,可以知道node master对应哪些slot,但没有key和node的对应 ...
- 随机定时修改密码change_passwd.sh
change_passwd.sh #!/bin/sh /usr/bin/chattr -i /etc/passwd /etc/shadow /etc/group /etc/gshadow /usr/b ...
- SpringMVC中的参数绑定
SpringMVC中的参数绑定 参数绑定的定义 所谓参数绑定,简单来说就是客户端发送请求,而请求中包含一些数据,那么这些数据怎么到达 Controller.从客户端请求key/value数据(比如ge ...