
Netty中CompositeByteBuf的理解以及读写操作
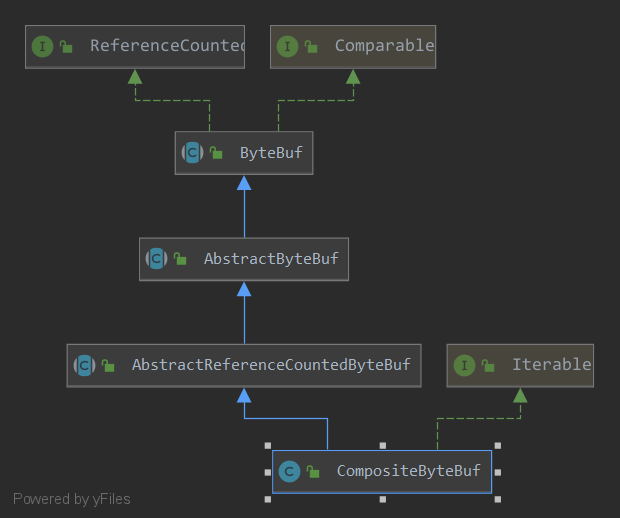
CompositeByteBuf实际上是一个虚拟化的ByteBuf,作为一个ByteBuf特殊的子类,可以用来对多个ByteBuf统一操作,一般情况下,CompositeByteBuf对多个ByteBuf操作并不会出现复制拷贝操作,只是保存原来ByteBuf的引用。
在正式开始介绍·CompositeByteBuf之前 需要先介绍一下CompositeByteBuf的一个重要的内部类Component .
(在CompositeByteBuf中保存有一个Component 类型的数组,这是整个CompositeByteBuf实现的关键数据结构。)
Component 称之为组件,是对原始ByteBuf的包装的数据结构
Component 含几个有重要的属性
final ByteBuf srcBuf; // the originally added buffer

int srcAdjustment; // index of the start of this CompositeByteBuf relative to srcBuf

int offset; // offset of this component within this CompositeByteBuf

int endOffset; // end offset of this component within this CompositeByteBuf
srcBuf
指向原始的一个ByteBuf 保证不需要复制原始的ByteBuf 就可以达到读写的目的
adjustment 标记经过Component包装后在整个现有坐标和现在坐标的偏移量srcAdjustment
srcBuf 的开始坐标相对于整个ConpositeByteBuf的相对坐标
offset
标记经过Component包装后开始位置的坐标的实际坐标
endOffset
标记经过Component包装后结束位置的坐标的实际坐标
所以在内部,只要通过offset和endOffset 将每一个component 所代表的ByteBuf 连接起来 就可以将全部的ByteBuf 视为一个ByteBuf
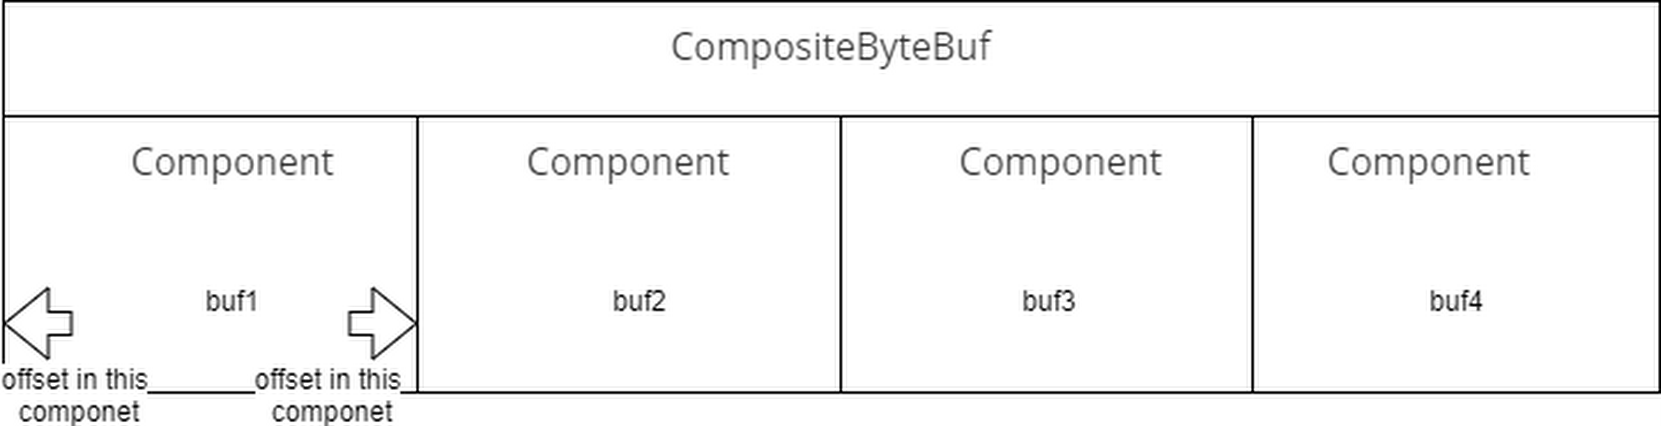
所以我们可以这样认为,在CompositeByteBuf 中,保存着一个包装有原始ByteBuf引用以及ByteBuf在当前的CompositeByteBuf 的相对位置的实例集合.
那么这个虚拟化的ByteBuf是如何生成的,以及是如何读写底层的数据结构的ByteBuf
我们来看一下其中的一个构造函数
    CompositeByteBuf(ByteBufAllocator alloc, boolean direct, int maxNumComponents,

                     ByteBuf[] buffers, int offset) {

        this(alloc, direct, maxNumComponents, buffers.length - offset);

//        第二个参数cIndex=0 表示新增加的buffers插入到0开始的位置 原来的组件往后移动

        addComponents0(false, 0, buffers, offset);

//        如果需要 合并全部组件为一个组件

        consolidateIfNeeded();

//        设置已经写满 不可再写 可以从头开始读取

        setIndex0(0, capacity());

    }
其中最重要的是addComponents0的这个函数,因为初始化时组件数组为空,所以我们应该从第一个位置开始新增新的组件
//    将buffer从arrOffset开始的元素依此添加到cIndex开始的组件数组中

    private CompositeByteBuf addComponents0(boolean increaseWriterIndex,

                                            final int cIndex, ByteBuf[] buffers, int arrOffset) {

        final int len = buffers.length, count = len - arrOffset;//count 真正增加的数量

        // only set ci after we've shifted so that finally block logic is always correct

        int ci = Integer.MAX_VALUE;

        try {

//            检查是否支持在cIndex位置开始添加

            checkComponentIndex(cIndex);

//            如果是插入到现有集合的元素中的话  移动组件到合适的位置

            shiftComps(cIndex, count); // will increase componentCount

//           nextOffset 表示插入的第一个组件的所对应的byteBuf起始位置在整个CompositeByteBuf(实际上也是一个ByteBuf)的位置

            int nextOffset = cIndex > 0 ? components[cIndex - 1].endOffset : 0;

            for (ci = cIndex; arrOffset < len; arrOffset++, ci++) {

                ByteBuf b = buffers[arrOffset];

                if (b == null) {

                    break;

                }

//                新建一个组件用于存放 记录全局位置

                Component c = newComponent(ensureAccessible(b), nextOffset);

//                保存到组件数组中

                components[ci] = c;

//                下一个组件的起始位置等于上一个组件的endOffset 实际上是上一个组件的nextOffset+len

                nextOffset = c.endOffset;

            }

            return this;

        } finally {

            // ci is now the index following the last successfully added component

            if (ci < componentCount) {

                if (ci < cIndex + count) {

//                如果添加完毕 还有部分组件的空间没有使用

//                实际上是部分因为元素为空无法添加进来

//                 那么实际上在最后的地方是存在空的数组元素的 需要释放掉

                    // we bailed early

                    removeCompRange(ci, cIndex + count);

                    for (; arrOffset < len; ++arrOffset) {

//                        释放掉没有添加到组件的其他byteBuf

                        ReferenceCountUtil.safeRelease(buffers[arrOffset]);

                    }

                }

//                需要更新一下被插入元素的后续偏移量

//

                updateComponentOffsets(ci); // only need to do this here for components after the added ones

            }

//            如果需要更新写的坐标的 todo 写入正常? 是否正常都应该更新!

//             需要添加写入的为真正添加的坐标

            if (increaseWriterIndex && ci > cIndex && ci <= componentCount) {

                writerIndex += components[ci - 1].endOffset - components[cIndex].offset;

            }

        }

    }
然后新建新的组件操作
@SuppressWarnings("deprecation")

    private Component newComponent(final ByteBuf buf, final int offset) {

        final int srcIndex = buf.readerIndex();

        final int len = buf.readableBytes();

        // unpeel any intermediate outer layers (UnreleasableByteBuf, LeakAwareByteBufs, SwappedByteBuf)

        ByteBuf unwrapped = buf;

        int unwrappedIndex = srcIndex;

        while (unwrapped instanceof WrappedByteBuf || unwrapped instanceof SwappedByteBuf) {

            unwrapped = unwrapped.unwrap();

        }

        // unwrap if already sliced

        if (unwrapped instanceof AbstractUnpooledSlicedByteBuf) {

            unwrappedIndex += ((AbstractUnpooledSlicedByteBuf) unwrapped).idx(0);

            unwrapped = unwrapped.unwrap();

        } else if (unwrapped instanceof PooledSlicedByteBuf) {

            unwrappedIndex += ((PooledSlicedByteBuf) unwrapped).adjustment;

            unwrapped = unwrapped.unwrap();

        } else if (unwrapped instanceof DuplicatedByteBuf || unwrapped instanceof PooledDuplicatedByteBuf) {

            unwrapped = unwrapped.unwrap();

        }

        // We don't need to slice later to expose the internal component if the readable range

        // is already the entire buffer

//        如果整个buf都是可以被读取的 则保存一个切片

        final ByteBuf slice = buf.capacity() == len ? buf : null;

        return new Component(buf.order(ByteOrder.BIG_ENDIAN), srcIndex,

                unwrapped.order(ByteOrder.BIG_ENDIAN), unwrappedIndex, offset, len, slice);

    }
调用Component的构造方法,将原始的byteBuf和经过解包的byteBuf已经相应的偏移值保存起来
Component(ByteBuf srcBuf, int srcOffset, ByteBuf buf, int bufOffset,

          int offset, int len, ByteBuf slice) {

    this.srcBuf = srcBuf;

    this.srcAdjustment = srcOffset - offset;

    this.buf = buf;

    this.adjustment = bufOffset - offset;

    this.offset = offset;

    this.endOffset = offset + len;

    this.slice = slice;

}
接下来看看给定一个的CompositeByteBuf实例的下标,如何读取一个字节
以下面的方法为例
    @Override

    public byte getByte(int index) {

//        通过下标在组件数组中找到合适的组件实例

        Component c = findComponent(index);

//        将下标转换为组件实例中(对应的ByteBuf)的下标读取

        return c.buf.getByte(c.idx(index));

    }
    private Component findComponent(int offset) {

        Component la = lastAccessed;

//       如果最近访问过 那么最近读取这个组件可能就是我们要的

//        一个缓存 优化 实际上也可以不要 性能差一些

        if (la != null && offset >= la.offset && offset < la.endOffset) {

            ensureAccessible();

            return la;

        }

        checkIndex(offset);

//        二分查找

        return findIt(offset);

    }
    private Component findIt(int offset) {

//        遍历组件 找到这个组件应该满足offset<=index<=endOffset

        for (int low = 0, high = componentCount; low <= high; ) {

            int mid = low + high >>> 1;

            Component c = components[mid];

            if (offset >= c.endOffset) {

                low = mid + 1;

            } else if (offset < c.offset) {

                high = mid - 1;

            } else {

                lastAccessed = c;

                return c;

            }

        }

        throw new Error("should not reach here");

    }
到这里已经找到那个合适的组件实例了 只要将全局的index 转换为组件实例的局部index 就可以获得对应的字节值返回了 即组件实例的idx方法
        int idx(int index) {

//            加上相对位置的偏移量 这个实际是一个负值

            return index + adjustment;

        }
而写入也是一样的情况 ,找个合适的组件实例,转换为实例的局部下标 写入即可
@Override

public CompositeByteBuf setByte(int index, int value) {

    Component c = findComponent(index);

    c.buf.setByte(c.idx(index), value);

    return this;

}
参考
《Netty 实战》
netty version 4.1.45.Final
Netty中CompositeByteBuf的理解以及读写操作的更多相关文章
- 第9.11节 Python中IO模块文件打开读写操作实例
为了对前面学习的内容进行一个系统化的应用,老猿写了一个程序来进行文件相关操作功能的测试. 一. 测试程序说明 该程序允许测试人员选择一个文件,自己输入文件打开模式.写入文件的位置以及写入内容,程序按照 ...
- !!无须定义配置文件中的每个变量的读写操作,以下代码遍历界面中各个c#控件,自动记录其文本,作为配置文件保存
namespace PluginLib{ /// <summary> /// 遍历控件所有子控件并初始化或保存其值 /// </summary> pub ...
- Python中关于txt的简单读写模式与操作
Python中关于txt的简单读写操作 常用的集中读写模式: 1.r 打开只读文件,该文件必须存在. 2.r+ 打开可读写的文件,该文件必须存在. 3.w 打开只写文件,若文件存在则文件长度清为0,即 ...
- io流对文件读写操作
public static void main(String[] args) throws IOException { BufferedReader reader = new BufferedRead ...
- INI 文件的读写操作
在C#中对INI文件进行读写操作,在此要引入using System.Runtime.InteropServices; 命名空间,具体方法如下: #region 变量 private static r ...
- ASP.NET MVC Filters 4种默认过滤器的使用【附示例】 数据库常见死锁原因及处理 .NET源码中的链表 多线程下C#如何保证线程安全? .net实现支付宝在线支付 彻头彻尾理解单例模式与多线程 App.Config详解及读写操作 判断客户端是iOS还是Android,判断是不是在微信浏览器打开
ASP.NET MVC Filters 4种默认过滤器的使用[附示例] 过滤器(Filters)的出现使得我们可以在ASP.NET MVC程序里更好的控制浏览器请求过来的URL,不是每个请求都会响 ...
- 理解Netty中的零拷贝(Zero-Copy)机制【转】
理解零拷贝 零拷贝是Netty的重要特性之一,而究竟什么是零拷贝呢? WIKI中对其有如下定义: “Zero-copy” describes computer operations in which ...
- 一个I/O线程可以并发处理N个客户端连接和读写操作 I/O复用模型 基于Buf操作NIO可以读取任意位置的数据 Channel中读取数据到Buffer中或将数据 Buffer 中写入到 Channel 事件驱动消息通知观察者模式
Tomcat那些事儿 https://mp.weixin.qq.com/s?__biz=MzI3MTEwODc5Ng==&mid=2650860016&idx=2&sn=549 ...
- berkerly db 中简单的读写操作(有一些C的 还有一些C++的)
最近在倒腾BDB,才发现自己确实在C++这一块能力很弱,看了一天的api文档,总算是把BDB的一些api之间的关系理清了,希望初学者要理清数据库基本知识中的环境,句柄,游标的基本概念,这样有助于你更好 ...
随机推荐
- JAVA System.exit(0) 和 System.exit(1) 的区别
System.exit(int state) 方法都是来结束当前运行的java虚拟机.所有System.exit(1).System.exit(0) 执行后都会退出程序. state为0时时正常退出, ...
- pytorch之 activation funcion
import torch import torch.nn.functional as F from torch.autograd import Variable import matplotlib.p ...
- 持续集成:jenkins集合
持续集成:jenkins集合 jenkins(一): 持续集成和Jenkins简介 jenkins(二): Jenkins的安装 jenkins(三): Jenkins的应用场景和job ...
- windows系统端口占用
这几天win服务器几个服务总是停止运行,查询原因是端口被占用,解决方法 在dos窗口中使用以下命令 netstat -a 显示所有连接和监听端口 netstat -b 显示包含于创建 ...
- pt-query-digest 慢日志监控
一.安装percona-toolkit,以centos为例 yum -y install https://repo.percona.com/yum/percona-release-latest.noa ...
- 国内jenkins搭建不再龟速的方式
最新国内jenkisn搭建过程 第一步下载jenkins 点击进入清华源jenkins下载地址,我们下载的是jenkins-2.204.2.zip版本 之后解压后安装. 第二步配置管理员密码 自动弹出 ...
- vs code支持 es6, node.js 语法提示
npm install --save-dev @types/node 安装这个东西就可以了, 代码拷走, 回去愉快的敲代码吧
- Windows远程连接Ubuntu上的MySQL数据库
原因:mysql安装好后,默认监听3306端口,并且只允许localhost访问,只允许root用户在localhost上登录. 我的环境: Ubuntu16.04 ...
- 1. c++实现最最最原始人的数字时钟
网课c++第一次作业,学到了iomanip库文件里的setw(),setfill()等函数,自己完成作业时搜着学到了Windows.h库文件里的sleep(),system("cls&quo ...
- opencv —— contourArea、arcLength 计算轮廓面积与长度
计算轮廓面积:contourArea 函数 double contourArea(InputArray contour, bool oriented = false); contour,输入的二维点集 ...