
UWP通过机器学习加载ONNX进行表情识别
首先我们先来说说这个ONNX
ONNX是一种针对机器学习所设计的开放式的文件格式,用于存储训练好的模型。它使得不同的人工智能框架(如Pytorch, MXNet)可以采用相同格式存储模型数据并交互。 ONNX的规范及代码主要由微软,亚马逊 ,Facebook 和 IBM 等公司共同开发,以开放源代码的方式托管在Github上。目前官方支持加载ONNX模型并进行推理的深度学习框架有: Caffe2, PyTorch, MXNet,ML.NET,TensorRT 和 Microsoft CNTK,并且 TensorFlow 也非官方的支持ONNX。---维基百科
看了上面的引用 大家应该知道了 这个其实是个文件格式用来存储训练好的模型,所以我这篇帖子既然是做表情识别那肯定是需要有个能识别表情的模型。有了这个模型我们就可以根据图片上的人物,进行表情的识别判断了。
刚好微软对机器学习这块也挺上心的,所以我也趁着疫情比较闲,就来学习学习了。UWP的机器学习的api微软已经切成正式了,所以大家可以放心使用。
这就是uwp api文档 开头就是AI的
我其实是个小白 所以我就直接拿官方的一个demo的简化版来进行讲解了,官方的demo演示如下。

这个app就是通过摄像头读取每一帧 进行和模型匹配得出结果的
下面是机器学习的微软的github地址
Emoji8的git地址
我今天要说的就是这个demo的简化代码大致运行流程
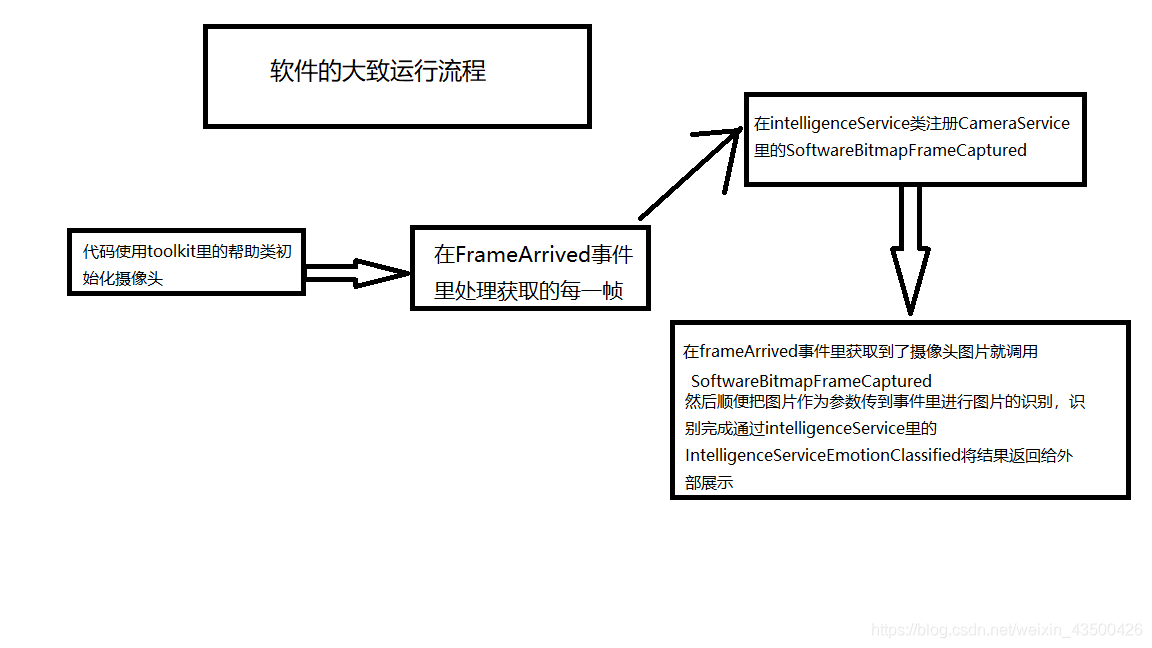
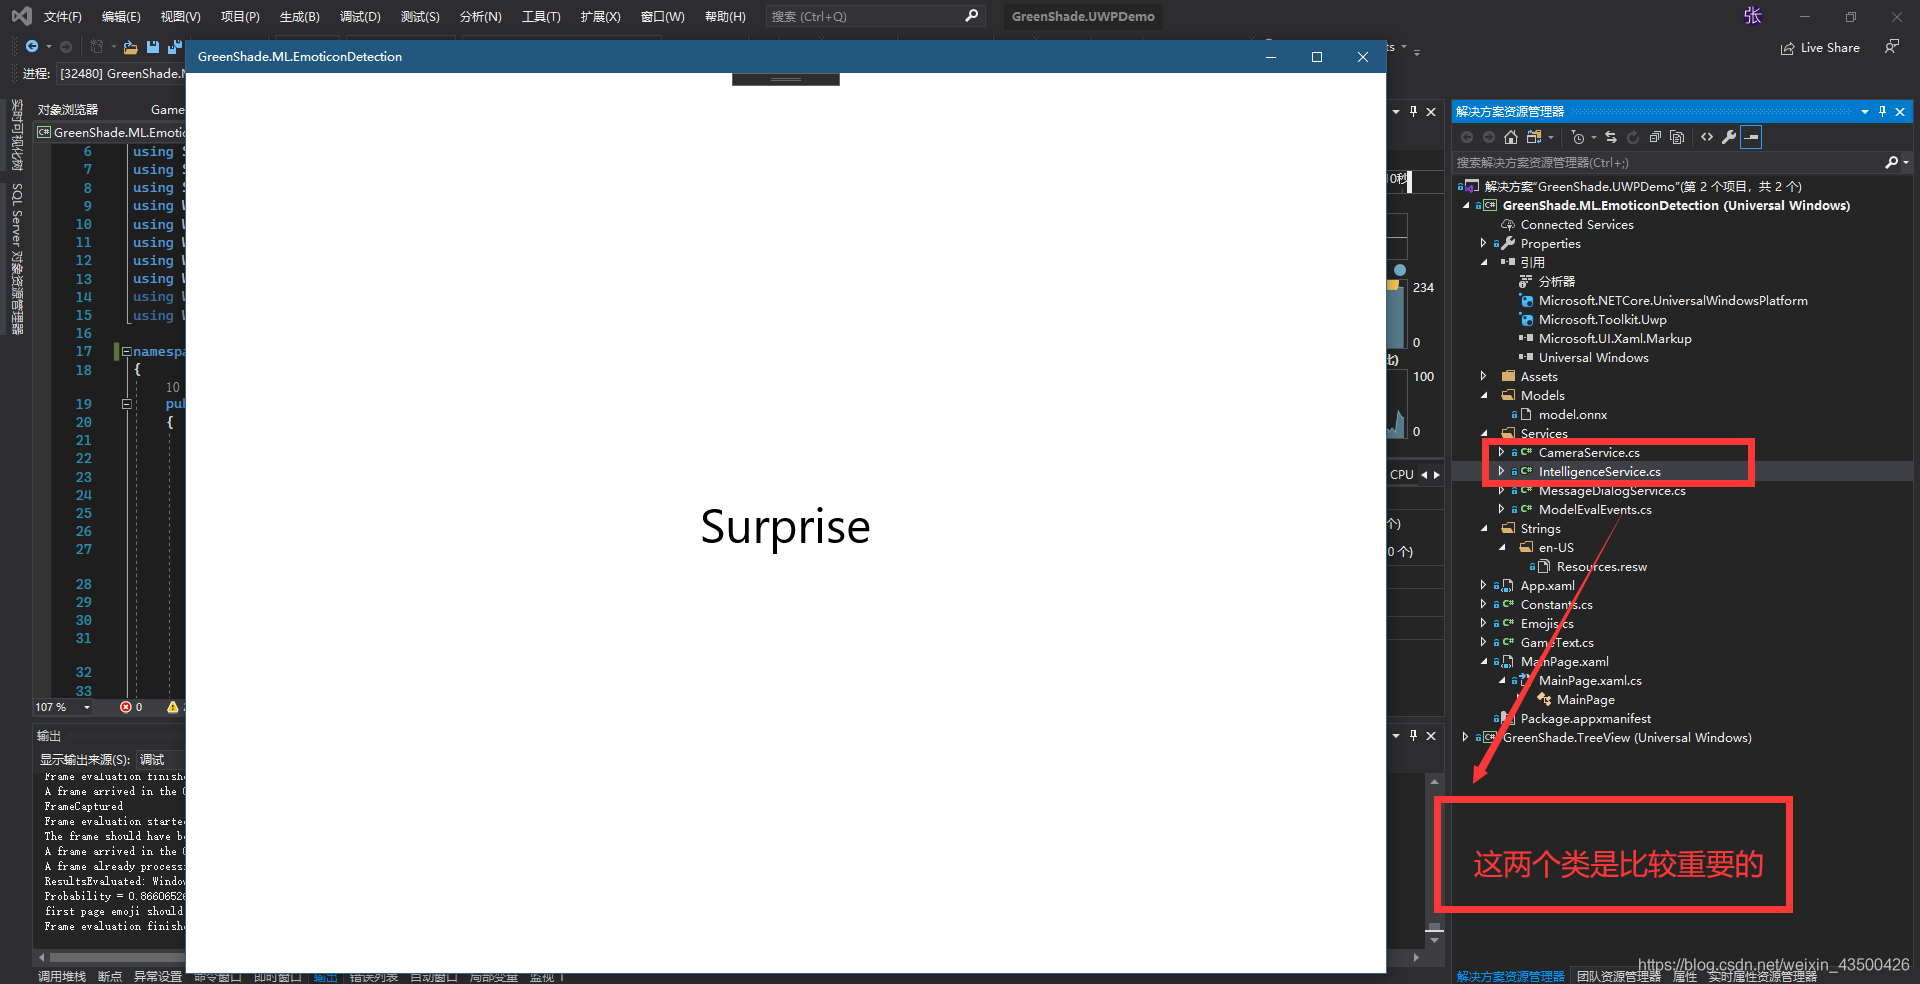
下面是项目结构图
我把官方项目简化了 所以只留下了识别后的文本移除了一些依赖的库
核心代码在IntelligenceService类里的Current_SoftwareBitmapFrameCaptured方法里
 private async void Current_SoftwareBitmapFrameCaptured(object sender, SoftwareBitmapEventArgs e)

        {

            Debug.WriteLine("FrameCaptured");

            Debug.WriteLine($"Frame evaluation started {DateTime.Now}" );

            if (e.SoftwareBitmap != null)

            {

                BitmapPixelFormat bpf = e.SoftwareBitmap.BitmapPixelFormat;

                var uncroppedBitmap = SoftwareBitmap.Convert(e.SoftwareBitmap, BitmapPixelFormat.Nv12);

                var faces = await _faceDetector.DetectFacesAsync(uncroppedBitmap);

                if (faces.Count > 0)

                {

                    //crop image to focus on face portion

                    var faceBox = faces[0].FaceBox;

                    VideoFrame inputFrame = VideoFrame.CreateWithSoftwareBitmap(e.SoftwareBitmap);

                    VideoFrame tmp = null;

                    tmp = new VideoFrame(e.SoftwareBitmap.BitmapPixelFormat, (int)(faceBox.Width + faceBox.Width % 2) - 2, (int)(faceBox.Height + faceBox.Height % 2) - 2);

                    await inputFrame.CopyToAsync(tmp, faceBox, null);

                    //crop image to fit model input requirements

                    VideoFrame croppedInputImage = new VideoFrame(BitmapPixelFormat.Gray8, (int)_inputImageDescriptor.Shape[3], (int)_inputImageDescriptor.Shape[2]);

                    var srcBounds = GetCropBounds(

                        tmp.SoftwareBitmap.PixelWidth,

                        tmp.SoftwareBitmap.PixelHeight,

                        croppedInputImage.SoftwareBitmap.PixelWidth,

                        croppedInputImage.SoftwareBitmap.PixelHeight);

                    await tmp.CopyToAsync(croppedInputImage, srcBounds, null);

                    ImageFeatureValue imageTensor = ImageFeatureValue.CreateFromVideoFrame(croppedInputImage);

                    _binding = new LearningModelBinding(_session);

                    TensorFloat outputTensor = TensorFloat.Create(_outputTensorDescriptor.Shape);

                    List<float> _outputVariableList = new List<float>();

                    // Bind inputs + outputs

                    _binding.Bind(_inputImageDescriptor.Name, imageTensor);

                    _binding.Bind(_outputTensorDescriptor.Name, outputTensor);

                    // Evaluate results

                    var results = await _session.EvaluateAsync(_binding, new Guid().ToString());

                    Debug.WriteLine("ResultsEvaluated: " + results.ToString());

                    var outputTensorList = outputTensor.GetAsVectorView();

                    var resultsList = new List<float>(outputTensorList.Count);

                    for (int i = 0; i < outputTensorList.Count; i++)

                    {

                        resultsList.Add(outputTensorList[i]);

                    }

                    var softMaxexOutputs = SoftMax(resultsList);

                    double maxProb = 0;

                    int maxIndex = 0;

                    // Comb through the evaluation results

                    for (int i = 0; i < Constants.POTENTIAL_EMOJI_NAME_LIST.Count(); i++)

                    {

                        // Record the dominant emotion probability & its location

                        if (softMaxexOutputs[i] > maxProb)

                        {

                            maxIndex = i;

                            maxProb = softMaxexOutputs[i];

                        }

                    }

                    Debug.WriteLine($"Probability = {maxProb}, Threshold set to = {Constants.CLASSIFICATION_CERTAINTY_THRESHOLD}, Emotion = {Constants.POTENTIAL_EMOJI_NAME_LIST[maxIndex]}");

                    // For evaluations run on the MainPage, update the emoji carousel

                    if (maxProb >= Constants.CLASSIFICATION_CERTAINTY_THRESHOLD)

                    {

                        Debug.WriteLine("first page emoji should start to update");

                        IntelligenceServiceEmotionClassified?.Invoke(this, new ClassifiedEmojiEventArgs(CurrentEmojis._emojis.Emojis[maxIndex]));

                    }

                    // Dispose of resources

                    if (e.SoftwareBitmap != null)

                    {

                        e.SoftwareBitmap.Dispose();

                        e.SoftwareBitmap = null;

                    }

                }

            }

            IntelligenceServiceProcessingCompleted?.Invoke(this, null);

            Debug.WriteLine($"Frame evaluation finished {DateTime.Now}");

        }

        //WinML team function

        private List<float> SoftMax(List<float> inputs)

        {

            List<float> inputsExp = new List<float>();

            float inputsExpSum = 0;

            for (int i = 0; i < inputs.Count; i++)

            {

                var input = inputs[i];

                inputsExp.Add((float)Math.Exp(input));

                inputsExpSum += inputsExp[i];

            }

            inputsExpSum = inputsExpSum == 0 ? 1 : inputsExpSum;

            for (int i = 0; i < inputs.Count; i++)

            {

                inputsExp[i] /= inputsExpSum;

            }

            return inputsExp;

        }

        public static BitmapBounds GetCropBounds(int srcWidth, int srcHeight, int targetWidth, int targetHeight)

        {

            var modelHeight = targetHeight;

            var modelWidth = targetWidth;

            BitmapBounds bounds = new BitmapBounds();

            // we need to recalculate the crop bounds in order to correctly center-crop the input image

            float flRequiredAspectRatio = (float)modelWidth / modelHeight;

            if (flRequiredAspectRatio * srcHeight > (float)srcWidth)

            {

                // clip on the y axis

                bounds.Height = (uint)Math.Min((srcWidth / flRequiredAspectRatio + 0.5f), srcHeight);

                bounds.Width = (uint)srcWidth;

                bounds.X = 0;

                bounds.Y = (uint)(srcHeight - bounds.Height) / 2;

            }

            else // clip on the x axis

            {

                bounds.Width = (uint)Math.Min((flRequiredAspectRatio * srcHeight + 0.5f), srcWidth);

                bounds.Height = (uint)srcHeight;

                bounds.X = (uint)(srcWidth - bounds.Width) / 2; ;

                bounds.Y = 0;

            }

            return bounds;

        }
感兴趣的朋友可以把官方的代码和我的代码都克隆下来看一看,玩一玩。
我的简化版的代码 地址如下
简化版表情识别代码地址
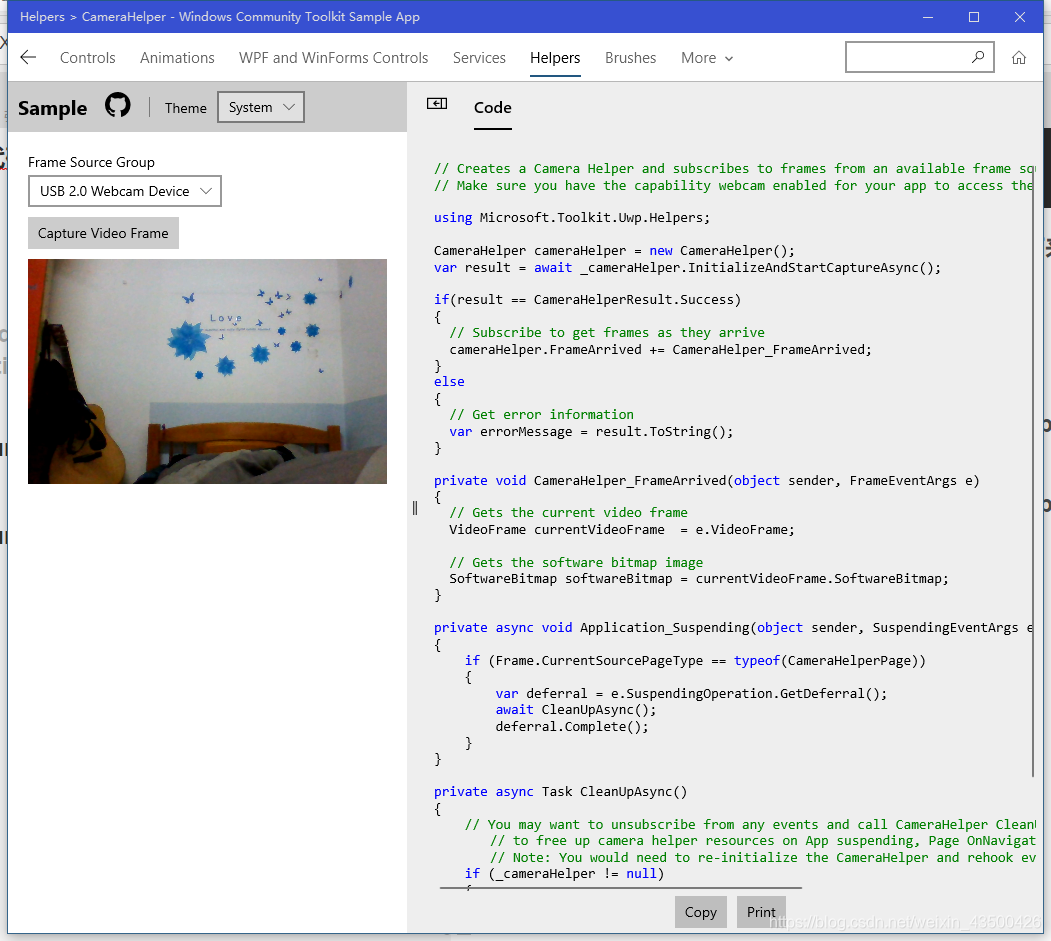
特别感谢 Windows Community Toolkit Sample App提供的摄像头辅助类
商店搜索 Windows Community Toolkit Sample App就能下载
讲的不好的地方 希望大家给与批评
UWP通过机器学习加载ONNX进行表情识别的更多相关文章
- xamarin UWP设置HUD加载功能
使用xamarin开发的时候经常用到加载HUD功能,就是我们常见的一个加载中的动作,Android 下使用 AndHUD , iOS 下使用 BTProgressHUD, 这两个在在 NuGet 上都 ...
- win10 uwp 发布旁加载自动更新
在很多企业使用的程序都是不能通过微软商店发布,原因很多,其中我之前的团队开发了很久的应用,结果发现没有用户能从微软应用商店下载所以我对应用商店没有好感.但是作为一个微软粉丝,怎么能不支持 UWP 开发 ...
- 深度学习之加载VGG19模型分类识别
主要参考博客: https://blog.csdn.net/u011046017/article/details/80672597#%E8%AE%AD%E7%BB%83%E4%BB%A3%E7%A0% ...
- 2019-11-25-win10-uwp-发布旁加载自动更新
原文:2019-11-25-win10-uwp-发布旁加载自动更新 title author date CreateTime categories win10 uwp 发布旁加载自动更新 lindex ...
- 2019-3-1-win10-uwp-发布旁加载自动更新
title author date CreateTime categories win10 uwp 发布旁加载自动更新 lindexi 2019-03-01 09:40:27 +0800 2019-0 ...
- UWP开发细节记录:加载图像文件到D2D位图和D3D纹理
在UWP中加载文件一般先创建 StorageFile 对象,然后调用StorageFile.OpenReadAsync 方法得到一个IRandomAccessStream 接口用来读取数据: Stor ...
- (sklearn)机器学习模型的保存与加载
需求: 一直写的代码都是从加载数据,模型训练,模型预测,模型评估走出来的,但是实际业务线上咱们肯定不能每次都来训练模型,而是应该将训练好的模型保存下来 ,如果有新数据直接套用模型就行了吧?现在问题就是 ...
- Windows 10开发基础——VS2015 Update1新建UWP项目,XAML设计器无法加载的解决
这次,我们来解决一个问题...在使用Visual Studio 2015 Update 1的时候,新建一个UWP的项目,XAML设计器就会崩,具体异常信息如下图: 解决方法如下:下面圈出的那个路径就按 ...
- 分享大麦UWP版本开发历程-03.GridView或ListView 滚动底部自动加载后续数据
今天跟大家分享的是大麦UWP客户端,在分类.订单或是搜索时都用到的一个小技巧,技术粗糙大神勿喷. 以大麦分类举例,默认打开的时候,会为用户展示20条数据,当用户滚动鼠标或者使用手势将列表滑动到倒数第二 ...
随机推荐
- Elasticsearch如何修改Mapping结构并实现业务零停机
Elasticsearch 版本:6.4.0 一.疑问 在项目中后期,如果想调整索引的 Mapping 结构,比如将 ik_smart 修改为 ik_max_word 或者 增加分片数量 等,但 El ...
- MyBatis5——Mybatis整合log4j、延迟加载
开启日志:Log4j (1)加入jar包 (2)在conf.xml中配置开启日志: <settings> <!-- 开启日志,并指定要使用的具体日志为log4j -- ...
- Dynamics 365 CRM Connected Field Service 不能接收IoT Alert
今天浪费了2,3个小时再connected field service(CFS)上面. 状况如下 1. 在CFS中添加了新的customer assets,并且点击了注册按钮. 2. 注册步骤一直在i ...
- 令牌桶算法实现API限流
令牌桶算法( Token Bucket )和 Leaky Bucket 效果一样但方向相反的算法,更加容易理解.随着时间流逝,系统会按恒定 1/QPS 时间间隔(如果 QPS=100 ,则间隔是 10 ...
- 浏览器无法进入GitHub(已解决)
时间:2020/1/22 今天突然chrome登不上GitHub,一直出现响应时间过长的问题,如下: 开始还以为是GitHub服务器出问题了(虽然概率很小.....),但这种情况一直持续了几个小时,我 ...
- PAT乙级(Basic Level)真题,福尔摩斯的约会
题目描述 大侦探福尔摩斯接到一张奇怪的字条:“我们约会吧! 3485djDkxh4hhGE 2984akDfkkkkggEdsb s&hgsfdk d&Hyscvnm”.大侦探很快就明 ...
- Node.js实战--资源压缩与zlib模块
Blog:<NodeJS模块研究 - zlib> Github:https://github.com/dongyuanxin/blog nodejs 的 zlib 模块提供了资源压缩功能. ...
- archlinux+UEFI模式在linux主机下基于KVM-QEMU命令行虚拟机安装笔记
ArchLinux十分精简,并且具有强大的滚动更新.最近在基于ubuntu的宿主机下通过KVM-QEMU虚拟机安装了archlinux,将过程记录下来以供参考. 1.下载启动盘 1.1.下载archl ...
- Python学习--内置函数isinstance()
内置函数isinstance() isinstance() 函数来判断一个对象是否是一个已知的类型,类似 type(). isinstance() 与 type() 区别: type() 不会认为子类 ...
- 练习:等待用户输入input()
等待用户输入 执行下面的程序在按回车键后就会等待用户输入: 实例(Python 3.0+) #!/usr/bin/python3 input("\n\n按下 enter 键后退出." ...