
android studio 自定义控件
第一种方式:
<?xml version="1.0" encoding="utf-8"?>

<LinearLayout xmlns:android="http://schemas.android.com/apk/res/android"

    android:layout_width="match_parent"

    android:background="#ff28f010"

    android:layout_height="100px">

    <Button

        android:layout_width="wrap_content"

        android:layout_height="wrap_content"

        android:background="@drawable/ic_launcher"

        android:id="@+id/imageButton"

        android:gravity="center"

        android:text="返回"

        android:textColor="#f0a4cc"

        android:layout_margin="5dp"

        />

    <TextView

        android:layout_width="wrap_content"

        android:layout_height="100px"

        android:id="@+id/textView2"

        android:text="标题"

        android:gravity="center_vertical|center_horizontal"

        android:textSize="45px"

        android:layout_weight="0.23" />

    <Button

        android:layout_width="wrap_content"

        android:layout_height="wrap_content"

        android:id="@+id/imageButton2"

        android:layout_margin="5dp"

        android:background="@drawable/ic_launcher"

        android:textColor="#f0a4cc"

        android:text="编辑"/>

</LinearLayout>
如果其他的地方引用,直接使用<include layout="@layout/title"/>
第二种方式:
xml
<LinearLayout xmlns:android="http://schemas.android.com/apk/res/android"

    xmlns:tools="http://schemas.android.com/apk/res-auto"

    android:layout_width="match_parent"

    android:layout_height="match_parent"

    android:orientation="vertical">

    <RelativeLayout

        android:layout_width="match_parent"

        android:background="#0000ff"

        android:layout_height="45dp">

        <Button

            android:id="@+id/title_bar_left"

            android:layout_width="wrap_content"

            android:layout_height="wrap_content"

            android:layout_alignParentLeft="true"

            android:layout_centerVertical="true"

            android:layout_marginLeft="5dp"

            android:background="@mipmap/ic_launcher"

            android:minHeight="45dp"

            android:minWidth="45dp"

            android:textSize="14sp" />

        <TextView

            android:id="@+id/title_bar_title"

            android:layout_width="wrap_content"

            android:layout_height="wrap_content"

            android:layout_centerInParent="true"

            android:text="登录"

            android:singleLine="true"

            android:textSize="17sp" />

        <Button

            android:id="@+id/title_bar_right"

            android:layout_width="wrap_content"

            android:layout_height="wrap_content"

            android:layout_alignParentRight="true"

            android:layout_centerVertical="true"

            android:layout_marginRight="7dp"

            android:text="提交"

            android:textColor="@android:color/white"

            android:background="@null"

            android:minHeight="45dp"

            android:minWidth="45dp"

            android:textSize="14sp" />

    </RelativeLayout>

</LinearLayout>
attrs。xml代码
<declare-styleable name="CustomTitleBar">

        <attr name="title_background_color" format="reference|integer" />

        <attr name="left_button_visible" format="boolean" />

        <attr name="right_button_visible" format="boolean" />

        <attr name="title_text" format="string" />

        <attr name="title_text_color" format="color" />

        <attr name="title_text_drawable" format="reference|integer" />

        <attr name="right_button_text" format="string" />

        <attr name="right_button_text_color" format="color" />

        <attr name="right_button_drawable" format="reference|integer" />

        <attr name="left_button_text" format="string" />

        <attr name="left_button_text_color" format="color" />

        <attr name="left_button_drawable" format="reference|integer" />

    </declare-styleable>
自定义:
public class CustomTitleBar  extends RelativeLayout {

    private Button titleBarLeftBtn;

    private Button titleBarRightBtn;

    private TextView titleBarTitle;

    public CustomTitleBar(Context context, AttributeSet attrs) {

        super(context, attrs);

        LayoutInflater.from(context).inflate(R.layout.custom_title_bar, this, true);

        titleBarLeftBtn = (Button) findViewById(R.id.title_bar_left);

        titleBarRightBtn = (Button) findViewById(R.id.title_bar_right);

        titleBarTitle = (TextView) findViewById(R.id.title_bar_title);

        TypedArray attributes = context.obtainStyledAttributes(attrs, R.styleable.CustomTitleBar);

        if (attributes != null) {

            //处理titleBar背景色

            int titleBarBackGround = attributes.getResourceId(R.styleable.CustomTitleBar_title_background_color, Color.GREEN);

            setBackgroundResource(titleBarBackGround);

            //先处理左边按钮

            //获取是否要显示左边按钮

            boolean leftButtonVisible = attributes.getBoolean(R.styleable.CustomTitleBar_left_button_visible, true);

            if (leftButtonVisible) {

                titleBarLeftBtn.setVisibility(View.VISIBLE);

            } else {

                titleBarLeftBtn.setVisibility(View.INVISIBLE);

            }

            //设置左边按钮的文字

            String leftButtonText = attributes.getString(R.styleable.CustomTitleBar_left_button_text);

            if (!TextUtils.isEmpty(leftButtonText)) {

                titleBarLeftBtn.setText(leftButtonText);

                //设置左边按钮文字颜色

                int leftButtonTextColor = attributes.getColor(R.styleable.CustomTitleBar_left_button_text_color, Color.WHITE);

                titleBarLeftBtn.setTextColor(leftButtonTextColor);

            } else {

                //设置左边图片icon 这里是二选一 要么只能是文字 要么只能是图片

                int leftButtonDrawable = attributes.getResourceId(R.styleable.CustomTitleBar_left_button_drawable, R.mipmap.ic_launcher);

                if (leftButtonDrawable != -1) {

                    titleBarLeftBtn.setBackgroundResource(leftButtonDrawable);

                }

            }

            //处理标题

            //先获取标题是否要显示图片icon

            int titleTextDrawable = attributes.getResourceId(R.styleable.CustomTitleBar_title_text_drawable, -1);

            if (titleTextDrawable != -1) {

                titleBarTitle.setBackgroundResource(titleTextDrawable);

            } else {

                //如果不是图片标题 则获取文字标题

                String titleText = attributes.getString(R.styleable.CustomTitleBar_title_text);

                if (!TextUtils.isEmpty(titleText)) {

                    titleBarTitle.setText(titleText);

                }

                //获取标题显示颜色

                int titleTextColor = attributes.getColor(R.styleable.CustomTitleBar_title_text_color, Color.WHITE);

                titleBarTitle.setTextColor(titleTextColor);

            }

            //先处理右边按钮

            //获取是否要显示右边按钮

            boolean rightButtonVisible = attributes.getBoolean(R.styleable.CustomTitleBar_right_button_visible, true);

            if (rightButtonVisible) {

                titleBarRightBtn.setVisibility(View.VISIBLE);

            } else {

                titleBarRightBtn.setVisibility(View.INVISIBLE);

            }

            //设置右边按钮的文字

            String rightButtonText = attributes.getString(R.styleable.CustomTitleBar_right_button_text);

            if (!TextUtils.isEmpty(rightButtonText)) {

                titleBarRightBtn.setText(rightButtonText);

                //设置右边按钮文字颜色

                int rightButtonTextColor = attributes.getColor(R.styleable.CustomTitleBar_right_button_text_color, Color.WHITE);

                titleBarRightBtn.setTextColor(rightButtonTextColor);

            } else {

                //设置右边图片icon 这里是二选一 要么只能是文字 要么只能是图片

                int rightButtonDrawable = attributes.getResourceId(R.styleable.CustomTitleBar_right_button_drawable, -1);

                if (rightButtonDrawable != -1) {

                    titleBarRightBtn.setBackgroundResource(rightButtonDrawable);

                }

            }

            attributes.recycle();

        }

    }

    public void setTitleClickListener(OnClickListener onClickListener) {

        if (onClickListener != null) {

            titleBarLeftBtn.setOnClickListener(onClickListener);

            titleBarRightBtn.setOnClickListener(onClickListener);

        }

    }

    public Button getTitleBarLeftBtn() {

        return titleBarLeftBtn;

    }

    public Button getTitleBarRightBtn() {

        return titleBarRightBtn;

    }

    public TextView getTitleBarTitle() {

        return titleBarTitle;

    }

}
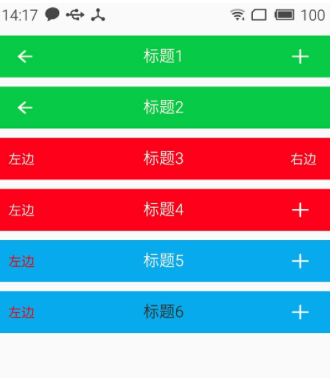
最后其他布局使用
 <com.cqytjr.www.cheji.view.CustomTitleBar

        android:layout_width="match_parent"

        android:layout_height="45dp"

        android:layout_marginTop="10dp"

        tools:left_button_text="左边"

        tools:left_button_text_color="#ff0000"

        tools:right_button_drawable="@mipmap/titlebar_add_icon"

        tools:title_background_color="@color/blue"

        tools:title_text="标题5" />
android studio 自定义控件的更多相关文章
- Intellij idea 和android studio 代码给混淆
Intellij idea 和android studio 代码给混淆 一.指令说明-optimizationpasses 5 # 指定代码的压缩级别 -dontusemixedcaseclassna ...
- Android项目实战(二十五):Android studio 混淆+打包+验证是否成功
前言: 单挑Android项目,最近即时通讯用到环信,集成sdk的时候 官方有一句 在 ProGuard 文件中加入以下 keep. -keep class com.hyphenate.** {*;} ...
- 【Android】Android Studio 进行代码混淆,打包release APK
整了一天,感觉坑挺多. 1. 选择如图中的选项Android Studio进行签名打包: 2. 填写APP对应的信息:(最好用个文本记下来放在项目中同步给Team) - Key store path: ...
- 告别编译运行 ---- Android Studio 2.0 Preview发布Instant Run功能
以往的Android开发有一个头疼的且拖慢速度的问题,就是你每改一行代码要想看到结果必须要编译运行到手机或者模拟器上,而且需要从头(可能是登录界面)一直点击到你修改的界面为止.开发一个完整的Andro ...
- [Android Pro] 告别编译运行 ---- Android Studio 2.0 Preview发布Instant Run功能
reference to : http://www.cnblogs.com/soaringEveryday/p/4991563.html 以往的Android开发有一个头疼的且拖慢速度的问题,就是你每 ...
- Android studio混淆
看了一篇关于Android studio混淆的文章http://blog.csdn.net/qq_23547831/article/details/51581491,感觉有必要总结一个简单的混淆版本设 ...
- android studio 实现代码混淆
=======本文章属于转载==========原文章地址:http://my.oschina.net/aibenben/blog/370985 这篇文章等是跟大家分享一在Android studio ...
- Android Studio 代码混淆
新建一个项目,Android Studio默认关闭代码混淆开关,在build.gradle文件中,如下图所示的minifyEnabled 开关,因此如果需要混淆代码,需将false改为true,然后在 ...
- Android Studio环境下代码混淆+签名打包
Android Studio环境下代码混淆+签名打包 作者 Mr_冯先生 关注 2016.08.21 01:10 字数 1040 阅读 734评论 5喜欢 34 注:本文使用的Android Stud ...
随机推荐
- bool和BOOL类型知识集合
知识点一.C语言中有bool类型吗? 转自http://blog.csdn.net/liuqiqi677/article/details/6703615 之前一直都没有注意到,最近在用C语言写DSP算 ...
- codeforces水题100道 第二十五题 Codeforces Round #197 A. Helpful Maths (Div. 2) (strings)
题目链接:http://www.codeforces.com/problemset/problem/339/A题意:重新组合加法字符串,使得按照1,2,3的顺序进行排列.C++代码: #include ...
- 《C++ Primer Plus》第17章 输入、输出和文件 学习笔记
流是进出程序的字节流.缓冲区是内存中的临时存储区域,是程序与文件或其他I/O设备之间的桥梁.信息在缓冲区和文件之间传输时,将使用设备(如磁盘驱动器)处理效率最高的尺寸以大块数据的方式进行传输.信息在缓 ...
- Church 整数前驱的推导
Church 整数前驱的推导比其后继复杂得多,wiki中一个前驱的定义据王垠的博客里说,是他一个数学系的同学花一星期时间推导出来的, 其定义确实比其它介绍lambda的文章中用pair来实现(据说是图 ...
- 【EF框架】EF DBFirst 快速生成数据库实体类 Database1.tt
现有如下需求,数据库表快速映射到数据库实体类 VS给出的两个选择都有问题,并不能实现,都是坑啊 EF .x DbContext 生成器 EF .x DbContext 生成器 测试结果如下 生成文件 ...
- 0R的电阻以及NC的意义
0欧电阻的作用: 0欧的电阻大概有以下几个功能:①做为跳线使用.这样既美观,安装也方便.②在数字和模拟等混合电路中,往往要求两个地分开,并且单点连接.我们可以用一个0欧的电阻来连接这两个地,而不是直接 ...
- Sencha Touch 扩展集合
https://market.sencha.com/extensions http://try.sencha.com/touch/2.1.0/ http://www.mitchellsimoens.c ...
- Openstack的网卡设置
本博客已经添加"打赏"功能,"打赏"位置位于右边栏红色框中,感谢您赞助的咖啡. 最开始接触Openstack,这块是比较头疼的,不同的文档,设置都会有所差异,并 ...
- ASP.NET Session 简单超实用使用总结
一.概述 Session用于存储特定的用户会话所需的信息 . Session对象的引入是为了弥补HTTP协议的不足,HTTP协议是一种无状态的协议. Session中文是“会话”的意思,在ASP.NE ...
- python nose测试框架全面介绍一
一.简介 nose 是python自带框架unttest的扩展,使测试更简单高效:nose是一个开源的项目,可以在官网上下载源码 1.快速安装 有以下几中安装方式: easy_install ...