TX2之多线程读取视频及深度学习推理
背景
一般在TX2上部署深度学习模型时,都是读取摄像头视频或传入视频文件进行推理,从视频中抽取帧进行目标检测等任务。对于大点的模型,推理的速度是赶不上摄像头或视频的帧率的,如果我们使用单线程进行处理,即读取一帧检测一帧,推理会堵塞视频的正常传输,表现出来就是摄像头视频有很大的延迟,如果是对实时性要求较高,这种延迟是难以接受的。因此,采用多线程的方法,将视频读取与深度学习推理放在两个线程里,互不影响,达到实时的效果。
实现方法
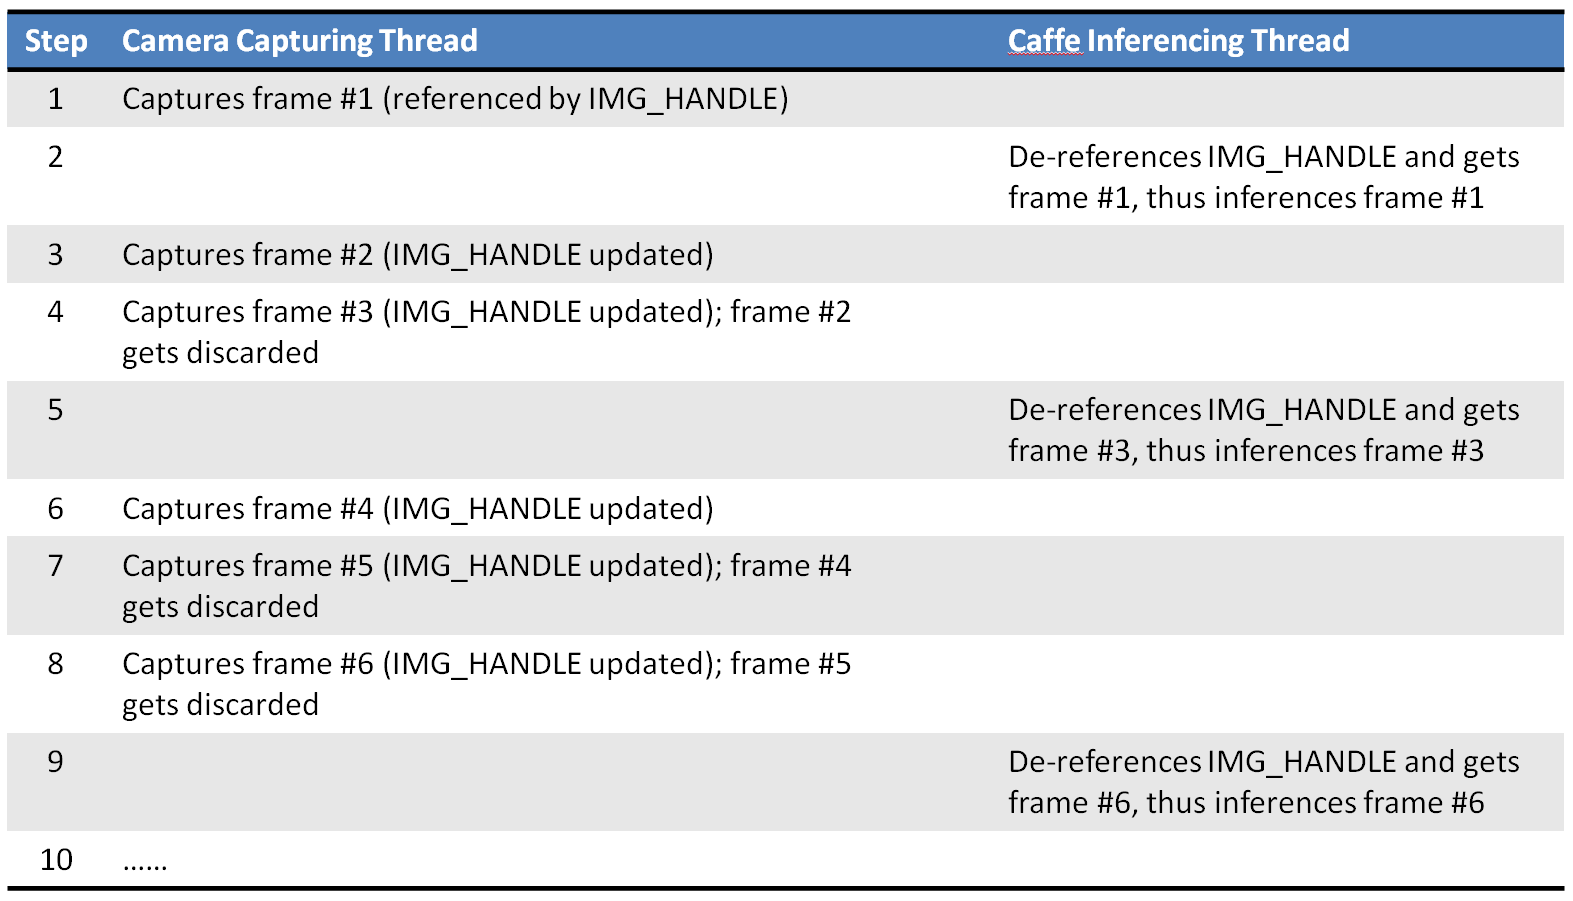
将摄像头的视频读取放入子线程,充当一个生产者的角色,将推理放入主线程,充当消费者的角色,主线程推理完一帧后从子线程提数据,继续推理,下图是原博文的一幅图片,描述了两个线程的关系:
程序实现
子线程
"""camera.py

This code implements the Camera class, which encapsulates code to

handle IP CAM, USB webcam or the Jetson onboard camera.  The Camera

class is further extend to take either a video or an image file as

input.

"""

import time

import logging

import threading

import numpy as np

import cv2

def open_cam_rtsp(uri, width, height, latency):

    """Open an RTSP URI (IP CAM)."""

    gst_str = ('rtspsrc location={} latency={} ! '

               'rtph264depay ! h264parse ! omxh264dec ! '

               'nvvidconv ! '

               'video/x-raw, width=(int){}, height=(int){}, '

               'format=(string)BGRx ! videoconvert ! '

               'appsink').format(uri, latency, width, height)

    return cv2.VideoCapture(gst_str, cv2.CAP_GSTREAMER)

def open_cam_usb(dev, width, height):

    """Open a USB webcam.

    We want to set width and height here, otherwise we could just do:

        return cv2.VideoCapture(dev)

    """

    gst_str = ('v4l2src device=/dev/video{} ! '

               'video/x-raw, width=(int){}, height=(int){}, '

               'format=(string)RGB ! videoconvert ! '

               'appsink').format(dev, width, height)

    return cv2.VideoCapture(gst_str, cv2.CAP_GSTREAMER)

def open_cam_onboard(width, height):

    """Open the Jetson onboard camera.

    On versions of L4T prior to 28.1, you might need to add

    'flip-method=2' into gst_str.

    """

    gst_str = ('nvcamerasrc ! '

               'video/x-raw(memory:NVMM), '

               'width=(int)2592, height=(int)1458, '

               'format=(string)I420, framerate=(fraction)30/1 ! '

               'nvvidconv ! '

               'video/x-raw, width=(int){}, height=(int){}, '

               'format=(string)BGRx ! videoconvert ! '

               'appsink').format(width, height)

    return cv2.VideoCapture(gst_str, cv2.CAP_GSTREAMER)

def grab_img(cam):

    """This 'grab_img' function is designed to be run in the sub-thread.

    Once started, this thread continues to grab a new image and put it

    into the global 'img_handle', until 'thread_running' is set to False.

    """

    while cam.thread_running:

        if cam.args.use_image:

            assert cam.img_handle is not None, 'img_handle is empty in use_image case!'

            # keep using the same img, no need to update it

            time.sleep(0.01)  # yield CPU to other threads

        else:

            _, cam.img_handle = cam.cap.read()

            fps = cam.cap.get(cv2.CAP_PROP_FPS)

            time.sleep(1/fps)  # fps = 20hz

            print('time sleep ', 1/fps)

            if cam.img_handle is None:

                logging.warning('grab_img(): cap.read() returns None...')

                break

    cam.thread_running = False

class Camera():

    """Camera class which supports reading images from theses video sources:

    1. Video file

    2. Image (jpg, png, etc.) file, repeating indefinitely

    3. RTSP (IP CAM)

    4. USB webcam

    5. Jetson onboard camera

    """

    def __init__(self, args):

        self.args = args

        self.is_opened = False

        self.thread_running = False

        self.img_handle = None

        self.img_width = 0

        self.img_height = 0

        self.cap = None

        self.thread = None

    def open(self):

        """Open camera based on command line arguments."""

        assert self.cap is None, 'Camera is already opened!'

        args = self.args

        if args.use_file:

            self.cap = cv2.VideoCapture(args.filename)

            # ignore image width/height settings here

        elif args.use_image:

            self.cap = 'OK'

            self.img_handle = cv2.imread(args.filename)

            # ignore image width/height settings here

            if self.img_handle is not None:

                self.is_opened = True

                self.img_height, self.img_width, _ = self.img_handle.shape

        elif args.use_rtsp:

            self.cap = open_cam_rtsp(

                args.rtsp_uri,

                args.image_width,

                args.image_height,

                args.rtsp_latency

            )

        elif args.use_usb:

            self.cap = open_cam_usb(

                args.video_dev,

                args.image_width,

                args.image_height

            )

        else:  # by default, use the jetson onboard camera

            self.cap = open_cam_onboard(

                args.image_width,

                args.image_height

            )

        if self.cap != 'OK':

            if self.cap.isOpened():

                # Try to grab the 1st image and determine width and height

                _, img = self.cap.read()

                if img is not None:

                    self.img_height, self.img_width, _ = img.shape

                    self.is_opened = True

    def start(self):

        assert not self.thread_running

        self.thread_running = True

        self.thread = threading.Thread(target=grab_img, args=(self,))

        self.thread.start()

    def stop(self):

        self.thread_running = False

        self.thread.join()

    def read(self):

        if self.args.use_image:

            return np.copy(self.img_handle)

        else:

            return self.img_handle

    def release(self):

        assert not self.thread_running

        if self.cap != 'OK':

            self.cap.release()
主线程
主线程程序以tensorflow object-detection部分为主,重点看里边读摄像头或视频的方法,运行时要传入读取的摄像头或视频参数:
# coding: utf-8

import numpy as np

import os

import six.moves.urllib as urllib

import sys

import tarfile

import tensorflow as tf

import zipfile

from collections import defaultdict

from io import StringIO

from matplotlib import pyplot as plt

from PIL import Image

import cv2

import time

from PIL import Image

import tensorflow.contrib.tensorrt as trt

from camera import Camera

import argparse

os.environ['CUDA_VISIBLE_DEVICES'] = '0'

# This is needed since the notebook is stored in the object_detection folder.

sys.path.append("..")

from object_detection.utils import ops as utils_ops

if tf.__version__ < '1.4.0':

  raise ImportError('Please upgrade your tensorflow installation to v1.4.* or later!')

from utils import label_map_util

from utils import visualization_utils as vis_util

# Path to frozen detection graph. This is the actual model that is used for the object detection.

PATH_TO_FROZEN_GRAPH = 'data/ssd_mobilenet_coco_0129/frozen_inference_graph.pb'

# List of the strings that is used to add correct label for each box.

PATH_TO_LABELS = os.path.join('data/object-detection.pbtxt')

NUM_CLASSES = 12

VIDEO_NAME = 'data/2018-09-10_162811'

filename = VIDEO_NAME + '.mp4'

def parse_args():

    """Parse input arguments."""

    desc = ('This script captures and displays live camera video, '

            'and does real-time object detection with TF-TRT model '

            'on Jetson TX2/TX1')

    parser = argparse.ArgumentParser(description=desc)

    parser.add_argument('--file', dest='use_file',

                        help='use a video file as input (remember to '

                        'also set --filename)',

                        action='store_true')

    parser.add_argument('--image', dest='use_image',

                        help='use an image file as input (remember to '

                        'also set --filename)',

                        action='store_true')

    parser.add_argument('--filename', dest='filename',

                        help='video file name, e.g. test.mp4',

                        default='data/2018-09-10_162811.mp4', type=str)

    parser.add_argument('--rtsp', dest='use_rtsp',

                        help='use IP CAM (remember to also set --uri)',

                        action='store_true')

    parser.add_argument('--uri', dest='rtsp_uri',

                        help='RTSP URI, e.g. rtsp://admin:jiaxun123@192.168.170.119/H.264/ch1/main',

                        default=None, type=str)

    parser.add_argument('--latency', dest='rtsp_latency',

                        help='latency in ms for RTSP [200]',

                        default=200, type=int)

    parser.add_argument('--usb', dest='use_usb',

                        help='use USB webcam (remember to also set --vid)',

                        action='store_true')

    parser.add_argument('--vid', dest='video_dev',

                        help='device # of USB webcam (/dev/video?) [1]',

                        default=1, type=int)

    parser.add_argument('--width', dest='image_width',

                        help='image width [1280]',

                        default=1280, type=int)

    parser.add_argument('--height', dest='image_height',

                        help='image height [720]',

                        default=720, type=int)

    parser.add_argument('--confidence', dest='conf_th',

                        help='confidence threshold [0.3]',

                        default=0.3, type=float)

    args = parser.parse_args()

    return args

def detect_in_video():

    args = parse_args()

    detection_graph = tf.Graph()

    with detection_graph.as_default():

        od_graph_def = tf.GraphDef()

        with tf.gfile.GFile(PATH_TO_FROZEN_GRAPH, 'rb') as fid:

            serialized_graph = fid.read()

            od_graph_def.ParseFromString(serialized_graph)

            tf.import_graph_def(od_graph_def, name='')

    label_map = label_map_util.load_labelmap(PATH_TO_LABELS)

    categories = label_map_util.convert_label_map_to_categories(

        label_map, max_num_classes=NUM_CLASSES, use_display_name=True)

    category_index = label_map_util.create_category_index(categories)

    config = tf.ConfigProto()

    config.gpu_options.allow_growth = True

    with detection_graph.as_default():

        with tf.Session(graph=detection_graph,config=config) as sess:

            image_tensor = detection_graph.get_tensor_by_name('image_tensor:0')

            detection_boxes = detection_graph.get_tensor_by_name(

                'detection_boxes:0')

            detection_scores = detection_graph.get_tensor_by_name(

                'detection_scores:0')

            detection_classes = detection_graph.get_tensor_by_name(

                'detection_classes:0')

            num_detections = detection_graph.get_tensor_by_name(

                'num_detections:0')

            cam = Camera(args)

            cam.open()

            cam.start()

            while cam.thread_running:

                frame = cam.read()

                color_frame = cv2.cvtColor(frame, cv2.COLOR_BGR2RGB)

                image_np_expanded = np.expand_dims(color_frame, axis=0)

                (boxes, scores, classes, num) = sess.run(

                    [detection_boxes, detection_scores,

                        detection_classes, num_detections],

                    feed_dict={image_tensor: image_np_expanded})

def main():

  detect_in_video()

if __name__ =='__main__':

  main()
Ref
TX2之多线程读取视频及深度学习推理的更多相关文章
- 在TX2上多线程读取视频帧进行caffe推理
参考文章:Multi-threaded Camera Caffe Inferencing TX2之多线程读取视频及深度学习推理 背景 一般在TX2上部署深度学习模型时,都是读取摄像头视频或者传入视频文 ...
- NVIDIA TensorRT高性能深度学习推理
NVIDIA TensorRT高性能深度学习推理 NVIDIA TensorRT 是用于高性能深度学习推理的 SDK.此 SDK 包含深度学习推理优化器和运行时环境,可为深度学习推理应用提供低延迟和高 ...
- Papers | 图像/视频增强 + 深度学习
目录 I. ARCNN 1. Motivation 2. Contribution 3. Artifacts Reduction Convolutional Neural Networks (ARCN ...
- 【ARM-Linux开发】【CUDA开发】【深度学习与神经网络】Jetson Tx2安装相关之三
JetPack(Jetson SDK)是一个按需的一体化软件包,捆绑了NVIDIA®Jetson嵌入式平台的开发人员软件.JetPack 3.0包括对Jetson TX2 , Jetson TX1和J ...
- 机器学习(Machine Learning)&深度学习(Deep Learning)资料【转】
转自:机器学习(Machine Learning)&深度学习(Deep Learning)资料 <Brief History of Machine Learning> 介绍:这是一 ...
- 机器学习(Machine Learning)与深度学习(Deep Learning)资料汇总
<Brief History of Machine Learning> 介绍:这是一篇介绍机器学习历史的文章,介绍很全面,从感知机.神经网络.决策树.SVM.Adaboost到随机森林.D ...
- TensorRT深度学习训练和部署图示
TensorRT深度学习训练和部署 NVIDIA TensorRT是用于生产环境的高性能深度学习推理库.功率效率和响应速度是部署的深度学习应用程序的两个关键指标,因为它们直接影响用户体验和所提供服务的 ...
- MLPerf结果证实至强® 可有效助力深度学习训练
MLPerf结果证实至强 可有效助力深度学习训练 核心与视觉计算事业部副总裁Wei Li通过博客回顾了英特尔这几年为提升深度学习性能所做的努力. 目前根据英特尔 至强 可扩展处理器的MLPerf结果显 ...
- 实战深度学习OpenCV(二):读取并播放本地或者摄像头的视频
一.读取并播放的代码如下: #include "pch.h" #include <iostream> #include <opencv2/core/core.hp ...
随机推荐
- 关于fastjson的一些知识
今天被问到了一些有关fastjson的知识,问了fastjson内部的实现机制,笔者只是用过fastjson这个包,还真没了解过它的机制等. 下去后搜索了一些有关fastjson的知识,希望能对自己和 ...
- Spring MVC拦截器(Interceptor )详解
处理器拦截器简介 Spring Web MVC的处理器拦截器(如无特殊说明,下文所说的拦截器即处理器拦截器)类似于Servlet开发中的过滤器Filter,用于对处理器进行预处理和后处理. 常见应用场 ...
- [BAT] 通过批处理加host
echo. >> %WINDIR%\system32\drivers\etc\hosts & echo xxx.xxx.xxx.xx test_host >> %WIN ...
- mysql varchar 类型 超出字符
4.0版本以下,varchar(50),指的是50字节,如果存放UTF8汉字时,只能存16个(每个汉字3字节) 5.0版本以上,varchar(50),指的是50字符,无论存放的是数字.字母还是UTF ...
- QT之Variant
QVariant识别类型的注册 QVariant识别类型的注册 QVariant为一个万能的数据类型--可以作为许多类型互相之间进行自动转换.将C++变为弱数据类型成为可能--也是许多控件中用户定义数 ...
- WordPaster-Drupal 7.34-CKEditor4x
1.1. 集成到drupal 7x-ck4 插件下载:Drupal 7x, 1.1.1. 安装ckeditor4x 下载插件 说明:下载并解压 CKEditor4x插件:https://yunpan. ...
- JS 单例模式
<parctical common lisp>的作者曾说,如果你需要一种模式,那一定是哪里出了问题.他所说的问题是指因为语言的天生缺陷,不得不去寻求和总结一种通用的解决方案. 不管是弱类型 ...
- ACM 超级楼梯 发工资
超级楼梯 有一楼梯共M级,刚开始时你在第一级,若每次只能跨上一级或二级,要走上第M级,共有多少种走法? Input 输入数据首先包含一个整数N,表示测试实例的个数,然后是N行数据,每行包含一个整数M( ...
- Alpha冲刺(六)
Information: 队名:彳艮彳亍团队 组长博客:戳我进入 作业博客:班级博客本次作业的链接 Details: 组员1(组长)柯奇豪 - 过去两天完成了哪些任务 1. 基于ssm框架的前后端交互 ...
- T Fiddler 教程 _转
阅读目录 Fiddler的基本介绍 Fiddler的工作原理 同类的其它工具 Fiddler如何捕获Firefox的会话 Fiddler如何捕获HTTPS会话 Fiddler的基本界面 Fiddler ...