kvm虚拟化之kvm虚拟机克隆
kvm虚拟机的克隆分为两种情况,本文也就通过以下两种情况进行克隆,克隆虚拟机为OEL5.8X64。
(1) KVM主机本机虚拟机直接克隆。
(2) 通过复制配置文件与磁盘文件的虚拟机复制克隆(适用于异机的静态迁移)。
1. 本机虚拟机直接克隆
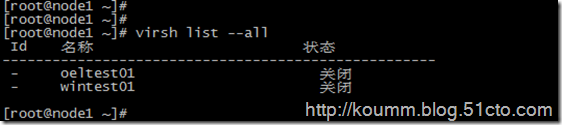
(1) 查看虚拟机配置文件
[root@node1 ~]# cat /etc/libvirt/qemu/oeltest01.xml

<!--

WARNING: THIS IS AN AUTO-GENERATED FILE. CHANGES TO IT ARE LIKELY TO BE

OVERWRITTEN AND LOST. Changes to this xml configuration should be made using:

virsh edit oeltest01

or other application using the libvirt API.

-->

<domain type='kvm'>

<name>oeltest01</name>

<uuid>8f2bb4a7-c7ed-32aa--9fb05923269d</uuid>

<memory unit='KiB'></memory>

<currentMemory unit='KiB'></currentMemory>

<vcpu placement='static'></vcpu>

<os>

<type arch='x86_64' machine='rhel6.4.0'>hvm</type>

<boot dev='hd'/>

</os>

<features>

<acpi/>

<apic/>

<pae/>

</features>

<clock offset='utc'/>

<on_poweroff>destroy</on_poweroff>

<on_reboot>restart</on_reboot>

<on_crash>restart</on_crash>

<devices>

<emulator>/usr/libexec/qemu-kvm</emulator>

<disk type='file' device='disk'>

<driver name='qemu' type='raw' cache='none'/>

<source file='/data/test01.img'/>

<target dev='hda' bus='ide'/>

<address type='drive' controller='' bus='' target='' unit=''/>

</disk>

<disk type='block' device='cdrom'>

<driver name='qemu' type='raw'/>

<target dev='hdc' bus='ide'/>

<readonly/>

<address type='drive' controller='' bus='' target='' unit=''/>

</disk>

<controller type='usb' index=''>

<address type='pci' domain='0x0000' bus='0x00' slot='0x01' function='0x2'/>

</controller>

<controller type='ide' index=''>

<address type='pci' domain='0x0000' bus='0x00' slot='0x01' function='0x1'/>

</controller>

<interface type='bridge'>

<mac address='52:54:00:82:39:01'/>

<source bridge='br0'/>

<model type='virtio'/>

<address type='pci' domain='0x0000' bus='0x00' slot='0x03' function='0x0'/>

</interface>

<serial type='pty'>

<target port=''/>

</serial>

<console type='pty'>

<target type='serial' port=''/>

</console>

<input type='tablet' bus='usb'/>

<input type='mouse' bus='ps2'/>

<graphics type='vnc' port='' autoport='no' listen='0.0.0.0'>

<listen type='address' address='0.0.0.0'/>

</graphics>

<video>

<model type='cirrus' vram='' heads=''/>

<address type='pci' domain='0x0000' bus='0x00' slot='0x02' function='0x0'/>

</video>

<memballoon model='virtio'>

<address type='pci' domain='0x0000' bus='0x00' slot='0x04' function='0x0'/>

</memballoon>

</devices>

</domain>
虚拟机磁盘文件: /data/test01.img
虚拟机名称:oeltest01
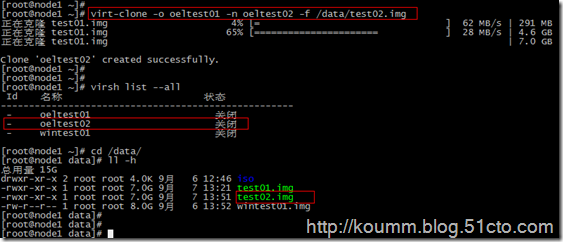
(2) 开始克隆
# virt-clone -o oeltest01 -n oeltest02 -f /data/test02.img
说明:以oeltest01做为源,克隆oeltest01虚拟机,并创建名称为oeltest02虚拟机,使用磁盘文件/data/test02.img
(3) 启动虚拟机并配置主机名,IP地址等
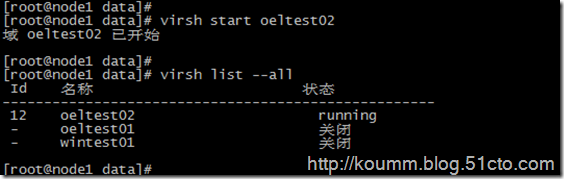
[root@node1 data]# virsh console oeltest02
连接到域 oeltest02

Escape character is ^]

Found volume group "vg" using metadata type lvm2

 logical volume(s) in volume group "vg" now active

Welcome to Oracle Linux Oracle Linux Server release 5.8

Press 'I' to enter interactive startup.

Starting udev: [  OK  ]

Loading default keymap (us): [  OK  ]

Setting hostname test01:  [  OK  ]

Setting up Logical Volume Management:    logical volume(s) in volume group "vg" now active

[  OK  ]

Checking filesystems

Checking all file systems.

[/sbin/fsck.ext3 () -- /] fsck.ext3 -a /dev/vg/root

/dev/vg/root: clean, / files, / blocks

[/sbin/fsck.ext3 () -- /boot] fsck.ext3 -a /dev/hda1

/boot: clean, / files, / blocks

[  OK  ]

Remounting root filesystem in read-write mode:  [  OK  ]

Mounting local filesystems:  [  OK  ]

Enabling local filesystem quotas:  [  OK  ]

Enabling /etc/fstab swaps:  [  OK  ]

INIT: Entering runlevel:

Entering non-interactive startup

Applying Intel CPU microcode update: [  OK  ]

Starting background readahead: [  OK  ]

Checking for hardware changes [  OK  ]

[  OK  ] iSCSI daemon: [  OK  ]

[  OK  ]

Bringing up loopback interface:  [  OK  ]

Bringing up interface eth0:

Determining IP information for eth0... done.

[  OK  ]

Starting auditd: [  OK  ]

Starting system logger: [  OK  ]

Starting kernel logger: [  OK  ]

Starting irqbalance: [  OK  ]

iscsid (pid  ) is running...

Setting up iSCSI targets: iscsiadm: No records found

[  OK  ]

Starting portmap: [  OK  ]

Starting NFS statd: [  OK  ]

Starting RPC idmapd: [  OK  ]

Starting system message bus: [  OK  ]

Starting o2cb:  [  OK  ]

[  OK  ] Bluetooth services:[  OK  ]

Mounting other filesystems:  [  OK  ]

Starting PC/SC smart card daemon (pcscd): [  OK  ]

Starting acpi daemon: [  OK  ]

Starting HAL daemon: [  OK  ]

Starting hidd: [  OK  ]

Starting monitoring for VG vg:    logical volume(s) in volume group "vg" monitored

[  OK  ]

Starting autofs:  Loading autofs4: [  OK  ]

Starting automount: [  OK  ]

[  OK  ]

Starting hpiod: [  OK  ]

Starting hpssd: [  OK  ]

Starting sshd: [  OK  ]

Starting cups: [  OK  ]

Starting xinetd: [  OK  ]

Starting console mouse services: [  OK  ]

Starting crond: [  OK  ]

Starting xfs: [  OK  ]

Starting anacron: [  OK  ]

[  OK  ] atd: [  OK  ]

Starting background readahead: [  OK  ]

Starting yum-updatesd: [  OK  ]

Starting Avahi daemon... [  OK  ]

Starting smartd: hdc: drive_cmd: status=0x41 { DriveReady Error }

hdc: drive_cmd: error=0x04 { AbortedCommand }

ide: failed opcode was: 0xec

[  OK  ]

Oracle Linux Server release 5.8

Kernel 2.6.-.el5 on an x86_64

test01 login: mtrr: type mismatch for f0000000, old: uncachable new: write-combining

mtrr: type mismatch for f0000000, old: uncachable new: write-combining

Oracle Linux Server release 5.8

Kernel 2.6.-.el5 on an x86_64

test01 login:

Oracle Linux Server release 5.8

Kernel 2.6.-.el5 on an x86_64

test01 login: root

Password:

Last login: Sat Sep   :: on ttyS0

[root@test01 ~]#

[root@test01 ~]#

[root@test01 ~]#

() 修改主机名,IP地址等

# vi /etc/hosts

# Do not remove the following line, or various programs

# that require network functionality will fail.

127.0.0.1       test02 localhost.localdomain localhost

::             localhost6.localdomain6 localhost6

# vi /etc/sysconfig/network

NETWORKING=yes

NETWORKING_IPV6=no

HOSTNAME=test02

GATEWAY=192.168.233.2

修改IP地址

# vi /etc/sysconfig/network-script/ifcfg-eth0

# Virtio Network Device

DEVICE=eth0

BOOTPROTO=static

ONBOOT=yes

HWADDR=::::bd:2b

IPADDR=192.168.233.142

NETMASK=255.255.255.0

[root@test01 ~]# service network restart

Shutting down interface eth0:  [  OK  ]

Shutting down loopback interface:  [  OK  ]

Bringing up loopback interface:  [  OK  ]

Bringing up interface eth0:  [  OK  ]

[root@test01 ~]#
2. 复制配置文件与磁盘文件克隆
(1) 导入kvm虚拟机配置文件
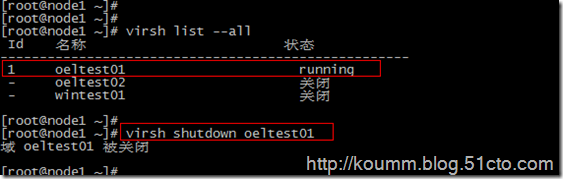
这里采用oeltest01做为模板,进行克隆。
# virsh shutdown oeltest01
# virsh dumpxml oeltest01 > /etc/libvirt/qemu/oeltest03.xml
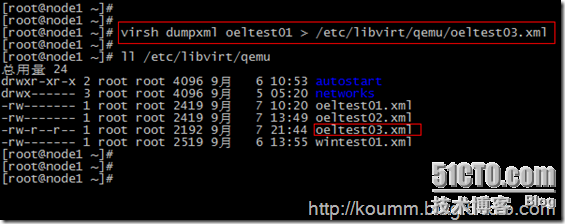
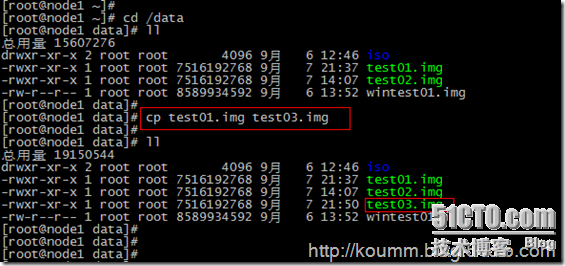
(2) 复制kvm虚拟机磁盘文件
本系列文章都是采用虚拟磁盘文件进行测试,没有使用lvm卷。
通过查看配置文件:虚拟磁盘位置<source file='/data/test01.img'/>
(3) 直接编辑修改配置文件
修改name,uuid,disk位置,vnc端口
此时还是将该配置文件注册进来,无法通过virsh edit进行编辑。
[root@node1 data]# vi /etc/libvirt/qemu/oeltest03.xml

<domain type='kvm'>

  <name>oeltest03</name>

  <uuid>8f2bb4a7-c7ed-32aa--9fb05923260d</uuid>

  <memory unit='KiB'></memory>

  <currentMemory unit='KiB'></currentMemory>

  <vcpu placement='static'></vcpu>

  <os>

    <type arch='x86_64' machine='rhel6.4.0'>hvm</type>

    <boot dev='hd'/>

  </os>

  <features>

    <acpi/>

    <apic/>

    <pae/>

  </features>

  <clock offset='utc'/>

  <on_poweroff>destroy</on_poweroff>

  <on_reboot>restart</on_reboot>

  <on_crash>restart</on_crash>

  <devices>

    <emulator>/usr/libexec/qemu-kvm</emulator>

    <disk type='file' device='disk'>

      <driver name='qemu' type='raw' cache='none'/>

      <source file='/data/test03.img'/>

      <target dev='hda' bus='ide'/>

      <address type='drive' controller='' bus='' target='' unit=''/>

    </disk>

    <disk type='block' device='cdrom'>

      <driver name='qemu' type='raw'/>

      <target dev='hdc' bus='ide'/>

      <readonly/>

      <address type='drive' controller='' bus='' target='' unit=''/>

    </disk>

    <controller type='usb' index=''>

      <address type='pci' domain='0x0000' bus='0x00' slot='0x01' function='0x2'/>

    </controller>

    <controller type='ide' index=''>

      <address type='pci' domain='0x0000' bus='0x00' slot='0x01' function='0x1'/>

    </controller>

    <interface type='bridge'>

      <mac address='52:54:00:82:39:01'/>

      <source bridge='br0'/>

      <model type='virtio'/>

      <address type='pci' domain='0x0000' bus='0x00' slot='0x03' function='0x0'/>

    </interface>

    <serial type='pty'>

      <target port=''/>

    </serial>

    <console type='pty'>

      <target type='serial' port=''/>

    </console>

    <input type='tablet' bus='usb'/>

    <input type='mouse' bus='ps2'/>

    <graphics type='vnc' port='' autoport='no' listen='0.0.0.0'>

      <listen type='address' address='0.0.0.0'/>

    </graphics>

    <video>

      <model type='cirrus' vram='' heads=''/>

      <address type='pci' domain='0x0000' bus='0x00' slot='0x02' function='0x0'/>

    </video>

    <memballoon model='virtio'>

      <address type='pci' domain='0x0000' bus='0x00' slot='0x04' function='0x0'/>

    </memballoon>

  </devices>

</domain>
(4) 定义新虚拟机配置文件
[root@node1 data]# virsh define /etc/libvirt/qemu/oeltest03.xml
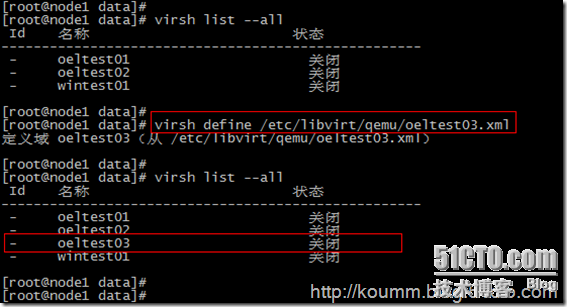
启动虚拟机
[root@node1 data]# virsh start oeltest03

域 oeltest03 已开始
(5) 登录虚拟机进行主机名,IP等修改
[root@node1 data]# virsh console oeltest03

连接到域 oeltest03

Escape character is ^]

Oracle Linux Server release 5.8

Kernel 2.6.-.el5 on an x86_64

test01 login: mtrr: type mismatch for f0000000, old: uncachable new: write-combining

mtrr: type mismatch for f0000000, old: uncachable new: write-combining

Oracle Linux Server release 5.8

Kernel 2.6.-.el5 on an x86_64

test01 login: root

Password:

Last login: Sat Sep   :: on ttyS0

[root@test01 ~]#

[root@test01 ~]#

修改主机名

# vi /etc/hosts

# Do not remove the following line, or various programs

# that require network functionality will fail.

127.0.0.1 test03 localhost.localdomain localhost

:: localhost6.localdomain6 localhost6

# vi /etc/sysconfig/network

NETWORKING=yes

NETWORKING_IPV6=no

HOSTNAME=test03

GATEWAY=192.168.233.2

修改IP地址

# vi /etc/sysconfig/network-script/ifcfg-eth0

# Virtio Network Device

DEVICE=eth0

BOOTPROTO=static

ONBOOT=yes

HWADDR=::::bd:3b

IPADDR=192.168.233.143

NETMASK=255.255.255.0

service network restart

Shutting down interface eth0: [ OK ]

Shutting down loopback interface: [ OK ]

Bringing up loopback interface: [ OK ]

Bringing up interface eth0: [ OK ]
本文到此通过两种方式进行kvm虚拟机克隆,其实各有用处。
再次说明:本文克隆的虚拟机是oel5.8,如果克隆的虚拟机是RHEL/CentOS/OEL6.x操作系统,还需要修改/etc/udev/rules.d/70-persistent-net.rules文件。
kvm虚拟化之kvm虚拟机克隆的更多相关文章
- kvm虚拟化之kvm虚拟机快照备份
kvm虚拟机默认使用raw格式的镜像格式,性能最好,速度最快,它的缺点就是不支持一些新的功能,如支持镜像,zlib磁盘压缩,AES加密等. 要使用镜像功能,磁盘格式必须为qcow2.下面开始kvm ...
- kvm虚拟化之kvm虚拟机vnc配置
本文是通过vnc方式访问虚拟主机上的KVM虚拟机. 这里的通过vnc方式访问虚拟机不是在kvm虚拟机安装配置vnc服务器,通过虚拟主机的IP地址与端口进行访问,kvm虚拟化对vnc的支持相对来说 ...
- KVM虚拟化之windows虚拟机性能调整
通过KVM安装WindowsXP/2003/7/2008操作系统后,由于默认的磁盘驱动(IDE)性能与网卡驱动(RTL8139100M)的性能都极其低下,需要调整,通过加载Redhatvirtio驱动 ...
- kvm虚拟化安装及虚拟机创建
1.开启虚拟化(VMware虚拟机为例),安装centos7操作系统. 2.查看CPU是否开启虚拟化 #zgrep "vmx" /proc/cpuinfo 3.配置yum源,通过 ...
- KVM虚拟化(KVM简介和KVM安装)
KVM 虚拟化架构分类 寄居虚拟化架构:指在宿主操作系统之上安装和运行虚拟化程序,依赖于宿主操作系统对设备的支持和物理资源的管理. 裸金属虚拟化架构:指直接在硬件上面安装虚拟化软件,再在其上安装操作系 ...
- CentOS7.1 KVM虚拟化之linux虚拟机安装(2)
一.上传ISO文件到/data/iso下 这里使用CentOS-5.5-i386-bin-DVD.iso 二.安装CentOS5.5 CentOS7.1 安装KVM虚拟机默认磁盘格式为qcow2(推荐 ...
- Kvm虚拟化安装与虚拟机创建
1. 验证CPU是否支持KVM:如果结果中有vmx(Intel)或svm(AMD)字样,就说明CPU的支持的. egrep '(vmx|svm)' /proc/cpuinfo 2. 关闭SELinux ...
- kvm虚拟化之kvm虚拟机控制台登陆
vm虚拟机能否像xen虚拟机一样通过virsh console 一样采用字符界面进行linux虚拟机控制台呢,答案是肯定的,默认情况下该命令是不起作用的,需要修改相关文件才能实现. 1. 配置方法如下 ...
- kvm虚拟化学习笔记(三)之windows kvm虚拟机安装
KVM虚拟化学习笔记系列文章列表----------------------------------------kvm虚拟化学习笔记(一)之kvm虚拟化环境安装http://koumm.blog.51 ...
随机推荐
- 网络编程基础之粘包现象与UDP协议
一.粘包现象原理分析 1.我们先来看几行代码,从现象来分析: 测试程序分为两部分,分别是服务端和客户端 服务端.py #!/usr/bin/env python3 #-*- coding:utf-8 ...
- k8s podpreset 参数注入
启动apiserver时,增加 参数 --runtime-config=settings.k8s.io/v1alpha1=true kind: PodPresetapiVersion: setting ...
- Codeforces 712D DP
题意:有2个人玩游戏,他们都有个初始值a和b, 游戏进行t轮, 每次可以选择加上一个[-k, +k]之间的数字,问有多少种方案a的和严格大于b的和. 思路:如果不考虑多于这个条件,只是询问有多少种方案 ...
- 此时servlet中的request和我们在页面jsp中的request 是同一个request.
在tomcat容器启动的时候,jsp页面的内置对象request,response,同样是依赖于tomcat容器中的servlet-api.jar包,这个jar包和我们在web项目中的jar包是一样的 ...
- http协议简析(一)
HTTP:hype-text transfer protocol,超文本传输协议,超文本(html)在网络间(电脑与电脑之间)传输过程中所遵循的一些规则. 两台电脑之间要实现数据传输的条件 1.两台电 ...
- 虚拟机硬盘格式的选择:qcow2、 raw等
虚拟机硬盘格式的选择:qcow2. raw等曾经有过一段时间,徘徊于对虚拟机硬盘格式的迷惑中,2009年,终于得出了一些结论(下面的思路基本通用于其他虚拟机) 搜了下,发现大部分用qemu或者kvm的 ...
- 测试URL
http://localhost:8080/dmonitor-webapi/monitor/vm/342?r=1410331220921&indexes=cpu&indexes=mem ...
- 原型设计工具Mockplus新年送福利,见者有份
为感谢大家对Mockplus的喜爱与支持,给大家送福利了! 送送送,见者有份! 参与活动,三分钟时间,均可最高获赠专业版1个月使用时间.见者有份! 领福利步骤: 1. 扫码关注微信公众号:Mockpl ...
- VS2012用正则表达式统计行数
使用正则表达式: b*[^:b#/]+.*$
- 版本控制-https svn服务器搭建和常用命令(centos 6.3)
Svn是比较优秀的版本控制工具,虽然功能和性能上无法和Git媲美,但由于其容易搭建和使用的特性,所以在各个小公司还是很受欢迎的.使用Git可参考<版本控制-Git服务器搭建和常用命令使用> ...