
转载:spring boot学习
Spring Boot学习
Spring Boot是为了简化Spring应用的创建、运行、调试、部署等而出现的,使用它可以做到专注于Spring应用的开发,而无需过多关注XML的配置。
简单来说,它提供了一堆依赖打包,并已经按照使用习惯解决了依赖问题---习惯大于约定。
Spring Boot默认使用tomcat作为服务器,使用logback提供日志记录。
无需多言,直接进入节奏:
前提
Spring Boot提供了一系列的依赖包,所以需要构建工具的支持:maven 或 gradle。个人仅熟悉maven,所以下面的内容都是maven相关的。
如果不熟悉maven,请先了解一下。
使用
① 新建一个maven项目。
② pom中parent设为 spring-boot-starter-parent 。建议使用最新的 RELEASE 版本。否则可能需要设置 <repositories/> 和<pluginRepositories/> 。
③ 添加应用需要的starter模块,作为示例,我们仅添加web starter模块。
这里需要解释下starter模块,简单的说,就是一系列的依赖包组合。例如web starter模块,就是包含了Spring Boot预定义的一些Web开发的常用依赖:
○ spring-web, spring-webmvc            Spring WebMvc框架

○ tomcat-embed-*                              内嵌Tomcat容器

○ jackson                                             处理json数据

○ spring-*                                            Spring框架

○ spring-boot-autoconfigure             Spring Boot提供的自动配置功能
换句话说,当你添加了相应的starter模块,就相当于添加了相应的所有必须的依赖包。
starter模块的列表及含义,见 Spring Boot的启动器Starter详解 。
至此,pom内容如下:

<project xmlns="http://maven.apache.org/POM/4.0.0" xmlns:xsi="http://www.w3.org/2001/XMLSchema-instance"

    xsi:schemaLocation="http://maven.apache.org/POM/4.0.0 http://maven.apache.org/xsd/maven-4.0.0.xsd">

    <modelVersion>4.0.0</modelVersion>

    <groupId>cn.larry.spring</groupId>

    <artifactId>larry-spring-demo4</artifactId>

    <version>0.0.1-SNAPSHOT</version>

    <parent>

        <groupId>org.springframework.boot</groupId>

        <artifactId>spring-boot-starter-parent</artifactId>

        <version>1.4.0.RELEASE</version>

    </parent>

    <dependencies>

        <dependency>

            <groupId>org.springframework.boot</groupId>

            <artifactId>spring-boot-starter-web</artifactId>

        </dependency>

    </dependencies>

</project>
保存pom,刷新maven,以便刷新依赖导入。
基本上,如果没有特别的需要,现在就可以直接写Controller了!!!--特别的需要 是指设置容器、访问端口、路径等。后面再解释。
④ 写一个简单的Controller。--直接拿了 Spring Boot——开发新一代Spring Java应用 中的示例。
package cn.larry.spring.controller;

import org.springframework.boot.SpringApplication;

import org.springframework.boot.autoconfigure.EnableAutoConfiguration;

import org.springframework.stereotype.Controller;

import org.springframework.web.bind.annotation.RequestMapping;

import org.springframework.web.bind.annotation.ResponseBody;

@Controller

@EnableAutoConfiguration

public class SampleController {

    @RequestMapping("/")

    @ResponseBody

    String home() {

        return "Hello World!";

    }

    public static void main(String[] args) throws Exception {

        SpringApplication.run(SampleController.class, args);

    }

}
这里有两个新东西:@EnableAutoConfiguration 和 SpringApplication 。
@EnableAutoConfiguration 用于自动配置。简单的说,它会根据你的pom配置(实际上应该是根据具体的依赖)来判断这是一个什么应用,并创建相应的环境。
在上面这个例子中,@EnableAutoConfiguration 会判断出这是一个web应用,所以会创建相应的web环境。
SpringApplication 则是用于从main方法启动Spring应用的类。默认,它会执行以下步骤:
- 创建一个合适的ApplicationContext实例 (取决于classpath)。
- 注册一个CommandLinePropertySource,以便将命令行参数作为Spring properties。
- 刷新application context,加载所有单例beans。
- 激活所有CommandLineRunner beans。
默认,直接使用SpringApplication 的静态方法run()即可。但也可以创建实例,并自行配置需要的设置。
具体的描述见javadoc即可,如下:
Open Declaration org.springframework.boot.SpringApplication

Classes that can be used to bootstrap and launch a Spring application from a Java main method. By default class will perform the following steps to bootstrap your application:

Create an appropriate ApplicationContext instance (depending on your classpath)

Register a CommandLinePropertySource to expose command line arguments as Spring properties

Refresh the application context, loading all singleton beans

Trigger any CommandLineRunner beans

In most circumstances the static run(Object, String []) method can be called directly from your main method to bootstrap your application:

 @Configuration

 @EnableAutoConfiguration

 public class MyApplication  {

 // ... Bean definitions

 public static void main(String[] args) throws Exception {

   SpringApplication.run(MyApplication.class, args);

 }

For more advanced configuration a SpringApplication instance can be created and customized before being run:

 public static void main(String[] args) throws Exception {

   SpringApplication app = new SpringApplication(MyApplication.class);

   // ... customize app settings here

   app.run(args)

 }

SpringApplications can read beans from a variety of different sources. It is generally recommended that a single @Configuration class is used to bootstrap your application, however, any of the following sources can also be used:

Class - A Java class to be loaded by AnnotatedBeanDefinitionReader

Resource - An XML resource to be loaded by XmlBeanDefinitionReader, or a groovy script to be loaded by GroovyBeanDefinitionReader

Package - A Java package to be scanned by ClassPathBeanDefinitionScanner

CharSequence - A class name, resource handle or package name to loaded as appropriate. If the CharSequence cannot be resolved to class and does not resolve to a Resource that exists it will be considered a Package.
⑤ 现在,直接右键启动main方法即可。启动信息(包括关闭信息)如下:
   .   ____          _            __ _ _

  /\\ / ___'_ __ _ _(_)_ __  __ _ \ \ \ \

 ( ( )\___ | '_ | '_| | '_ \/ _` | \ \ \ \

  \\/  ___)| |_)| | | | | || (_| |  ) ) ) )

   '  |____| .__|_| |_|_| |_\__, | / / / /

  =========|_|==============|___/=/_/_/_/

  :: Spring Boot ::        (v1.4.0.RELEASE)

 2016-08-15 14:30:16.565  INFO 10652 --- [           main] c.l.spring.controller.SampleController   : Starting SampleController on Larry with PID 10652 (D:\Workspace\Workspace_sts\larry-spring-demo4\target\classes started by Administrator in D:\Workspace\Workspace_sts\larry-spring-demo4)

 2016-08-15 14:30:16.567  INFO 10652 --- [           main] c.l.spring.controller.SampleController   : No active profile set, falling back to default profiles: default

 2016-08-15 14:30:16.596  INFO 10652 --- [           main] ationConfigEmbeddedWebApplicationContext : Refreshing org.springframework.boot.context.embedded.AnnotationConfigEmbeddedWebApplicationContext@4a94ee4: startup date [Mon Aug 15 14:30:16 CST 2016]; root of context hierarchy

 2016-08-15 14:30:17.676  INFO 10652 --- [           main] s.b.c.e.t.TomcatEmbeddedServletContainer : Tomcat initialized with port(s): 8080 (http)

 2016-08-15 14:30:17.687  INFO 10652 --- [           main] o.apache.catalina.core.StandardService   : Starting service Tomcat

 2016-08-15 14:30:17.688  INFO 10652 --- [           main] org.apache.catalina.core.StandardEngine  : Starting Servlet Engine: Apache Tomcat/8.5.4

 2016-08-15 14:30:17.767  INFO 10652 --- [ost-startStop-1] o.a.c.c.C.[Tomcat].[localhost].[/]       : Initializing Spring embedded WebApplicationContext

 2016-08-15 14:30:17.767  INFO 10652 --- [ost-startStop-1] o.s.web.context.ContextLoader            : Root WebApplicationContext: initialization completed in 1173 ms

 2016-08-15 14:30:17.928  INFO 10652 --- [ost-startStop-1] o.s.b.w.servlet.ServletRegistrationBean  : Mapping servlet: 'dispatcherServlet' to [/]

 2016-08-15 14:30:17.932  INFO 10652 --- [ost-startStop-1] o.s.b.w.servlet.FilterRegistrationBean   : Mapping filter: 'characterEncodingFilter' to: [/*]

 2016-08-15 14:30:17.933  INFO 10652 --- [ost-startStop-1] o.s.b.w.servlet.FilterRegistrationBean   : Mapping filter: 'hiddenHttpMethodFilter' to: [/*]

 2016-08-15 14:30:17.933  INFO 10652 --- [ost-startStop-1] o.s.b.w.servlet.FilterRegistrationBean   : Mapping filter: 'httpPutFormContentFilter' to: [/*]

 2016-08-15 14:30:17.933  INFO 10652 --- [ost-startStop-1] o.s.b.w.servlet.FilterRegistrationBean   : Mapping filter: 'requestContextFilter' to: [/*]

 2016-08-15 14:30:18.177  INFO 10652 --- [           main] s.w.s.m.m.a.RequestMappingHandlerAdapter : Looking for @ControllerAdvice: org.springframework.boot.context.embedded.AnnotationConfigEmbeddedWebApplicationContext@4a94ee4: startup date [Mon Aug 15 14:30:16 CST 2016]; root of context hierarchy

 2016-08-15 14:30:18.230  INFO 10652 --- [           main] s.w.s.m.m.a.RequestMappingHandlerMapping : Mapped "{[/]}" onto java.lang.String cn.larry.spring.controller.SampleController.home()

 2016-08-15 14:30:18.234  INFO 10652 --- [           main] s.w.s.m.m.a.RequestMappingHandlerMapping : Mapped "{[/error]}" onto public org.springframework.http.ResponseEntity<java.util.Map<java.lang.String, java.lang.Object>> org.springframework.boot.autoconfigure.web.BasicErrorController.error(javax.servlet.http.HttpServletRequest)

 2016-08-15 14:30:18.235  INFO 10652 --- [           main] s.w.s.m.m.a.RequestMappingHandlerMapping : Mapped "{[/error],produces=[text/html]}" onto public org.springframework.web.servlet.ModelAndView org.springframework.boot.autoconfigure.web.BasicErrorController.errorHtml(javax.servlet.http.HttpServletRequest,javax.servlet.http.HttpServletResponse)

 2016-08-15 14:30:18.262  INFO 10652 --- [           main] o.s.w.s.handler.SimpleUrlHandlerMapping  : Mapped URL path [/webjars/**] onto handler of type [class org.springframework.web.servlet.resource.ResourceHttpRequestHandler]

 2016-08-15 14:30:18.262  INFO 10652 --- [           main] o.s.w.s.handler.SimpleUrlHandlerMapping  : Mapped URL path [/**] onto handler of type [class org.springframework.web.servlet.resource.ResourceHttpRequestHandler]

 2016-08-15 14:30:18.295  INFO 10652 --- [           main] o.s.w.s.handler.SimpleUrlHandlerMapping  : Mapped URL path [/**/favicon.ico] onto handler of type [class org.springframework.web.servlet.resource.ResourceHttpRequestHandler]

 2016-08-15 14:30:18.423  INFO 10652 --- [           main] o.s.j.e.a.AnnotationMBeanExporter        : Registering beans for JMX exposure on startup

 2016-08-15 14:30:18.480  INFO 10652 --- [           main] s.b.c.e.t.TomcatEmbeddedServletContainer : Tomcat started on port(s): 8080 (http)

 2016-08-15 14:30:18.485  INFO 10652 --- [           main] c.l.spring.controller.SampleController   : Started SampleController in 2.209 seconds (JVM running for 2.642)

 2016-08-15 14:30:23.564  INFO 10652 --- [nio-8080-exec-1] o.a.c.c.C.[Tomcat].[localhost].[/]       : Initializing Spring FrameworkServlet 'dispatcherServlet'

 2016-08-15 14:30:23.564  INFO 10652 --- [nio-8080-exec-1] o.s.web.servlet.DispatcherServlet        : FrameworkServlet 'dispatcherServlet': initialization started

 2016-08-15 14:30:23.574  INFO 10652 --- [nio-8080-exec-1] o.s.web.servlet.DispatcherServlet        : FrameworkServlet 'dispatcherServlet': initialization completed in 10 ms

 2016-08-15 14:30:32.002  INFO 10652 --- [2)-192.168.56.1] inMXBeanRegistrar$SpringApplicationAdmin : Application shutdown requested.

 2016-08-15 14:30:32.003  INFO 10652 --- [2)-192.168.56.1] ationConfigEmbeddedWebApplicationContext : Closing org.springframework.boot.context.embedded.AnnotationConfigEmbeddedWebApplicationContext@4a94ee4: startup date [Mon Aug 15 14:30:16 CST 2016]; root of context hierarchy

 2016-08-15 14:30:32.004  INFO 10652 --- [2)-192.168.56.1] o.s.j.e.a.AnnotationMBeanExporter        : Unregistering JMX-exposed beans on shutdown
如果使用sts (Spring Tools Suite--没意外的话,后面的博客我会介绍一下),还可以用Spring Application的形式启动,信息不变,但是彩色的,如下:
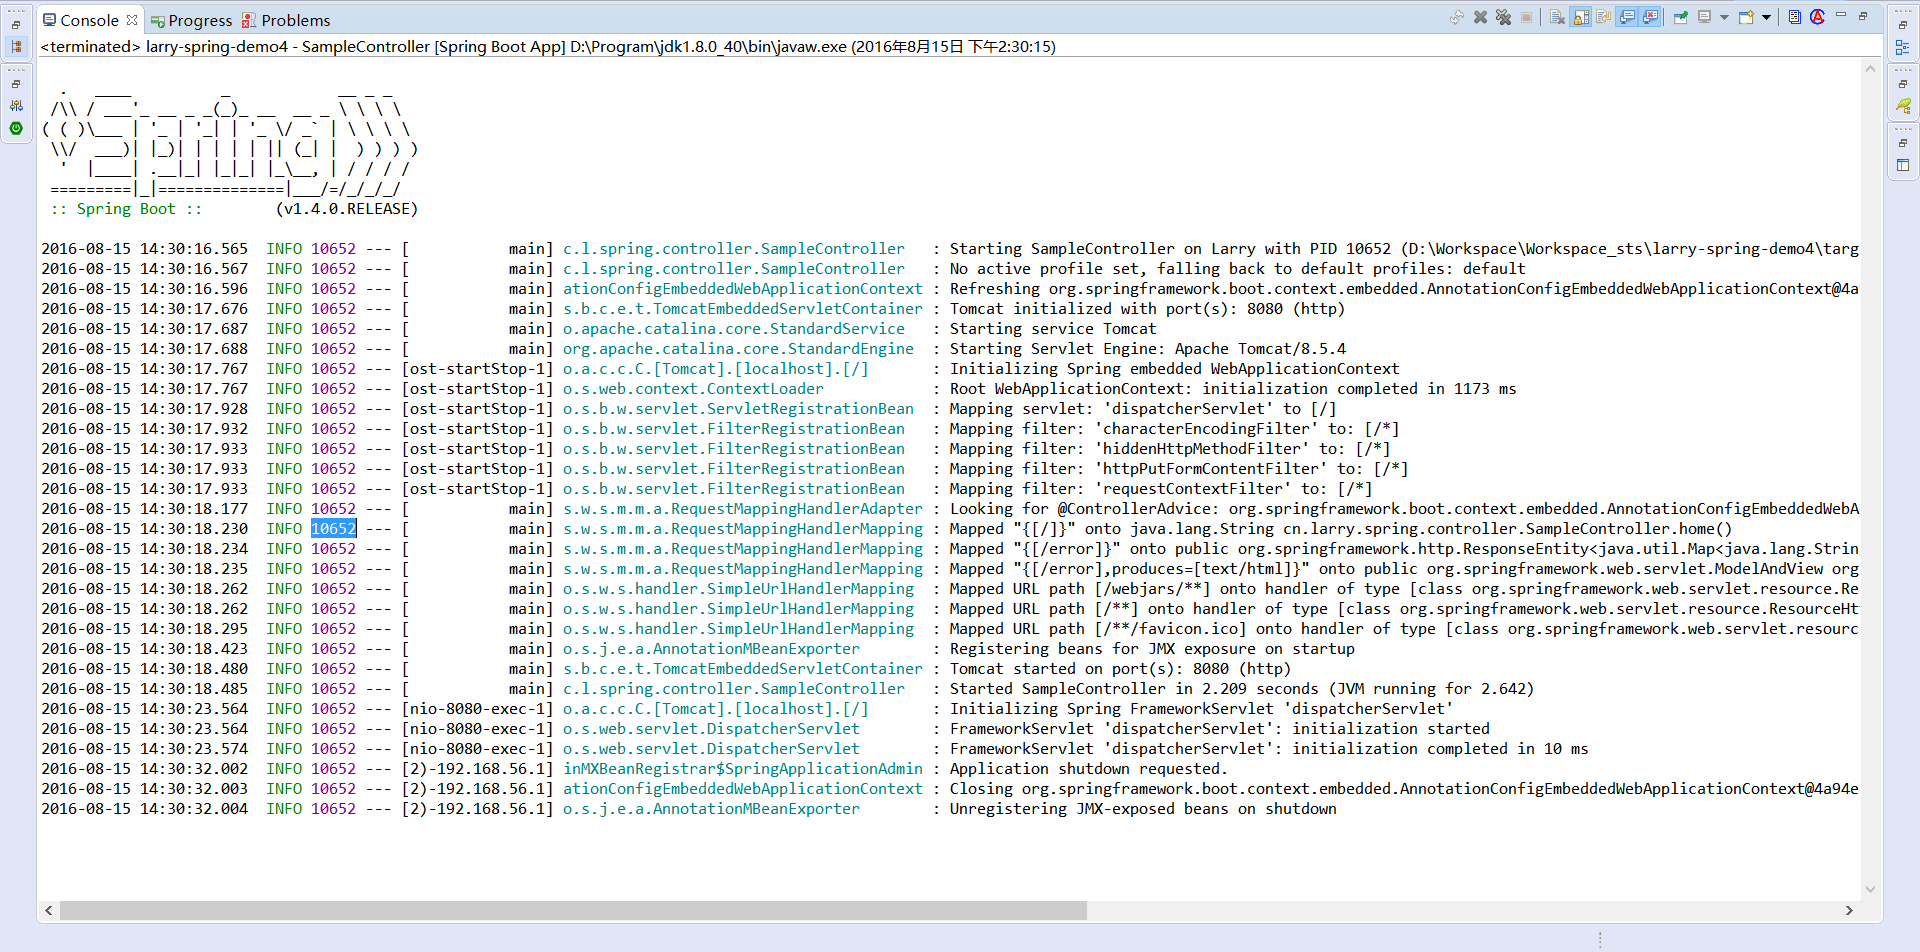
⑥ 根据这个信息,我们可以看出很多东西,不过现在先访问一下吧。
默认访问地址: http://localhost:8080/
按照之前的web项目习惯,你可能会问,怎么没有项目路径?
这就是Spring Boot的默认设置了,将项目路径直接设为根路径。
当然,我们也可以设置自己的项目路径 -- 在classpath下的 application.properties 或者 application.yaml 文件中设置即可。
内容如下:
# application.yaml

# Server settings (ServerProperties)

server:

  port: 8080

  address: 127.0.0.1

  sessionTimeout: 30

  contextPath: /aaa

  # Tomcat specifics

  tomcat:

    accessLogEnabled: false

    protocolHeader: x-forwarded-proto

    remoteIpHeader: x-forwarded-for

    basedir:

    backgroundProcessorDelay: 30 # secs
# application.properties
# Server settings (ServerProperties)
server.port=8080
server.address=127.0.0.1
#server.sessionTimeout=30
server.contextPath=/aaa

# Tomcat specifics
#server.tomcat.accessLogEnabled=false
server.tomcat.protocolHeader=x-forwarded-proto
server.tomcat.remoteIpHeader=x-forwarded-for
server.tomcat.basedir=
server.tomcat.backgroundProcessorDelay=30
上面, server.contextPath=/aaa 就是设置了项目路径。所以现在需要访问 http://localhost:8080/aaa/ 才行。
分析
OK,当目前为止,已经成功运行并访问了一个 SpringMVC 应用。简单的不能再简单了!
再来看一下启动时的信息:
第 9 行,启动SampleController。

第10行,查找active profile,无,设为default。

第11行,刷新上下文。

第12行,初始化tomcat,设置端口8080,设置访问方式为http。

第13行,启动tomcat服务。

第14行,启动Servlet引擎。

第15行,Spring内嵌的WebApplicationContext 初始化开始。
第16行,Spring内嵌的WebApplicationContext 初始化完成。
第17行,映射servlet,将 dispatcherServlet 映射到 [/] 。
第18行,映射filter,将 characterEncodingFilter 映射到 [/*] 。
第19行,映射filter,将 hiddenHttpMethodFilter 映射到 [/*] 。
第20行,映射filter,将 httpPutFormContentFilter 映射到 [/*] 。
第21行,映射filter,将 requestContextFilter 映射到 [/*] 。
第22行,查找 @ControllerAdvice。
第23行,映射路径 "{[/]}" 到 cn.larry.spring.controller.SampleController.home()。
第24行,映射路径 "{[/error]}" 到 org.springframework.boot.autoconfigure.web.BasicErrorController.error(javax.servlet.http.HttpServletRequest)。
第25行,映射路径 "{[/error],produces=[text/html]}" 到 org.springframework.web.servlet.ModelAndView org.springframework.boot.autoconfigure.web.BasicErrorController.errorHtml(javax.servlet.http.HttpServletRequest,javax.servlet.http.HttpServletResponse)。
第26行,略。 第27行,略。 第28行,略。 第29行,略。
第30行,tomcat启动完毕。
第31行,SampleController启动耗费的时间。
第32行,初始化 dispatcherServlet 。
第33行,dispatcherServlet 的初始化已启动。
第34行,dispatcherServlet 的初始化已完成。
第35行,收到shutdown关闭请求。
第36行,关闭AnnotationConfigEmbeddedWebApplicationContext。
第37行,略。
从上面的启动信息中可以明显看到SpringMVC的加载过程,特别需要注意的是这种默认方式下加载的几个 filter 。
这里就不再介绍了,具体可以见本文末尾最后三个链接。
参考:
Spring Boot——开发新一代Spring Java应用 Spring Boot的启动器Starter详解 深入学习微框架:Spring Boot转载:spring boot学习的更多相关文章
- Spring Boot 学习笔记(六) 整合 RESTful 参数传递
Spring Boot 学习笔记 源码地址 Spring Boot 学习笔记(一) hello world Spring Boot 学习笔记(二) 整合 log4j2 Spring Boot 学习笔记 ...
- Spring Boot学习大全(入门)
Spring Boot学习(入门) 1.了解Spring boot Spring boot的官网(https://spring.io),我们需要的一些jar包,配置文件都可以在下载.添置书签后,我自己 ...
- Spring Boot学习记录(二)--thymeleaf模板 - CSDN博客
==他的博客应该不错,没有细看 Spring Boot学习记录(二)--thymeleaf模板 - CSDN博客 http://blog.csdn.net/u012706811/article/det ...
- Spring boot学习1 构建微服务:Spring boot 入门篇
Spring boot学习1 构建微服务:Spring boot 入门篇 Spring Boot是由Pivotal团队提供的全新框架,其设计目的是用来简化新Spring应用的初始搭建以及开发过程.该框 ...
- spring boot 学习资料
spring boot 学习资料: 学习资料 网址 Spring Boot Cookbook-极客学院 http://wiki.jikexueyuan.com/project/spring-boot- ...
- Spring Boot学习笔记2——基本使用之最佳实践[z]
前言 在上一篇文章Spring Boot 学习笔记1——初体验之3分钟启动你的Web应用已经对Spring Boot的基本体系与基本使用进行了学习,本文主要目的是更加进一步的来说明对于Spring B ...
- spring boot 学习(十四)SpringBoot+Redis+SpringSession缓存之实战
SpringBoot + Redis +SpringSession 缓存之实战 前言 前几天,从师兄那儿了解到EhCache是进程内的缓存框架,虽然它已经提供了集群环境下的缓存同步策略,这种同步仍然需 ...
- Spring Boot学习路线
Spring Boot 学习路线,本文计划根据作者近几年的工作.学习经验,来分析和制定一个学习使用 Spring Boot技术的步骤路线图. SpringBoot是伴随着Spring4.0诞生的: S ...
- 我的Spring Boot学习记录(二):Tomcat Server以及Spring MVC的上下文问题
Spring Boot版本: 2.0.0.RELEASE 这里需要引入依赖 spring-boot-starter-web 这里有可能有个人的误解,请抱着怀疑态度看. 建议: 感觉自己也会被绕晕,所以 ...
随机推荐
- U3D中的又一个坑
using System.Collections; using System.Collections.Generic; using UnityEditor; using UnityEngine; pu ...
- redis cluster test
cp /test/tests/redis.conf /etc redis-server /etc/redis.conf redis-trib.rb create --replicas 1 172.17 ...
- 【poj1743】Musical Theme 【后缀自动机】
题意 给出一个n个数字的序列,找出相同变化趋势且不重叠的两个最长子串. 分析 这个题以前应该用后缀数组+二分做过.学了后缀自动机后可以用后缀自动机搞一下. 先差分,然后把查分后的数组建SAM.然后对于 ...
- Spark性能优化的10大问题及其解决方案
Spark性能优化的10大问题及其解决方案 问题1:reduce task数目不合适 解决方式: 需根据实际情况调节默认配置,调整方式是修改参数spark.default.parallelism.通常 ...
- Nginx源码完全注释(4)ngx_queue.h / ngx_queue.c
队列头文件ngx_queue.h #include <ngx_config.h> #include <ngx_core.h> #ifndef _NGX_QUEUE_H_INCL ...
- 689. Maximum Sum of 3 Non-Overlapping Subarrays三个不重合数组的求和最大值
[抄题]: In a given array nums of positive integers, find three non-overlapping subarrays with maximum ...
- spring4-2-bean配置-2-属性注入细节
配置 bean,本章节中主要介绍蓝色文字部分. 配置形式:基于 XML 文件的方式:基于注解的方式 Bean 的配置方式:通过全类名(反射).通过工厂方法(静态工厂方法 & 实例工厂方法).F ...
- EZOJ #258
传送门 分析 我们考虑一个点有多少中情况可以被删除 我们发现只有删除它自己和删祖先共$dep_i$中 所以每个点的答案就是$\frac{1}{dep_i}$ 代码 #include<iostre ...
- select下拉列表
1.写 <!DOCTYPE html> <html> <head> <title></title> <script language= ...
- nuget get-package id显示不全
Get-Package | ft -AutoSize 参考 https://stackoverflow.com/questions/5036719/is-there-a-way-to-get-the- ...