浅谈ASP.NET的Postback
说道ASP.NET的Postback,就得说Web Page的生命周期,但是Web Page的生命周期却不是三言两语就能够说得清楚的,所以在这里单纯站的编程的角度,撇开Web Page 的生命周期浅谈Postback。
我们知道,无论是ASP.NET1.x,2.0,甚至是以后的版本,ASP.NET最终Render到Client端通过浏览器浏览的都是一样:一个单纯的HTML。Client通过Submit Form的方式将填入Form的数据提交给Server进行处理。我们现在来看看ASP.NET整个Postback程序处理的过程。
首先我们通过一个Sample来看ASP.NET如何处理一个通过Click一个Button引起的Postback。下面是Web Page的HTML:
 <%@ Page Language="C#" AutoEventWireup="true" CodeFile="Default.aspx.cs" Inherits="_Default" %>
 <!DOCTYPE html PUBLIC "-//W3C//DTD XHTML 1.0 Transitional//EN" "http://www.w3.org/TR/xhtml1/DTD/xhtml1-transitional.dtd"><html xmlns="http://www.w3.org/1999/xhtml"><head runat="server"> <title>Test Page</title></head><body> <form id="form1" runat="server"> <div> <asp:Label runat="server" ID="LabelMessage" ForeColor="red"></asp:Label> </div> <div> <asp:Button runat="server" ID="Button1" Text="Button1" OnClick="Button1_Click" OnCommand="Button_Command" CommandArgument="Button1" /> <asp:Button runat="server" ID="Button2" Text="Button2" OnClick="Button2_Click" OnCommand="Button_Command" CommandArgument="Button2" UseSubmitBehavior="false" /> <asp:Button runat="server" ID="Button3" Text="Button3" OnClick="Button3_Click" OnCommand="Button_Command" CommandArgument="Button3" UseSubmitBehavior="false" /> </div> </form></body></html>
很简单,定义了3个Button,分别注册了他们的两个Event:Click和Command。3个Button的Command Event Hander是一样的:Button_Command,通过指定的CommandArgument来让Event Handler判断到底是哪个Button触发了Command Event。
下面是Code Behind:
using System;using System.Data;using System.Configuration;using System.Web;using System.Web.Security;using System.Web.UI;using System.Web.UI.WebControls;using System.Web.UI.WebControls.WebParts;using System.Web.UI.HtmlControls;public partial class _Default : System.Web.UI.Page{  protected void Page_Load(object sender, EventArgs e)
 {
{  } protected void Button1_Click(object sender, EventArgs e) { string message = string.Format("The {0} event of {1} is fired", "Click", "Button1"); this.LabelMessage.Text = message; } protected void Button2_Click(object sender, EventArgs e) { string message = string.Format("The {0} event of {1} is fired", "Click", "Button2"); this.LabelMessage.Text = message; } protected void Button3_Click(object sender, EventArgs e) { string message = string.Format("The {0} event of {1} is fired", "Click", "Button3"); this.LabelMessage.Text = message; } protected void Button_Command(object sender, CommandEventArgs e) { string message = string.Format("The {0} event of {1} is fired", "Command", e.CommandArgument); this.LabelMessage.Text += "; " + message; }
 }
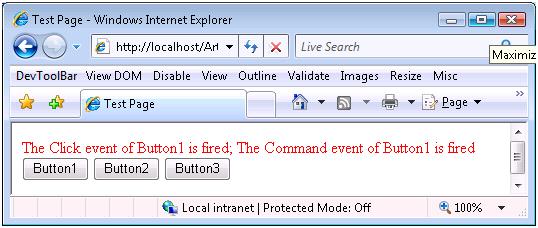
}我们来运行这个Page,并Click某个按钮(比如Button2):

我们通过最上方的Message可以看出,Button2的Click Event和Command先后触发。
这篇Blog的主旨就是从方法调用的角度讲述整个程序运行的过程:从HTML 被Render到Client端,到用户Click某个按钮,输入被Postback到Server端,并触发两个Event,执行Event Handler打印出相关的Message。
首先我们来看看ASP.NET设计的Page Render到Client端的HTML是什么样子:
<!DOCTYPE html PUBLIC "-//W3C//DTD XHTML 1.0 Transitional//EN" "http://www.w3.org/TR/xhtml1/DTD/xhtml1-transitional.dtd"><html xmlns="http://www.w3.org/1999/xhtml"> <head> <title> Test Page </title> </head> <body> <form name="form1" method="post" action="Default.aspx" id="form1"> <div> <input type="hidden" name="__EVENTTARGET" id="__EVENTTARGET" value="" /> <input type="hidden" name="__EVENTARGUMENT" id="__EVENTARGUMENT" value="" /> <input type="hidden" name="__VIEWSTATE" id="__VIEWSTATE" value="/wEPDwUKMTA0NDQ2OTE5OWRk281L4eAk7iZT10hzg+BeOyoUWBQ=" /> </div><script type="text/javascript"> <!--var theForm = document.forms['form1'];if (!theForm) { theForm = document.form1;}function __doPostBack(eventTarget, eventArgument) { if (!theForm.onsubmit || (theForm.onsubmit() != false)) { theForm.__EVENTTARGET.value = eventTarget; theForm.__EVENTARGUMENT.value = eventArgument; theForm.submit(); }}// --></script><div><span id="LabelMessage" style="color:Red;"></span></div><div> <input type="submit" name="Button1" value="Button1" id="Button1" /> <input type="button" name="Button2" value="Button2" onclick="javascript:__doPostBack('Button2','')" id="Button2" /> <input type="button" name="Button3" value="Button3" onclick="javascript:__doPostBack('Button3','')" id="Button3" /></div></form></body></html>上面的HTMLBody部分大体包括3个部分:
1. 定义了3个hidden field:
<input type="hidden" name="__EVENTTARGET" id="__EVENTTARGET" value="" /> <input type="hidden" name="__EVENTARGUMENT" id="__EVENTARGUMENT" value="" /><input type="hidden" name="__VIEWSTATE" id="__VIEWSTATE" value="/wEPDwUKMTA0NDQ2OTE5OWRk281L4eAk7iZT10hzg+BeOyoUWBQ=" />从他们的命名可以看出他们分别代表的意思:__EVENTTARGET代表触发Event的Control的Unique name;__EVENTARGUMENT代表为Event Handler定义的额外的参数;__VIEWSTATE:代表的是Viewstate。
2. 一段script:
<script type="text/javascript"> <!--var theForm = document.forms['form1'];if (!theForm) { theForm = document.form1;}function __doPostBack(eventTarget, eventArgument) { if (!theForm.onsubmit || (theForm.onsubmit() != false)) { theForm.__EVENTTARGET.value = eventTarget; theForm.__EVENTARGUMENT.value = eventArgument; theForm.submit(); }}// --></script>定义了一个__doPostBack function完成Postback的操作,该function只有区区3行代码,前两行通过参数对上面定义的两个hidden field赋值,然后向Server端提交表单。
3. 一段HTML对应通过ASP.NET定义的Web Control。
<div><span id="LabelMessage" style="color:Red;"></span></div><div> <input type="submit" name="Button1" value="Button1" id="Button1" /> <input type="button" name="Button2" value="Button2" onclick="javascript:__doPostBack('Button2','')" id="Button2" /> <input type="button" name="Button3" value="Button3" onclick="javascript:__doPostBack('Button3','')" id="Button3" />div>我们定义的3个Button被转化成3个能向Server端提交表单的<input > Tag, 但是他们提交表的方式却不一样,第一个以<input type="submit">的方式提交,后面两个通过调用javascript的方式提交表单(<input type="button">)。对于一个System.Web.UI.WebControls.Button,默认采用第一种提交方式,但是我们通过设置UseSubmitBehavior属性(这个属性时ASP.NET 2.0新加的,1x没有相应的设置),改变其表单提交的行为。
当用户Click Button2的时候,调用__doPostBack,并传入两个参数:一个代表出发Event的对象的Unique name,也就是Button2的名称,另一个描述Event的额外信息的参数,这里不需要,所以这里是空字符串。在__doPostBack中把这两个参数赋值给两个Hidden Field:__EVENTTARGET,__EVENTARGUMENT。然后向Server端提交表单,完成Postback。
然后我们来看看Server如何处理这个Postback,关于Web Page的生命周期在这里就不详细介绍了。Server端通过__EVENTTARGET这个hidden field的值找到对应的Server端的Control,通过Reflection确定该Control是否实现了System.Web.UI.IPostBackEventHandler Interface。如果该Control确实实现了该Interface,那么调用Page的RaisePostBackEvent方法,这是一个Virtual的方法,可以被Override。我们来看该方法的定义。
[EditorBrowsable(EditorBrowsableState.Advanced)]protected virtual void RaisePostBackEvent(IPostBackEventHandler sourceControl, string eventArgument){ sourceControl.RaisePostBackEvent(eventArgument);}我们可以看到该方法直接调用该sourceControl的RaisePostBackEvent,并传入一个eventArgument参数,在这个例子中sourceControl就是__EVENTTARGET对应的Web Control:Button2,eventArgument就是__EVENTTARGET对应的值:一个空字符串。Button2的类型是System.Web.UI.WebControls.Button。我们来看看System.Web.UI.WebControls.Button中的RaisePostBackEvent方法是如何定义的:
protected virtual void RaisePostBackEvent(string eventArgument){ base.ValidateEvent(this.UniqueID, eventArgument); if (this.CausesValidation) { this.Page.Validate(this.ValidationGroup); } this.OnClick(EventArgs.Empty); this.OnCommand(new CommandEventArgs(this.CommandName, this.CommandArgument));}这个方法也很简单,先进行Validation,然后先后出发两个Event:OnClick 和OnCommand,随后调用对应的Event handler,这和我们的输出结果是吻合的。
这基本上就是整个Postback的整个程序执行的过程,现在我们对我们的Page作一些小的有趣的改动,来验证一下:
Client端和Server端进行交互的途径就是提交表单(Form Submitting),而我们现在有两种方式来提交表单:通过<input type="submit">控件;通过调用javascript:__doPostBack。基于这一点我们在Html中加了下面一段javascript:
<script type="text/javascript"> function postback() { __doPostBack('Button1',''); } document.getElementById("Button2").onclick = postback; document.getElementById("Button3").onclick = postback; </script>我们override Button2和Button3的onclick event,把'Button1作为参数传入__doPostBack方法,可以想象,现在无论Click那个Button,程序都将认为之Click Button1。有兴趣的可以亲自试试,无论Click那个Button,显示的效果都将是下面的样子:
接下来我们取消上面的改动,在Server对Code作另一方面的尝试。我们前面说过,Server接受到Client的Postback,对于事件的Web Control(或者Html Server Control),如果实现了System.Web.UI.IPostBackEventHandler接口,会调用Page的virtual方法:RaisePostbackEvent,我们现在来Override这个方法:
protected override void RaisePostBackEvent(IPostBackEventHandler sourceControl, string eventArgument) { sourceControl = this.Button1; base.RaisePostBackEvent(sourceControl, eventArgument);}在上面的Code中,我们把sourceControl设为Button1,这样无论在client端Click的那个Button,现在都将认为是对Button的Click。运行的结果和上面一样。
通过上面的介绍,我们知道了Page的RaisePostBackEvent会调用Source Control的RaisePostBackEvent方法,这个方法是定义在IPostBackEventHandler接口中,很多Control都实现了这个方法,对于Button来说,这个方法是Virtual的,它可以被你Override,如果感兴趣的话,可以自己写一个Custom Button,并Override该方法,看看执行的情况,相信会使加深你对Postback的理解。
浅谈ASP.NET的Postback的更多相关文章
- 【ASP.NET MVC系列】浅谈ASP.NET MVC八大类扩展(上篇)
lASP.NET MVC系列文章 [01]浅谈Google Chrome浏览器(理论篇) [02]浅谈Google Chrome浏览器(操作篇)(上) [03]浅谈Google Chrome浏览器(操 ...
- 【ASP.NET MVC系列】浅谈ASP.NET 页面之间传值的几种方式
ASP.NET MVC系列文章 [01]浅谈Google Chrome浏览器(理论篇) [02]浅谈Google Chrome浏览器(操作篇)(上) [03]浅谈Google Chrome浏览器(操作 ...
- 【ASP.NET MVC系列】浅谈ASP.NET MVC运行过程
ASP.NET MVC系列文章 [01]浅谈Google Chrome浏览器(理论篇) [02]浅谈Google Chrome浏览器(操作篇)(上) [03]浅谈Google Chrome浏览器(操作 ...
- 【ASP.NET MVC系列】浅谈ASP.NET MVC 视图
ASP.NET MVC系列文章 [01]浅谈Google Chrome浏览器(理论篇) [02]浅谈Google Chrome浏览器(操作篇)(上) [03]浅谈Google Chrome浏览器(操作 ...
- 【ASP.NET MVC系列】浅谈ASP.NET MVC 视图与控制器传递数据
ASP.NET MVC系列文章 [01]浅谈Google Chrome浏览器(理论篇) [02]浅谈Google Chrome浏览器(操作篇)(上) [03]浅谈Google Chrome浏览器(操作 ...
- 【ASP.NET MVC系列】浅谈ASP.NET MVC 控制器
ASP.NET MVC系列文章 [01]浅谈Google Chrome浏览器(理论篇) [02]浅谈Google Chrome浏览器(操作篇)(上) [03]浅谈Google Chrome浏览器(操作 ...
- 【ASP.NET MVC系列】浅谈ASP.NET MVC 路由
ASP.NET MVC系列文章 [01]浅谈Google Chrome浏览器(理论篇) [02]浅谈Google Chrome浏览器(操作篇)(上) [03]浅谈Google Chrome浏览器(操作 ...
- 【ASP.NET MVC系列】浅谈ASP.NET 程序发布过程
ASP.NET MVC系列文章 [01]浅谈Google Chrome浏览器(理论篇) [02]浅谈Google Chrome浏览器(操作篇)(上) [03]浅谈Google Chrome浏览器(操作 ...
- 浅谈ASP.NET ---- 系列文章
[01]浅谈Google Chrome浏览器(理论篇) [02]浅谈Google Chrome浏览器(操作篇)(上) [03]浅谈Google Chrome浏览器(操作篇)(下) [04]浅谈ASP. ...
随机推荐
- awk练习总结
>>> >>>awk是个优秀文本处理工具,可以说是一门程序设计语言.下面是awk内置变量. 一.内置变量表 属性 说明 $0 当前记录(作为单个变量) $1~$n ...
- LoadRunner学习笔记log函数
lr_log_message 只是记会写到本地vuser的log里面. lr_message和lr_output_message基本相同,它们会同时写到vuser的log和发送到controller里 ...
- 【WPF】自定义控件之远程图片浏览
using System; using System.Collections.Generic; using System.IO; using System.Linq; using System.Tex ...
- 转:perl源码审计
转:http://www.cgisecurity.com/lib/sips.html Security Issues in Perl Scripts By Jordan Dimov (jdimov@c ...
- [Codeforces50C]Happy Farm 5 凸包
大致题意: 平面上有n个整数点,问你最少经过多少步能够将所有点严格包围. 将点严格包围要求你走的路径完全包围给出的点且不能有点在路径上 你只能走整数点,且方向只有上下左右左上右下等8个方向,每次移动一 ...
- java.lang.TypeNotPresentException: Type org.eclipse.jetty.maven.plugin.JettyRunMojo not present的原因
原因 :我的JDK版本不支持当前Jetty版本. 解决:将jetty版本换成较低版本的就可以,这个是我之前的我的jdk是1.7.7的 <groupId>org.eclipse.jetty& ...
- poj 2096Collecting Bugs
题目链接 poj 2096Collecting Bugs 题解 dp[i][j]表示已经找到i种bug,并存在于j个子系统中,要达到目标状态的天数的期望. 显然,dp[n][s]=0,因为已经达到目标 ...
- [BZOJ4289][PA2012]TAX(最短路)
首先考虑一种暴力做法,为每条边拆成两条有向边,各建一个点.若某两条边有公共点,则在边所对应的点之间连一条边,权值为两条边中的较大值.这样跑最短路是$O(m^2\log m)$的. 用类似网络流中补流的 ...
- HihoCoder - 1756 打怪
题面在这里! 拆成两个部分分别算显然比较简单. 前面一个部分排个序枚举最大值算就好啦. 后面的就相当于把每一种数值的贡献加起来,也可以在排完序之后的a[]上面直接算出来. #include<bi ...
- Vue学习记录-状态管理
要解决的问题 平时的系统开发中,基本都会碰到这个权限问题,需要根据用户的登录状态进行处理.最常见的情况就是“先登录,后使用”.除去打包成APP,无法看到连接外,如果地址栏里直接输入地址就能绕过登录的话 ...