
Springboot学习02-webjars和静态资源映射规则
Springboot学习01-webjars和静态资源映射规则
前言
1-以前我们在IDEA中创建一个项目,添加web依赖包,我们现在是一个web应用,应该在man目录下面有一个webapp文件夹,将所有的页面都放在这里,这是我们以前的做法。
2-现在我们创建的这个项目中,没有这个webapp目录,但是SpringBoot给我们做了规定。在SpringBoot中对SpringMVC的相关配置都在 WebMvcAutoConfiguration 这个类中做了规定。
3-本文主要内容
- /webjars/** ,在 classpath:/META-INF/resources/webjars/ 找资源
- "/**" 访问当前项目的任何资源,都去(静态资源的文件夹)找映射
- 欢迎页; 静态资源文件夹下的所有index.html页面;被"/**"映射;
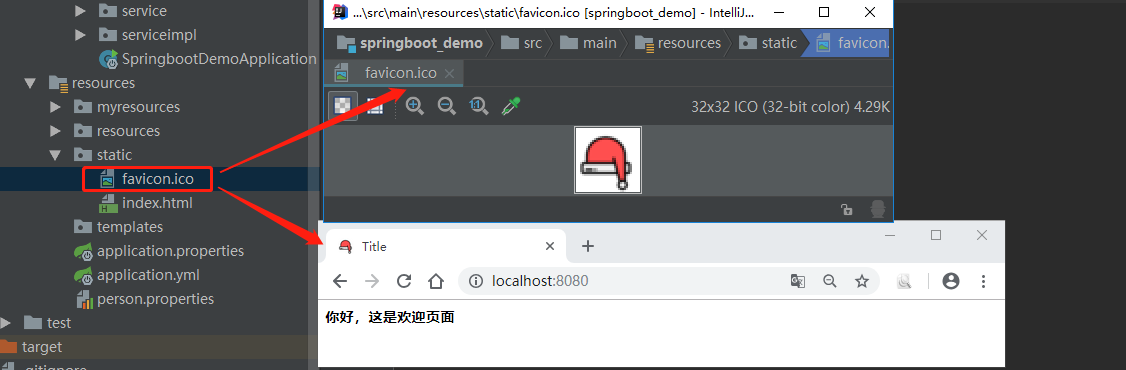
- favicon.ico :所有的 **/favicon.ico 都是在静态资源文件下找;
正文
1-/webjars/** ,在 classpath:/META-INF/resources/webjars/ 找资源
1-1-源码分析
public static class WebMvcAutoConfigurationAdapter implements WebMvcConfigurer, ResourceLoaderAware {

private final ResourceProperties resourceProperties;

    //1-配置静态访问资源

    public void addResourceHandlers(ResourceHandlerRegistry registry) {

        if (!this.resourceProperties.isAddMappings()) {

            logger.debug("Default resource handling disabled");

        } else {

            Duration cachePeriod = this.resourceProperties.getCache().getPeriod();

            CacheControl cacheControl = this.resourceProperties.getCache().getCachecontrol().toHttpCacheControl();

            if (!registry.hasMappingForPattern("/webjars/**")) {

                this.customizeResourceHandlerRegistration(registry.addResourceHandler(new String[]{"/webjars/**"})

                .addResourceLocations(new String[]{"classpath:/META-INF/resources/webjars/"})

                .setCachePeriod(this.getSeconds(cachePeriod)).setCacheControl(cacheControl));

            }

            String staticPathPattern = this.mvcProperties.getStaticPathPattern();

            //静态资源文件夹映射

            if (!registry.hasMappingForPattern(staticPathPattern)) {

                this.customizeResourceHandlerRegistration(registry.addResourceHandler(new String[]{staticPathPattern})

                .addResourceLocations(getResourceLocations(this.resourceProperties.getStaticLocations()))

                .setCachePeriod(this.getSeconds(cachePeriod)).setCacheControl(cacheControl));

            }

        }

    }

}
1-2-webjars:以jar包的方式引入静态资源,可以去http://www.webjars.org/ 这个网站选择自己的静态资源
1-2-1-去webjars官网获取自己需要的maven依赖
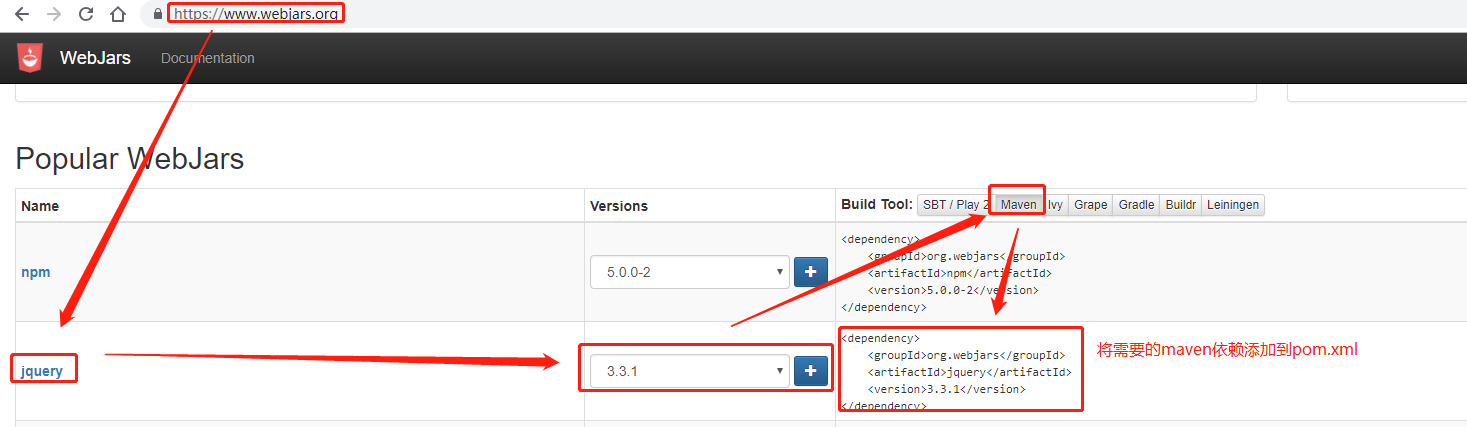
1-2-2-将maven依赖导入行pom.xml文件

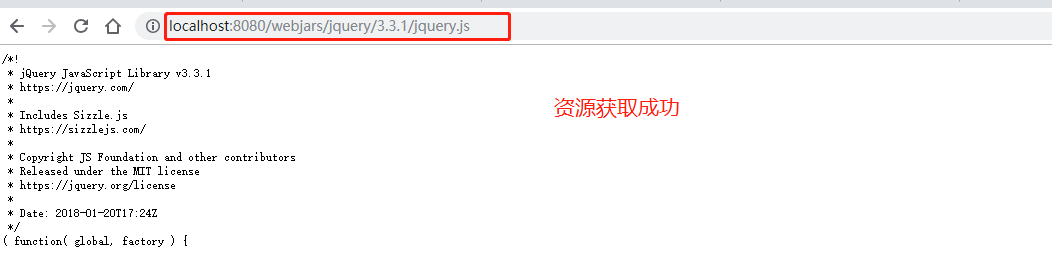
1-2-3-启动项目,测试是否可以获取jquery资源(示例路径:http://localhost:8080/webjars/jquery/3.3.1/jquery.js)
2-自定义静态文件的映射路径(意思为:我们把静态文件放在这些路径下面,就会被加载到)
2-1-默认映射路径:"classpath:/META-INF/resources/", "classpath:/resources/", "classpath:/static/", "classpath:/public/";优先级顺序为:META-INF/resources > resources > static > public
2-2-默认映射路径,源码出处
//ResourceProperties类

@ConfigurationProperties(

    prefix = "spring.resources",//如果要自己配置路径,在配资前缀为"spring.resources"

    ignoreUnknownFields = false

)

public class ResourceProperties {

    //声明了默认classpath资源路径为:{"classpath:/META-INF/resources/", "classpath:/resources/", "classpath:/static/", "classpath:/public/"}

    private static final String[] CLASSPATH_RESOURCE_LOCATIONS = new String[]{"classpath:/META-INF/resources/", "classpath:/resources/", "classpath:/static/", "classpath:/public/"};

}
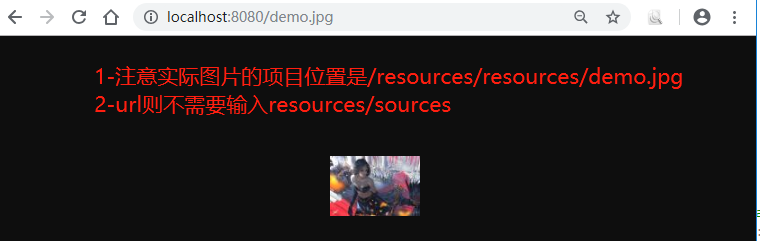
2-3-应用示例(http://localhost:8080/demo.jpg指的是依次去"classpath:/META-INF/resources/", "classpath:/resources/", "classpath:/static/", "classpath:/public/"去找demo.jpg图片)
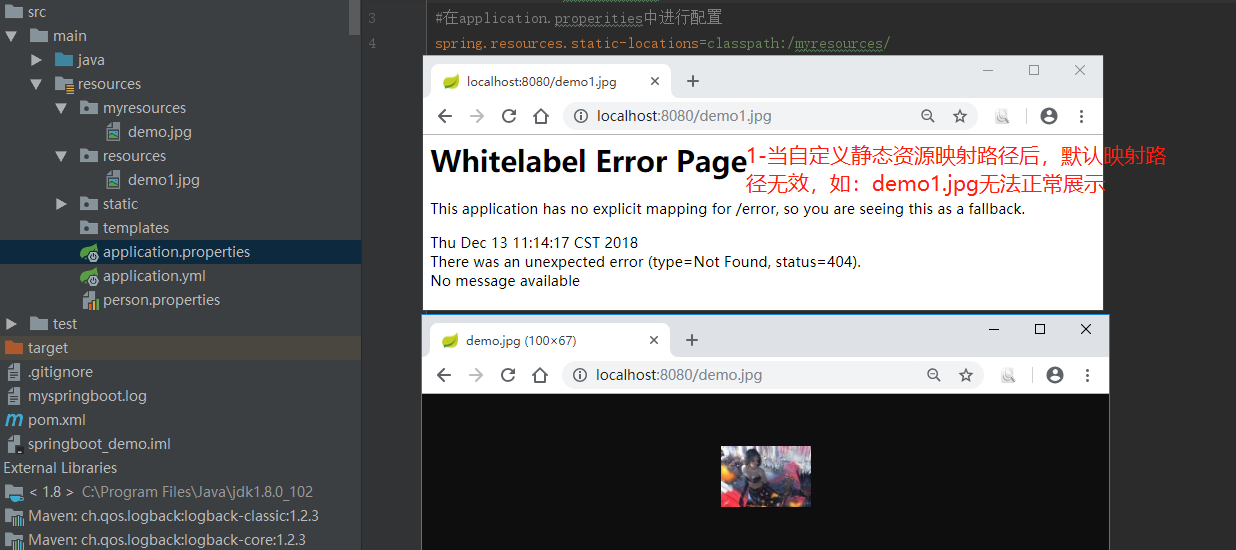
2-4-修改默认静态资源路径,方法一:配置spring.resources.static-locations参数
#在application.properities中进行配置,多个路径可以用逗号隔开

spring.resources.static-locations=classpath:/myresources/
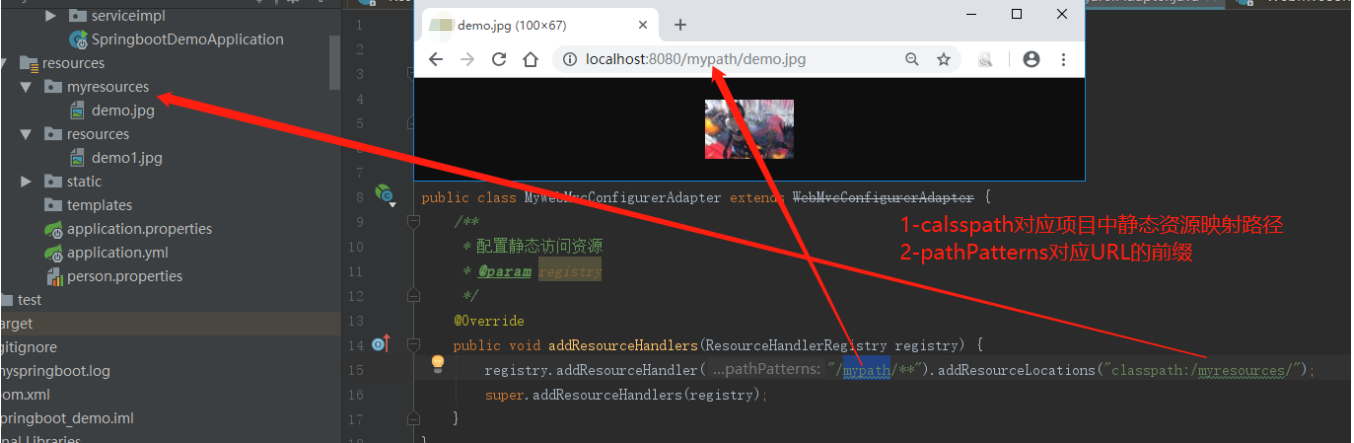
2-5-修改默认静态资源路径,方法二:重写WebMvcConfigurerAdapter 中的addResourceHandlers方法,自定义映射路径
2-5-1-重写WebMvcConfigurerAdapter 中的addResourceHandlers方法,自定义映射路径
@Configuration

public class MyWebMvcConfigurerAdapter extends WebMvcConfigurerAdapter {

    /**

     * 配置静态访问资源

     * @param registry

     */

    @Override

    public void addResourceHandlers(ResourceHandlerRegistry registry) {

        registry.addResourceHandler("/mypath/**").addResourceLocations("classpath:/myresources/");

        super.addResourceHandlers(registry);

    }

}
2-5-2-应用示例
3-欢迎页面(当浏览器)
3-1-源码分析
public static class WebMvcAutoConfigurationAdapter implements WebMvcConfigurer, ResourceLoaderAware {

    private final ResourceProperties resourceProperties;

    //1-指定this.getWelcomePage(),见2

    @Bean

    public WelcomePageHandlerMapping welcomePageHandlerMapping(ApplicationContext applicationContext) {

        return new WelcomePageHandlerMapping(new TemplateAvailabilityProviders(applicationContext), applicationContext, this.getWelcomePage(), this.mvcProperties.getStaticPathPattern());

    }

    //2-去getIndexHtml()获取欢迎页面路径,见3

    private Optional<Resource> getWelcomePage() {

        String[] locations = getResourceLocations(this.resourceProperties.getStaticLocations());

        return Arrays.stream(locations).map(this::getIndexHtml).filter(this::isReadable).findFirst();

    }

    //3-默认欢迎页面在location(映射路径) + "index.html"

    private Resource getIndexHtml(String location) {

        return this.resourceLoader.getResource(location + "index.html");

    }

}
3-2-应用示例

4-favicon.ico
4-1-所有的 **/favicon.ico 都是在静态资源文件下找
4-1-应用示例
参看资料:
1-https://blog.csdn.net/baidu_36216018/article/details/79699084
2-https://www.cnblogs.com/java-synchronized/p/7091723.html
3-https://blog.csdn.net/javareact/article/details/77981769
Springboot学习02-webjars和静态资源映射规则的更多相关文章
- 尚硅谷springboot学习21-web开发-处理静态资源
SpringBoot对静态资源的映射规则 @ConfigurationProperties(prefix = "spring.resources", ignoreUnknownFi ...
- springboot静态资源映射规则
一.所有/webjars/**的请求,都会去classpath:/META-INF/resources/webjars/下的目录去找资源. 二.访问/**,即访问任何资源,如果没有controller ...
- SpringBoot学习5:访问静态资源
springboot默认从项目的resources里面的static目录下或者webapp目录下访问静态资源 方式一:在resources下新建static文件(文件名必须是static) 在浏览器中 ...
- Spring Boot笔记五: Web开发之Webjar和静态资源映射规则
目录 Webjar /** 访问当前项目的任何资源 欢迎页 标签页图标 Webjar 开始讲到Spring Boot的Web开发了,先介绍Webjar,这个其实就是把一些前端资源以jar包的形式导入到 ...
- SpringBoot之Web开发——webjars&静态资源映射规则
在webjars中找到需要引入的Maven依赖,添加到pom.xml中,即可自动导入相关依赖.
- SpringBoot:静态资源映射、定制404、配置icon
目录 静态资源映射规则 定制首页 定制错误页面 配置 icon 静态资源映射规则.定制首页.定制404页面.配置网站的图标 静态资源映射规则 SpringBoot中对于静态资源(css,js,img. ...
- springboot 2.X 在访问静态资源的的时候出现404的问题
通过idea快速搭建一个springboot项目: springboot版本2.1.6 在网上看的资料,springboot静态资源访问如下: "classpath:/META‐INF/re ...
- SpringBoot 配置静态资源映射
SpringBoot 配置静态资源映射 (嵌入式servlet容器)先决知识 request.getSession().getServletContext().getRealPath("/& ...
- springboot静态资源映射
springboot静态资源映射 WebMvcAutoConfiguration @Override public void addResourceHandlers(ResourceHandlerRe ...
随机推荐
- Others-常用数学符号大全
常用数学符号读法大全 大写 小写 英文注音 国际音标注音 中文注音 Α α alpha alfa 阿耳法 Β β beta beta 贝塔 Γ γ gamma gamma 伽马 Δ δ deta de ...
- touch修改文件时间戳
https://blog.csdn.net/lsbhjshyn/article/details/51443304 touch -t 20181011000.01 text.txt
- upupw
https://sourceforge.net/projects/upupw/files/ANK/
- python实现根据文件关键字进行切分为多个文件
来源:在工作过程中,需要统计一些trace信息,也就是一些打点信息,而打点是通过关键字进行的,因此对一个很大的文件进行分析时,想把两个打点之间的内容单独拷贝出来进行分析 #!/usr/bin/env ...
- python中求两个List的交集、并集和差集
直接上代码,有三种方法,第三种调用库函数效率最高 # ! /usr/bin/env python # encoding:utf-8 if __name__ == '__main__': a = [1, ...
- Delphi编写Shell扩展
用delphi创建一个外壳扩展(Shell Extension)程序的基本步骤如下: (1) 创建一个 ActiveX Library 工程,命名为“CloudUpload“(2) 创建一个新的自动化 ...
- C++学习二继承
转载自https://www.cnblogs.com/33debug/p/6666939.html 1.继承与派生 继承是使代码可以复用的重要手段,也是面向对象程序设计的核心思想之一.简单的说,继承 ...
- windows安装xgboost
https://blog.csdn.net/leo_xu06/article/details/52300869 参考部分共同安装的部分: https://www.cnblogs.com/kongcon ...
- pandas 中的常用数学计算
1.开方: >>> s = pd.Series([1.2 + 1j]) >>> s.abs()
- linux安装Anconda
1.下载 wget https://repo.anaconda.com/archive/Anaconda3-2018.12-Linux-x86_64.sh sh Anaconda3-2018.12-L ...