通过mapreduce把mysql的一张表的数据导到另外一张表中
怎么安装hadoop集群我在这里就不多说了,我这里安装的是三节点的集群
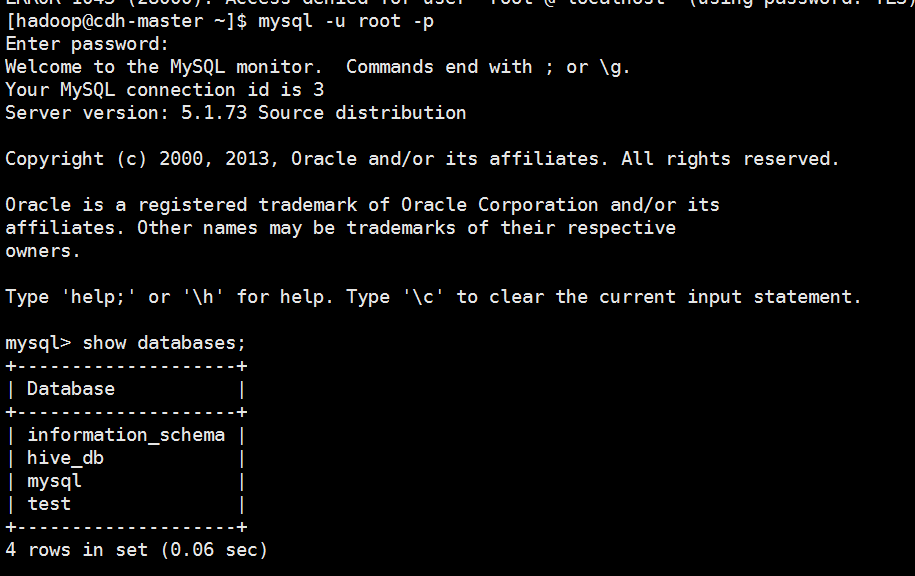
先在主节点安装mysql
启动mysql

登录mysql
创建数据库,创建表格,先把数据加载到表格 t ,表格t2是空的
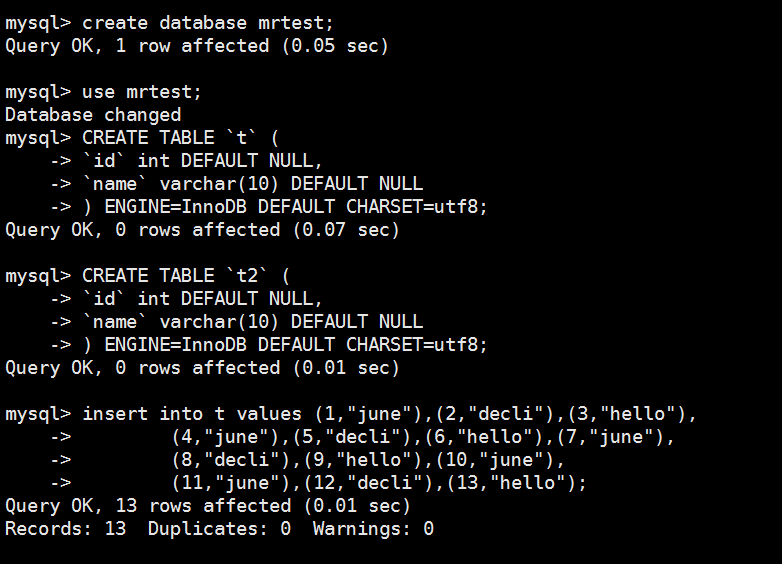
mysql> create database mrtest;

Query OK, 1 row affected (0.05 sec)

mysql> use mrtest;

Database changed

mysql> CREATE TABLE `t` (

    -> `id` int DEFAULT NULL,

    -> `name` varchar(10) DEFAULT NULL

    -> ) ENGINE=InnoDB DEFAULT CHARSET=utf8;

Query OK, 0 rows affected (0.07 sec)

mysql> CREATE TABLE `t2` (

    -> `id` int DEFAULT NULL,

    -> `name` varchar(10) DEFAULT NULL

    -> ) ENGINE=InnoDB DEFAULT CHARSET=utf8;

Query OK, 0 rows affected (0.01 sec)

mysql> insert into t values (1,"june"),(2,"decli"),(3,"hello"),

    ->         (4,"june"),(5,"decli"),(6,"hello"),(7,"june"),

    ->         (8,"decli"),(9,"hello"),(10,"june"),

    ->         (11,"june"),(12,"decli"),(13,"hello");

Query OK, 13 rows affected (0.01 sec)

Records: 13  Duplicates: 0  Warnings: 0
配置一下mysql数据库
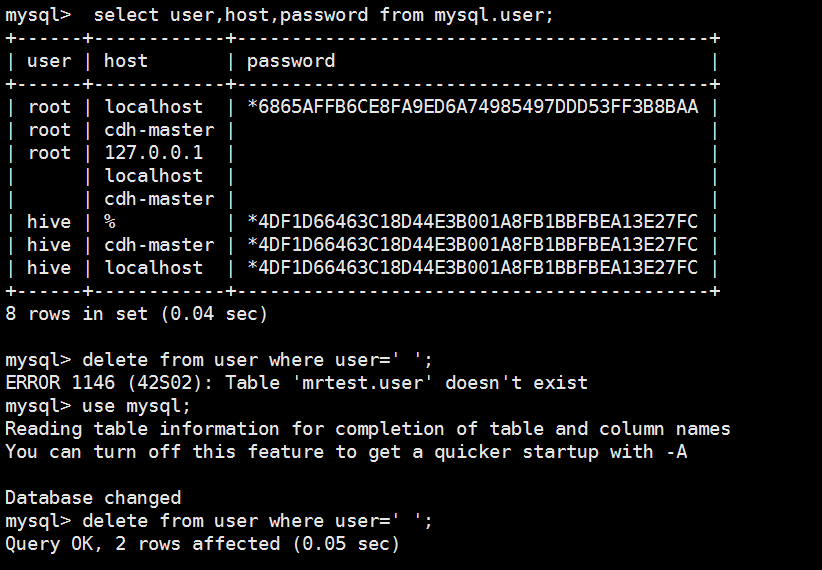
mysql> select user,host,password from mysql.user;
+------+------------+-------------------------------------------+
| user | host | password |
+------+------------+-------------------------------------------+
| root | localhost | *6865AFFB6CE8FA9ED6A74985497DDD53FF3B8BAA |
| root | cdh-master | |
| root | 127.0.0.1 | |
| | localhost | |
| | cdh-master | |
| hive | % | *4DF1D66463C18D44E3B001A8FB1BBFBEA13E27FC |
| hive | cdh-master | *4DF1D66463C18D44E3B001A8FB1BBFBEA13E27FC |
| hive | localhost | *4DF1D66463C18D44E3B001A8FB1BBFBEA13E27FC |
+------+------------+-------------------------------------------+
8 rows in set (0.04 sec) mysql> delete from user where user=' ';
ERROR 1146 (42S02): Table 'mrtest.user' doesn't exist
mysql> use mysql;
Reading table information for completion of table and column names
You can turn off this feature to get a quicker startup with -A Database changed
mysql> delete from user where user=' ';
Query OK, 2 rows affected (0.05 sec) mysql> select user,host,password from mysql.user;
+------+------------+-------------------------------------------+
| user | host | password |
+------+------------+-------------------------------------------+
| root | localhost | *6865AFFB6CE8FA9ED6A74985497DDD53FF3B8BAA |
| root | cdh-master | |
| root | 127.0.0.1 | |
| hive | % | *4DF1D66463C18D44E3B001A8FB1BBFBEA13E27FC |
| hive | cdh-master | *4DF1D66463C18D44E3B001A8FB1BBFBEA13E27FC |
| hive | localhost | *4DF1D66463C18D44E3B001A8FB1BBFBEA13E27FC |
+------+------------+-------------------------------------------+
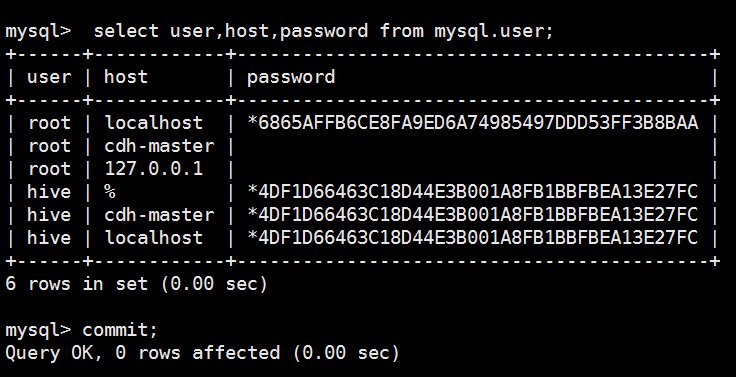
6 rows in set (0.00 sec) mysql> commit;
Query OK, 0 rows affected (0.00 sec) mysql> select user,host,password from mysql.user;
+------+------------+-------------------------------------------+
| user | host | password |
+------+------------+-------------------------------------------+
| root | localhost | *6865AFFB6CE8FA9ED6A74985497DDD53FF3B8BAA |
| root | cdh-master | |
| root | 127.0.0.1 | |
| hive | % | *4DF1D66463C18D44E3B001A8FB1BBFBEA13E27FC |
| hive | cdh-master | *4DF1D66463C18D44E3B001A8FB1BBFBEA13E27FC |
| hive | localhost | *4DF1D66463C18D44E3B001A8FB1BBFBEA13E27FC |
+------+------------+-------------------------------------------+
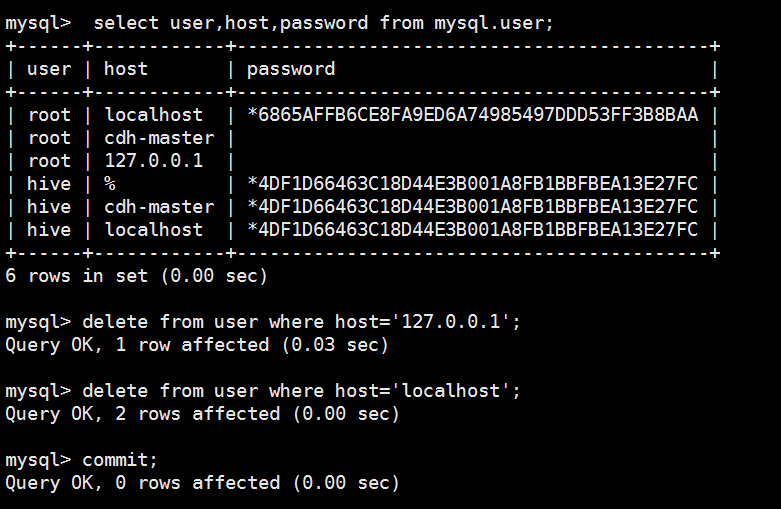
6 rows in set (0.00 sec) mysql> delete from user where host='127.0.0.1';
Query OK, 1 row affected (0.03 sec) mysql> delete from user where host='localhost';
Query OK, 2 rows affected (0.00 sec) mysql> commit;
Query OK, 0 rows affected (0.00 sec) mysql> select user,host,password from mysql.user;
+------+------------+-------------------------------------------+
| user | host | password |
+------+------------+-------------------------------------------+
| root | cdh-master | |
| hive | % | *4DF1D66463C18D44E3B001A8FB1BBFBEA13E27FC |
| hive | cdh-master | *4DF1D66463C18D44E3B001A8FB1BBFBEA13E27FC |
+------+------------+-------------------------------------------+
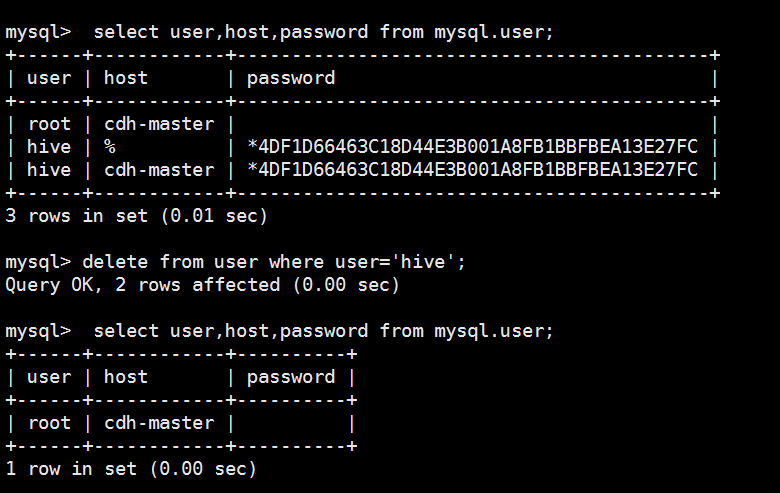
3 rows in set (0.01 sec) mysql> delete from user where user='hive';
Query OK, 2 rows affected (0.00 sec) mysql> select user,host,password from mysql.user;
+------+------------+----------+
| user | host | password |
+------+------------+----------+
| root | cdh-master | |
+------+------------+----------+
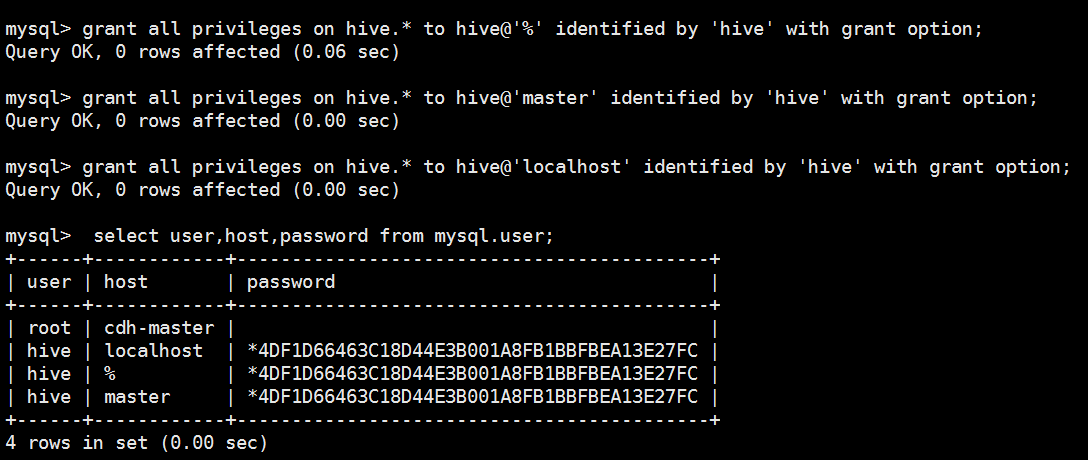
1 row in set (0.00 sec) mysql> grant all privileges on hive.* to hive@'%' identified by 'hive' with grant option;
Query OK, 0 rows affected (0.06 sec) mysql> grant all privileges on hive.* to hive@'master' identified by 'hive' with grant option;
Query OK, 0 rows affected (0.00 sec) mysql> grant all privileges on hive.* to hive@'localhost' identified by 'hive' with grant option;
Query OK, 0 rows affected (0.00 sec) mysql> select user,host,password from mysql.user;
+------+------------+-------------------------------------------+
| user | host | password |
+------+------------+-------------------------------------------+
| root | cdh-master | |
| hive | localhost | *4DF1D66463C18D44E3B001A8FB1BBFBEA13E27FC |
| hive | % | *4DF1D66463C18D44E3B001A8FB1BBFBEA13E27FC |
| hive | master | *4DF1D66463C18D44E3B001A8FB1BBFBEA13E27FC |
+------+------------+-------------------------------------------+
4 rows in set (0.00 sec) mysql> grant all privileges on *.* to root@'%' identified by 'root';
Query OK, 0 rows affected (0.02 sec) mysql> select user,host,password from mysql.user;
+------+------------+-------------------------------------------+
| user | host | password |
+------+------------+-------------------------------------------+
| root | % | *81F5E21E35407D884A6CD4A731AEBFB6AF209E1B |
| root | cdh-master | |
| hive | localhost | *4DF1D66463C18D44E3B001A8FB1BBFBEA13E27FC |
| hive | % | *4DF1D66463C18D44E3B001A8FB1BBFBEA13E27FC |
| hive | master | *4DF1D66463C18D44E3B001A8FB1BBFBEA13E27FC |
+------+------------+-------------------------------------------+
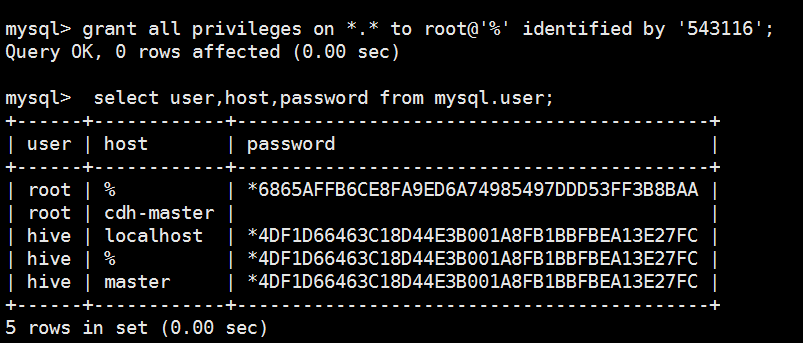
5 rows in set (0.00 sec) mysql> grant all privileges on *.* to root@'%' identified by '543116';
Query OK, 0 rows affected (0.00 sec) mysql> select user,host,password from mysql.user;
+------+------------+-------------------------------------------+
| user | host | password |
+------+------------+-------------------------------------------+
| root | % | *6865AFFB6CE8FA9ED6A74985497DDD53FF3B8BAA |
| root | cdh-master | |
| hive | localhost | *4DF1D66463C18D44E3B001A8FB1BBFBEA13E27FC |
| hive | % | *4DF1D66463C18D44E3B001A8FB1BBFBEA13E27FC |
| hive | master | *4DF1D66463C18D44E3B001A8FB1BBFBEA13E27FC |
+------+------------+-------------------------------------------+
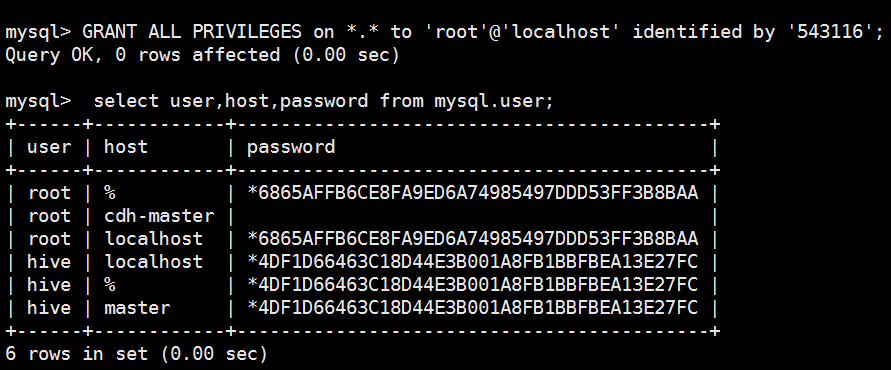
5 rows in set (0.00 sec) mysql> GRANT ALL PRIVILEGES on *.* to 'root'@'localhost' identified by '543116';
Query OK, 0 rows affected (0.00 sec) mysql> select user,host,password from mysql.user;
+------+------------+-------------------------------------------+
| user | host | password |
+------+------------+-------------------------------------------+
| root | % | *6865AFFB6CE8FA9ED6A74985497DDD53FF3B8BAA |
| root | cdh-master | |
| root | localhost | *6865AFFB6CE8FA9ED6A74985497DDD53FF3B8BAA |
| hive | localhost | *4DF1D66463C18D44E3B001A8FB1BBFBEA13E27FC |
| hive | % | *4DF1D66463C18D44E3B001A8FB1BBFBEA13E27FC |
| hive | master | *4DF1D66463C18D44E3B001A8FB1BBFBEA13E27FC |
+------+------------+-------------------------------------------+
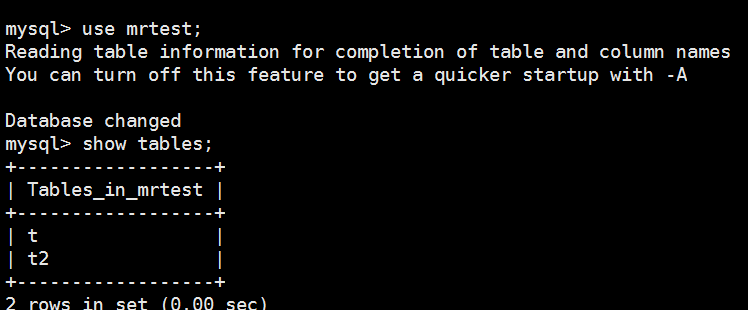
6 rows in set (0.00 sec) mysql> use mrtest;
Reading table information for completion of table and column names
You can turn off this feature to get a quicker startup with -A Database changed
mysql> show tables;
+------------------+
| Tables_in_mrtest |
+------------------+
| t |
| t2 |
+------------------+
2 rows in set (0.00 sec)
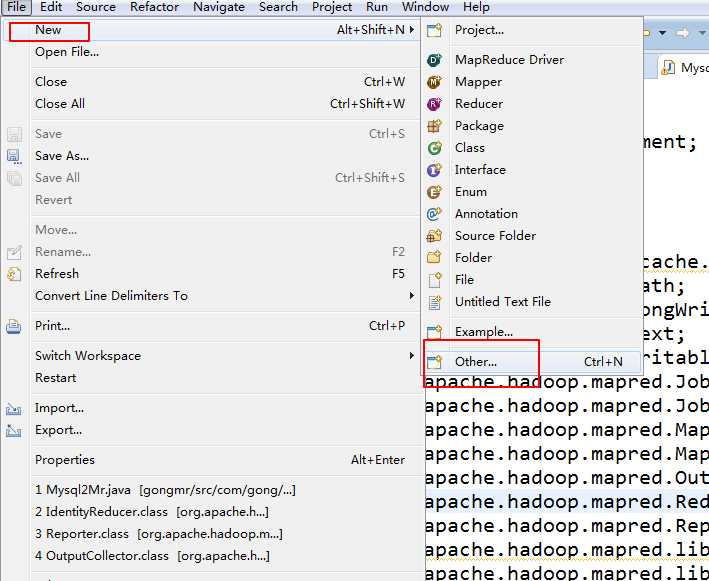
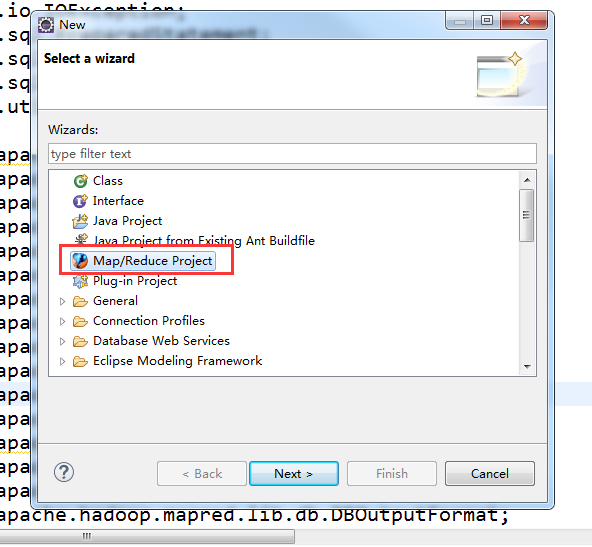
在eclipse创建mapreduce项目
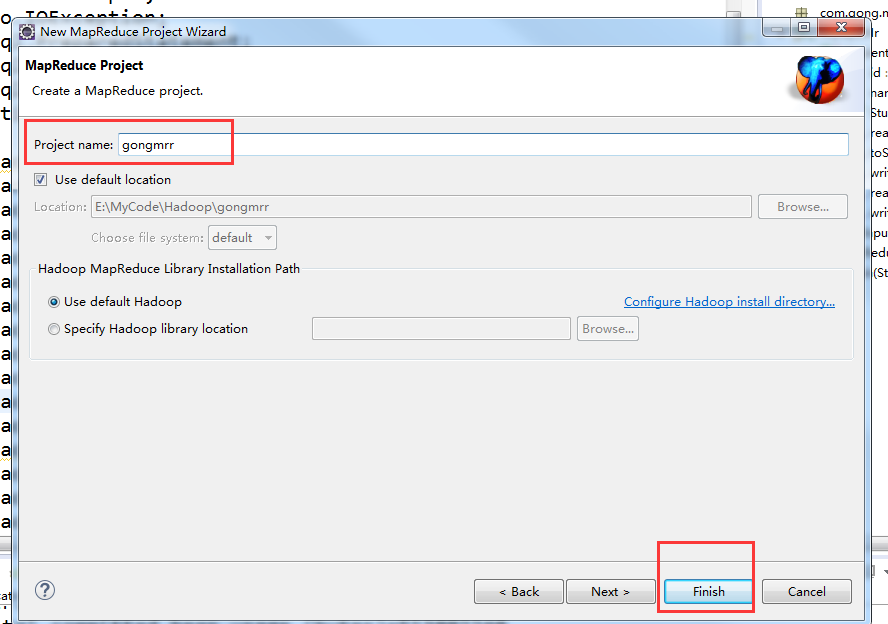
在这里说一下我这里是安装的是hadoop2.6.0版本的
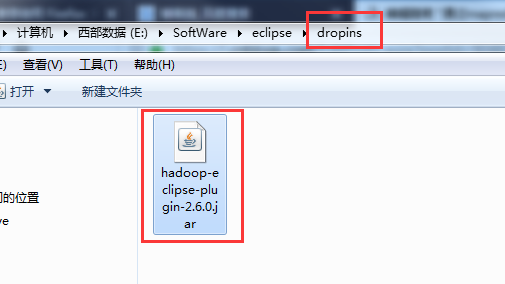
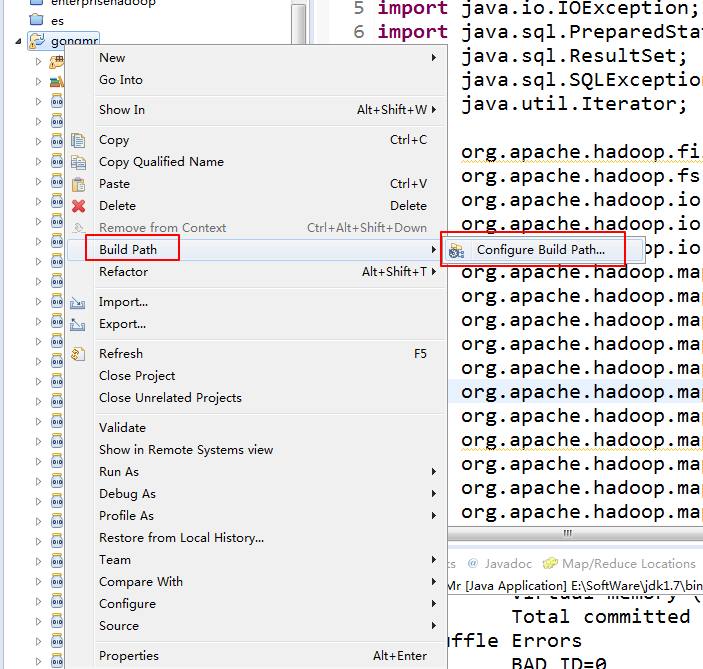
如果没有添加对应的hadoop插件的话就这样添加
现在你本地安装的eclipse的dropins文件夹了放入这个插件,然后重新启动eclipse
重启之后

我们可以看到多了这么一项
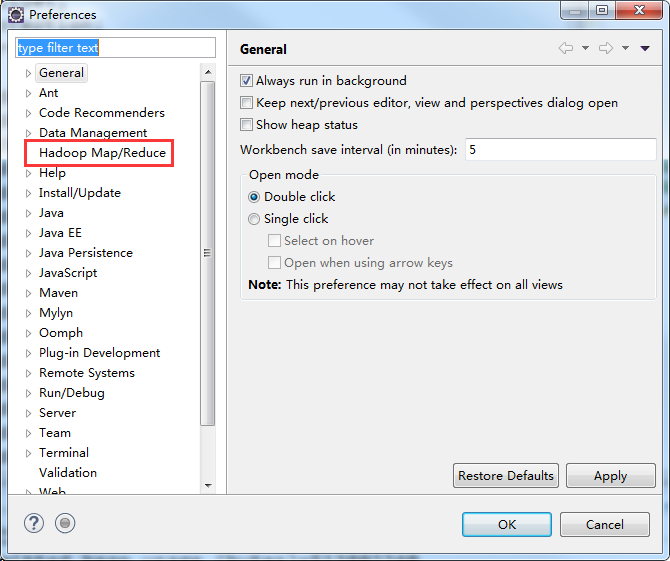
在这里选定本地安装的hadoop

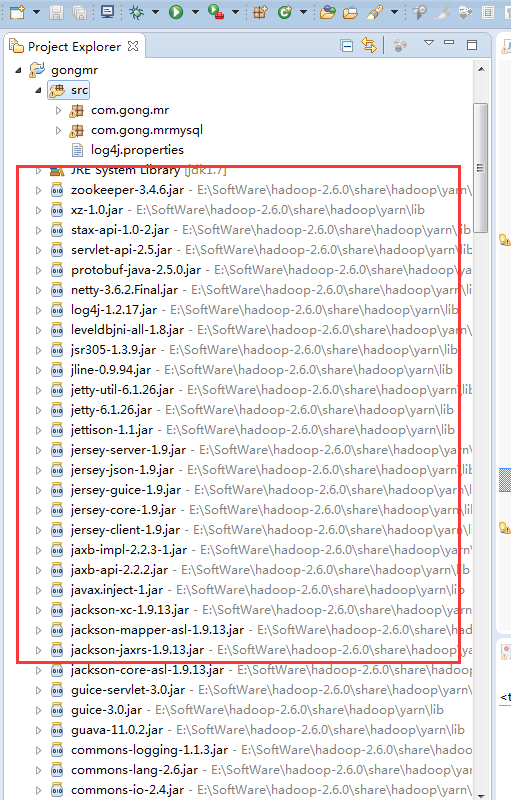
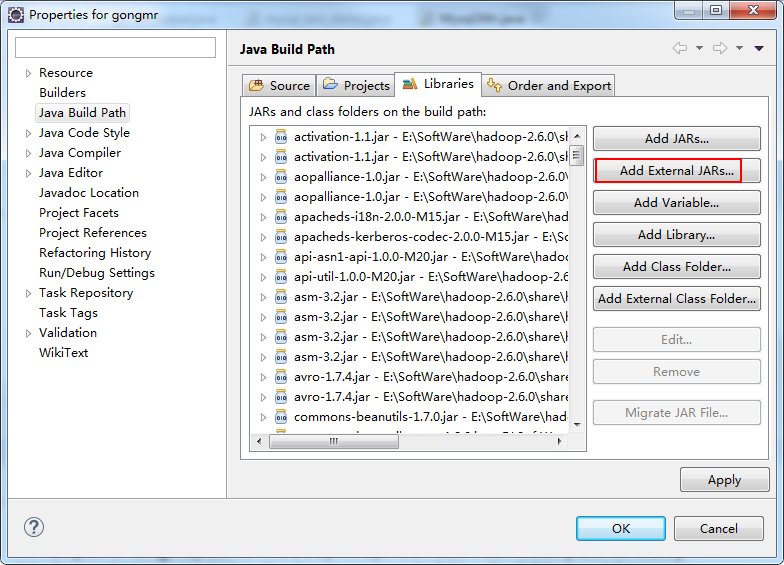
接下来是加载mysql的驱动包
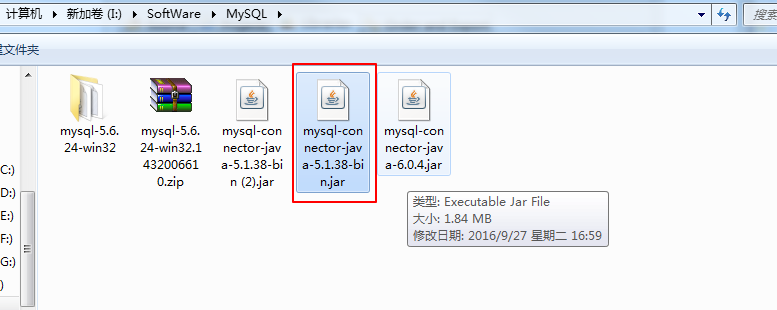
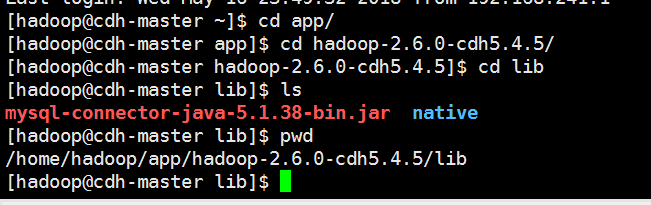
这个是我本地的mysql驱动包
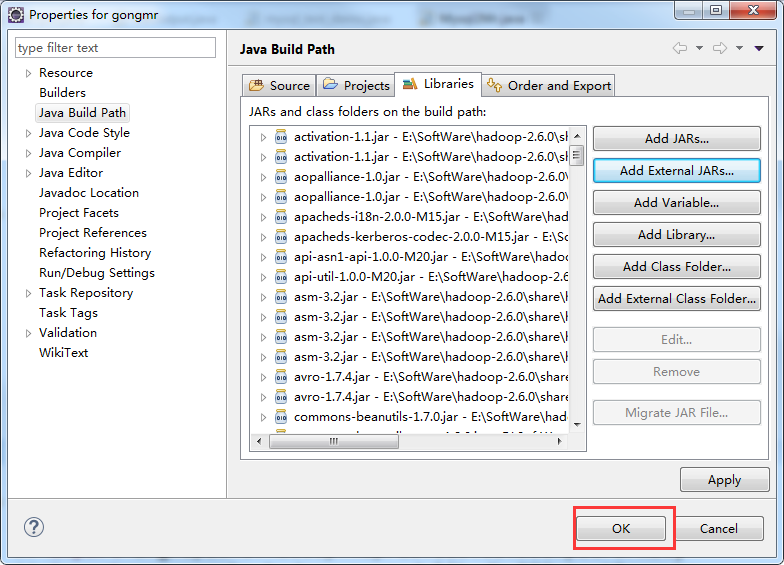
在eclipse加载驱动包之后还需要在集群里加载
把驱动包上传的每个节点的hadoop安装目录的lib目录下,是所有节点
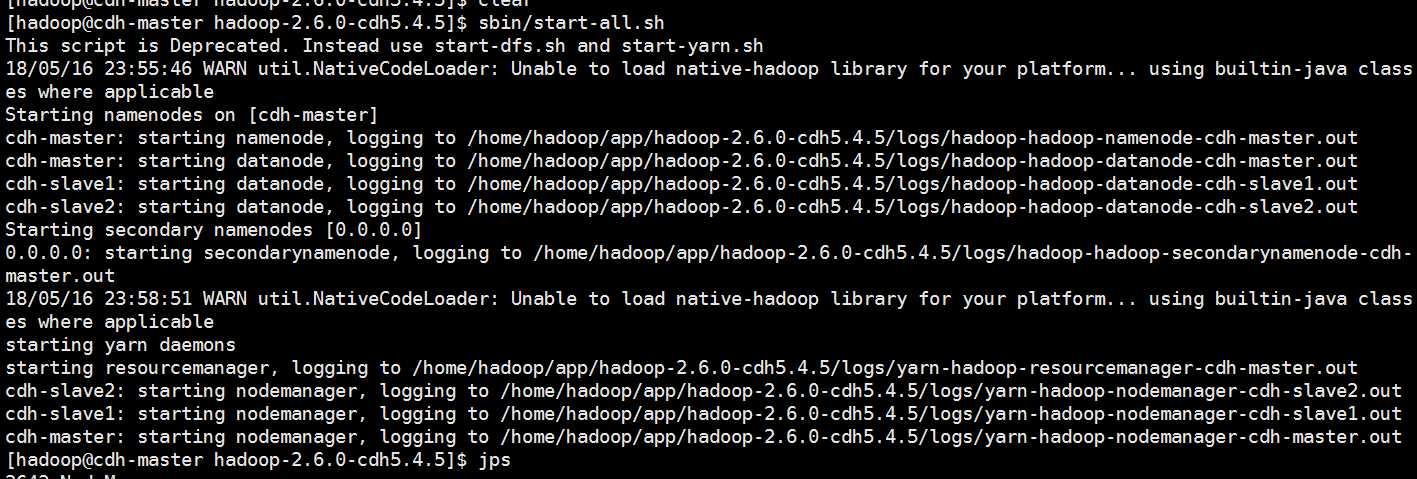
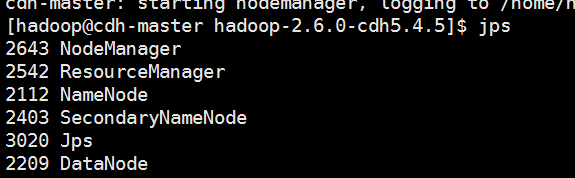
把集群启动一下,我这里只是搭建了分布式的3节点没有搭建HA
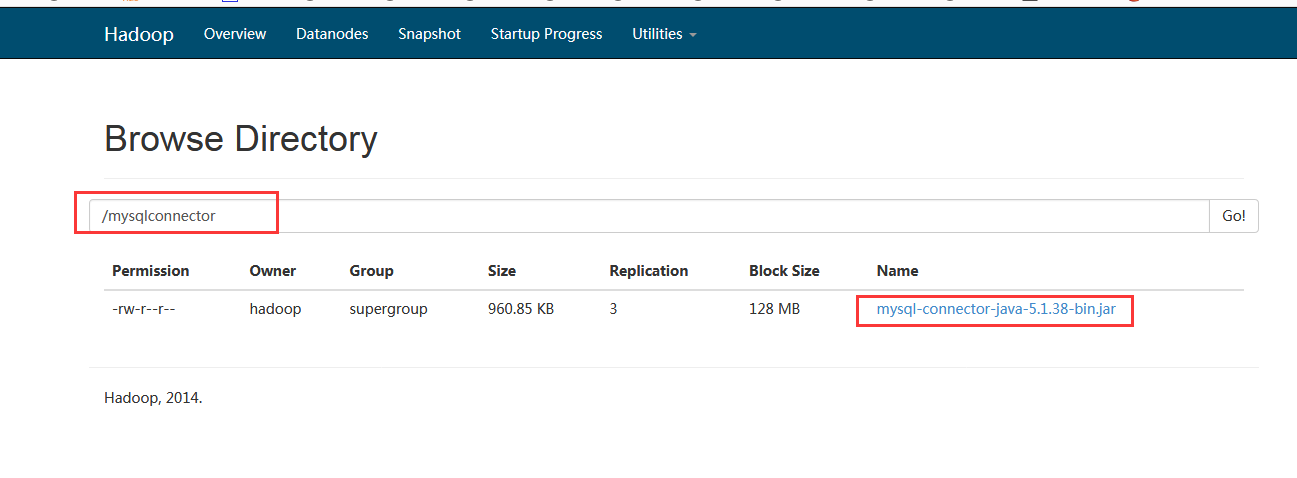
我们现在hdfs上创建一个目录来存放mysql的驱动包

把本地的驱动包上传的hdfs上

在代码里面要加上这句来实现
DistributedCache.addFileToClassPath(new Path("hdfs://192.168.241.13:9000/mysqlconnector/mysql-connector-java-5.1.38-bin.jar"), conf);
下面是运行代码
package com.gong.mrmysql; import java.io.DataInput;
import java.io.DataOutput;
import java.io.IOException;
import java.sql.PreparedStatement;
import java.sql.ResultSet;
import java.sql.SQLException;
import java.util.Iterator; import org.apache.hadoop.filecache.DistributedCache;
import org.apache.hadoop.fs.Path;
import org.apache.hadoop.io.LongWritable;
import org.apache.hadoop.io.Text;
import org.apache.hadoop.io.Writable;
import org.apache.hadoop.mapred.JobClient;
import org.apache.hadoop.mapred.JobConf;
import org.apache.hadoop.mapred.MapReduceBase;
import org.apache.hadoop.mapred.Mapper;
import org.apache.hadoop.mapred.OutputCollector;
import org.apache.hadoop.mapred.Reducer;
import org.apache.hadoop.mapred.Reporter;
import org.apache.hadoop.mapred.lib.IdentityReducer;
import org.apache.hadoop.mapred.lib.db.DBConfiguration;
import org.apache.hadoop.mapred.lib.db.DBInputFormat;
import org.apache.hadoop.mapred.lib.db.DBOutputFormat;
import org.apache.hadoop.mapred.lib.db.DBWritable; /**
* Function: 测试 mr 与 mysql 的数据交互,此测试用例将一个表中的数据复制到另一张表中
* 实际当中,可能只需要从 mysql 读,或者写到 mysql 中。
* date: 2013-7-29 上午2:34:04 <br/>
* @author june
*/
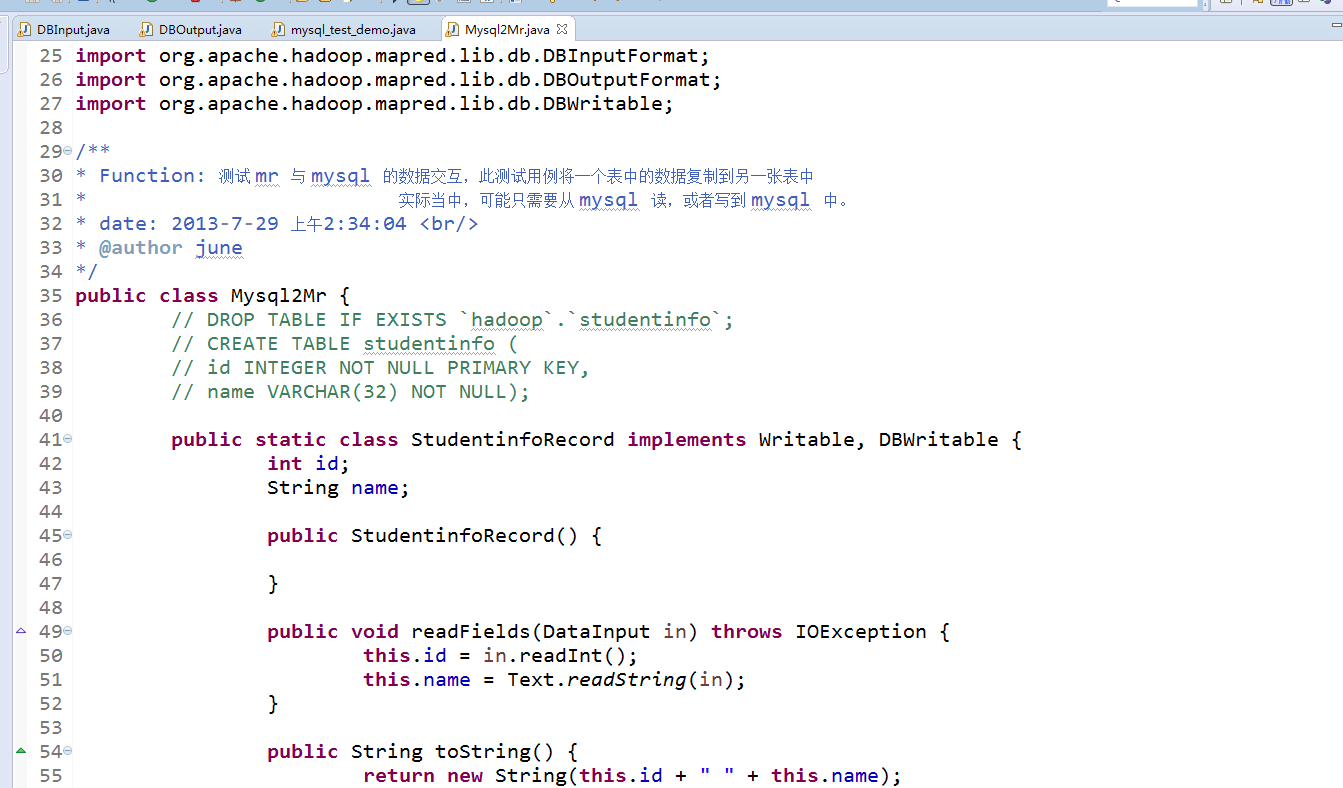
public class Mysql2Mr {
// DROP TABLE IF EXISTS `hadoop`.`studentinfo`;
// CREATE TABLE studentinfo (
// id INTEGER NOT NULL PRIMARY KEY,
// name VARCHAR(32) NOT NULL); public static class StudentinfoRecord implements Writable, DBWritable {
int id;
String name; public StudentinfoRecord() { } public void readFields(DataInput in) throws IOException {
this.id = in.readInt();
this.name = Text.readString(in);
} public String toString() {
return new String(this.id + " " + this.name);
} @Override
public void write(PreparedStatement stmt) throws SQLException {
stmt.setInt(1, this.id);
stmt.setString(2, this.name);
} @Override
public void readFields(ResultSet result) throws SQLException {
this.id = result.getInt(1);
this.name = result.getString(2);
} @Override
public void write(DataOutput out) throws IOException {
out.writeInt(this.id);
Text.writeString(out, this.name);
}
} // 记住此处是静态内部类,要不然你自己实现无参构造器,或者等着抛异常:
// Caused by: java.lang.NoSuchMethodException: DBInputMapper.<init>()
// http://stackoverflow.com/questions/7154125/custom-mapreduce-input-format-cant-find-constructor
// 网上脑残式的转帖,没见到一个写对的。。。
public static class DBInputMapper extends MapReduceBase implements
Mapper<LongWritable, StudentinfoRecord, LongWritable, Text> {
public void map(LongWritable key, StudentinfoRecord value,
OutputCollector<LongWritable, Text> collector, Reporter reporter) throws IOException {
collector.collect(new LongWritable(value.id), new Text(value.toString()));
}
} public static class MyReducer extends MapReduceBase implements
Reducer<LongWritable, Text, StudentinfoRecord, Text> {
@Override
public void reduce(LongWritable key, Iterator<Text> values,
OutputCollector<StudentinfoRecord, Text> output, Reporter reporter) throws IOException {
String[] splits = values.next().toString().split(" ");
StudentinfoRecord r = new StudentinfoRecord();
r.id = Integer.parseInt(splits[0]);
r.name = splits[1];
output.collect(r, new Text(r.name));
}
} public static void main(String[] args) throws IOException {
JobConf conf = new JobConf(Mysql2Mr.class);
DistributedCache.addFileToClassPath(new Path("hdfs://192.168.241.13:9000/mysqlconnector/mysql-connector-java-5.1.38-bin.jar"), conf); conf.setMapOutputKeyClass(LongWritable.class);
conf.setMapOutputValueClass(Text.class);
conf.setOutputKeyClass(LongWritable.class);
conf.setOutputValueClass(Text.class); conf.setOutputFormat(DBOutputFormat.class);
conf.setInputFormat(DBInputFormat.class);
// // mysql to hdfs
// conf.setReducerClass(IdentityReducer.class);
// Path outPath = new Path("/tmp/1");
// FileSystem.get(conf).delete(outPath, true);
// FileOutputFormat.setOutputPath(conf, outPath); DBConfiguration.configureDB(conf, "com.mysql.jdbc.Driver", "jdbc:mysql://192.168.241.13:3306/mrtest",
"root", "543116");
String[] fields = { "id", "name" };
// 从 t 表读数据
DBInputFormat.setInput(conf, StudentinfoRecord.class, "t", null, "id", fields);
// mapreduce 将数据输出到 t2 表
DBOutputFormat.setOutput(conf, "t2", "id", "name");
// conf.setMapperClass(org.apache.hadoop.mapred.lib.IdentityMapper.class);
conf.setMapperClass(DBInputMapper.class);
conf.setReducerClass(MyReducer.class); JobClient.runJob(conf);
}
}
我们运行一下
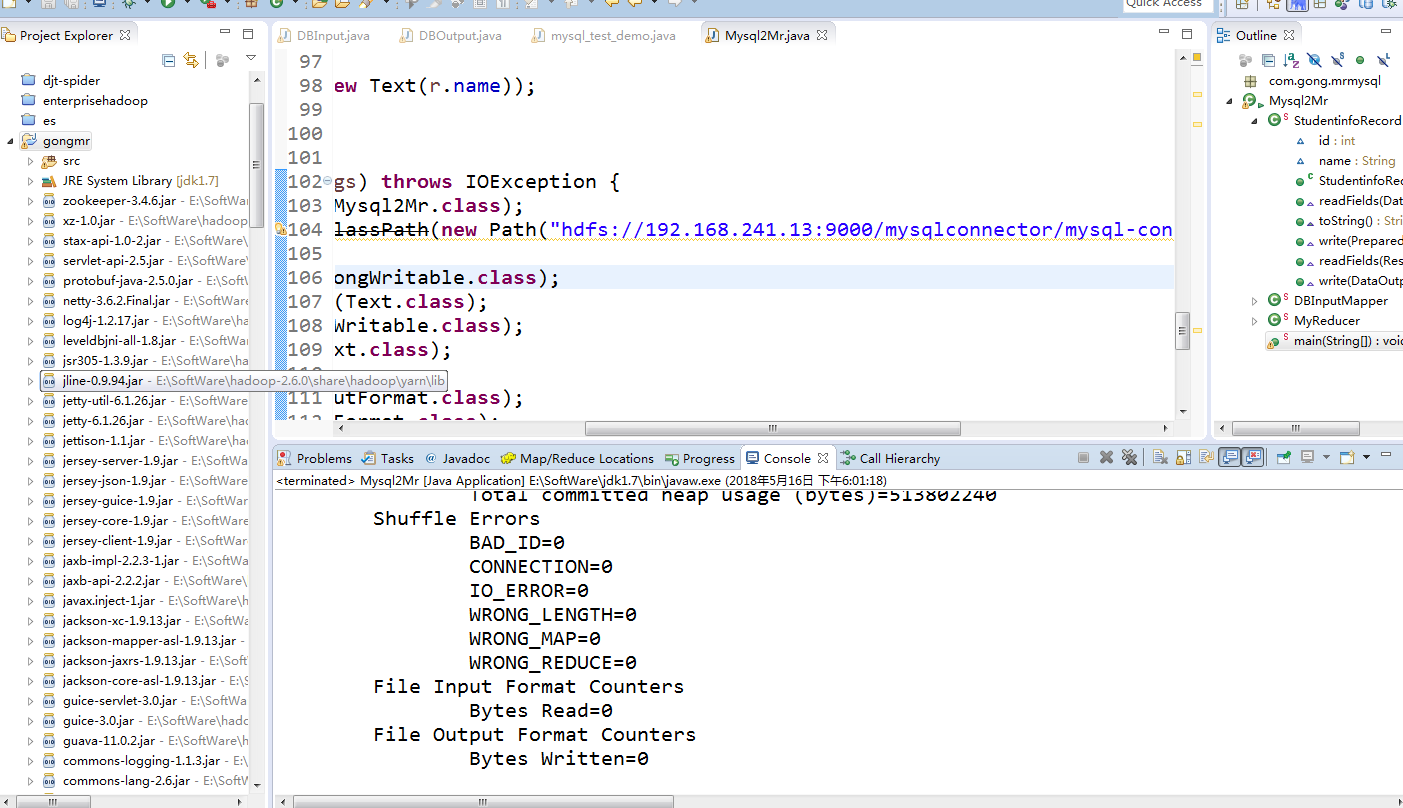
通过mysql查看t2表看看有没有数据
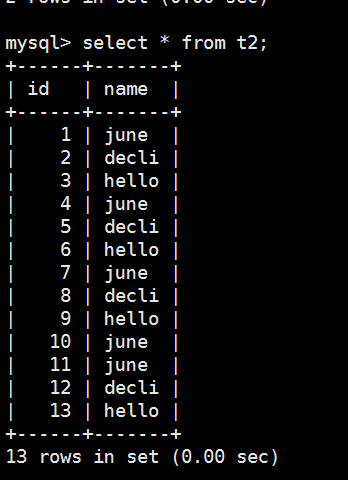
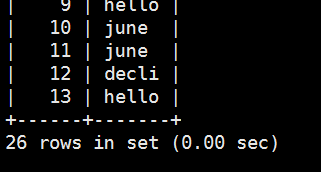
再运行一次,可以看到t2表又一次被加载进数据了
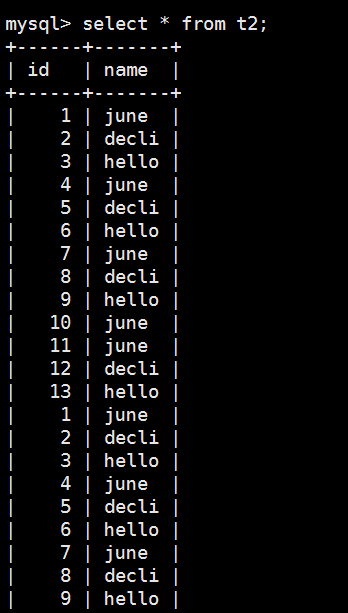
这里我们就实现了怎么用mapreduce把mysql的一张表的数据加载到另外一张表去了。
通过mapreduce把mysql的一张表的数据导到另外一张表中的更多相关文章
- 一条sql解决.一张表的数据复制到另外一张表
如何把一个表的数组复制到一张表?也许很多人会把这个表查出来的数据再插入到另外一张表里面,这样很麻烦又要写代码逻辑去处理,其实一条sql语句就可以把一张表的数据复制到另外一张表,或者一张表的某一条数据复 ...
- hive sql 查询一张表的数据不在另一张表中
有时,我们需要对比两张表的数据,找到在其中一张表,不在另一张表中的数据 hql 如下: SELECT * FROM (SELECT id FROM a WHERE dt = '2019-03-17' ...
- oracle 批量更新之将一个表的数据批量更新至另一个表
oracle 批量更新之将一个表的数据批量更新至另一个表 CreationTime--2018年7月3日17点38分 Author:Marydon Oracle 将一个表的指定字段的值更新至另一个 ...
- mysql 如何用一条SQL将一张表里的数据插入到另一张表 3个例子
1. 表结构完全一样 insert into 表1 select * from 表2 2. 表结构不一样(这种情况下得指定列名) insert into 表1 (列名1,列名2,列名3) selec ...
- mysql 将一张表里的数据插入到另一张表
1. 表结构一样 insert into 表1 select * from 表2 2. 表结构不一样 insert into 表1 (列名1,列名2,列名3) select 列1,列2,列3 from ...
- 两种方法将oracle数据库中的一张表的数据导入到另外一个oracle数据库中
oracle数据库实现一张表的数据导入到另外一个数据库的表中的方法有很多,在这介绍两个. 第一种,把oracle查询的数据导出为sql文件,执行sql文件里的insert语句,如下: 第一步,导出sq ...
- SQL- 将一张表的数据插入到另一张表,表结构不一致(加条件)
公司业务需要,在对表进行操作的时候将操作人和操作记录记录到日志表里.记录下来以供参考和学习. 首先准备两张测试表:Info以及InfoLog 1.表结构相同的情况下: insert into Info ...
- 在oracle中怎么把一张表的数据插入到另一张表中
把table2表的数据插入到table1中 insert into table1 select * from table2
- SQL从一个表查询数据插入/更新到另一个表
示例一: 从数据库表A中查询出数据插入到数据库表B 从数据库DataBaseA的表TDA中查询出数据插入到数据库DataBaseB的表TDB insert into [DataBaseA].[dbo] ...
随机推荐
- yum 安装 Mysql 5.7,忘记密码解决方案
Linux卸载yum安装的mysql 一.系统情况 Linux:Centos7.4(64位) Mysql:5.6 二.卸载mysql 1.查看安装了哪些mysql程序 Bash rpm -qa | g ...
- 谈谈 在 .Net 生态里为什么没有 Hadoop 系列 ?
在 .Net 生态里为什么没有 Hadoop 系列 ? 有需要 有 Hadoop 系列 吗 ?
- js对象的key类型
http://javascript.ruanyifeng.com/grammar/object.html#toc2 对象的所有键名都是字符串(ES6 又引入了 Symbol 值也可以作为键名),所以加 ...
- URL编码规则
一.问题的由来 问题:当url地址中包含&.+.%等特殊字符(主要是传递参数时,参数的内容中包含这些字符)时,地址无效.比如http://10.190.0.0:108/doc/test+des ...
- Spring IOC(一)概览
Spring ioc源码解析这一系列文章会比较枯燥,但是只要坚持下去,总会有收获,一回生二回熟,没有第一次,哪有下一次... 本系列目录: Spring IOC(一)概览 Spring IOC(二)容 ...
- [转] Centos7 yum lock,无法上网问题,以及安装python3.5
centos 7 无法上网问题 转自 http://www.cnblogs.com/katios/p/5660336.html 博主本着学无止境的精神在虚拟机上安装了一个centos7 来敲敲命令行. ...
- 找出n个数中重复最多的10个数
题目很清晰,直接上python代码 import pandas as pd import copy class BenchMark: def __init__(self): self.MIN = 10 ...
- 脱壳:OEP(即程序入口点)查找 --- 基本思路和常见方法
OEP:程序的入口点,软件加壳就是隐藏了OEP(或者用了假的OEP), 只要我们找到程序真正的OEP,就可以立刻脱壳. PUSHAD (压栈) 代表程序的入口点, POPAD (出栈) 代表程序的出口 ...
- Qt中窗口退出事件
窗口右上角的X按键会导致其在不给出任何提示的情况下直接退出, 当点击右上角的x按键时,会触发Qt中的一个事件处理函数:void QWidget::closeEvent ( QCloseEvent * ...
- MySQL Binlog解析
https://yq.aliyun.com/articles/238364?spm=5176.8067842.tagmain.52.73PjU3 摘要: 概述 MySQL的安装可以参考:Linux(C ...