
ASP.NET CORE API Swagger+IdentityServer4授权验证
简介
本来不想写这篇博文,但在网上找到的文章博客都没有完整配置信息,所以这里记录下。
不了解IdentityServer4的可以看看我之前写的入门博文
Swagger 官方演示地址
配置IdentityServer4服务端
首先创建一个新的ASP.NET Core项目。
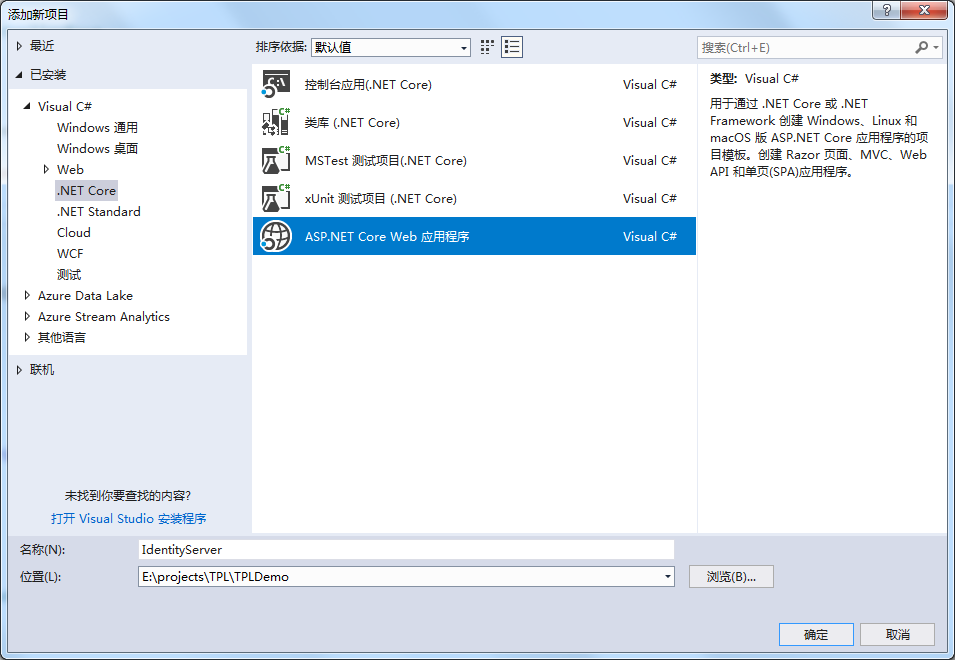
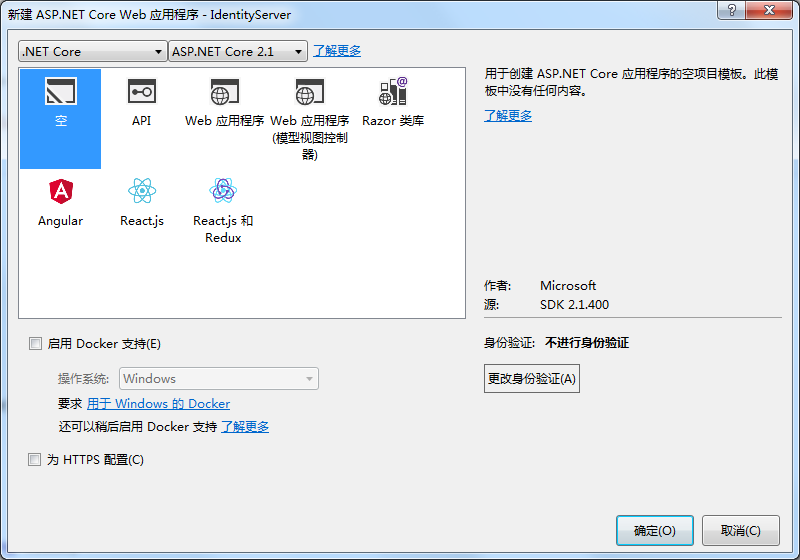
这里选择空白项,新建空白项目
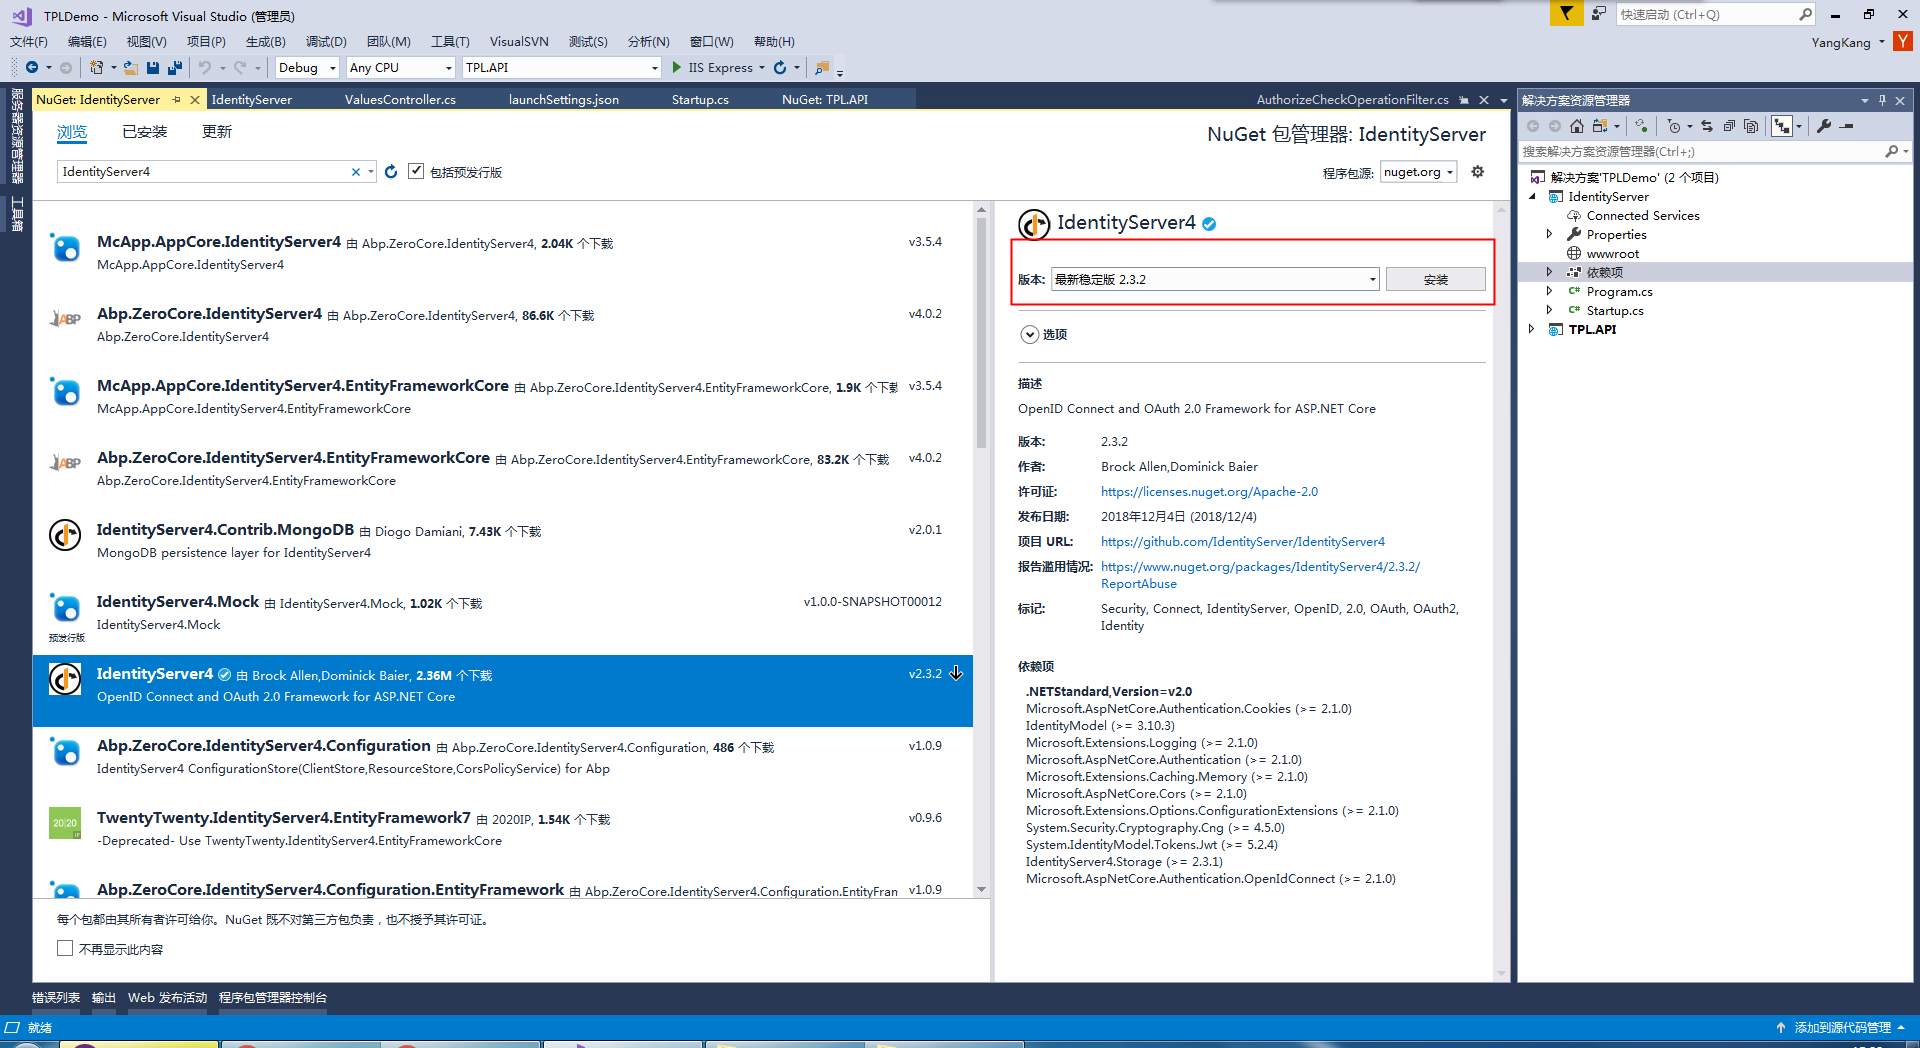
等待创建完成后,右键单击项目中的依赖项选择管理NuGet程序包,搜索IdentityServer4并安装:
等待安装完成后,下载官方提供的UI文件,并拖放到项目中。下载地址:https://github.com/IdentityServer/IdentityServer4.Quickstart.UI
配置IdentityServer4
在项目中新建文件Config.cs文件,源码如下:
using IdentityServer4;

using IdentityServer4.Models;

using IdentityServer4.Test;

using System;

using System.Collections.Generic;

using System.Linq;

using System.Threading.Tasks;

namespace IdentityServer

{

    public static class Config

    {

        public static IEnumerable<IdentityResource> GetIdentityResources()

        {

            return new IdentityResource[]

            {

                new IdentityResources.OpenId(),

                new IdentityResources.Profile(),

            };

        }

        /// <summary>

        /// API信息

        /// </summary>

        /// <returns></returns>

        public static IEnumerable<ApiResource> GetApis()

        {

            return new[]

            {

                new ApiResource("demo_api", "Demo API with Swagger")

            };

        }

        /// <summary>

        /// 客服端信息

        /// </summary>

        /// <returns></returns>

        public static IEnumerable<Client> GetClients()

        {

            return new[]

            {

                new Client

                {

                    ClientId = "demo_api_swagger",//客服端名称

                    ClientName = "Swagger UI for demo_api",//描述

                    AllowedGrantTypes = GrantTypes.Implicit,//指定允许的授权类型(AuthorizationCode,Implicit,Hybrid,ResourceOwner,ClientCredentials的合法组合)。

                    AllowAccessTokensViaBrowser = true,//是否通过浏览器为此客户端传输访问令牌

                    RedirectUris =

                    {

                        "http://localhost:5001/swagger/oauth2-redirect.html"

                    },

                    AllowedScopes = { "demo_api" }//指定客户端请求的api作用域。 如果为空,则客户端无法访问

                }

            };

        }

    }

}
打开Startup.cs文件配置,修改如下:
using System;

using System.Collections.Generic;

using System.Linq;

using System.Threading.Tasks;

using IdentityServer4.Quickstart.UI;

using Microsoft.AspNetCore.Builder;

using Microsoft.AspNetCore.Hosting;

using Microsoft.AspNetCore.Http;

using Microsoft.AspNetCore.Mvc;

using Microsoft.Extensions.DependencyInjection;

namespace IdentityServer

{

    public class Startup

    {

        // This method gets called by the runtime. Use this method to add services to the container.

        // For more information on how to configure your application, visit https://go.microsoft.com/fwlink/?LinkID=398940

        public void ConfigureServices(IServiceCollection services)

        {

            services.AddMvc().SetCompatibilityVersion(CompatibilityVersion.Version_2_1);

            //配置身份服务器与内存中的存储,密钥,客户端和资源

            services.AddIdentityServer()

                   .AddDeveloperSigningCredential()

                   .AddInMemoryApiResources(Config.GetApis())//添加api资源

                   .AddInMemoryClients(Config.GetClients())//添加客户端

                   .AddInMemoryIdentityResources(Config.GetIdentityResources())//添加对OpenID Connect的支持

                   .AddTestUsers(TestUsers.Users); //添加测试用户

        }

        // This method gets called by the runtime. Use this method to configure the HTTP request pipeline.

        public void Configure(IApplicationBuilder app, IHostingEnvironment env)

        {

            if (env.IsDevelopment())

            {

                app.UseDeveloperExceptionPage();

            }

            //IdentityServe

            app.UseIdentityServer();

            //添加静态资源访问

            app.UseStaticFiles();

            //

            app.UseMvcWithDefaultRoute();

        }

    }

}
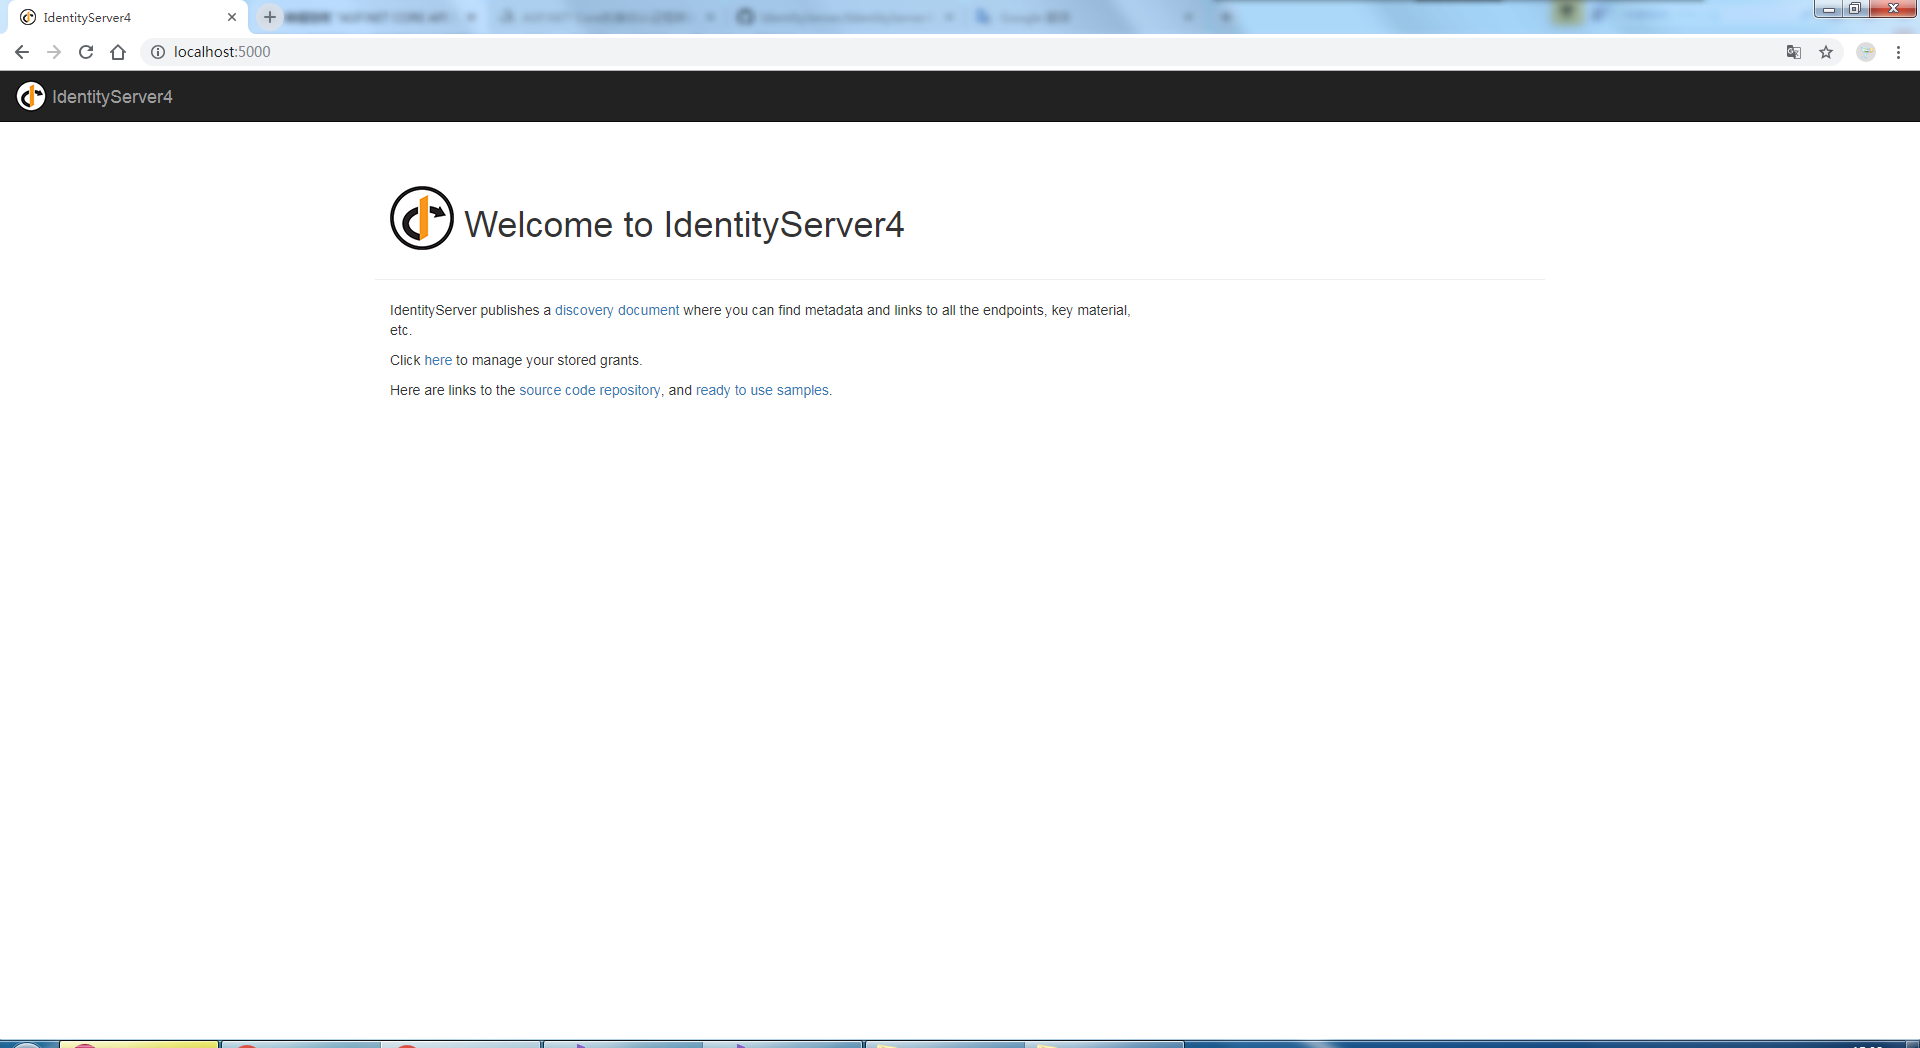
修改启动端口为5000,启动访问:http://localhost:5000/,效果如下:
API配置
新建ASP.NET CORE API项目,使用NuGet添加包:IdentityServer4.AccessTokenValidation、Swashbuckle.AspNetCore

在API中添加 AuthorizeCheckOperationFilter用于管理IdentityServer4认证处理,代码如下:
using Microsoft.AspNetCore.Authorization;

using Swashbuckle.AspNetCore.Swagger;

using Swashbuckle.AspNetCore.SwaggerGen;

using System;

using System.Collections.Generic;

using System.Linq;

using System.Threading.Tasks;

namespace TPL.API

{

    /// <summary>

    /// IdentityServer4认证过滤器

    /// </summary>

    public class AuthorizeCheckOperationFilter : IOperationFilter

    {

        public void Apply(Operation operation, OperationFilterContext context)

        {

            //获取是否添加登录特性

            var authAttributes = context.MethodInfo.DeclaringType.GetCustomAttributes(true)

             .Union(context.MethodInfo.GetCustomAttributes(true))

             .OfType<AuthorizeAttribute>().Any();

            if (authAttributes)

            {

                operation.Responses.Add("", new Response { Description = "暂无访问权限" });

                operation.Responses.Add("", new Response { Description = "禁止访问" });

                //给api添加锁的标注

                operation.Security = new List<IDictionary<string, IEnumerable<string>>>

                {

                    new Dictionary<string, IEnumerable<string>> {{"oauth2", new[] {"demo_api"}}}

                };

            }

        }

    }

}
修改API的Startup文件,修改如下:
using System;

using System.Collections.Generic;

using IdentityServer4.AccessTokenValidation;

using Microsoft.AspNetCore.Builder;

using Microsoft.AspNetCore.Hosting;

using Microsoft.AspNetCore.Mvc;

using Microsoft.Extensions.Configuration;

using Microsoft.Extensions.DependencyInjection;

using Swashbuckle.AspNetCore.Swagger;

namespace TPL.API

{

    public class Startup

    {

        public Startup(IConfiguration configuration)

        {

            Configuration = configuration;

        }

        public IConfiguration Configuration { get; }

        // This method gets called by the runtime. Use this method to add services to the container.

        public void ConfigureServices(IServiceCollection services)

        {

            services.AddMvc().SetCompatibilityVersion(CompatibilityVersion.Version_2_1);

            //用户校验

            services.AddAuthentication(IdentityServerAuthenticationDefaults.AuthenticationScheme)

              .AddIdentityServerAuthentication(options =>

              {

                  options.Authority = "http://localhost:5000"; // IdentityServer服务器地址

                  options.ApiName = "demo_api"; // 用于针对进行身份验证的API资源的名称

                  options.RequireHttpsMetadata = false; // 指定是否为HTTPS

              });

            //添加Swagger.

            services.AddSwaggerGen(options =>

            {

                options.SwaggerDoc("v1", new Info { Title = "Protected API", Version = "v1" });

                //向生成的Swagger添加一个或多个“securityDefinitions”,用于API的登录校验

                options.AddSecurityDefinition("oauth2", new OAuth2Scheme

                {

                    Flow = "implicit", // 只需通过浏览器获取令牌(适用于swagger)

                    AuthorizationUrl = "http://localhost:5000/connect/authorize",//获取登录授权接口

                    Scopes = new Dictionary<string, string> {

                        { "demo_api", "Demo API - full access" }//指定客户端请求的api作用域。 如果为空,则客户端无法访问

                    }

                });

                options.OperationFilter<AuthorizeCheckOperationFilter>(); // 添加IdentityServer4认证过滤

            });

        }

        // This method gets called by the runtime. Use this method to configure the HTTP request pipeline.

        public void Configure(IApplicationBuilder app, IHostingEnvironment env)

        {

            if (env.IsDevelopment())

            {

                app.UseDeveloperExceptionPage();

            }

            app.UseAuthentication();

            // Swagger JSON Doc

            app.UseSwagger();

            // Swagger UI

            app.UseSwaggerUI(options =>

            {

                options.SwaggerEndpoint("/swagger/v1/swagger.json", "My API V1");

                options.OAuthClientId("demo_api_swagger");//客服端名称

                options.OAuthAppName("Demo API - Swagger-演示"); // 描述

            });

            app.UseMvc();

        }

    }

}
修改Properties文件夹下的launchSettings启动端口为5001,这里端口必须跟IdentityServer4中的Config配置的客服端资源中保持一致。
{

  "$schema": "http://json.schemastore.org/launchsettings.json",

  "iisSettings": {

    "windowsAuthentication": false,

    "anonymousAuthentication": true,

    "iisExpress": {

      "applicationUrl": "http://localhost:5001",

      "sslPort":

    }

  },

  "profiles": {

    "IIS Express": {

      "commandName": "IISExpress",

      "launchBrowser": true,

      "launchUrl": "swagger",

      "environmentVariables": {

        "ASPNETCORE_ENVIRONMENT": "Development"

      }

    },

    "TPL.API": {

      "commandName": "Project",

      "launchBrowser": true,

      "launchUrl": "swagger",

      "applicationUrl": "http://localhost:5001",

      "environmentVariables": {

        "ASPNETCORE_ENVIRONMENT": "Development"

      }

    }

  }

}
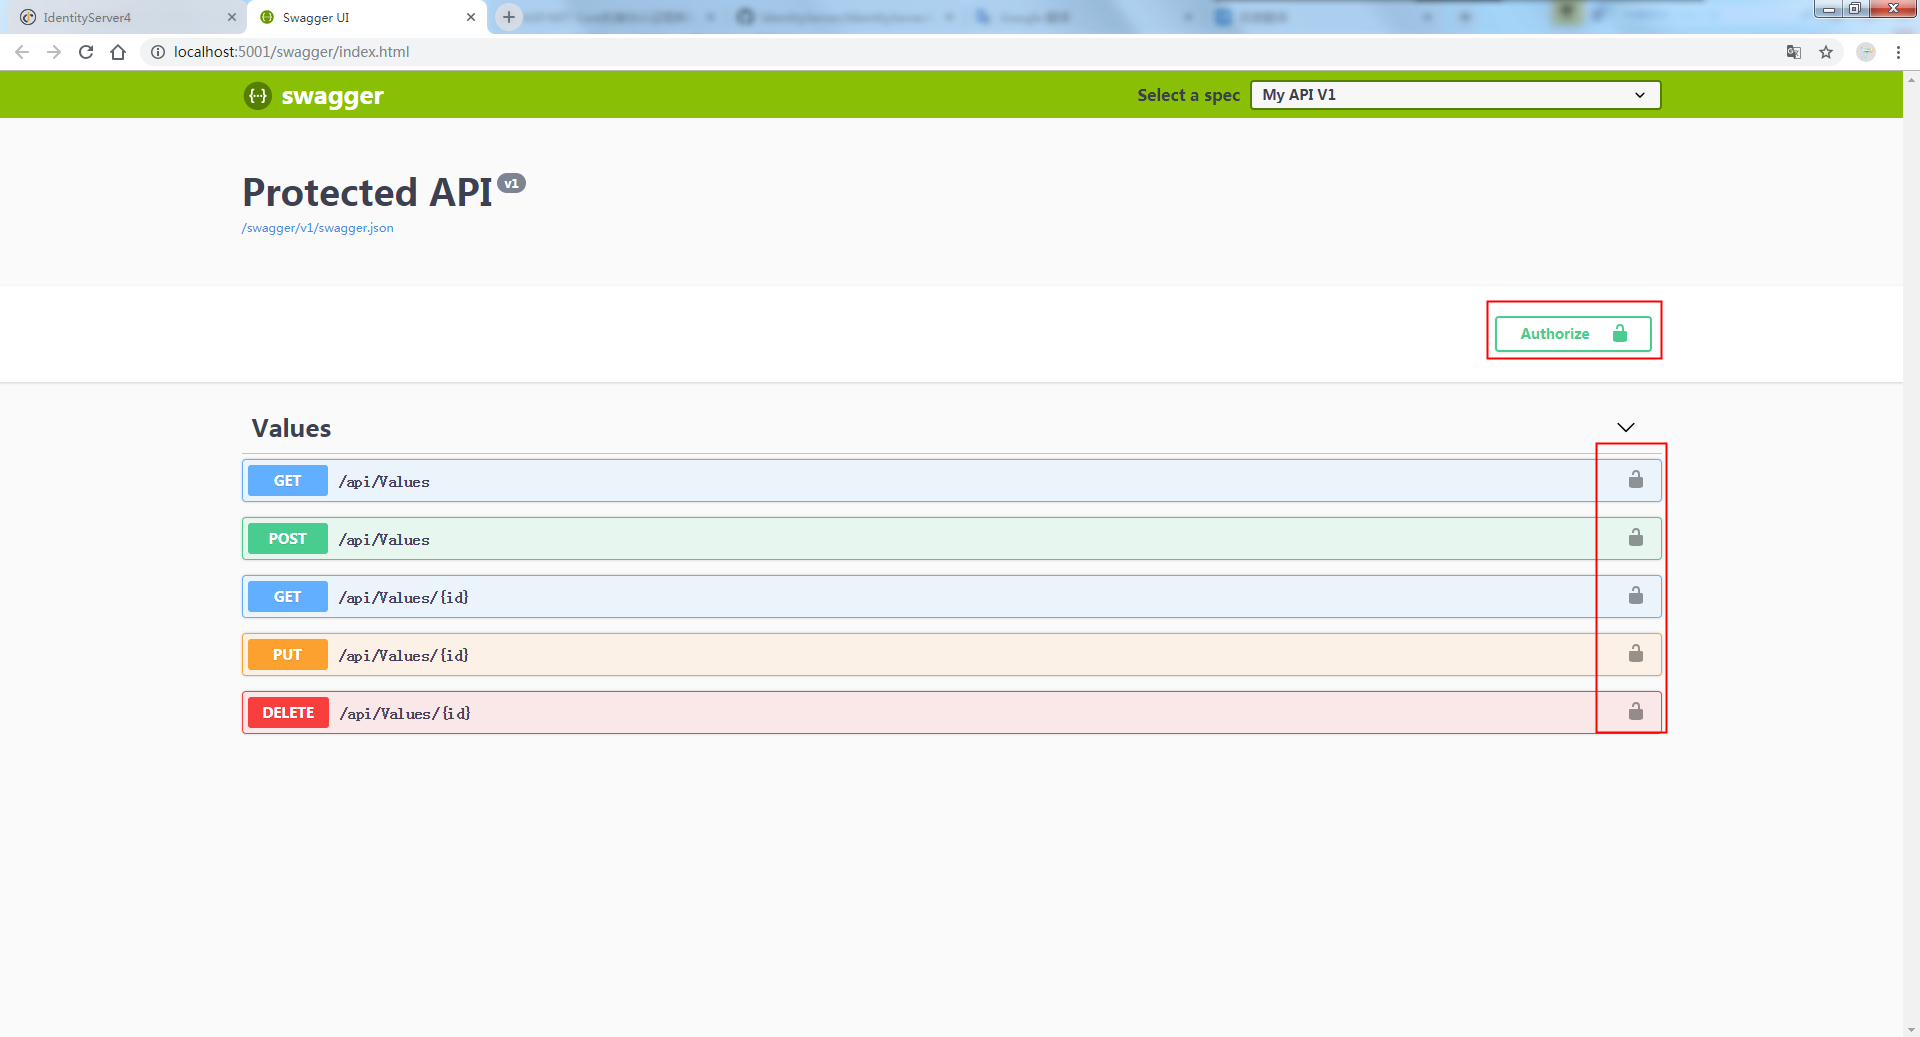
访问呈现效果如下,从中效果图中可以看出添加登录按钮,API控制器中如果添加Authorize特性,对应接口会有一把锁的标志:
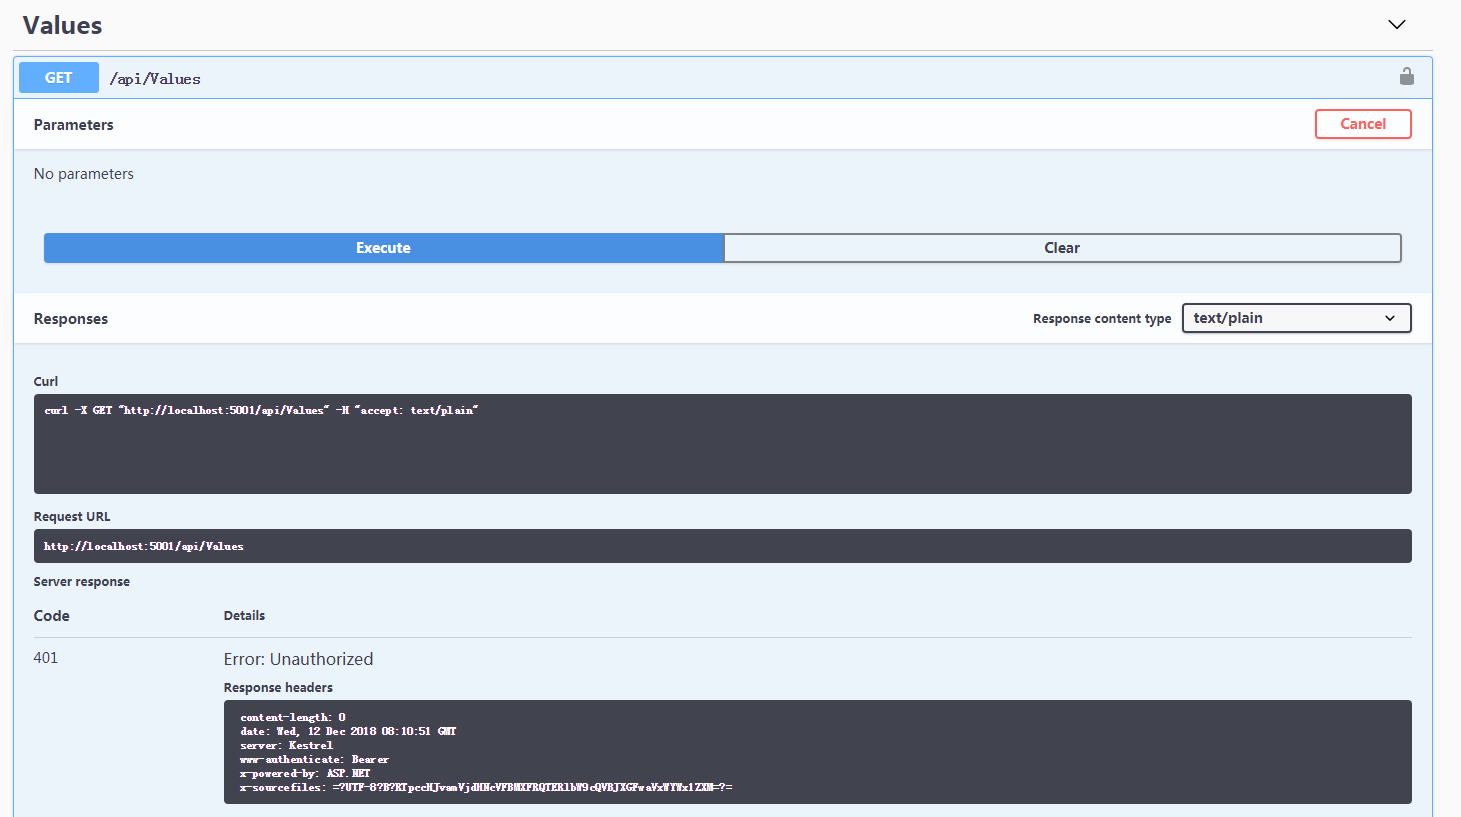
如果未授权访问接口返回401,未授权提示:
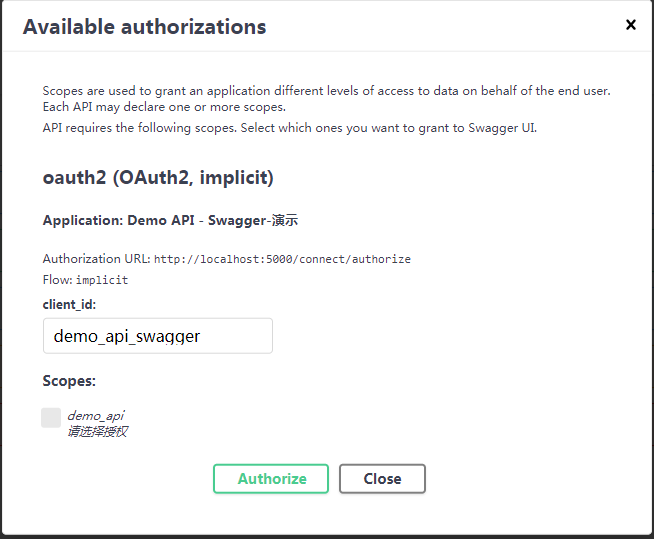
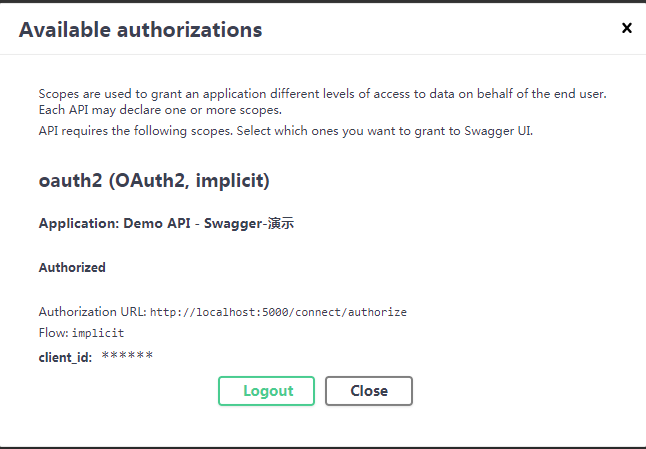
点击Authorize按钮会跳转到IdentityServer4登录页面,登录授权成功后会自动获取登录后服务器返回Token,再次访问接口即可正常访问,授权前后效果如下:
到此演示项目完毕。如果需求配合自己的数据库使用请看我前面写过的博文 自定义登录即可。
ASP.NET CORE API Swagger+IdentityServer4授权验证的更多相关文章
- C#中缓存的使用 ajax请求基于restFul的WebApi(post、get、delete、put) 让 .NET 更方便的导入导出 Excel .net core api +swagger(一个简单的入门demo 使用codefirst+mysql) C# 位运算详解 c# 交错数组 c# 数组协变 C# 添加Excel表单控件(Form Controls) C#串口通信程序
C#中缓存的使用 缓存的概念及优缺点在这里就不多做介绍,主要介绍一下使用的方法. 1.在ASP.NET中页面缓存的使用方法简单,只需要在aspx页的顶部加上一句声明即可: <%@ Outp ...
- asp.net core系列 49 Identity 授权(上)
一.概述 授权是指用户能够访问资源的权限,如页面数据的查看.编辑.新增.删除.导出.下载等权限.ASP.NET Core 授权提供了多种且灵活的方式,包括:Razor pages授权约定.简单授权.R ...
- 详解ASP.NET Core API 的Get和Post请求使用方式
上一篇文章帮助大家解决问题不彻底导致博友使用的时候还是遇到一些问题,欢迎一起讨论.所以下面重点详细讲解我们常用的Get和Post请求( 以.net core2.2的Http[Verb]为方向 ,推荐该 ...
- ASP.NET Core API 接收参数去掉烦人的 [FromBody]
在测试ASP.NET Core API 项目的时候,发现后台接口参数为类型对象,对于PostMan和Ajax的Post方法传Json数据都获取不到相应的值,后来在类型参数前面加了一个[FromBody ...
- ASP.NET Core API ——Dapper的使用
ASP.NET Core API ——Dapper的使用 简介:Dapper是一个ORM框架,负责数据库和程序语言之间的映射. 使用步骤: l 创建一个IDBConnection的接口对象 l 编 ...
- ASP.NET Core API总结(一)
ASP.NET Core API 问题:当应用收到一个http请求之后,API应用程序是怎么一步步执行的. 注册服务——构造容器——使用服务——创建对象 1. 创建一个新的API之后, ...
- asp.net core 3.1多种身份验证方案,cookie和jwt混合认证授权
开发了一个公司内部系统,使用asp.net core 3.1.在开发用户认证授权使用的是简单的cookie认证方式,然后开发好了要写几个接口给其它系统调用数据.并且只是几个简单的接口不准备再重新部署一 ...
- Asp.Net Core Api 使用Swagger管理文档教程的安装与使用
这周因为公司的需求需要我做一个Api的程序,这周的三天时间我一直在Core Api和 framework Api之间做纠结.不知道要使用哪一个去做项目,想着想着就决定了.既然两个我都没用过那个何不来使 ...
- asp.net core系列 53 IdentityServer4 (IS4)介绍
一.概述 在物理层之间相互通信必须保护资源,需要实现身份验证和授权,通常针对同一个用户存储.对于资源安全设计包括二个部分,一个是认证,一个是API访问. 1 认证 认证是指:应用程序需要知道当前用户的 ...
随机推荐
- 使用Axure RP设计Android界面原型
转至@徐州瑞步科技(http://www.cnblogs.com/brooks-dotnet/archive/2013/06/05/3119923.html) 资源地址:http://pan.baid ...
- BNUOJ 52318 Be Friends prim+Trie
题目链接: https://acm.bnu.edu.cn/v3/problem_show.php?pid=52318 B. Be Friends Case Time Limit: 2500msMemo ...
- 第二章 Socket用法详解
构造Socket Socket构造方法如下: Socket() //Creates an unconnected socket, with the system-default type of Soc ...
- GDI+缩放图片
uses WinAPI.GDIPAPI, WinAPI.GDIPOBJ; var Bitmap1: TGPBitmap; Bitmap2: TBitmap; Graphic: TGPGraphi ...
- set_magic_quotes_runtime
在php的配置文件中,有个布尔值的设置,就是magic_quotes_runtime,当它打开时,php的大部分函数自动的给从外部引入的(包括数据库或者文件)数据中的溢出字符加上反斜线. 当然如果重复 ...
- SpringBoot(十三)_springboot上传Excel并读取excel中的数据
今天工作中,发现同事在整理数据,通过excel上传到数据库.所以现在写了篇利用springboot读取excel中的数据的demo.至于数据的进一步处理,大家肯定有不同的应用场景,自行修改 pom文件 ...
- Java override 和 overload 的区别和联系
方法的重写(Overriding)和重载(Overloading)是Java多态性的不同表现.重写(Overriding)是父类与子类之间多态性的一种表现,而重载(Overloading)是一个类中多 ...
- [C/C++] 输入函数getline(cin,str) 与cin.getline(str,int)区别
cin.getline()函数是处理数组字符串的,其原型为cin.getline(char * , int),第一个参数为一个char指针,第二个参数为数组字符串长度. getline(cin,str ...
- forEach遍历数组对象且去重
forEach遍历数组对象 var obj1 = [{ key: '01', value: '哈哈' }, { key: '02', value: '旺旺' }, { key: '03', value ...
- 一些常用的基础Linux操作指令
复习的时候顺便分享我学的知识,虽不是什么牛的技术分享,只是一些基础,基础打好了技术慢慢就提高了!一起加油一起共勉! 具体的vi和vim命令集太多了,以后的随笔我也会分享出来,没必要全记住,记住常用的就 ...