自定义控件(视图)2期笔记14:自定义视图之View事件分发 dispatchTouchEvent,onTouch,onTouchEvent,onClick逻辑顺序过程
1. 这里我们先从案例角度说明dispatchTouchEvent,onTouch,onTouchEvent,onClick逻辑顺序过程:
(1)首先我们重写一个MyButton 继承自 Button,代码如下:
 package com.himi.eventdemo;

 import android.content.Context;

 import android.util.AttributeSet;

 import android.util.Log;

 import android.view.MotionEvent;

 import android.widget.Button;

 public class MyButton extends Button {

     private static String TAG = "MyButton";

     public MyButton(Context context) {

         super(context);

     }

     public MyButton(Context context, AttributeSet attrs) {

         super(context, attrs);

     }

     public MyButton(Context context, AttributeSet attrs, int defStyleAttr) {

         super(context, attrs, defStyleAttr);

     }

     @Override

     public boolean dispatchTouchEvent(MotionEvent event) {

         switch (event.getAction()) {

             case MotionEvent.ACTION_DOWN:

                 Log.e(TAG,"dispatchTouchEvent====MyButton=====ACTION_DOWN");

                 break;

             case MotionEvent.ACTION_MOVE:

                  Log.e(TAG,"dispatchTouchEvent====MyButton=====ACTION_MOVE");

                 break;

             case MotionEvent.ACTION_UP:

                  Log.e(TAG,"dispatchTouchEvent====MyButton=====ACTION_UP");

                 break;

         }

         return super.dispatchTouchEvent(event);

     }

     @Override

     public boolean onTouchEvent(MotionEvent event) {

         switch (event.getAction()) {

             case MotionEvent.ACTION_DOWN:

                  Log.e(TAG,"onTouchEvent====MyButton=====ACTION_DOWN");

                 break;

             case MotionEvent.ACTION_MOVE:

                  Log.e(TAG,"onTouchEvent====MyButton=====ACTION_MOVE");

                 break;

             case MotionEvent.ACTION_UP:

                  Log.e(TAG,"onTouchEvent====MyButton=====ACTION_UP");

                 break;

         }

         return super.onTouchEvent(event);

     }

 }
(2)来到主布局文件activity_main.xml,如下:
 <RelativeLayout xmlns:android="http://schemas.android.com/apk/res/android"

     xmlns:tools="http://schemas.android.com/tools"

     android:layout_width="match_parent"

     android:layout_height="match_parent"

     android:gravity="center"

     tools:context="com.himi.eventdemo.MainActivity" >

     <com.himi.eventdemo.MyButton

         android:id="@+id/myButton"

         android:layout_width="wrap_content"

         android:layout_height="wrap_content"

         android:text="测试"

         />

 </RelativeLayout>
(3)测试MainActivity,如下:
 package com.himi.eventdemo;

 import android.app.Activity;

 import android.os.Bundle;

 import android.util.Log;

 import android.view.MotionEvent;

 import android.view.View;

 import android.widget.Button;

 public class MainActivity extends Activity {

     private static String TAG ="MainActivity";

     private Button myButton;

     @Override

     protected void onCreate(Bundle savedInstanceState) {

         super.onCreate(savedInstanceState);

         setContentView(R.layout.activity_main);

         myButton = (Button) findViewById(R.id.myButton);

         myButton.setOnTouchListener(new View.OnTouchListener() {

             @Override

             public boolean onTouch(View v, MotionEvent event) {

                 switch (event.getAction()) {

                     case MotionEvent.ACTION_DOWN:

                          Log.e(TAG,"onTouch====MyButton=====ACTION_DOWN");

                         break;

                     case MotionEvent.ACTION_MOVE:

                          Log.e(TAG,"onTouch====MyButton=====ACTION_MOVE");

                         break;

                     case MotionEvent.ACTION_UP:

                          Log.e(TAG,"onTouch====MyButton=====ACTION_UP");

                         break;

                 }

                 return false;

             }

         });

         myButton.setOnClickListener(new View.OnClickListener() {

             @Override

             public void onClick(View v) {

                 Log.e(TAG,"onClick====MyButton=====onClick");

             }

         });

     }

 }
(4)部署程序到手机上,如下:

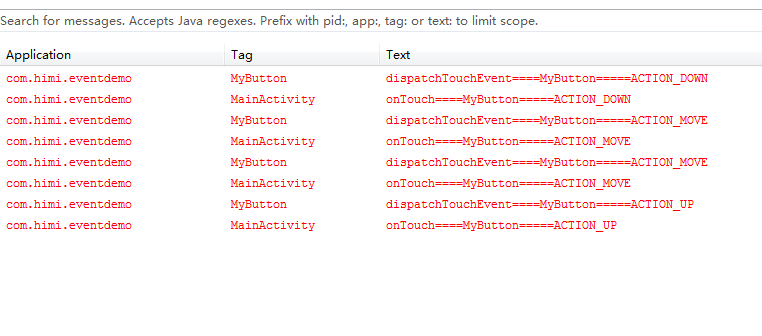
点击测试按钮,打印结果如下:

从上面打印的结果分析:
点击Button按钮事件分发过程如下:
dispatchTouchEvent --> onTouch --> onTouchEvent --> onClick
相信细心的你肯定发现了,都是在ACTION_UP事件之后才触发onClick点击事件。
2. 下面我们从源码的角度分析dispatchTouchEvent,onTouch,onTouchEvent,onClick逻辑顺序过程:
(1)事件分发都是从dispatchTouchEvent方法开始的,那么我们这里是重写了dispatchTouchEvent方法,并且最后也调用了父类的super.dispatchTouchEvent(event)方法。那么我们看看父类中的方法到底做了什么??点击进入父类的dispatchTouchEvent方法,发现此方法在View类中找到,其实也不奇怪,所有控件的父类都是View。这里我贴出最新源码如下:
 public boolean dispatchTouchEvent(MotionEvent event) {

         boolean result = false;

         if (mInputEventConsistencyVerifier != null) {

             mInputEventConsistencyVerifier.onTouchEvent(event, 0);

         }

         final int actionMasked = event.getActionMasked();

         if (actionMasked == MotionEvent.ACTION_DOWN) {

             // Defensive cleanup for new gesture

             stopNestedScroll();

         }

         if (onFilterTouchEventForSecurity(event)) {

             //noinspection SimplifiableIfStatement

             ListenerInfo li = mListenerInfo;

             if (li != null && li.mOnTouchListener != null

                     && (mViewFlags & ENABLED_MASK) == ENABLED

                     && li.mOnTouchListener.onTouch(this, event)) {

                 result = true;

             }

             if (!result && onTouchEvent(event)) {

                 result = true;

             }

         }

         if (!result && mInputEventConsistencyVerifier != null) {

             mInputEventConsistencyVerifier.onUnhandledEvent(event, 0);

         }

         // Clean up after nested scrolls if this is the end of a gesture;

         // also cancel it if we tried an ACTION_DOWN but we didn't want the rest

         // of the gesture.

         if (actionMasked == MotionEvent.ACTION_UP ||

                 actionMasked == MotionEvent.ACTION_CANCEL ||

                 (actionMasked == MotionEvent.ACTION_DOWN && !result)) {

             stopNestedScroll();

         }

         return result;

     }
忽略其他无关代码,我们直接看17--25行。
第17行的 if 判断关键在于li.mOnTouchListener.onTouch(this, event) 的返回值,
这个接口回调就是我们外面写的myButton.setOnTouchListener事件(Button 的onTouch事件),
在MainActivity代码里,我们setOnTouchListener返回的值是false,所以在源码中我们可以看到 17行的条件不成立,那么条件不成立,result=false;
因此,源码的第23行 if 判断第一个条件成立,继续执行第二个条件,也就是onTouchEvent。我们跳到这个方法里看看里面干啥了?看如下代码:
 public boolean onTouchEvent(MotionEvent event) {

         if (((viewFlags & CLICKABLE) == CLICKABLE ||

                 (viewFlags & LONG_CLICKABLE) == LONG_CLICKABLE)) {

             switch (event.getAction()) {

                 case MotionEvent.ACTION_UP:

                     boolean prepressed = (mPrivateFlags & PFLAG_PREPRESSED) != 0;

                     if ((mPrivateFlags & PFLAG_PRESSED) != 0 || prepressed) {

                         // take focus if we don't have it already and we should in

                         // touch mode.

                         boolean focusTaken = false;

                         if (isFocusable() && isFocusableInTouchMode() && !isFocused()) {

                             focusTaken = requestFocus();

                         }

                         if (prepressed) {

                             // The button is being released before we actually

                             // showed it as pressed.  Make it show the pressed

                             // state now (before scheduling the click) to ensure

                             // the user sees it.

                             setPressed(true, x, y);

                        }

                         if (!mHasPerformedLongPress) {

                             // This is a tap, so remove the longpress check

                             removeLongPressCallback();

                             // Only perform take click actions if we were in the pressed state

                             if (!focusTaken) {

                                 // Use a Runnable and post this rather than calling

                                 // performClick directly. This lets other visual state

                                 // of the view update before click actions start.

                                 if (mPerformClick == null) {

                                     mPerformClick = new PerformClick();

                                 }

                                 if (!post(mPerformClick)) {

                      performClick();

                                 }

                             }

                         }

                         if (mUnsetPressedState == null) {

                             mUnsetPressedState = new UnsetPressedState();

                         }

                         if (prepressed) {

                             postDelayed(mUnsetPressedState,

                                     ViewConfiguration.getPressedStateDuration());

                         } else if (!post(mUnsetPressedState)) {

                             // If the post failed, unpress right now

                             mUnsetPressedState.run();

                         }

                         removeTapCallback();

                     }

                     break;

             return true;

         }

         return false;

     }
我们看看这里边都做了些什么,忽略其他,我们直接看37行的 performClick(); 方法,跳进去继续看:
(注意:这里的performClick方法是在ACTION_UP手势里边执行的哦!!!)
 public boolean performClick() {

         final boolean result;

         final ListenerInfo li = mListenerInfo;

         if (li != null && li.mOnClickListener != null) {

             playSoundEffect(SoundEffectConstants.CLICK);

             li.mOnClickListener.onClick(this);

             result = true;

         } else {

             result = false;

         }

         sendAccessibilityEvent(AccessibilityEvent.TYPE_VIEW_CLICKED);

         return result;

     }
看见没??
第6行 li.mOnClickListener.onClick(this);
这个接口回调就是我们Button的 onClick事件。到此为止,我们从源码分析了Button事件分发过程。
结论:
dispatchTouchEvent---->onTouch---->onTouchEvent----->onClick。并且如果仔细的你会发现,在onTouchEvent方法内部判断执行onClick方法,但是,在所有ACTION_UP事件之后才触发onClick点击事件。
3. 现在我们来看看其他情况:当onTouch返回为true,打印结果如下:
 package com.himi.eventdemo;

 import android.app.Activity;

 import android.os.Bundle;

 import android.util.Log;

 import android.view.MotionEvent;

 import android.view.View;

 import android.widget.Button;

 public class MainActivity extends Activity {

     private static String TAG ="MainActivity";

     private Button myButton;

     @Override

     protected void onCreate(Bundle savedInstanceState) {

         super.onCreate(savedInstanceState);

         setContentView(R.layout.activity_main);

         myButton = (Button) findViewById(R.id.myButton);

         myButton.setOnTouchListener(new View.OnTouchListener() {

             @Override

             public boolean onTouch(View v, MotionEvent event) {

                 switch (event.getAction()) {

                     case MotionEvent.ACTION_DOWN:

                          Log.e(TAG,"onTouch====MyButton=====ACTION_DOWN");

                         break;

                     case MotionEvent.ACTION_MOVE:

                          Log.e(TAG,"onTouch====MyButton=====ACTION_MOVE");

                         break;

                     case MotionEvent.ACTION_UP:

                          Log.e(TAG,"onTouch====MyButton=====ACTION_UP");

                         break;

                 }

                 return true;

             }

         });

         myButton.setOnClickListener(new View.OnClickListener() {

             @Override

             public void onClick(View v) {

                 Log.e(TAG,"onClick====MyButton=====onClick");

             }

         });

     }

 }
打印结果如下:
结论:
dispatchTouchEvent---->onTouch
惊奇的发现,竟然没有执行onClick事件是吧????如果你仔细阅读上面的文章,估计你知道为什么了吧?还是跟大家一起分析一下吧:源码如下:
 public boolean dispatchTouchEvent(MotionEvent event) {

         boolean result = false;

         if (mInputEventConsistencyVerifier != null) {

             mInputEventConsistencyVerifier.onTouchEvent(event, 0);

         }

         final int actionMasked = event.getActionMasked();

         if (actionMasked == MotionEvent.ACTION_DOWN) {

             // Defensive cleanup for new gesture

             stopNestedScroll();

         }

         if (onFilterTouchEventForSecurity(event)) {

             //noinspection SimplifiableIfStatement

             ListenerInfo li = mListenerInfo;

             if (li != null && li.mOnTouchListener != null

                     && (mViewFlags & ENABLED_MASK) == ENABLED

                     && li.mOnTouchListener.onTouch(this, event)) {

                 result = true;

             }

             if (!result && onTouchEvent(event)) {

                 result = true;

             }

         }

         if (!result && mInputEventConsistencyVerifier != null) {

             mInputEventConsistencyVerifier.onUnhandledEvent(event, 0);

         }

         // Clean up after nested scrolls if this is the end of a gesture;

         // also cancel it if we tried an ACTION_DOWN but we didn't want the rest

         // of the gesture.

         if (actionMasked == MotionEvent.ACTION_UP ||

                 actionMasked == MotionEvent.ACTION_CANCEL ||

                 (actionMasked == MotionEvent.ACTION_DOWN && !result)) {

             stopNestedScroll();

         }

         return result;

     }
从第 17 行可以看出,条件成立,result=true;
那么第 23 行 if 条件根本不会执行第二个判断,那么就不会执行onTouchEvent方法,也就不会调用 onClick的接口,因此Button 不会执行setOnClickListener中的onClick事件。
4. 总结:

自定义控件(视图)2期笔记14:自定义视图之View事件分发 dispatchTouchEvent,onTouch,onTouchEvent,onClick逻辑顺序过程的更多相关文章
- Python3+Selenium3+webdriver学习笔记14(等待判断 鼠标事件 )
!/usr/bin/env python -*- coding:utf-8 -*-'''Selenium3+webdriver学习笔记14(等待判断 鼠标事件 )'''from selenium im ...
- 自定义控件(视图)2期笔记10:自定义视图之View事件分发机制("瀑布流"的案例)
1. Touch事件的传递: 图解Touch事件的传递,如下: 当我们点击子View 02内部的Button控件时候,我们就触发了Touch事件. • 这个Touch事件首先传递给了顶级父View ...
- flask_admin 笔记四 自定义视图
定义自己的视图 对于您的要求非常具体的情况,您很难用内置的ModelView类来满足这些需求,Flask-Admin使您可以轻松地完全控制并将自己的视图添加到界面中. 1)独立视图 可以通过扩展Bas ...
- angularJS1笔记-(14)-自定义指令(scope)
index.html: <!DOCTYPE html> <html lang="en"> <head> <meta charset=&qu ...
- Kotlin入门(24)如何自定义视图
Android提供了丰富多彩的视图与控件,已经能够满足大部分的业务需求,然而计划赶不上变化,总是有意料之外的情况需要特殊处理.比如PagerTabStrip无法在布局文件中指定文本大小和文本颜色,只能 ...
- SpringMVC系列(九)自定义视图、重定向、转发
一.自定义视图 1. 自定义一个视图HelloView.java,使用@Component注解交给Spring IOC容器处理 package com.study.springmvc.views; i ...
- [转载]开发 Spring 自定义视图和视图解析器
原文出处 http://www.ibm.com/developerworks/cn/java/j-lo-springview/ 概述 Spring 3.0 默认包含了多种视图和视图解析器,比如 JSP ...
- SpringMVC:自定义视图及其执行过程
一:自定义视图 1.自定义一个实现View接口的类,添加@Component注解,将其放入SpringIOC容器 package com.zzj.view; import java.io.PrintW ...
- 【朝花夕拾】Android自定义View篇之(六)Android事件分发机制(中)从源码分析事件分发逻辑及经常遇到的一些“诡异”现象
前言 转载请注明,转自[https://www.cnblogs.com/andy-songwei/p/11039252.html]谢谢! 在上一篇文章[[朝花夕拾]Android自定义View篇之(五 ...
随机推荐
- 设计模式学习--面向对象的5条设计原则之接口隔离原则--ISP
一.ISP简介(ISP--Interface Segregation Principle): 使用多个专门的接口比使用单一的总接口要好.一个类对另外一个类的依赖性应当是建立在最小的接口上的.一个接口代 ...
- mysql 中文乱码 解决
数据库安装设置编码: mysql默认的字符编码是latin1,而我用的是utf-8,存入数据库就变成了?????这样的乱码,解决方法: 修改安装路径下的my.ini文件,default-chara ...
- Sql-Server触发器,根据条件匹配另一个表中的字段
USE [CDM] GO /****** Object: Trigger [dbo].[UpdateAkisFlight] Script Date: 2018/6/14 16:43:29 ****** ...
- 解决XShell不能使用小键盘的问题
新建链接的时候,在Terminal节点,选择VT Modes为set to normal.
- SDWebImage实现图片展示、缓存、清除缓存
1. /* 图片显示 */ [self.imageView sd_setImageWithURL:[NSURL URLWithString:urlString]]; [s ...
- 【原】通过Dubbo注解实现RPC调用
启动Dubbo服务有2个方式,1是通过xml配置,2是通过注解来实现,这点和Spring相似. 采用XML配置如下: <?xml version="1.0" encoding ...
- ActiveMQ Could not connect to broker URL
javax.jms.JMSException: Could not connect to broker URL: http://localhost:8161/. Reason: java.io.IOE ...
- ReadWriteLock
ReadWriteLock也是一个接口,只有两个方法 一个用来获取读锁,一个用来获取写锁.也就是说将文件的读写操作分开,分成2个锁来分配给线程,从而使得多个线程可以同时进行读操作.下面的Reentra ...
- 【学习笔记】--- 老男孩学Python,day12 函数名的应用,闭包,迭代器
1, 函数名的应用,第一类对象 函数名可以像变量一样进行使用 1.赋值 def func(): print("你吃了么?") # print(func) # a = func # ...
- 11招教你做好 ERP 系统维护
ERP 维护的具体工作内容主要包括以下几个方面: 例行和突发事件的处理 以管理和技术的手段,维护和发展 ERP 运行环境,如平衡技术先进性/实用风险.目标/成本而进行的IT基础结构(服务器.网络.PC ...