用UIScrollView产生视差效果
用UIScrollView产生视差效果

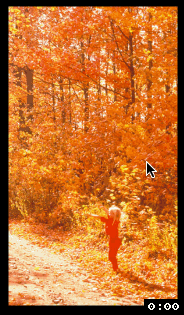
效果:

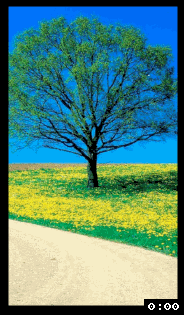
高级效果:

源码:
MoreInfoView.h + MoreInfoView.m
//

//  MoreInfoView.h

//  YXCell

//

//  Copyright (c) 2014年 Y.X. All rights reserved.

//

#import <UIKit/UIKit.h>

@interface MoreInfoView : UIView

@property (nonatomic, strong) UIImageView *imageView;

@end
//
// MoreInfoView.m
// YXCell
//
// Copyright (c) 2014年 Y.X. All rights reserved.
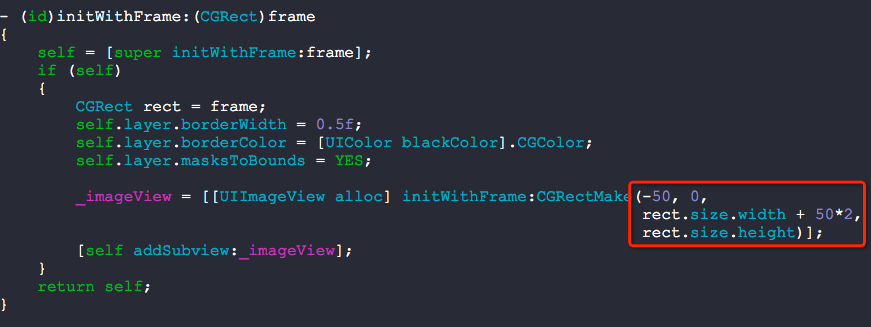
// #import "MoreInfoView.h" @implementation MoreInfoView - (id)initWithFrame:(CGRect)frame
{
self = [super initWithFrame:frame];
if (self)
{
CGRect rect = frame;
self.layer.borderWidth = 0.5f;
self.layer.borderColor = [UIColor blackColor].CGColor;
self.layer.masksToBounds = YES; _imageView = [[UIImageView alloc] initWithFrame:CGRectMake(-, ,
rect.size.width + *,
rect.size.height)];
[self addSubview:_imageView];
}
return self;
} @end
RootViewController.m
//
// RootViewController.m
// YXCell
//
// Copyright (c) 2014年 Y.X. All rights reserved.
// #import "RootViewController.h"
#import "MoreInfoView.h" @interface RootViewController ()<UIScrollViewDelegate> @property (nonatomic, strong) UIScrollView *scrollView;
@property (nonatomic, assign) CGFloat k;
@property (nonatomic, assign) CGFloat b; @end @implementation RootViewController - (void)linearFunctionPointA:(CGPoint)pointA
pointB:(CGPoint)pointB
{
CGFloat x1 = pointA.x; CGFloat y1 = pointA.y;
CGFloat x2 = pointB.x; CGFloat y2 = pointB.y; _k = calculateSlope(x1, y1, x2, y2);
_b = calculateConstant(x1, y1, x2, y2);
} - (void)viewDidLoad
{
[super viewDidLoad];
self.view.backgroundColor = [UIColor blackColor]; // 计算斜率
[self linearFunctionPointA:CGPointMake(, -)
pointB:CGPointMake(, )]; _scrollView = [[UIScrollView alloc] initWithFrame:self.view.bounds];
_scrollView.delegate = self;
_scrollView.pagingEnabled = YES;
[self.view addSubview:_scrollView]; NSArray *picArray = @[[UIImage imageNamed:@""],
[UIImage imageNamed:@""],
[UIImage imageNamed:@""],
[UIImage imageNamed:@""],
[UIImage imageNamed:@""]]; [picArray enumerateObjectsUsingBlock:^(id obj, NSUInteger idx, BOOL *stop) {
MoreInfoView *show = \
[[MoreInfoView alloc] initWithFrame:CGRectMake(idx*self.view.bounds.size.width, ,
self.view.bounds.size.width,
self.view.bounds.size.height)];
show.imageView.image = obj; [_scrollView addSubview:show];
}]; _scrollView.contentSize = CGSizeMake(picArray.count*self.view.bounds.size.width,
self.view.bounds.size.height);
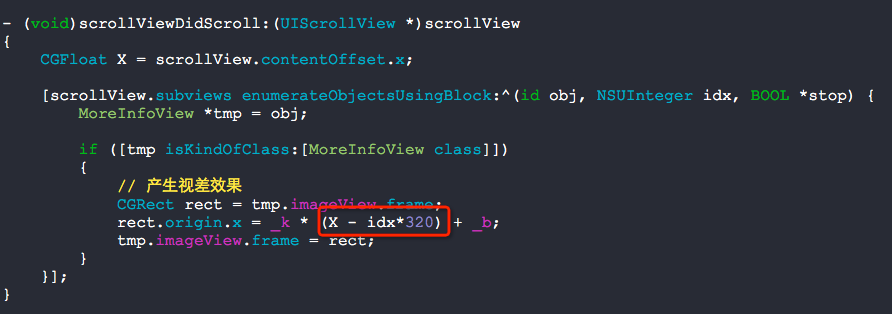
} - (void)scrollViewDidScroll:(UIScrollView *)scrollView
{
CGFloat X = scrollView.contentOffset.x; [scrollView.subviews enumerateObjectsUsingBlock:^(id obj, NSUInteger idx, BOOL *stop) {
MoreInfoView *tmp = obj; if ([tmp isKindOfClass:[MoreInfoView class]])
{
// 产生视差效果
CGRect rect = tmp.imageView.frame;
rect.origin.x = _k * (X - idx*) + _b;
tmp.imageView.frame = rect;
}
}];
} // 计算用
CGFloat calculateSlope(CGFloat x1, CGFloat y1, CGFloat x2, CGFloat y2)
{
return (y2 - y1) / (x2 - x1);
} CGFloat calculateConstant(CGFloat x1, CGFloat y1, CGFloat x2, CGFloat y2)
{
return (y1*(x2 - x1) - x1*(y2 - y1)) / (x2 - x1);
} @end
需要注意的地方:
1. 这个地方的值不是随便设定的哦:)
2. 修改那个270的值来达到上图显示的各种效果

3. 下面的X - idx*320也是非常关键的哦
用UIScrollView产生视差效果的更多相关文章
- Swift - 用UIScrollView实现视差动画效果
Swift - 用UIScrollView实现视差动画效果 效果 源码 https://github.com/YouXianMing/Swift-Animations // // MoreInfoVi ...
- UIScrollView视差效果动画
UIScrollView视差效果动画 效果 源码 https://github.com/YouXianMing/Animations // // ScrollImageViewController.m ...
- 使用UITableView实现图片视差效果
使用UITableView实现图片视差效果 视差效果如下: 原理: 根据偏移量计算不同的移动速度,so easy! // // RootTableViewController.h // TableVi ...
- 滚动视差效果——background-attachment
滚动视差效果的实现原理是在同一个页面上将页面元素分为多层,例如可以分为背景.内容.贴图层,在滚动页面的时候让三者滚动的速度不一,从而在人的视觉上能够形成一种立体的近似效果.最近在做一个项目wiki的时 ...
- 基于Parallax设计HTML视差效果
年关将至,给大家拜年. 最近时间充裕了一点,给大家介绍一个比较有意思的控件:Parallax.它可以用来实现鼠标移动时,页面上的元素也做偏移的视差效果.在一些有表现层次,布局空旷的页面上,用来做Hea ...
- css中的视距perspective和视差效果
概述 之前觉得2个效果很叼,一个是3D翻转效果,另一个是视差效果.今天好好的研究一下,把心得记录下来,供以后开发时参考,相信对其他人也有用. 3D翻转 3D翻转效果其实非常简单,其实就是perspec ...
- banner 跟随鼠标呈现视差效果
参考 Element 官网,利用 js / jq 和 css3, 实现某图片随着鼠标移动呈现的视差效果. <!DOCTYPE html> <html> <head> ...
- 使用NestedScrollView+ViewPager+RecyclerView+SmartRefreshLayout打造酷炫下拉视差效果并解决各种滑动冲突
使用NestedScrollView+ViewPager+RecyclerView+SmartRefreshLayout打造酷炫下拉视差效果并解决各种冲突 如果你还在为处理滑动冲突而发愁,那么你需要静 ...
- UITableViewCell图片视差效果
UITableViewCell图片视差效果 效果 源码 https://github.com/YouXianMing/Animations 细节 OffsetImageCell.m OffsetCel ...
随机推荐
- 13-hadoop-入门程序
通过之前的操作, http://www.cnblogs.com/wenbronk/p/6636926.html http://www.cnblogs.com/wenbronk/p/6659481.ht ...
- linux文件 面试知识
1. 文件存储结构 Linux正统的文件系统(如ext2.ext3)中,一个文件由目录项.inode和数据块组成. 目录项:包括文件名和inode节点号. inode:又称文件索引节点, ...
- SSL虚拟主机安全方案
SSL虚拟主机安全方案 随着虚拟主机技术的发展,功能越来越丰富,已经不仅仅只是满足个人网站的需要,越来越多的小型电子商务网站也采用了虚拟主机来建站,如何为这些商户提供经济.方便的SSL解决方案,成为虚 ...
- Visual Studio最常用的快捷键
Ctrl + J:快捷提示,强迫智能感知: Ctrl + 空格键:使用 IntelliSense(智能感知)自动完成: Ctrl + Z:撤销,回退键: Ctrl + Shift + 空格:强迫显示参 ...
- Node.js中setTimeout和setInterval的使用
Node.js和js一样也有计时器,超时计时器.间隔计时器.及时计时器,它们以及process.nextTick(callback)函数来实现事件调度.今天先学下setTimeout和setInter ...
- Linux 文件IO管理 - POSIX
以下是对POSIX的简短解释: POSIX表示可移植操作系统接口(Portable Operating System Interface of UNIX,缩写为 POSIX ),POSIX标准定义了操 ...
- Ionic3 UI组件之 Gallery Modal
Gallery Modal可以理解为相册的预览界面.可以显示网络图片,也可以显示base64Image. 在这个例子中,我用来实现图片的预览功能. 相机拍照,或者相册选择图片后,用缩略图组件显示缩略图 ...
- npm run build之后生成的dist如何扔到服务器运行(npm run build之后如何本地运行)
运行npm run build之后,会生成一个dist文件夹,里面的目录结构大概是这样的: 生成完的文件我们怎么来运行呢?直接在本地打开inde.html是无法运行的,打包的时候有提示: 构建文件应该 ...
- 【原】使用Builder模式替代构造参数传参
前言:关于传递参数,当参数过多的时候我们可以考虑使用建造者模式. #没用 Builder模式 之前是这样传参的: 如下所示,构造方法里面的参数一大堆,看起来就非常的混乱. 用了Builder模式之后是 ...
- Syntax error on token "Invalid Regular Expression Options", no accurate corr
今天导入项目一个js文件报这个错 Syntax error on token "Invalid Regular Expression Options", no accurate c ...