
Service生命周期以及应用
Service概念及用途:
Android中的服务,它与Activity不同,它是不能与用户交互的,不能自己启动的,运行在后台的程序,如果我们退出应用时,Service进程并没有结束,它仍然在后台运行,那 我们什么时候会用到Service呢?比如我们播放音乐的时候,有可能想边听音乐边干些其他事情,当我们退出播放音乐的应用,如果不用Service,我 们就听不到歌了,所以这时候就得用到Service了,又比如当我们一个应用的数据是通过网络获取的,不同时间(一段时间)的数据是不同的这时候我们可以 用Service在后台定时更新,而不用每打开应用的时候在去获取。
Service生命周期 :
Android Service的生命周期并不像Activity那么复杂,它只继承了onCreate(),onStart(),onDestroy()三个方法,当我 们第一次启动Service时,先后调用了onCreate(),onStart()这两个方法,当停止Service时,则执行onDestroy()方法,这里需要注意的是,如果Service已经启动了,当我们再次启动Service时,不会在执行onCreate()方法,而是直接执行onStart()方法,具体的可以看下面的实例。
Service与Activity通信:
Service后端的数据最终还是要呈现在前端Activity之上的,因为启动Service时,系统会重新开启一个新 的进程,这就涉及到不同进程间通信的问题了(AIDL)这一节我不作过多描述,当我们想获取启动的Service实例时,我们可以用到 bindService和onBindService方法,它们分别执行了Service中IBinder()和onUnbind()方法。
为了让大家 更容易理解,我写了一个简单的Demo,大家可以模仿着我,一步一步的来。
第一步:新建一个Android工程,我这里命名为ServiceDemo.
第二步:修改main.xml代码,我这里增加了四个按钮,代码如下:
<?xml version="1.0" encoding="utf-8"?>

<LinearLayout xmlns:android="http://schemas.android.com/apk/res/android"

    android:orientation="vertical"

    android:layout_width="fill_parent"

    android:layout_height="fill_parent"

    >

    <TextView

        android:id="@+id/text"

        android:layout_width="fill_parent"

        android:layout_height="wrap_content"

        android:text="@string/hello"

        />

    <Button

        android:id="@+id/startservice"

        android:layout_width="fill_parent"

        android:layout_height="wrap_content"

        android:text="startService"

    />

    <Button

        android:id="@+id/stopservice"

        android:layout_width="fill_parent"

        android:layout_height="wrap_content"

        android:text="stopService"

    />

    <Button

        android:id="@+id/bindservice"

        android:layout_width="fill_parent"

        android:layout_height="wrap_content"

        android:text="bindService"

    />

    <Button

        android:id="@+id/unbindservice"

        android:layout_width="fill_parent"

        android:layout_height="wrap_content"

        android:text="unbindService"

    />

</LinearLayout>
第三步:新建一个Service,命名为MyService.java代码如下:
import android.app.Service;
import android.content.Intent;
import android.os.Binder;
import android.os.IBinder;
import android.text.format.Time;
import android.util.Log;
public class MyService extends Service {
//定义个一个Tag标签
private static final String TAG = "MyService";
//这里定义吧一个Binder类,用在onBind()有方法里,这样Activity那边可以获取到
private MyBinder mBinder = new MyBinder();
@Override
public IBinder onBind(Intent intent) {
Log.e(TAG, "start IBinder~~~");
return mBinder;
}
@Override
public void onCreate() {
Log.e(TAG, "start onCreate~~~");
super.onCreate();
}
@Override
public void onStart(Intent intent, int startId) {
Log.e(TAG, "start onStart~~~");
super.onStart(intent, startId);
}
@Override
public void onDestroy() {
Log.e(TAG, "start onDestroy~~~");
super.onDestroy();
}
@Override
public boolean onUnbind(Intent intent) {
Log.e(TAG, "start onUnbind~~~");
return super.onUnbind(intent);
}
//这里我写了一个获取当前时间的函数,不过没有格式化就先这么着吧
public String getSystemTime(){
Time t = new Time();
t.setToNow();
return t.toString();
}
public class MyBinder extends Binder{
MyService getService()
{
return MyService.this;
}
}
}
第四步:修改ServiceDemo.java,代码如下:
package com.tutor.servicedemo;

import android.app.Activity;

import android.content.ComponentName;

import android.content.Context;

import android.content.Intent;

import android.content.ServiceConnection;

import android.os.Bundle;

import android.os.IBinder;

import android.view.View;

import android.view.View.OnClickListener;

import android.widget.Button;

import android.widget.TextView;

public class ServiceDemo extends Activity implements OnClickListener{

    private MyService  mMyService;

    private TextView mTextView;

    private Button startServiceButton;

    private Button stopServiceButton;

    private Button bindServiceButton;

    private Button unbindServiceButton;

    private Context mContext;

    //这里需要用到ServiceConnection在Context.bindService和context.unBindService()里用到

    private ServiceConnection mServiceConnection = new ServiceConnection() {

        //当我bindService时,让TextView显示MyService里getSystemTime()方法的返回值

        public void onServiceConnected(ComponentName name, IBinder service) {

            // TODO Auto-generated method stub

            mMyService = ((MyService.MyBinder)service).getService();

            mTextView.setText("I am frome Service :" + mMyService.getSystemTime());

        }

        public void onServiceDisconnected(ComponentName name) {

            // TODO Auto-generated method stub

        }

    };

    public void onCreate(Bundle savedInstanceState) {

        super.onCreate(savedInstanceState);

        setContentView(R.layout.main);

        setupViews();

    }

    public void setupViews(){

        mContext = ServiceDemo.this;

        mTextView = (TextView)findViewById(R.id.text);

        startServiceButton = (Button)findViewById(R.id.startservice);

        stopServiceButton = (Button)findViewById(R.id.stopservice);

        bindServiceButton = (Button)findViewById(R.id.bindservice);

        unbindServiceButton = (Button)findViewById(R.id.unbindservice);

        startServiceButton.setOnClickListener(this);

        stopServiceButton.setOnClickListener(this);

        bindServiceButton.setOnClickListener(this);

        unbindServiceButton.setOnClickListener(this);

    }

    public void onClick(View v) {

        // TODO Auto-generated method stub

        if(v == startServiceButton){

            Intent i  = new Intent();

            i.setClass(ServiceDemo.this, MyService.class);

            mContext.startService(i);

        }else if(v == stopServiceButton){

            Intent i  = new Intent();

            i.setClass(ServiceDemo.this, MyService.class);

            mContext.stopService(i);

        }else if(v == bindServiceButton){

            Intent i  = new Intent();

            i.setClass(ServiceDemo.this, MyService.class);

            mContext.bindService(i, mServiceConnection, BIND_AUTO_CREATE);

        }else{

            mContext.unbindService(mServiceConnection);

        }

    }

}
第五步:修改AndroidManifest.xml代码(将我们新建的MyService注册进去如下代码第14行:)
第六步:执行上述工程,效果图如下:
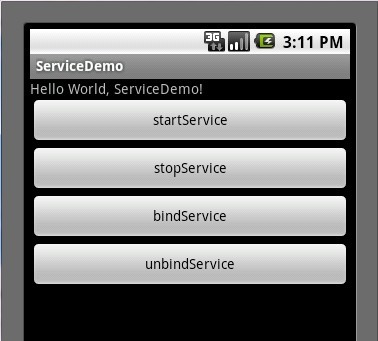
点击startServie按钮时先后执行了Service中onCreate()->onStart()这两个方法,打开Logcat视窗效果如下图:

我们这时可以按HOME键进入Settings(设置)->Applications(应用)->Running Services(正在运行的服务)看一下我们新启动了一个服务,效果如下:
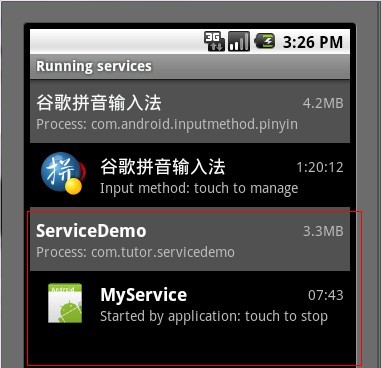
点击stopService按钮时,Service则执行了onDestroy()方法,效果图如下所示:

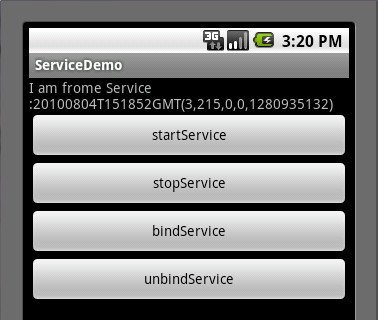
这时候我们再次点击startService按钮,然后点击bindService按钮(通常bindService都是bind已经启动的
Service),我们看一下Service执行了IBinder()方法,以及TextView的值也有所变化了,如下两张图所示:

最后点击unbindService按钮,则Service执行了onUnbind()方法,如下图所示:

转载:http://blog.csdn.net/android_tutor/article/details/5789203
Service生命周期以及应用的更多相关文章
- Android生命周期和Service生命周期
android生命周期 运行:oncreate → onstart → onresume暂停:onresume → onpause:再次运行:onresume停止:onpause → onstop → ...
- Android(java)学习笔记171:Service生命周期
1.Service的生命周期 Android中的Service(服务)与Activity不同,它是不能和用户交互,不能自己启动的,运行在后台的程序,如果我们退出应用的时候,Servic ...
- Android Service生命周期及用法
Service概念及用途:Android中的服务,它与Activity不同,它是不能与用户交互的,不能自己启动的,运行在后台的程序,如果我们退出应用时,Service进程并没有结束,它仍然在后台运行, ...
- Service具体解释(二):Service生命周期
< Service具体解释(一):什么是Service> < Service具体解释(二):Service生命周期> <Service具体解释(三):Service的使用 ...
- Android中startService的使用及Service生命周期
Android中有两种主要方式使用Service,通过调用Context的startService方法或调用Context的bindService方法.本文仅仅探讨纯startService的使用.不 ...
- Service 生命周期
有了 Service 类我们如何启动他呢,有两种方法: • Context.startService() • Context.bindService() 1. 在同一个应用任何地方调用 start ...
- Android Service 生命周期
Service概念及用途: Android中的服务,它与Activity不同,它是不能与用户交互的,不能自己启动的,运行在后台的程序,如果我们退出应用时,Service进程并没有结束,它仍然在后台运行 ...
- Android(java)学习笔记114:Service生命周期
1.Service的生命周期 Android中的Service(服务)与Activity不同,它是不能和用户交互,不能自己启动的,运行在后台的程序,如果我们退出应用的时候,Servic ...
- Android 中Service生命周期
使用context.startService() 启动Service 其生命周期为context.startService() ->onCreate()- >onStart()->S ...
随机推荐
- 如何把OpenWrt安装到PC?
前言 什么是openwrt? 它是一个适用于路由器的Linux发行版.和其他Linux发行版一样,它也内置了包管理工具,你可以从一个软件仓库里直接安装软件.OpenWrt可以用在所有需要嵌入式Linu ...
- Android代码编译出现的错误
一.decoupled apps failed 解耦应用程序失败 2.每次编译时候一定先扩充内存 export JACK_SERVER_VM_ARGUMENTS="-Dfile.encod ...
- Python replace方法的使用
在Python str 中, 有一个很方便的查找替换的函数 replace() my_str = "lowmanmana" new_str = my_str.replace(&qu ...
- Binary Indexed Tree-307. Range Sum Query - Mutable
Given an integer array nums, find the sum of the elements between indices i and j (i ≤ j), inclusive ...
- iOS----线程之间的通信
当线程的数量大于一个的时候,线程之间可能会产生通信,既一个线程产生的结果要被另一个线程用到. 比如常用的图片的加载就是这个样子.图片的加载是在子线程进行的,当图片加载完毕,就会回到主线程中刷新UI,展 ...
- 读/写锁的实现和应用(高并发状态下的map实现)
程序中涉及到对一些共享资源的读和写操作,且写操作没有读操作那么频繁.在没有写操作的时候,两个线程同时读一个资源没有任何问题,所以应该允许多个线程能在同时读取共享资源.但是如果有一个线程想去写这些共享资 ...
- BeautifulSoap库入门
BeautifulSoup类的基本元素 基本元素 说明 Tag 标签,最基本的信息组织单元,分别用<>和</>标明开头和结尾 Name 标签的名字,<p>-< ...
- Codeforces Round #555 (Div. 3) c2 d e f
c2:Increasing Subsequence (hard version) 那边小取那边,然后相等比较后面的长度 #include<bits/stdc++.h> using name ...
- 开源微信支付SDK
应该有一年多没在博客园上写文章了,毕竟是一个记录自己技术成长的平台,没能将写博客长期坚持下来,说起来也是挺惭愧的.对于自己的近况而言,确实平常加班也比较多,时间会比较压缩,所以到后来博客也基本停止了更 ...
- Linq基础知识之延迟执行
Linq中的绝大多数查询运算符都有延迟执行的特性,查询并不是在查询创建的时候执行,而是在遍历的时候执行,也就是在enumerator的MoveNext()方法被调用的时候执行,大说数Linq查询操作实 ...