
WebGL——osg框架学习一
从今天开始,我们开始正式的学习osg框架,今天我们学习的是osg的渲染模块,我们来看一下代码结构。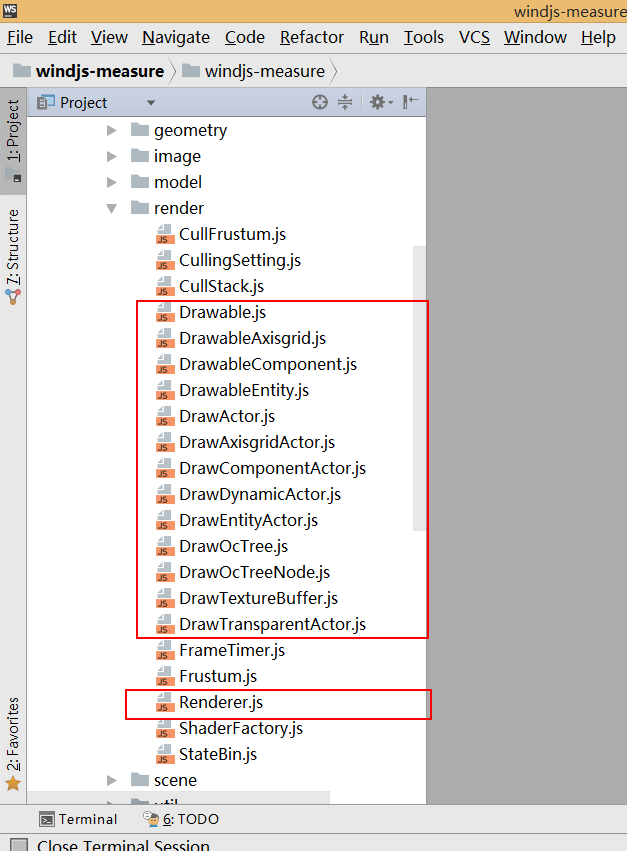
所有DrawXXX的js模块都是渲染的模块,我们逐一来简单介绍一下,第一个Drawable.js,这个模块是描述可绘制对象的类,也是我们今天要讨论的类。在osg框架中,渲染管道在准备时期首先要统计管理可绘制对象,我们来看看Drawable模块到底做了什么操作,进行了哪些管理。先贴出代码。
/*

可绘制对象

 */

let StateBin = require('./StateBin');

let BoundingBox = require('../util/BoundingBox');

let BoundingSphere = require('../util/BoundingSphere');

let Vec3 = require('../util/Vec3');

let Drawable = function (actor) {

    this._drawActor = actor;//关联的DrawActor

    this._geometry = undefined;//渲染的几何Geometry

    this._transform = undefined;//世界变换 FloatArray(16)

    this._statebin = undefined;//状态结点,原始的状态,没有额外功能时的状态

    this._curStatebin = undefined;//如果状态会动态变化,这里存储每一帧绘制时的状态结点

    this._depth = 0.0;//场景深度值,透明需要按深度排序绘制

    this._boundingBox = undefined;//包围盒

    this._boundingSphere = undefined;//包围球

};

Drawable.prototype = {

     setGeometry: function (g, transform) {

        this._geometry = g;

        this._transform = transform;

    },

    getGeometry: function () {

        return this._geometry;

    },

    getTransform: function () {

        return this._transform;

    },

    setStateBin: function (sb) {

        this._statebin = sb;

    },

    getStateBin: function () {

        return this._statebin;

    },

    getCurrentStateBin: function () {

        return this._curStatebin;

    },

    // setDepth: function (d) {

    //     this._depth = d;

    // },

    getDepth: function () {

        return this._depth;

    },

    reset: function () {

        this._geometry = undefined;

        this._transform = undefined;

        this._statebin = undefined;

        this._curStatebin = undefined;

        this._depth = 0.0;

        this._boundingBox = undefined;

        this._boundingSphere = undefined;

    },

    valid: function () {

        if (this._drawActor.getBaseCamera().isBoundingBoxCulled(this.getBoundingBox())) {

            return false;

        }

        return true;

    },

    isTransparent: function () {

        return false;

    },

    //计算深度值

    computeDepth: function () {

        //根据包围盒和相机变换矩阵,确认中心点的Z值

        let mvmatrix = this._drawActor.getBaseCamera().getModelViewMatrix();

        let temp = Vec3.MemoryPool.alloc();

        this._depth = this.distanceZ(this.getBoundingBox().getCenter(temp), mvmatrix);

        Vec3.MemoryPool.free(temp);

        //drawable.setDepth(depth);

    },

    //相机的矩阵要取反

    distanceZ: function (coord, matrix) {

        return -(coord[0] * matrix[2] + coord[1] * matrix[6] + coord[2] * matrix[10] + matrix[14]);

    },

    getBoundingBox: function () {

        if(this._boundingBox === undefined){

            this._boundingBox = new BoundingBox();

            this._boundingBox.copy(this._geometry.getBoundingBox(true));

            if(this._transform){

                this._boundingBox.transformMat4(this._transform);

            }

        }

        return this._boundingBox;

    },

    getBoundingSphere: function () {

        if(this._boundingSphere === undefined) {

            this._boundingSphere = new BoundingSphere();

            let bb = this.getBoundingBox();

            this._boundingSphere.expandByBoundingBox(bb);

        }

        return this._boundingSphere;

    },

    getRadius: function () {

        return this.getBoundingSphere().getRadius();

    },

    // There are 3 cases when there is a prev / current render leaf

    // pSG: previousStateGraph

    // cSG: currentStateGraph

    // pRL: previousRenderLeaf

    // cRL: currentRenderLeaf

    //

    //          A                        B                       C

    // +-----+     +-----+            +-----+                 +-----+

    // | pSG |     | cSG |         +--+ SG  +--+              | SG  |

    // +--+--+     +--+--+         |  +-----+  |              +--+--+

    //    |           |            |           |                 |

    // +--v--+     +--v--+      +--v--+     +--v--+           +--v--+

    // | pSG |     | cSG |      | pSG |     | cSG |        +--+ SG  +--+

    // +--+--+     +--+--+      +--+--+     +--+--+        |  +-----+  |

    //    |           |            |           |           |           |

    // +--v--+     +--v--+      +--v--+     +--v--+     +--v--+     +--v--+

    // | pRL |     | cRL |      | pRL |     | cRL |     | pRL |     | cRL |

    // +-----+     +-----+      +-----+     +-----+     +-----+     +-----+

    //

    //

    // Case A

    // no common parent StateGraphNode we need to

    // popStateSet until we find the common parent and then

    // pushStateSet from the common parent to the current RenderLeaf

    //

    // Case B

    // common parent StateGraphNode so we apply the current stateSet

    //

    // Case C

    // the StateGraphNode is common to the previous RenderLeaf so we dont need

    // to do anything except if we used an insertStateSet

    draw: function (glstate, preDrawable) {

        //先接受状态,再渲染几何

        let curStateGraph = this._statebin;

        let curStateGraphStateSet = curStateGraph.getStateSet();

        let curStateGraphParent = curStateGraph.getParent();

        let preStateGraph;

        let preStateGraphParent;

        if(preDrawable !== undefined){

            preStateGraph = preDrawable._statebin;

            preStateGraphParent = preStateGraph.getParent();

            if(preStateGraphParent !== curStateGraphParent){//A

                StateBin.moveStateBin(glstate, preStateGraphParent, curStateGraphParent);

                glstate.applyStateSet(curStateGraphStateSet);

            }else if(preStateGraph !== curStateGraph){//B

                glstate.applyStateSet(curStateGraphStateSet);

            }else{

                // in osg we call apply but actually we dont need

                // except if the stateSetStack changed.

                // for example if insert/remove StateSet has been used

                // if (glstate._stateSetStackChanged(idLastDraw, lastStateSetStackSize )) {

                //     glstate.applyStateSet(curStateGraphStateSet);

                // }

            }

        }

        else{//如果preLeaf为空,第一个绘制的几何,状态遍历到根节点全部push到GLState中

            StateBin.moveStateBin(glstate, undefined, curStateGraphParent);

            glstate.applyStateSet(curStateGraphStateSet);

        }

        let camera = this._drawActor.getBaseCamera();

        glstate.applyModelMatrix(this._transform, camera.getModelViewMatrix(), camera.getProjectionMatrix());

        this._geometry.draw(glstate);

        return true;

    },

};

module.exports = Drawable;

// set: function (stateGraph, geometry, , depth) {

//     this._statebin = stateGraph;

//     this._geometry = geometry;

//

//     this._depth = depth;

// },

// drawGeometry: function (glstate) {

//     //let program = glstate.getLastProgramApplied();

//     //let programID = program.getID();

//     //let programCaches = glstate.getProgramCaches();

//     //let obj = programCaches[programID];

//     // if(!obj){//程序不存在,创建一个新的

//     //     obj = new CacheUniformApply(glstate, program);

//     //     programCaches[programID] = obj;

//     // }

//

//     //从相机获取modelview和projection

//     //着色器暂时不需要透视矩阵

//     //let modelview = this._camera.get

//

//

//

//     //glstate.applyModelViewMatrix(this._modelview);

//     //glstate.applyProjectionMatrix(this._projection);

//     glstate.applyTransformMatrix(this._transform);

//     //this._modelview = this._camera.getModelViewMatrix();

//     //Mat4.mul(this._modelview, this._modelview, this._transform);

//     //this._projection = this._camera.getProjectionMatrix();

//     glstate.applyModelMatrix(this._transform, this._camera.getModelViewMatrix(), this._camera.getProjectionMatrix());

//

//

//     //let gluniforms = program.getGLUniformsCache();

//     //let modelviewloc = gluniforms[glstate._modelViewMatrixUniform.getName()];

//     //let viewloc = gluniforms[glstate._viewMatrixUniform.getName()];

//

//     //obj.apply(glstate, this._modelview, this._modelworld, this._view, this._projection, this._normal);

//     this._geometry.draw(glstate);

// },
我们先来看看Drawable的构造函数,截取构造函数代码
let Drawable = function (actor) {

    this._drawActor = actor;//关联的DrawActor

    this._geometry = undefined;//渲染的几何Geometry

    this._transform = undefined;//世界变换 FloatArray(16)

    this._statebin = undefined;//状态结点,原始的状态,没有额外功能时的状态

    this._curStatebin = undefined;//如果状态会动态变化,这里存储每一帧绘制时的状态结点

    this._depth = 0.0;//场景深度值,透明需要按深度排序绘制

    this._boundingBox = undefined;//包围盒

    this._boundingSphere = undefined;//包围球

};
首先我们看到第一个私有属性是DrawActor,我们看看DrawActor是个什么模块,先贴出DrawActor类代码。
/*

绘制对象角色

每个DrawActor管理自己的渲染数据,自己的状态树,自己的相机树

如果该功能销毁直接销毁对应的DrawActor资源

但是他引用的状态,相机并不是他管理

不想把各个DrawActor搅和在一起,逻辑混乱

绘制分几种情况,全自动,全手动,半自动

全自动-所有的绘制流程从一开始数据构造好后就不会再变更,只需在初始化时确认好 后续直接渲染即可

半自动-部分绘制流程是固定的,部分绘制流程是动态的,比如构件场景下,需要点选高亮等功能变化

全手动-所有的绘制流程都是动态的,每一帧都需要重新构造每个drawable,部分功能数据

 */

let Drawable = require('./Drawable');

let StateBin = require('./StateBin');

let NodeVisitor = require('../util/NodeVisitor');

let CullStack = require('./CullStack');

let Mat4 = require('../util/Mat4');

let Group = require('../core/Group');

let Geode = require('../core/Geode');

let MatrixTrasform = require('../core/MatrixTransform');

let SceneRoot = require('../scene/SceneRoot');

let Geometry = require('../core/Geometry');

let DrawActor = function (renderer) {

    NodeVisitor.call(this, NodeVisitor.TRAVERSE_CHILDREN);

    CullStack.call(this);

    //为正确渲染准备的数据

    this._renderer = renderer;//所属的渲染器,固有资产,不会变更

    this._baseCamera = this._renderer.getMainCamera();//相机,默认为主相机

    this._baseState = new StateBin();//状态

    this._sceneRoot = undefined;//所属的场景根节点

    //渲染的对象

    this._drawables = [];

    //

    this._drawIndex = 0;//当前绘制的索引数,需要固定帧率渲染的地方使用

    //

    this._currentStateBin = undefined;//当前处理的状态树结点,临时数据

    //

    //this._fixed = false;//是否启用固定帧率

    this._valid = true;//直接屏蔽渲染的标记

};

DrawActor.prototype = Object.create(NodeVisitor.prototype);

Object.assign(DrawActor.prototype, CullStack.prototype);

DrawActor.prototype.constructor = DrawActor;

Object.assign(DrawActor.prototype, {

    setBaseCamera: function (camera) {//设置当前相机,可以自由设置自己独特的相机

        this._baseCamera = camera;

    },

    getBaseCamera: function () {

        return this._baseCamera;

    },

    getBaseStateBin: function () {

        return this._baseState;

    },

    getBaseStateSet: function () {

        return this._baseState.getStateSet();

    },

    //复原场景根节点的状态

    revertBaseState: function () {

        if (this._sceneRoot) {

            this._baseState.setStateSet(this._sceneRoot.getStateSet());

        }

    },

    //与场景的唯一联系,一定要先定义好场景的几何和状态再调用setSceneRoot

    setSceneRoot: function (root) {

        this._sceneRoot = root;

        //一定要先定义好场景根节点的状态,否则会出错!!!

        //this._baseState.setStateSet(root.getStateSet());

    },

    createDrawable: function () {//base override

        return new Drawable(this);//创建对应类型的Drawable

    },

    addDrawable: function (drawable) {

        this._drawables.push(drawable);

    },

    getDrawables: function () {

        return this._drawables;

    },

    valid: function (valid) {

        if (valid !== undefined) {

            this._valid = valid;

        }

        return this._valid;

    },

    //遍历

    apply: function (node) {

        this[node.typeID](node);

    },

    //重载,压入一个状态

    pushStateSet: function (stateset) {

        if (stateset) {

            //添加StateGraph子节点,更新当前活动的StateGraph为新的状态

            this._currentStateBin = this._currentStateBin.addStateSetChild(stateset);

        }

    },

    //重载,弹出一个状态

    popStateSet: function (stateset) {

        if (stateset) {

            this._currentStateBin = this._currentStateBin.getParent();

        }

    },

    //重载

    pushDrawable: function (geometry) {

        let drawable = this.createDrawable();

        drawable.setStateBin(this._currentStateBin);

        drawable.setGeometry(geometry, this.getCurrentTransformMatrix());

        this.addDrawable(drawable);

    },

    //根重载,绘制当前Actor下的drawables,绘制不需要固定帧率,永远在第一帧里绘制完毕

    draw: function (glstate, preCamera) {

        if (!this._valid) {//不再绘制

            return preCamera;

        }

        this.drawCamera(preCamera);

        //循环遍历一遍drawables,绘制实体

        let preDrawable = undefined;

        let l = this._drawables.length;

        for (let i = this._drawIndex; i < l; i++) {

            let drawable = this._drawables[i];

            if (drawable.valid()) {

                drawable.draw(glstate, preDrawable);//成功绘制的

                preDrawable = drawable;

            }

            this._drawIndex++;

        }

        return this._baseCamera;

    },

    //每个新帧绘制之前的重置工作

    drawReset: function () {

        this._baseCamera.setClearFlag(false);

        this._drawIndex = 0;

    },

    //当前Actor的对象是否全部绘制完毕

    drawFinished: function () {

        return this._drawables.length === this._drawIndex;

    },

    //绘制相机状态(视口,清空)

    drawCamera: function (preCamera) {

        if (preCamera === this._baseCamera) {//重复的不再处理

            return;

        }

        //视口何时都需要设置

        let glstate = this._renderer.getGLState();

        glstate.applyAttribute(this._baseCamera.getViewport());

        //以下是每个相机只需要处理一次的事情

        if (!this._baseCamera.getClearFlag()) {

            //更新视锥体,确保剔除正确,每帧相机的投影矩阵和视图矩阵可能都会变化

            this._baseCamera.updateCullFrustum();

            //清空颜色和深度,但如果是主相机不再需要,在最开始就已经清空

            let clearmask = this._baseCamera.getClearMask();

            if (clearmask !== 0x0) {

                let gl = glstate.getWebGLContext();

                if (clearmask & gl.COLOR_BUFFER_BIT) {

                    let color = this._baseCamera.getClearColor();//清空颜色

                    gl.clearColor(color[0], color[1], color[2], color[3]);

                }

                if (clearmask & gl.DEPTH_BUFFER_BIT) {

                    let depth = this._baseCamera.getClearDepth();//清空深度

                    gl.depthMask(true);

                    gl.clearDepth(depth);

                }

                gl.clear(clearmask);

            }

            this._baseCamera.setClearFlag(true);

        }

    },

    //根重载,线段求交,返回相交的drawable对象

    linesegmentIntersect: function (start, end, threshold) {

        let LineSegmentIntersector = require('../util/LineSegmentIntersector');

        let intersector = new LineSegmentIntersector();

        intersector.initialize(start, end, threshold);

        let length = this._drawables.length;

        for (let i = 0; i < length; i++) {

            let drawable = this._drawables[i];

            if (drawable.valid()) {//没有隐藏,没有被剔除的drawable进行相交运算

                intersector.intersect(drawable);

            }

        }

        //线段求交结果需要根据ratio排序

        return intersector.getIntersections();

    },

});

DrawActor.prototype[SceneRoot.typeID] = function (root) {

    this._baseState.removeChildren();

    this._baseState.setStateSet(root.getStateSet());

    this._currentStateBin = this._baseState;

    this.pushTransformMatrix(root.getRootTransform());//变换矩阵中先推入一个单位矩阵作为根节点,非常重要

    this.traverse(root);

    this.popTransformMatrix();

    this._currentStateBin = undefined;

};

DrawActor.prototype[MatrixTrasform.typeID] = function (node) {

    //模型矩阵变换

    let lastModelMatrix = this.getCurrentTransformMatrix();

    let mmatrix = undefined;

    if (lastModelMatrix) {

        mmatrix = Mat4.clone(lastModelMatrix);

    } else {

        mmatrix = Mat4.new();

    }

    node.computeLocalToWorldMatrix(mmatrix);

    this.pushTransformMatrix(mmatrix);

    //状态

    let stateset = node.getStateSet();

    this.pushStateSet(stateset);

    this.traverse(node);

    this.popStateSet(stateset);

    this.popTransformMatrix();

};

DrawActor.prototype[Geode.typeID] = function (geode) {

    this[Group.typeID](geode);

};

DrawActor.prototype[Group.typeID] = function (group) {

    let stateset = group.getStateSet();

    this.pushStateSet(stateset);

    this.traverse(group);

    this.popStateSet(stateset);

};

DrawActor.prototype[Geometry.typeID] = function (geometry) {//Geometry已经是叶子,不需要继续递归了

    let stateset = geometry.getStateSet();

    this.pushStateSet(stateset);

    this.pushDrawable(geometry);

    this.popStateSet(stateset);

};

module.exports = DrawActor;

// reset: function () {

//     this._drawables.length = 0;//置空

//     this._sceneRoot = undefined;

// },

// polytopeIntersect: function () {

//

// },

// sphereIntersect: function () {

//

// },
我们可以看到,DrawActor是将要被绘制的对象,分成全自动(初始化模型数据就构造Drawable,准备渲染)、半自动(事件触发后构造Drawable,等待渲染)、全手动(用户自己构造Drawable,用户自己将Drawable排入渲染队列)。我们看到,DrawActor的构造函数包含的私有属性有this._renderer渲染器、this._baseCamera待渲染模块所属相机、this._baseState状态(对应shader里的uniform参数)、this._sceneRoot所属场景根节点、this._drawables包含的渲染对象、this._drawIndex当前绘制的索引数(代表本次绘制是第几次绘制,如果一此不能全部绘制完,就分多次绘制,例如模型增长)、this._currentStateBin当前处理的状态树节点、this._valid屏蔽渲染的标记(true:加入渲染队列,false:不加入渲染队列)。
我们再来看看DrawActor的成员函数都做了什么,我们依次来看。
1.setBaseCamera设置参考相机,这就是设置当前绘制对象的观察相机。2.getBaseCamera获取参考相机。3.getbaseStateBin获取状态信息,包括当前渲染对象绑定的shader,uniform参数以及frameBuffer材质。4.getBaseStateSet同样是获取当前渲染对象的状态信息,shader,uniform,材质信息,depth深度缓冲等。5.revertBaseState恢复场景根节点状态,包括shader,uniform参数,材质信息,depth深度缓存。6.setSceneRoot设置场景根节点。7.createDrawable创建渲染对象。8.addDrawable追加渲染对象进入绘制对象数组。9.getDrawable返回渲染对象数组。10.valid标记当前渲染对象是否被屏蔽。11.apply取出每个渲染节点。12.pushStateSet向stateBin中加入stateSet,这里说明一点,stateSet是stateBin的属性。13.popStateSet从stateBin中取出stateSet属性参数。14.pushDrawable创建渲染对象drawable然后加入drawActor的drawable渲染对象数组。15.draw这才是drawActor的核心功能函数,同学们,鲫鱼为大家隆重介绍绘制函数,或者叫渲染函数,这就是将所有的drawable渲染对象进行遍历渲染的功能函数。16.drawReset每一帧绘制之前的整理重置。17.drawFinished判断当前drawActor绘制对象是否全部将drawable数组中的渲染对象绘制完毕。18.drawCamera绘制相机状态(视口,深度缓冲),如果没有渲染对象私有独立的相机,就操作主相机。19.linesegmentIntersection射线碰撞,重载父类方法。
依次看一下上面的函数,我们大致了解了DrawActor类处理的是渲染流程管理的工作。我们接下来继续看Drawable类的其他属性。我们再贴出一次drawable的构造函数。
let Drawable = function (actor) {

    this._drawActor = actor;//关联的DrawActor

    this._geometry = undefined;//渲染的几何Geometry

    this._transform = undefined;//世界变换 FloatArray(16)

    this._statebin = undefined;//状态结点,原始的状态,没有额外功能时的状态

    this._curStatebin = undefined;//如果状态会动态变化,这里存储每一帧绘制时的状态结点

    this._depth = 0.0;//场景深度值,透明需要按深度排序绘制

    this._boundingBox = undefined;//包围盒

    this._boundingSphere = undefined;//包围球

};
我们已经看过了this._drawActor,也知道了drawActor是管理渲染的类。接下来我们看this._geometry渲染的几何体成员对象。this._transform空间变换矩阵。this._statebin状态节点,用来添加stateSet状态参数对象。this._currStatebin,保存每一帧的临时状态stateSet。this._depth场景深度值,作用于主相机或渲染对象私有相机(如果有私有相机的话)。this._boundingBox包围盒。this._boundingSphere包围球。这些就是Drawable类的成员。我们马上来看一下Drawable的成员函数。
Drawable成员函数。贴出代码。
setGeometry: function (g, transform) {

        this._geometry = g;

        this._transform = transform;

    },

    getGeometry: function () {

        return this._geometry;

    },

    getTransform: function () {

        return this._transform;

    },

    setStateBin: function (sb) {

        this._statebin = sb;

    },

    getStateBin: function () {

        return this._statebin;

    },

    getCurrentStateBin: function () {

        return this._curStatebin;

    },

    // setDepth: function (d) {

    //     this._depth = d;

    // },

    getDepth: function () {

        return this._depth;

    },

    reset: function () {

        this._geometry = undefined;

        this._transform = undefined;

        this._statebin = undefined;

        this._curStatebin = undefined;

        this._depth = 0.0;

        this._boundingBox = undefined;

        this._boundingSphere = undefined;

    },

    valid: function () {

        if (this._drawActor.getBaseCamera().isBoundingBoxCulled(this.getBoundingBox())) {

            return false;

        }

        return true;

    },

    isTransparent: function () {

        return false;

    },

    //计算深度值

    computeDepth: function () {

        //根据包围盒和相机变换矩阵,确认中心点的Z值

        let mvmatrix = this._drawActor.getBaseCamera().getModelViewMatrix();

        let temp = Vec3.MemoryPool.alloc();

        this._depth = this.distanceZ(this.getBoundingBox().getCenter(temp), mvmatrix);

        Vec3.MemoryPool.free(temp);

        //drawable.setDepth(depth);

    },

    //相机的矩阵要取反

    distanceZ: function (coord, matrix) {

        return -(coord[0] * matrix[2] + coord[1] * matrix[6] + coord[2] * matrix[10] + matrix[14]);

    },

    getBoundingBox: function () {

        if(this._boundingBox === undefined){

            this._boundingBox = new BoundingBox();

            this._boundingBox.copy(this._geometry.getBoundingBox(true));

            if(this._transform){

                this._boundingBox.transformMat4(this._transform);

            }

        }

        return this._boundingBox;

    },

    getBoundingSphere: function () {

        if(this._boundingSphere === undefined) {

            this._boundingSphere = new BoundingSphere();

            let bb = this.getBoundingBox();

            this._boundingSphere.expandByBoundingBox(bb);

        }

        return this._boundingSphere;

    },

    getRadius: function () {

        return this.getBoundingSphere().getRadius();

    },
都是设置和获取属性的函数,包括包围盒和包围球。接下来我们来看看最核心的部分,隆重介绍draw绘制函数,请看代码。
// There are 3 cases when there is a prev / current render leaf

    // pSG: previousStateGraph

    // cSG: currentStateGraph

    // pRL: previousRenderLeaf

    // cRL: currentRenderLeaf

    //

    //          A                        B                       C

    // +-----+     +-----+            +-----+                 +-----+

    // | pSG |     | cSG |         +--+ SG  +--+              | SG  |

    // +--+--+     +--+--+         |  +-----+  |              +--+--+

    //    |           |            |           |                 |

    // +--v--+     +--v--+      +--v--+     +--v--+           +--v--+

    // | pSG |     | cSG |      | pSG |     | cSG |        +--+ SG  +--+

    // +--+--+     +--+--+      +--+--+     +--+--+        |  +-----+  |

    //    |           |            |           |           |           |

    // +--v--+     +--v--+      +--v--+     +--v--+     +--v--+     +--v--+

    // | pRL |     | cRL |      | pRL |     | cRL |     | pRL |     | cRL |

    // +-----+     +-----+      +-----+     +-----+     +-----+     +-----+

    //

    //

    // Case A

    // no common parent StateGraphNode we need to

    // popStateSet until we find the common parent and then

    // pushStateSet from the common parent to the current RenderLeaf

    //

    // Case B

    // common parent StateGraphNode so we apply the current stateSet

    //

    // Case C

    // the StateGraphNode is common to the previous RenderLeaf so we dont need

    // to do anything except if we used an insertStateSet

    draw: function (glstate, preDrawable) {

        //先接受状态,再渲染几何

        let curStateGraph = this._statebin;

        let curStateGraphStateSet = curStateGraph.getStateSet();

        let curStateGraphParent = curStateGraph.getParent();

        let preStateGraph;

        let preStateGraphParent;

        if(preDrawable !== undefined){

            preStateGraph = preDrawable._statebin;

            preStateGraphParent = preStateGraph.getParent();

            if(preStateGraphParent !== curStateGraphParent){//A

                StateBin.moveStateBin(glstate, preStateGraphParent, curStateGraphParent);

                glstate.applyStateSet(curStateGraphStateSet);

            }else if(preStateGraph !== curStateGraph){//B

                glstate.applyStateSet(curStateGraphStateSet);

            }else{

                // in osg we call apply but actually we dont need

                // except if the stateSetStack changed.

                // for example if insert/remove StateSet has been used

                // if (glstate._stateSetStackChanged(idLastDraw, lastStateSetStackSize )) {

                //     glstate.applyStateSet(curStateGraphStateSet);

                // }

            }

        }

        else{//如果preLeaf为空,第一个绘制的几何,状态遍历到根节点全部push到GLState中

            StateBin.moveStateBin(glstate, undefined, curStateGraphParent);

            glstate.applyStateSet(curStateGraphStateSet);

        }

        let camera = this._drawActor.getBaseCamera();

        glstate.applyModelMatrix(this._transform, camera.getModelViewMatrix(), camera.getProjectionMatrix());

        this._geometry.draw(glstate);

        return true;

    },
我将注释也贴了出来,我们可以看到,渲染绘制是分三种情况的,首先我们要了解一下StateGraph渲染属性这个来源于osg的概念。stateGraph是渲染的状态属性,包括本次渲染绑定的shader,uniform参数,frameBuffer材质属性,depth深度属性。好了,大致了解了StateGraph后我们再来了解一下RenderLeaf渲染叶这个同样来自osg的概念。RenderLeaf是渲染叶,需要注意的是渲染叶保存的是sceneTree的节点状态,而不是场景树的几何和transform信息。好了,了解了这两个概念我们来看看这三种情况。A.前一帧stateGraph和后一帧stateGraph没有同一个父节点;B.前后两帧stateGraph有同一个父节点;C.前后两帧renderLeaf有共同父节点。针对这三种情况,处理的方式不同,需要注意。鲫鱼也才开始逐步研究osg框架,理解不到位之处请各位方家海涵。
好了,今天讲述的是osg的渲染模块中的一部分DrawActor和Drawable两个模块。下一篇会进一步讲述渲染模块。欢迎大家讨论,祝大家元旦快乐。本文系原创,如需引用,请注明出处:https://www.cnblogs.com/ccentry/p/10199157.html
WebGL——osg框架学习一的更多相关文章
- WebGL——osg框架学习三
今天继续来Draw绘制的osg模块的学习,昨天我们学习的是StateBin渲染状态树节点类,今天我们来继续学习下一个Draw的基础类DrawableEntity渲染对象实体类.这个类和Drawable ...
- WebGL——osg框架学习四
这篇我们接着来看一下DrawEntityActor类,我们来看看这个继承DrawActor的类到底做了什么事.我们之前学习了Drawable对应的DrawActor,那么我们类比的来看Drawable ...
- IdentityServer4 ASP.NET Core的OpenID Connect OAuth 2.0框架学习保护API
IdentityServer4 ASP.NET Core的OpenID Connect OAuth 2.0框架学习之保护API. 使用IdentityServer4 来实现使用客户端凭据保护ASP.N ...
- Hadoop学习笔记—18.Sqoop框架学习
一.Sqoop基础:连接关系型数据库与Hadoop的桥梁 1.1 Sqoop的基本概念 Hadoop正成为企业用于大数据分析的最热门选择,但想将你的数据移植过去并不容易.Apache Sqoop正在加 ...
- Spring框架学习一
Spring框架学习,转自http://blog.csdn.net/lishuangzhe7047/article/details/20740209 Spring框架学习(一) 1.什么是Spring ...
- EF框架学习手记
转载: [ASP.NET MVC]: - EF框架学习手记 1.EF(Entity Framework)实体框架EF是ADO.NET中的一组支持开发面向数据的软件应用程序的技术,是微软的一个ORM框架 ...
- web框架学习列表
转载自鲁塔弗的博客,原文网址:http://lutaf.com/148.htm web framework层出不穷,特别是ruby/python,各有10+个,php/java也是一大堆 根据我自己的 ...
- OSG动画学习
OSG动画学习 转自:http://bbs.osgchina.org/forum.php?mod=viewthread&tid=3899&_dsign=2587a6a9 学习动画,看了 ...
- 2013 最新的 play web framework 版本 1.2.3 框架学习文档整理
Play framework框架学习文档 Play framework框架学习文档 1 一.什么是Playframework 3 二.playframework框架的优点 4 三.Play Frame ...
随机推荐
- Basestation函数解析(一)
---恢复内容开始--- 1._tmain _tmain()是微软操作系统(windows)提供的对unicode字符集和ANSI字符集进行自动转换用的程序入口点函数. 首先,这个_tmain() ...
- 自定义input[type="checkbox"]的样式
对复选框自定义样式,我们以前一直用的脚本来实现,不过现在可以使用新的伪类 :checkbox 来实现. 如果直接对复选框设置样式,那么这个伪类并不实用,因为没有多少样式能够对复选框起作用.不过,倒是可 ...
- Kubernetes-dns 服务搭建
DNS 服务不是独立的系统服务,而是一种 addon ,作为插件来安装的,不是 kubernetes 集群必须的(但是非常推荐安装).可以把它看做运行在集群上的应用,只不过这个应用比较特殊而已. DN ...
- Redis(五)主从复制
本文转载自编程迷思,原文链接 深入学习Redis(3):主从复制 前言 在前面的两篇文章中,分别介绍了Redis的内存模型和Redis的持久化. 在Redis的持久化中曾提到,Redis高可用的方案包 ...
- PAT乙级1027
1027 打印沙漏 (20 分) 本题要求你写个程序把给定的符号打印成沙漏的形状.例如给定17个“*”,要求按下列格式打印 ***** *** * *** ***** 所谓“沙漏形状”,是指每行输 ...
- C++网络爬虫的实现——WinSock编程
写了一个网络爬虫,可以抓取网上的图片. 需要给定初始网站即可. 在vs2010中编译通过. 需要使用多字节字符集进行编译, vs2010默认的是Unicode字符集. 编译后,运行即可,有惊喜哦!!! ...
- python为什么叫胶水语言?python为什么是系统脚本?
python为什么叫胶水语言?python为什么是系统脚本? 特点是什么? python现在最广为闻名的形容大概有这些: 他是很好的胶水语言.什么是胶水语言?反正当时的我不知道. 他是新一代的系统 ...
- SICP 习题 (1.35)解题总结
SICP 习题 1.35要求我们证明黄金切割率φ 是变换函数 x => 1+ 1/x 的不动点,然后利用这一事实通过过程fixed-point 计算出φ的值. 首先是有关函数的不动点,这个概念须 ...
- layedit富文本编辑器获取纯文字内容和全部内容
- 使用JQ实现统计剩余字数
JQ实现统计文本框剩余字数 效果图: 代码如下,复制即可使用: <html lang="en"> <head> <meta charset=" ...