
openfire+asmack搭建的安卓即时通讯(五) 15.4.12
这一篇博客其实是要昨天写的,但昨天做了作修改就停不下来了,这次的修改应该是前期开发的最终回了,其余的功能有空再做了,下周可能要做一些好玩的东西,敬请期待!
1.修改下Logo:(Just We)
 http://romannurik.github.io/AndroidAssetStudio/ 可以用这个网站来做哦,上传个图片就可以哦!
2.添加欢迎页:

我自己画了个Just We的欢迎页
这里是添加欢迎页活动的代码,把程序的启动活动换为Open活动:
 public class Open extends Activity {

     @Override

     public void onCreate(Bundle savedInstanceState) {

         super.onCreate(savedInstanceState);

         final View view = View.inflate(this, R.layout.open, null);

         setContentView(view);

         //渐变展示启动屏

         AlphaAnimation start = new AlphaAnimation(0.3f,1.0f);

         start.setDuration(2000);

         view.startAnimation(start);

         start.setAnimationListener(new Animation.AnimationListener()

         {

             @Override

             public void onAnimationEnd(Animation arg0) {

                 Log.e("linc", "---start!");

                 try{

                     Intent intent = new Intent();

                     intent.setClass(Open.this,MainActivity.class);

                     Open.this.startActivity(intent);

                     Open.this.finish();//记得要关闭,因为我们根本就不会再回到欢迎页

                 }

                 catch(Exception e)

                 {

                     e.printStackTrace();

                 }

             }

             @Override

             public void onAnimationRepeat(Animation animation) {}

             @Override

             public void onAnimationStart(Animation animation) {}

         });

     }

 }
3.对主界面进行了一些修改,说不上好看但也能看吧:
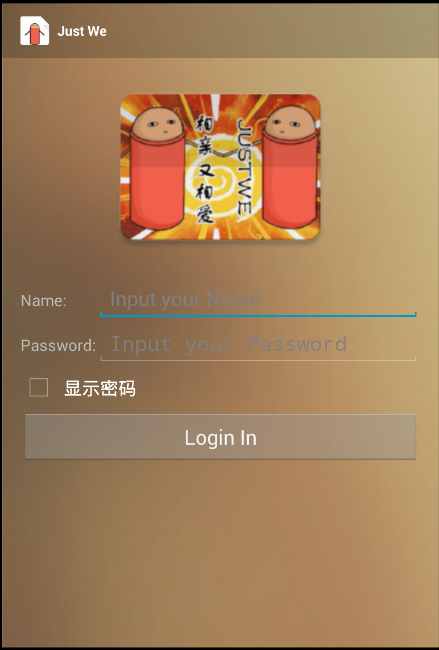
这里是布局文件,添加了图片,设置Actionbar为叠加模式,显示为透明Name和Password设置最大值行数为1,
Password使用了密文,还添加了一个控件可以用来替换是否显示密码更改了Button的大小。
下面是新的布局写法:
 <RelativeLayout xmlns:android="http://schemas.android.com/apk/res/android"

     xmlns:tools="http://schemas.android.com/tools"

     android:layout_width="match_parent"

     android:layout_height="match_parent"

     android:paddingLeft="@dimen/activity_horizontal_margin"

     android:paddingRight="@dimen/activity_horizontal_margin"

     android:paddingTop="?android:attr/actionBarSize"      //这个是计算Actionbar的宽度,以便不是真的叠加了

     android:background="@drawable/background"

     tools:context=".MainActivity">

     <ImageView

         android:id="@+id/image"

         android:src="@drawable/logo"

         android:layout_centerHorizontal="true"

         android:layout_width="wrap_content"

         android:layout_height="wrap_content" />

     <TableLayout

         android:layout_below="@id/image"

         android:id="@+id/tablelayout"

         android:layout_centerHorizontal="true"

         android:layout_width="match_parent"

         android:stretchColumns="1"

         android:layout_height="wrap_content">

         <TableRow>

             <TextView

                 android:layout_height="wrap_content"

                 android:text="Name:"

                 />

             <EditText

                 android:id="@+id/login_name"

                 android:hint="Input your Name "

                 android:maxLines="1"

                 android:layout_height="wrap_content"

                 />

         </TableRow>

         <TableRow>

             <TextView

                 android:layout_width="wrap_content"

                 android:text="Password:"

                 />

             <EditText

                 android:id="@+id/login_password"

                 android:hint="Input your Password "

                 android:maxLines="1"

                 android:password="true"

                 android:layout_height="wrap_content"

                 />

         </TableRow>

     </TableLayout>

     <CheckBox

         android:id="@+id/show"

         android:layout_below="@id/tablelayout"

         android:layout_width="wrap_content"

         android:layout_height="wrap_content"

         android:text="显示密码"/>

     <CheckBox

         android:id="@+id/sain"

         android:layout_below="@id/tablelayout"

         android:layout_width="wrap_content"

         android:layout_height="wrap_content"

         android:text="显示密码"/>

     <Button

         android:layout_below="@id/show"

         android:layout_centerHorizontal="true"

         android:id="@+id/buttonlogin"

         android:layout_width="match_parent"

         android:layout_height="48dp"

         android:text="Login In"/>

 </RelativeLayout>
这个是控制checkbox的代码:注册checkbox,然后设置他的监控器
          CheckBox checkBox=(CheckBox)findViewById(R.id.show);

          checkBox.setOnCheckedChangeListener(new CompoundButton.OnCheckedChangeListener(){

              @Override

              public void onCheckedChanged(CompoundButton buttonView,

                                           boolean isChecked) {

                  // TODO Auto-generated method stub

                  if(isChecked){

                      editText.setTransformationMethod(HideReturnsTransformationMethod.getInstance());//设置为明文

                  }else{

                      editText.setTransformationMethod(PasswordTransformationMethod.getInstance());//设置为密文

                 }

              }

          });
添加了双击返回键退出软件的功能:
 private long exitTime = 0;

     @Override

     public boolean onKeyDown(int keyCode, KeyEvent event) {

         if(keyCode == KeyEvent.KEYCODE_BACK && event.getAction() == KeyEvent.ACTION_DOWN){

             if((System.currentTimeMillis()-exitTime) > 2000){

                 Toast.makeText(getApplicationContext(), "再按一次退出程序", Toast.LENGTH_SHORT).show();

                 exitTime = System.currentTimeMillis();

             } else {

                 finish();

                 System.exit(0);

             }

             return true;

         }

         return super.onKeyDown(keyCode, event);

     }
4.添加朋友活动,作为主活动之后的运行活动:
用一个listview进行装载
 package com.lfk.webim;

 import android.app.Activity;

 import android.content.Intent;

 import android.os.Bundle;

 import android.os.Handler;

 import android.view.View;

 import android.widget.AdapterView;

 import android.widget.ArrayAdapter;

 import android.widget.ListView;

 import android.widget.TextView;

 import android.widget.Toast;

 import com.lfk.webim.appli.user;

 public class friend extends Activity {

     public static ArrayAdapter<String> mArrayAdapter;

     @Override

     protected void onCreate(Bundle savedInstanceState) {

         super.onCreate(savedInstanceState);

         setContentView(R.layout.activity_friend);

         Intent intent = getIntent();

         final String username = intent.getStringExtra("usename");

         TextView textView=(TextView)findViewById(R.id.name);

         textView.setText(username+"的朋友");

         final ListView listView=(ListView)findViewById(R.id.friend_list);

         mArrayAdapter= new ArrayAdapter<String>(this, R.layout.list_item);

         listView.setAdapter(mArrayAdapter);

         ClientConServer.findMan();

         listView.setOnItemClickListener(new AdapterView.OnItemClickListener() {

             @Override

             public void onItemClick(AdapterView<?> arg0, View arg1, int arg2,

                                     long arg3) {

                 String temp= (String) ((TextView)arg1).getText();

                 Intent intent = new Intent();

                 user.FromName=temp+"@172.6.33.68/Smack";//这么些是因为Android的用户名格式就是这样的

                 user.FromName_=temp;    //这里使用了全局变量,所以不需要向下一个活动穿什么参数了

                 intent.setClass(friend.this, useractivity.class);

                 startActivity(intent);

                 Toast.makeText(getApplicationContext(),

                         "Chat with " + temp,

                         Toast.LENGTH_SHORT).show();

                 mArrayAdapter.notifyDataSetChanged();

             }

         });

     }

     public static Handler mhandler=new Handler()

     {

         public void handleMessage(android.os.Message message)

         {

             String temp=(String)message.obj;

             friend.mArrayAdapter.add(temp);

         }

     };

 }
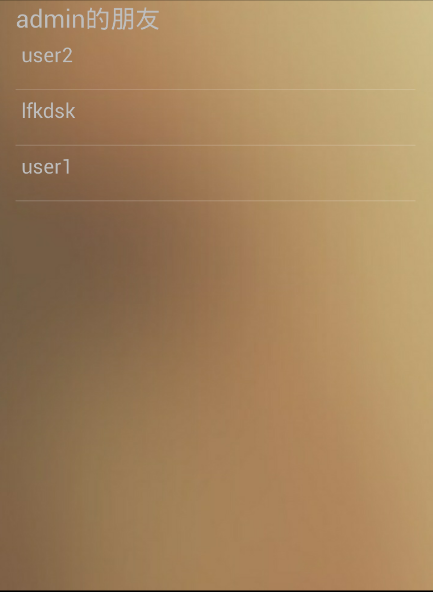
这个活动会生成一个列表,这个列表就是我们之前打印的那个组成员,现在我们就可以选择跟谁说话了,而不用在代码里制订了:
这个是他的布局:
 <RelativeLayout xmlns:android="http://schemas.android.com/apk/res/android"

     xmlns:tools="http://schemas.android.com/tools"

     android:layout_width="match_parent"

     android:layout_height="match_parent"

     android:paddingLeft="@dimen/activity_horizontal_margin"

     android:paddingRight="@dimen/activity_horizontal_margin"

     android:paddingTop="?android:attr/actionBarSize"

     android:background="@drawable/background"

     >

     <TextView

         android:id="@+id/name"

         android:text="@string/friend"

         android:textSize="22dp"

         android:layout_width="wrap_content"

         android:layout_height="wrap_content" />

     <ListView

         android:layout_below="@id/name"

         android:id="@+id/friend_list"

         android:layout_width="match_parent"

         android:layout_height="match_parent">

     </ListView>

 </RelativeLayout>
<?xml version="1.0" encoding="utf-8"?>

<TextView xmlns:android="http://schemas.android.com/apk/res/android"

    android:layout_width="match_parent"

    android:layout_height="48dp"

    android:textSize="18sp"

    android:padding="5dp"

    android:id="@+id/friend_name"

    />
很简单吧!
5.修改过的聊天详情页:
 public class useractivity extends Activity {

     private ListView listView;

     public static ArrayAdapter<String> mConversationArrayAdapter;

     private TextView text_out;

     @Override

     protected void onCreate(Bundle savedInstanceState) {

         super.onCreate(savedInstanceState);

         setContentView(R.layout.useractivity);

         listView = (ListView) findViewById(R.id.in);

         TextView textView = (TextView) findViewById(R.id.username);

         textView.setText("Talk with "+user.FromName_);

         mConversationArrayAdapter = new ArrayAdapter<String>(this, R.layout.message);

         listView.setAdapter(mConversationArrayAdapter);

         //connect.closeConnection();

         Button button=(Button)findViewById(R.id.button_send);

         button.setOnClickListener(new View.OnClickListener() {

             @Override

             public void onClick(View v) {

                 EditText input=(EditText) findViewById(R.id.edit_text_out);

                 final String content=input.getText().toString();

                 String string= "ME"+":"+content;

                 android.os.Message mm=new android.os.Message();

                 mm.obj=string;

                 mhandle.handleMessage(mm);

                 try {

                     XMPPConnection connection = connect.getConnection();

                     ChatManager cm = connection.getChatManager();

                     Chat chat=cm.createChat(user.FromName, new MessageListener() {

                         @Override

                         public void processMessage(Chat chat, Message msg) {

                             msg.setBody(content);

                             Log.i("---", msg.getFrom() + "说:" + msg.getBody());

                             //添加消息到聊天窗口  ,

                         }

                     });

                     Message m = new Message();

                     m.setBody(content);

                     chat.sendMessage(m.getBody());

                     input.setText("");

                 } catch (XMPPException e) {

                     e.printStackTrace();

                 }

             }

             Handler mhandle= new Handler()

             {

                 public void handleMessage(android.os.Message m) {

                     text_out=(TextView)findViewById(R.id.text_out);

                     String respond=(String)m.obj;

                     Log.i("---",respond);

                     mConversationArrayAdapter.add(respond);

                 }

             };

         });

     }

 }
 <?xml version="1.0" encoding="utf-8"?>

 <LinearLayout xmlns:android="http://schemas.android.com/apk/res/android"

     android:orientation="vertical"

     android:layout_width="match_parent"

     android:layout_height="match_parent"

     android:paddingTop="?android:attr/actionBarSize"

     android:background="@drawable/background"

     >

     <TextView

         android:id="@+id/username"

         android:layout_width="wrap_content"

         android:layout_height="wrap_content"

         android:text="@string/app_name"

         android:textSize="18dp"

         android:textColor="@color/unfocused"

         />

     <ListView

         android:id="@+id/in"

         android:layout_width="match_parent"

         android:layout_height="wrap_content"

         android:stackFromBottom="true"

         android:layout_weight="1"

         android:transcriptMode="alwaysScroll"

         />

     <LinearLayout

         android:orientation="horizontal"

         android:layout_width="match_parent"

         android:layout_height="wrap_content"

         >

         <EditText android:id="@+id/edit_text_out"

             android:layout_width="0dp"

             android:layout_height="wrap_content"

             android:layout_weight="1"

             android:layout_gravity="bottom"

             android:hint="说点什么呢?"

             android:maxLines="3"

             />

         <Button

             android:id="@+id/button_send"

             android:layout_width="wrap_content"

             android:layout_height="wrap_content"

             android:scaleType="centerCrop"

             android:text="sent"

             android:layout_gravity="bottom"

             android:background="#00000000"

             />

     </LinearLayout>

 </LinearLayout>
 这就是效果图
6.修改了接收的:
  private static Handler handler = new Handler(){

         public void handleMessage(android.os.Message m) {

             Message msg=new Message();

             msg=(Message) m.obj;

             //把从服务器获得的消息通过广播发送

            //Intent intent = new Intent("192.168.252.1");

             String[] message=new String[]{ msg.getFrom(), msg.getBody()};

             System.out.println("==========收到消息  From==========="+message[0].toString());

             System.out.println("==========收到消息  Body===========" + message[1].toString());

             String s=msg.getFrom();

             String s1=s.split("@")[0];

             if(user.UserName.equals(message[0].toString()))

                 System.out.println("自己的消息就不打印了");

             else

             {

                 useractivity.mConversationArrayAdapter.add(s1 + "说:" + msg.getBody());

             }

            // intent.putExtra("message", message);

             //context.sendBroadcast(intent);//发送广播

         }

     };
findMan函数进行了修改以搭配friend页的使用:
 public static void findMan(){

             //获取用户组、成员信息。

             System.out.println("--------find start----------");

             Roster roster = connect.con.getRoster();

             Collection<RosterGroup> entriesGroup = roster.getGroups();

             System.out.println("team:"+entriesGroup.size());

             for(RosterGroup group: entriesGroup){

                 Collection<RosterEntry> entries = group.getEntries();

                 int temp=group.getEntryCount();

                 System.out.println("--------groupnumber--------" + "\n" + temp);

                 System.out.println("--------groupName--------" + "\n" + group.getName());

                 for (RosterEntry entry : entries) {

                     System.out.println("name:"+entry.getName());

                     String string2=entry.getName();

                     android.os.Message message_list = new android.os.Message();

                     message_list.obj=string2;

                     friend.mhandler.sendMessage(message_list);

                 }

             }

             System.out.println("--------find end--------");

             //在登陆以后应该建立一个监听消息的监听器,用来监听收到的消息:

             ChatManager chatManager = connect.con.getChatManager();

             chatManager.addChatListener(new MyChatManagerListener());

     }
7.全局变量增加的东西:(一个用来制定用户名,一个用来显示)
 public class user extends Application {

     /**

      * 当前登录的用户名

      */

     public static String UserName = "";

     public static String UserName_ = "";

     /**

      * 当前与你聊天的用户名

      */

     public static String FromName = "";

     public static String FromName_ = "";

 }
修改完两个人的对话就能写在listview里面了


openfire+asmack搭建的安卓即时通讯(五) 15.4.12的更多相关文章
- openfire+asmack搭建的安卓即时通讯(一) 15.4.7
最进开始做一些android的项目,除了一个新闻客户端的搭建,还需要一个实现一个即时通讯的功能,参考了很多大神成型的实例,了解到operfire+asmack是搭建简易即时通讯比较方便,所以就写了这篇 ...
- openfire+asmack搭建的安卓即时通讯(三) 15.4.9
(能用得上话的话求点赞=-=,我表达不好的话跟我说哦) 上一次我们拿到了服务器端的组数据和用户信息,这就可以为我们日后使用好友系统打下基础了! 但是光是拿到了这些东西我们怎么能够满足呢?我们一个即时通 ...
- openfire+asmack搭建的安卓即时通讯(七) 15.5.27
本地化之章! 往期传送门: 1.http://www.cnblogs.com/lfk-dsk/p/4398943.html 2.http://www.cnblogs.com/lfk-dsk/p/441 ...
- openfire+asmack搭建的安卓即时通讯(四) 15.4.10
之前的教程不知道你们成功了没,,,没成功可以问我啊=-= 第四篇博文是要实现发送消息的功能. 首先在我们登陆后的活动的layout里添加这样的两个控件,一个EditText和一个Button用于发送数 ...
- openfire+asmack搭建的安卓即时通讯(六) 15.4.16
啊啊啊啊啊啊啊啊,这东西越做越觉得是个深坑啊! 1.SharedPreferences.Editor的密码保存和自动登录: 首先还是从主界面开始,因为要提升一下用户体验自然要加入保存密码和自动登录的功 ...
- openfire+asmack搭建的安卓即时通讯(二) 15.4.9
上期没有放成果图呢!忘了=-=,这就是上次的成果图,textview里面会显示登陆的名字(这个是默认管理员帐号=-=) 好吧,登陆了服务器我们就有了交互的功能啦可以说是前进了一大步呢!下面能我们就要试 ...
- Openfire XMPP Smack RTC IM 即时通讯 聊天 MD
Markdown版本笔记 我的GitHub首页 我的博客 我的微信 我的邮箱 MyAndroidBlogs baiqiantao baiqiantao bqt20094 baiqiantao@sina ...
- XMPP(三)-安卓即时通讯客户端
由于时间原因,所以更新比较慢 ,还请大家谅解,此次是对上篇文章中的安卓客户端初级版本进行的一次更新优化,在这次更新后,就有那么一点样子了,可以拿的出手了,呵呵,还在关注的同学也可以及时下载更新.此次主 ...
- 急急如律令!火速搭建一个C#即时通信系统!(附源码分享——高度可移植!)
(2016年3月更:由于后来了解到GGTalk开源即时通讯系统,因此直接采用了该资源用于项目开发,在此对作者表示由衷的感谢!) —————————————————————————————————— 人 ...
随机推荐
- uml中的几种关系
这是一堂关于UML基础知识的补习课:现在我们做项目时间都太紧了,基本上都没有做过真正的class级别的详细设计,更别提使用UML来实现规范建模了:本篇主要就以前自己一直感觉很迷糊的几种class之间的 ...
- 修改memcached服务的端口号
windows下修改memcached服务的端口号(默认端口:11211) 如果不是作为服务启动memcached的话,memcached -p 端口号就可以了. 通过修改注册表可以简单实现 运行:r ...
- 小白学Linux(三)--文件系统基本结构
Linux文件系统是一个倒立的单根树状结构,文件名称严格区分大小写(windows系统则是对大小写不明感的).路径用“/”分隔,跟windows的“\”不同. 这里我画了一张一般Linux系统的正常目 ...
- 百度FIS入门
1.fis作为nodejs的模块来管理的,所以首先得安装nodejs,看我前面的安装nodejs的文章. 2.官方的案例下载包https://github.com/hefangshi/fis-quic ...
- 从零开始学习Linux (cd命令)
上一篇博客中提到,我们学习命令大多都要参考 --help 这个选项.但是cd命令并没有这个选项. 我们可以通过 help cd 来查看cd的使用方式.其实cd命令挺简单的,它的作用是进入文件夹,也就是 ...
- canvas圆形进度条
通过定义一个canvas标签, new方法传进ID值,和旋转角度值,即可生成圆形进度条 <!DOCTYPE html> <html lang="en"> & ...
- 解决maven项目update project会更改jdk版本问题
一.问题描述 在Eclipse中新建了一个Maven工程, 然后更改JDK版本为1.6, 结果每次使用Maven > Update project的时候JDK版本都恢复成 ...
- 自定义SharePoint 2013 元数据选择控件
元数据在Sharepoint中是一个很常用的功能,他提供一个方法来管理企业中常用的关键词,可以更加统一的使用和更新.默认情况下,绑定在列表或库中的元数据字段可以设置是否允许为多个值.但是无法控制在弹出 ...
- Android-将RGB彩色图转换为灰度图
package com.example.yanlei.wifi; import android.graphics.Bitmap; import android.graphics.BitmapFacto ...
- 解决SharePoint文档库文件在搜索结果页面显示的标题和文档的标题不一致问题(search result)
问题表现: SharePoint 2013 爬网后,搜索一个文档,虽然搜到了,但是显示有点问题,如图: 原因分析: 造成该问题的原因是,该文档除了本身有一个名称外,在文档metadata的title属 ...