
HTML5手机APP开发入(5)
HTML5手机APP开发入(5)
回顾一下
HTML5手机APP开发入(4)
如何自定义Component,directive
HTML5手机APP开发入(3) 如何实现MVC的代码重构,自定义一个Provider Service,Injectable 依赖注入
HTML5手机APP开发入门(2)
利用ionic2 向导生成一个项目并开发一个简单的通讯录的APP
HTML5手机APP开发入门(1) ionic2+angular2 开发环境的配置
内容
完成一个登录验证的功能
这里我要向大家介绍一个第三方提供登录验证的云解决方案的,非常专业。并且支持Angular 2
Auth0是一家"身份验证即服务"提供商,旨在为开发人员提供简单易用的身份管理服务。为了保持灵活性和可扩展性,Auth0身份管理平台允许开发人员在身份验证和授权管道中增加自定义代码。而在一个多租户环境中,为了保证不同用户的自定义代码可以互不影响,就需要一种技术提供必要的数据隔离和资源利用保障。

步骤
注册一个auth0账号
新建一个application,这里需要做一些简单的配置

Allowed Callback URLs 设定你测试的客户端域名的url
配置auth0 客户端
Auth0提供了不同环境的Quick Start,我这边的环境就是ionic 2 + Angular 2

基本上一步一步照着做不会有问题。
1. Add the Auth0 Scripts and Install angular2-jwt
Install angular2-jwt with npm.

Add Lock in your index.html file and set the viewport.

添加javascript引用
2.修改app.ts
这里需要把用到类库angular2-jwt引用到项目中。同时还需要把Http也要加进来

注意:
providers:[DataService,

provide(AuthHttp, {

useFactory: (http) => {

return new AuthHttp(new AuthConfig({noJwtError: true}), http);

},

deps: [Http]

}),

AuthService],
3.新建一个authService用来实现登录验证
添加这些基础代码Quick Start都有提供照抄就可以了

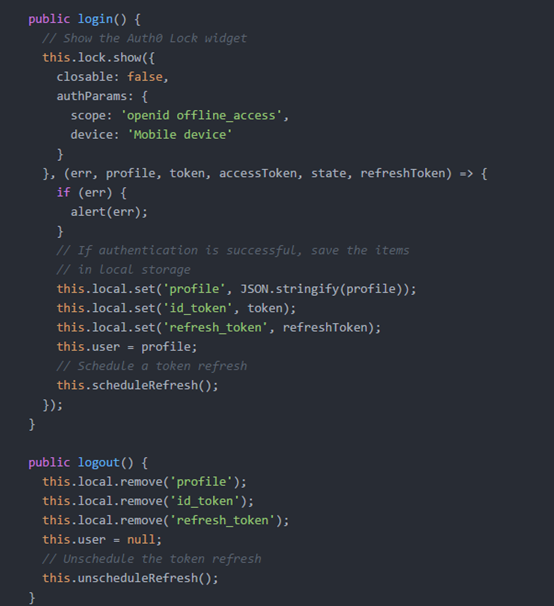
Auth0提供很多自定开发功能,等有时间了慢慢研究,这里我们先简单的实现吧登录成功后把用户信息保存到本地,这样下次就可以不用在登录了
 import {Storage, LocalStorage} from  'ionic-angular';

 import {HTTP_PROVIDERS, Http} from 'angular2/http';

 import {Type} from 'angular2/core';

 import {AuthHttp, JwtHelper, tokenNotExpired,AuthConfig} from 'angular2-jwt';

 import {Injectable} from 'angular2/core';

 import {Observable} from 'rxjs/Rx';

 // Avoid name not found warnings

 declare var Auth0Lock;

 @Injectable()

 export class AuthService {

   jwtHelper: JwtHelper = new JwtHelper();

   lock  = new Auth0Lock('05VEtQMpSej5rgSgKor4XsaMaCJm8hLa', 'app1001.auth0.com');

   local: Storage = new Storage(LocalStorage);

   refreshSubscription: any;

   user: Object;

   constructor(private authHttp: AuthHttp) {

     // If there is a profile saved in local storage

    this.local.get('profile').then((profile)=>{

       if (profile) {

         this.user = JSON.parse(profile);

       }

     });

     //let profile = this.local.get('profile').map();

     // if (profile) {

     //   this.user = JSON.parse(profile);

     // }

   }

   public authenticated() {

     // Check if there's an unexpired JWT

     return tokenNotExpired();

   }

   public login() {

     // Show the Auth0 Lock widget

     this.lock.show({

       closable: false,

       authParams: {

         scope: 'openid offline_access',

         device: 'Mobile device'

       }

     }, (err, profile, token, accessToken, state, refreshToken) => {

       if (err) {

         alert(err);

       }

       // If authentication is successful, save the items

       // in local storage

       this.local.set('profile', JSON.stringify(profile));

       this.local.set('id_token', token);

       this.local.set('refresh_token', refreshToken);

       this.user = profile;

       // Schedule a token refresh

       this.scheduleRefresh();

     });

   }

   public logout() {

     this.local.remove('profile');

     this.local.remove('id_token');

     this.local.remove('refresh_token');

     this.user = null;

     // Unschedule the token refresh

     this.unscheduleRefresh();

   }

   public scheduleRefresh() {

     this.authHttp.tokenStream

         // .flatMap(token=>{

         //       let jwtIat = this.jwtHelper.decodeToken(token).iat;

         //       let jwtExp = this.jwtHelper.decodeToken(token).exp;

         //       let iat = new Date(0);

         //       let exp = new Date(0);

         //

         //       let delay = (exp.setUTCSeconds(jwtExp) - iat.setUTCSeconds(jwtIat));

         //       return Observable.interval(delay);

         // })

         .subscribe(

           data => {

           console.log(data)

            this.getNewJwt();

         },

       err => console.log(err),

       () => console.log('Complete')

       );

     // If the user is authenticated, use the token stream

     // provided by angular2-jwt and flatMap the token

     // let source = this.authHttp.tokenStream.flatMap(

     //   token => {

     //     // The delay to generate in this case is the difference

     //     // between the expiry time and the issued at time

     //     let jwtIat = this.jwtHelper.decodeToken(token).iat;

     //     let jwtExp = this.jwtHelper.decodeToken(token).exp;

     //     let iat = new Date(0);

     //     let exp = new Date(0);

     //

     //     let delay = (exp.setUTCSeconds(jwtExp) - iat.setUTCSeconds(jwtIat));

     //

     //     return Observable.interval(delay);

     //   });

     //

     // this.refreshSubscription = source.subscribe(() => {

     //   this.getNewJwt();

     // });

   }

   public startupTokenRefresh() {

     // If the user is authenticated, use the token stream

     // provided by angular2-jwt and flatMap the token

     // if (this.authenticated()) {

     //   let source = this.authHttp.tokenStream.flatMap(

     //     token => {

     //       // Get the expiry time to generate

     //       // a delay in milliseconds

     //       let now: number = new Date().valueOf();

     //       let jwtExp: number = this.jwtHelper.decodeToken(token).exp;

     //       let exp: Date = new Date(0);

     //       exp.setUTCSeconds(jwtExp);

     //       let delay: number = exp.valueOf() - now;

     //

     //       // Use the delay in a timer to

     //       // run the refresh at the proper time

     //       return Observable.timer(delay);

     //     });

     //

     //    // Once the delay time from above is

     //    // reached, get a new JWT and schedule

     //    // additional refreshes

     //    source.subscribe(() => {

     //      this.getNewJwt();

     //      this.scheduleRefresh();

     //    });

     // }

   }

   public unscheduleRefresh() {

     // Unsubscribe fromt the refresh

     if (this.refreshSubscription) {

       this.refreshSubscription.unsubscribe();

     }

   }

   public getNewJwt() {

     this.local.get('refresh_token').then(token=>{

       this.lock.getClient().refreshToken(token,(err, delegationRequest) => {

         if (err) {

           alert(err);

         }

         console.log(delegationRequest);

         this.local.set('id_token', delegationRequest.id_token);

       });

     });

     // Get a new JWT from Auth0 using the refresh token saved

     // in local storage

     // let refreshToken = this.local.get('refresh_token')._result;

     // this.lock.getClient().refreshToken(refreshToken, (err, delegationRequest) => {

     //   if (err) {

     //     alert(err);

     //   }

     //   this.local.set('id_token', delegationRequest.id_token);

     // });

   }

 }
4.修改app.ts 实现登录后才能访问
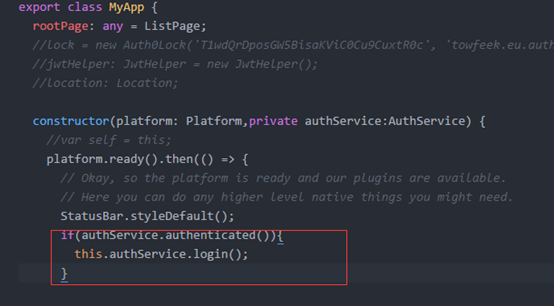
如果没有登录就显示登录页面,而这登录页面auth0 都有模板不需要另外开发
 import {App, Platform,Storage, SqlStorage} from 'ionic-angular';

 import {StatusBar} from 'ionic-native';

 import {ListPage} from './pages/home/list';

 import {DataService} from './pages/services/dataService';

 import {tokenNotExpired, JwtHelper,AuthHttp, AuthConfig} from 'angular2-jwt';

 import {provide} from 'angular2/core';

 import {HTTP_PROVIDERS, Http} from 'angular2/http';

 import {Type} from 'angular2/core';

 import {AuthService} from './pages/services/auth';

 declare var Auth0Lock;

 @App({

   template: '<ion-nav [root]="rootPage"></ion-nav>',

   providers:[DataService,

           provide(AuthHttp, {

                 useFactory: (http) => {

                       return new AuthHttp(new AuthConfig({noJwtError: true}), http);

                   },

                 deps: [Http]

                 }),

               AuthService],

   config: {} // http://ionicframework.com/docs/v2/api/config/Config/

 })

 export class MyApp {

   rootPage: any = ListPage;

   //lock = new Auth0Lock('T1wdQrDposGW5BisaKViC0Cu9CuxtR0c', 'towfeek.eu.auth0.com');

   //jwtHelper: JwtHelper = new JwtHelper();

   //location: Location;

   constructor(platform: Platform,private authService:AuthService) {

     //var self = this;

     platform.ready().then(() => {

       // Okay, so the platform is ready and our plugins are available.

       // Here you can do any higher level native things you might need.

       StatusBar.styleDefault();

       if(authService.authenticated()){

         this.authService.login();

       }

       // this.lock.show((err: string, profile: string, id_token: string) => {

       //   if (err) {

       //     throw new Error(err);

       //   }

       //

       //   localStorage.setItem('profile', JSON.stringify(profile));

       //   localStorage.setItem('id_token', id_token);

       //

       //   console.log(

       //     this.jwtHelper.decodeToken(id_token),

       //     this.jwtHelper.getTokenExpirationDate(id_token),

       //     this.jwtHelper.isTokenExpired(id_token)

       //   );

       //});

     });

   }

 }
5.RUN Test

当你运行app的时候系统就第一时间弹出登录页面,同时还有注册功能。是不是省了不少工作量
下次准备内容
打算在通讯录里调用一些手机的功能如何利用cordova-plugin-camera 调用拍照功能,利用cordova-plugin-geolocation实现定位.
HTML5手机APP开发入(5)的更多相关文章
- HTML5手机APP开发入(4)
HTML5手机APP开发入(4) 课程内容 完成一个自定义的Component用来展现通讯录用户的明细信息如下图 http://bootsnipp.com/snippets/featured/prof ...
- HTML5手机APP开发入(3)
HTML5手机APP开发入(3) 课程内容: 按照AngularJs MVC框架进行代码重构,新建一个DataService服务类使用SQLite插件实现储存对通讯录的本地存储. 涉及的知识点: An ...
- HTML5手机APP开发入门(2)
HTML5手机APP开发入门(2) 课程内容 使用IonicFramework v2 + angular 2 完成一个简单的联系人列表的操作,有三个页面: ListPage,DetailPage,Ad ...
- HTML5手机APP开发入门(1)
HTML5手机APP开发入门(1) 开发框架 Ionicframework V2 + Angular 2 具体内容可以参考一下网站 http://ionicframework.net/ http:// ...
- [转帖]H5 手机 App 开发入门:技术篇
H5 手机 App 开发入门:技术篇 http://www.ruanyifeng.com/blog/2019/12/mobile-app-technology-stack.html 阮一峰老师的文 ...
- 【转帖】H5 手机 App 开发入门:概念篇
H5 手机 App 开发入门:概念篇 http://www.ruanyifeng.com/blog/2019/12/hybrid-app-concepts.html 作者: 阮一峰 日期: 2019年 ...
- 手机app开发:浅谈APP登录方式的优劣
手机app开发公司亿合科技要是给你一个机会设计一款APP,你会用什么方式做这个APP的登录模块?根据APP的业务模型的不同会有不同的设计方法.如果是偏内容型的APP,需要优先展示内容给用户,当用户需要 ...
- 未来一年的13大手机APP开发趋势
无论是欢呼出租车,保存票据,订购披萨还是在线购物,您可以立即联系到什么设备?你的智能手机 这是您需要的朋友,在如何查找信息和简化日常任务方面发挥着不可或缺的作用. 移动技术以光速增长; 我们不能否认手 ...
- 示例浅谈PHP与手机APP开发,即API接口开发
示例浅谈PHP与手机APP开发,即API接口开发 API(Application Programming Interface,应用程序接口)架构,已经成为目前互联网产品开发中常见的软件架构模式,并且诞 ...
随机推荐
- 触动——beyond歌词
1.一霎那,仿佛,若有所失的感觉 2.远路无法看的清 3.无悔这一生
- WebStorm License Activation (WebStorm许可证激活)
User or company name(用户或公司名称): EMBRACE License key(许可证密钥): ===== LICENSE BEGIN =====89374-12042010 ...
- 通过java获取html中所有的图片路径
/** * 获取网页上所有的图片路径 * @param htmlCode * @return */ public static List<String> getImageSrc(Strin ...
- Java EE 参考文档及sample
http://docs.oracle.com/javaee/6/tutorial/doc/ https://svn.java.net/svn/javaeetutorial~svn/ 检索: site: ...
- [转]Oracle数据泵的使用
使用数据泵导出数据 1.连接Oracle数据库SQL> conn / as sysdba已连接. 2.创建一个操作目录SQL> create directory dump_dir as ' ...
- linux 下部署nodejs(两种方式)
本次博客的编写时用的系统环境,刚装好的Centos 6.4 64位虚拟机. 另外关于linux 其他系统的安装 可以参考https://github.com/joyent/node/wiki/Ins ...
- 【原创】-- uboot,kennel,fs,rootfs 编译制作
环境:ubuntu14.04 内核版本 linux 3.13.0 OK6410 内核编译环境 linux 3.0.1 uboot版本 1.1.6 交叉编译工具链 arm-lin ...
- redis和ssdb读取性能对比
最近关注了一下ssdb,它的特点是基于文件存储系统所以它支撑量大的数据而不因为内存的限制受取约束.从官网的测试报告来看其性能也非常出色和redis相当,因此可以使用它来代替redis来进行k-v数据业 ...
- C++11 并发指南五(std::condition_variable 详解)
前面三讲<C++11 并发指南二(std::thread 详解)>,<C++11 并发指南三(std::mutex 详解)>分别介绍了 std::thread,std::mut ...
- word2vec模型原理与实现
word2vec是Google在2013年开源的一款将词表征为实数值向量的高效工具. gensim包提供了word2vec的python接口. word2vec采用了CBOW(Continuous B ...