
Ubuntu18.04安装openCV4.1.2
Ubuntu18.04下安装openCV4.1.2
注意:
在整个安装过程中,包括后期QT的使用中不要出现中文路径。会很坑的。
一、下载openCV4.1.2
可以再官网进行下载https://opencv.org/releases/->选择Sources下载源码然后进行编译安装
也可以在https://github.com/opencv/opencv/tree/4.1.2下载源码进行编译安装
也可以在百度云盘下载安装https://pan.baidu.com/s/1LIqIvyA6BjjAy1pkC-Mg0w。
二、更新Ubuntu18.04apt源为阿里源(如果已更新或者其他源可以自己尝试)。
// 1.备份/etc/apt/sources.list
cp /etc/apt/sources.list /etc/apt/sources.list.bak
// 2.打开/etc/apt/sources.list
sudo vim /etc/apt/sources.list
// 3.删除文件内所有内容
// 4.将一下内容复制进/etc/apt/sources.list文件中
 deb http://mirrors.aliyun.com/ubuntu/ bionic main restricted universe multiverse

 deb http://mirrors.aliyun.com/ubuntu/ bionic-security main restricted universe multiverse

 deb http://mirrors.aliyun.com/ubuntu/ bionic-updates main restricted universe multiverse

 deb http://mirrors.aliyun.com/ubuntu/ bionic-proposed main restricted universe multiverse

 deb http://mirrors.aliyun.com/ubuntu/ bionic-backports main restricted universe multiverse

 deb-src http://mirrors.aliyun.com/ubuntu/ bionic main restricted universe multiverse

 deb-src http://mirrors.aliyun.com/ubuntu/ bionic-security main restricted universe multiverse

 deb-src http://mirrors.aliyun.com/ubuntu/ bionic-updates main restricted universe multiverse

 deb-src http://mirrors.aliyun.com/ubuntu/ bionic-proposed main restricted universe multiverse

 deb-src http://mirrors.aliyun.com/ubuntu/ bionic-backports main restricted universe multiverse
// 5.更新源
 sudo apt-get update

 sudo apt-get upgrade
三、解决ubuntu1804无法安装libjasper-dev问题(速度会非常的慢,一定要耐心等待)
// 1.检测是否有问题
apt-get install libjasper-dev
如果有报错信息:errorE: unable to locate libjasper-dev则继续解决一下问题,没有则可跳过第三步。
// 2.解决方案
 sudo add-apt-repository "deb http://security.ubuntu.com/ubuntu xenial-security main"

 sudo apt update

 sudo apt install libjasper1 libjasper-dev
添加一个源来重新安装,其中,libjasper1是新的依赖项。
但是上述命令会可能产生新的问题。无法找到add-apt-repository问题
// 3.解决add-apt-repository问题
 apt-get -y install software-properties-common

 apt-get -y install apt-file

 apt-get update
四、添加openCV安装的相关准备
//1.安装cmake(如果已经安装过可以忽略)
sudo apt-get install cmake
// 2.安装openCV相关依赖(如果刚才第三步失败或者跳过的话可能 libjasper-dev 会报错)
sudo apt-get install build-essential libtbb2 libtbb-dev libjpeg-dev libpng-dev libtiff-dev libjasper-dev libdc1394--dev
事实上,OpenCV的依赖项众多,在cmake阶段检查依赖项是否安装,调整自己的功能。因此,可根据项目需要调整安装依赖项。
五、安装openCV
//1.将下载的opencv-4.1.2.zip拷贝到主目录下,并解压缩
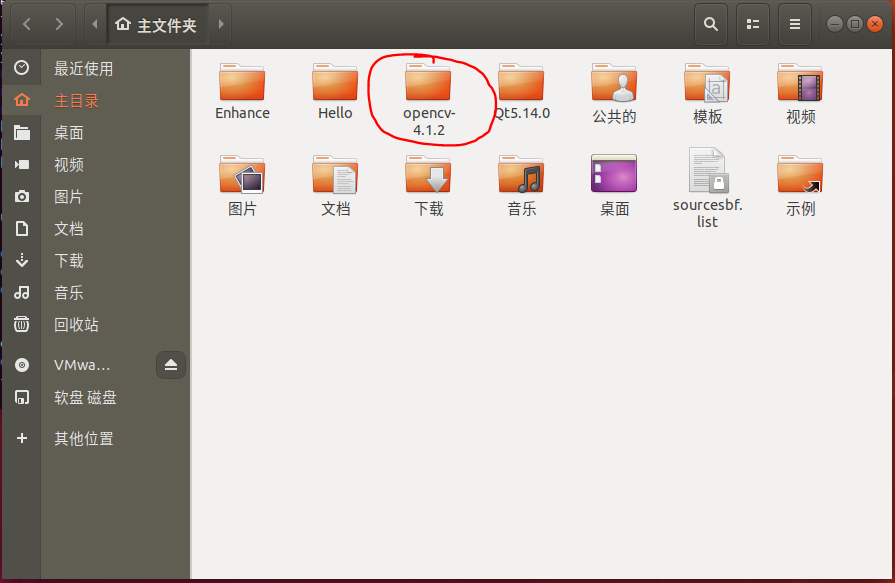
// 2.打开终端并切换至主目录下的openCV-4.1.2
cd /home/DepZcb/openCV-4.1.
// 3.在openCV-4.1.2下创建一个名为build目录,并切换到这个目录下
 mkdir build

 cd ./build
// 4.执行cmake,生成makefile文件
cmake -D CMAKE_BUILD_TYPE=Release -D OPENCV_GENERATE_PKGCONFIG=ON -D CMAKE_INSTALL_PREFIX=/usr/local ..
命令说明:
OpenCV4默认不生成.pc文件,OPENCV_GENERATE_PKGCONFIG=ON才会生成。该编译选项开启生成opencv4.pc文件,支持pkg-config功能。
可用-D CMAKE_INSTALL_PREFIX指定安装目录。如果指定安装目录则默认各部分分别安装在/usr/local/目录的include/ bin/ lib/3个文件夹下.
.. 为上一级目录。
// 5.执行makefile文件(有些人说上一步不会生成makefile,我在虚拟机和纯系统中都试过,在deepin下安装也试过没有出现类似问题。但出现了一堆其他问题,感觉还是源没有配置好)
sudo make -j[N]
说明:-j[n]我的电脑是四核四线程,可以运行make -j4,如果是八核可用make -j8。如果不想编译时影响工作,可以用-j3。建议虚拟机的同学就直接运行sudo make就行.
这一步事件很长的,大概需要半个小时往上。请耐心等待。
// 6.进行make install安装
sudo make install
六、C++环境配置
// 1.先在/etc/ld.so.conf.d/文件夹下新建一个opencv4.conf,然后再文件中写入/usr/local/lib。
 cd /etc/ld.so.conf.d/

 sudo touch opencv4.conf

 sudo sh -c 'echo "/usr/local/lib" > opencv4.conf'入代码片
// 2.更新pkg-config
sudo ldconfig
// 3.查看安装
 pkg-config --libs opencv4

 pkg-config --cflags opencv4
// 4.配置bash
 sudo vim /etc/bash.bashrc

 //在末尾添加

 PKG_CONFIG_PATH=$PKG_CONFIG_PATH:/usr/local/lib/pkgconfig

 export PKG_CONFIG_PATH
//5.更新bash
 sudo source /etc/bash.bashrc

 //激活配置然后更新database

 sudo updatedb
可能会遇到问题sudo: source: command not found,这时可如下2步处理(如图):
1> sudo -s
2> source /etc/profile
安装完成
七、可能出现的问题
// 1.QT5 Core编译错误
 CMake Warning at cmake/OpenCVFindLibsGUI.cmake: (find_package):

 By not providing "FindQt5Core.cmake" in CMAKE_MODULE_PATH this project has

 asked CMake to find a package configuration file provided by "Qt5Core", but

 CMake did not find one.

 Could not find a package configuration file provided by "Qt5Core" with any

 of the following names:

 Qt5CoreConfig.cmake

 qt5core-config.cmake

 Add the installation prefix of "Qt5Core" to CMAKE_PREFIX_PATH or set

 "Qt5Core_DIR" to a directory containing one of the above files.  If

 "Qt5Core" provides a separate development package or SDK, be sure it has

 been installed.

 Call Stack (most recent call first):

 CMakeLists.txt: (include)

 CMake Warning at cmake/OpenCVFindLibsGUI.cmake: (find_package):

 By not providing "FindQt5Gui.cmake" in CMAKE_MODULE_PATH this project has

 asked CMake to find a package configuration file provided by "Qt5Gui", but

 CMake did not find one.

 Could not find a package configuration file provided by "Qt5Gui" with any

 of the following names:

   Qt5GuiConfig.cmake

   qt5gui-config.cmake

 Add the installation prefix of "Qt5Gui" to CMAKE_PREFIX_PATH or set

 "Qt5Gui_DIR" to a directory containing one of the above files.  If "Qt5Gui"

 provides a separate development package or SDK, be sure it has been

 installed.

 Call Stack (most recent call first):

 CMakeLists.txt: (include)

 CMake Warning at cmake/OpenCVFindLibsGUI.cmake: (find_package):

 By not providing "FindQt5Widgets.cmake" in CMAKE_MODULE_PATH this project

 has asked CMake to find a package configuration file provided by

 "Qt5Widgets", but CMake did not find one.

 Could not find a package configuration file provided by "Qt5Widgets" with

 any of the following names:

   Qt5WidgetsConfig.cmake

   qt5widgets-config.cmake

 Add the installation prefix of "Qt5Widgets" to CMAKE_PREFIX_PATH or set

 "Qt5Widgets_DIR" to a directory containing one of the above files.  If

 "Qt5Widgets" provides a separate development package or SDK, be sure it has

 been installed.

 Call Stack (most recent call first):

   CMakeLists.txt: (include)

 CMake Warning at cmake/OpenCVFindLibsGUI.cmake: (find_package):

   By not providing "FindQt5Test.cmake" in CMAKE_MODULE_PATH this project has asked CMake to find a package configuration file provided by "Qt5Test", but

   CMake did not find one.

   Could not find a package configuration file provided by "Qt5Test" with any

   of the following names:

 Qt5TestConfig.cmake

 qt5test-config.cmake

 Add the installation prefix of "Qt5Test" to CMAKE_PREFIX_PATH or set

 "Qt5Test_DIR" to a directory containing one of the above files.  If

 "Qt5Test" provides a separate development package or SDK, be sure it has

 been installed.

 Call Stack (most recent call first):

   CMakeLists.txt: (include)

 CMake Warning at cmake/OpenCVFindLibsGUI.cmake: (find_package):

   By not providing "FindQt5Concurrent.cmake" in CMAKE_MODULE_PATH this

   project has asked CMake to find a package configuration file provided by

   "Qt5Concurrent", but CMake did not find one.

   Could not find a package configuration file provided by "Qt5Concurrent"

   with any of the following names:

     Qt5ConcurrentConfig.cmake

     qt5concurrent-config.cmake

   Add the installation prefix of "Qt5Concurrent" to CMAKE_PREFIX_PATH or set

   "Qt5Concurrent_DIR" to a directory containing one of the above files.  If

   "Qt5Concurrent" provides a separate development package or SDK, be sure it

   has been installed.

   Call Stack (most recent call first):

   CMakeLists.txt: (include)

 qmake: could not exec '/usr/lib/x86_64-linux-gnu/qt4/bin/qmake': No such file     or         directory

 CMake Error at /usr/share/cmake-2.8/Modules/FindQt4.cmake: (message):

   Found unsuitable Qt version "" from NOTFOUND, this code requires Qt .x

 Call Stack (most recent call first):

   cmake/OpenCVFindLibsGUI.cmake: (find_package)

   CMakeLists.txt: (include)

 -- Configuring incomplete, errors occurred!

 See also "/home/*******/OpenCV/opencv-2.4.9/build/CMakeFiles/CMakeOutput.log".

 See also "/home/*******/OpenCV/opencv-2.4.9/build/CMakeFiles/CMakeError.log".

 Qt5Core-CMake did not find one
解决办法:安装qt5-default
sudo apt-get install qt5-default
八、python环境的配置
// 1.安装python和numpy
sudo apt-get install python-dev python-numpy python3-dev python3-numpy #如果已经安装过,则该步骤省略
// 2.验证
$ python3

>>> import cv2

>>> print(cv2.__version__)

'4.1.1'

>>>
九、卸载openCV
如果安装出现了百度不能解决的问题。最好的办法就是卸载重新装一次(第一次安装时前前后后卸载了四五次)。
// 1. 删除openCV4.conf
 cd /etc/ld.so.conf.d/

 sudo rm opencv4.conf
// 2.卸载
 cd

 cd ./OpenCV-4.1./build

 sudo make uinstall
Ubuntu18.04安装openCV4.1.2的更多相关文章
- Ubuntu18.04安装OpenCV4.1.0
Ubuntu18.04安装OpenCV4.1.0 1.首先要安装依赖 sudo apt-get install build-essential \ cmake git libgtk2.0-dev pk ...
- Ubuntu18.04安装mysql5.7
Ubuntu18.04安装mysql5.7 1.1安装 首先执行下面三条命令: # 安装mysql服务 sudo apt-get install mysql-server # 安装客户端 sudo a ...
- Ubuntu18.04安装RabbitMQ
Ubuntu18.04安装RabbitMQ 2018年06月10日 19:32:38 dmfrm 阅读数:2492 版权声明:本文为博主原创文章,未经博主允许不得转载. https://blog ...
- ubuntu18.04 安装mysql不出现设置 root 帐户的密码问题(装)
ubuntu18.04 安装mysql不出现设置 root 帐户的密码问题 https://blog.csdn.net/NeptuneClouds/article/details/80995 ...
- ubuntu18.04 安装hadoop 2.7.3+hive 2.3.4
1. 安装hadoop 详细请参见本人的另外一片博文<Hadoop 2.7.3 分布式集群安装> 2. 下载hive 2.3.4 解压文件到/opt/software -bin.tar.g ...
- Ubuntu18.04安装Virtualenv虚拟环境
在Ubuntu18.04安装Virtualenv虚拟环境 [实验环境]: 在这台电脑上已经安装了python3 [安装参考] 1.查看是否已安装virtualenv virtualenv --vers ...
- Ubuntu18.04安装thunderbird并设置中文
Ubuntu18.04安装thunderbird并设置中文 安装thunderbird sudo apt-get install thunderbird 安装中文包 sudo apt-get inst ...
- Ubuntu18.04安装Docker, centos7安装Docker
Ubuntu18.04安装Docker 第一种方法从Ubuntu的仓库直接下载安装: 安装比较简单,这种安装的Docker不是最新版本,不过对于学习够用了,依次执行下面命令进行安装. $ sudo a ...
- Ubuntu18.04安装和配置Java JDK11并卸载自带OpenJDK
卸载自带的OpenJDK方法: 在终端执行命令:sudo apt-get remove openjdk* Ubuntu18.04安装JDK11.0.2 前面步骤一样,可参考:https://www.c ...
随机推荐
- keeplived离线安装openssl-devel依赖包
转载自素文宅博客:https://blog.yoodb.com/yoodb/article/detail/1434 由于公司业务并发比较高需要高可用使用LVS keeplived.在linux系统ce ...
- C++图像加Lidar点云转写rosbag
近期需要处理一批Lidar+image的数据,拿到的是其他格式,但要转存成rosbag使用,参考部分网上做法,完成并记录. 1.Lidar处理 主要是将Lidar点云信息按点转为pcl::PointX ...
- [LC] 108题 将有序数组转换为二叉搜索树 (建树)
①题目 将一个按照升序排列的有序数组,转换为一棵高度平衡二叉搜索树. 本题中,一个高度平衡二叉树是指一个二叉树每个节点 的左右两个子树的高度差的绝对值不超过 1. 示例: 给定有序数组: [-10,- ...
- pat 1023 Have Fun with Numbers(20 分)
1023 Have Fun with Numbers(20 分) Notice that the number 123456789 is a 9-digit number consisting exa ...
- 结合Spring Security进行web应用会话安全管理
在本文中,将为大家说明如何结合Spring Security 和Spring Session管理web应用的会话. 一.Spring Security创建使用session的方法 Spring Sec ...
- Spring Boot2 系列教程(二十五)Spring Boot 整合 Jpa 多数据源
本文是 Spring Boot 整合数据持久化方案的最后一篇,主要和大伙来聊聊 Spring Boot 整合 Jpa 多数据源问题.在 Spring Boot 整合JbdcTemplate 多数据源. ...
- Redis集群同步问题
之前被面试官问到:Redis集群中主从数据同步是从库异步读取主库,那么Redis集群其他主与主之间的数据是怎么共享的呢?或者说是怎么同步的? emmmm……当时我就懵逼了,这不是考试范围啊卧槽~只能老 ...
- 使用python脚本执行地理处理工具
桌面ArcGIS包含800多种可在Python脚本中运行的地理处理工具. 通过Python脚本来运行地理处理工具,可以处理复杂的工作和执行批处理任务. 案例一:使用脚本执行地理处理工具(以裁剪为例) ...
- 2019年12月4日Linux开发手记
OK,经过昨天对V4L2工作流程的学习,现在已经大体了解了V4L2的工作原理,现在开始对V4L2的API的学习,目标:1.打开摄像头 2.储存图像 3.关闭摄像头,API网址:Linux Media ...
- Elasticsearch系列---并发控制及乐观锁实现原理
概要 本篇主要介绍一下Elasticsearch的并发控制和乐观锁的实现原理,列举常见的电商场景,关系型数据库的并发控制.ES的并发控制实践. 并发场景 不论是关系型数据库的应用,还是使用Elasti ...